Mobi is an open and collaborative knowledge graph platform for teams and communities to bridge the gap between your business knowledge and your disparate data silos by easily developing innovative knowledge graph solutions that self-validate and integrate into your complex data systems.
Introduction
Mobi is a free and open platform for management of the foundational semantic artifacts that make up knowledge graph development, creating an environment for teams and communities to accelerate discovery and deployment of advanced data systems. Mobi is built with Apache Karaf and utilizes OWL 2 and SKOS for authoring models and reference data, SHACL for authoring validation constraints, the SPARQL query language for data lookup, and a pluggable backend system for processing and handling graph data modeled using the Resource Description Framework (RDF). The Mobi platform applies the best practices recommended by the World Wide Web Consortium (W3C) to support organic growth of knowledge in a variety of domains.
Quick Start Guide
Installing from the Distribution
Prerequisites
Mobi requires a Java SE 17 environment to run. Refer to http://www.oracle.com/technetwork/java/javase/ for details on how to download and install Java SE 1.17.
Make sure your JAVA_HOME environment variable correctly points to your Java 17 installation directory. For example on a Mac, this would resemble /Library/Java/JavaVirtualMachines/openjdk-17.jdk. On Windows, this would resemble C:\Program Files\Java\openjdk-17.jdk.
Distribution Installation
Download the appropriate binary distribution for your system using our download site.
The Mobi distribution comes packaged as a .zip file for Windows and a tar.gz file for Linux/OSX. Extract this file to a new directory on your system. For example, in C:\Mobi - from now on this directory will be referenced as $MOBI_HOME.
Open a command line console and change the directory to $MOBI_HOME.
To start the Mobi server, run the following command in Windows:
> cd %MOBI_HOME%
> bin\start.bat
or for Linux/OSX:
$ cd $MOBI_HOME
$ ./bin/start
All Mobi prepackaged bundles, services, and required artifacts and dependencies will be automatically deployed by the runtime once started.
|
Tip
|
You can check the status of the running server using the bin/status script or access the Mobi shell using the bin/client script (that’s bin\status.bat and bin\client.bat for you Windows users). If you are having problems starting Mobi, check the log files in $MOBI_HOME\data\log.
|
The Mobi web application should now be accessible at https://localhost:8443/mobi/index.html. The default login credentials are admin:admin.
|
Note
|
Due to the self-signed SSL certificate that Mobi comes with, your browser will likely show you a certificate warning when first loaded. This is safe to proceed past. See Configure Custom SSL Certificates for more details. |
Installing the Docker Image
The easiest way to get started with Mobi on Docker is to download and install https://docs.docker.com/get-docker/. If you are using Mac or Windows Operating System, Docker Desktop will be available for use which provides a Dashboard GUI to manage docker images. If you are using a Linux operating system, you will interact with Docker via terminal commands.
|
Note
|
For more detailed instructions on how to use Mobi with Docker, please refer to Docker Deployments in the Appendix. |
Mobi is available as a pre-configured Docker image on Docker Hub: https://hub.docker.com/r/inovexis/mobi/. You can find the Mobi image by searching for our organization "inovexis" in the DockerHub search bar.
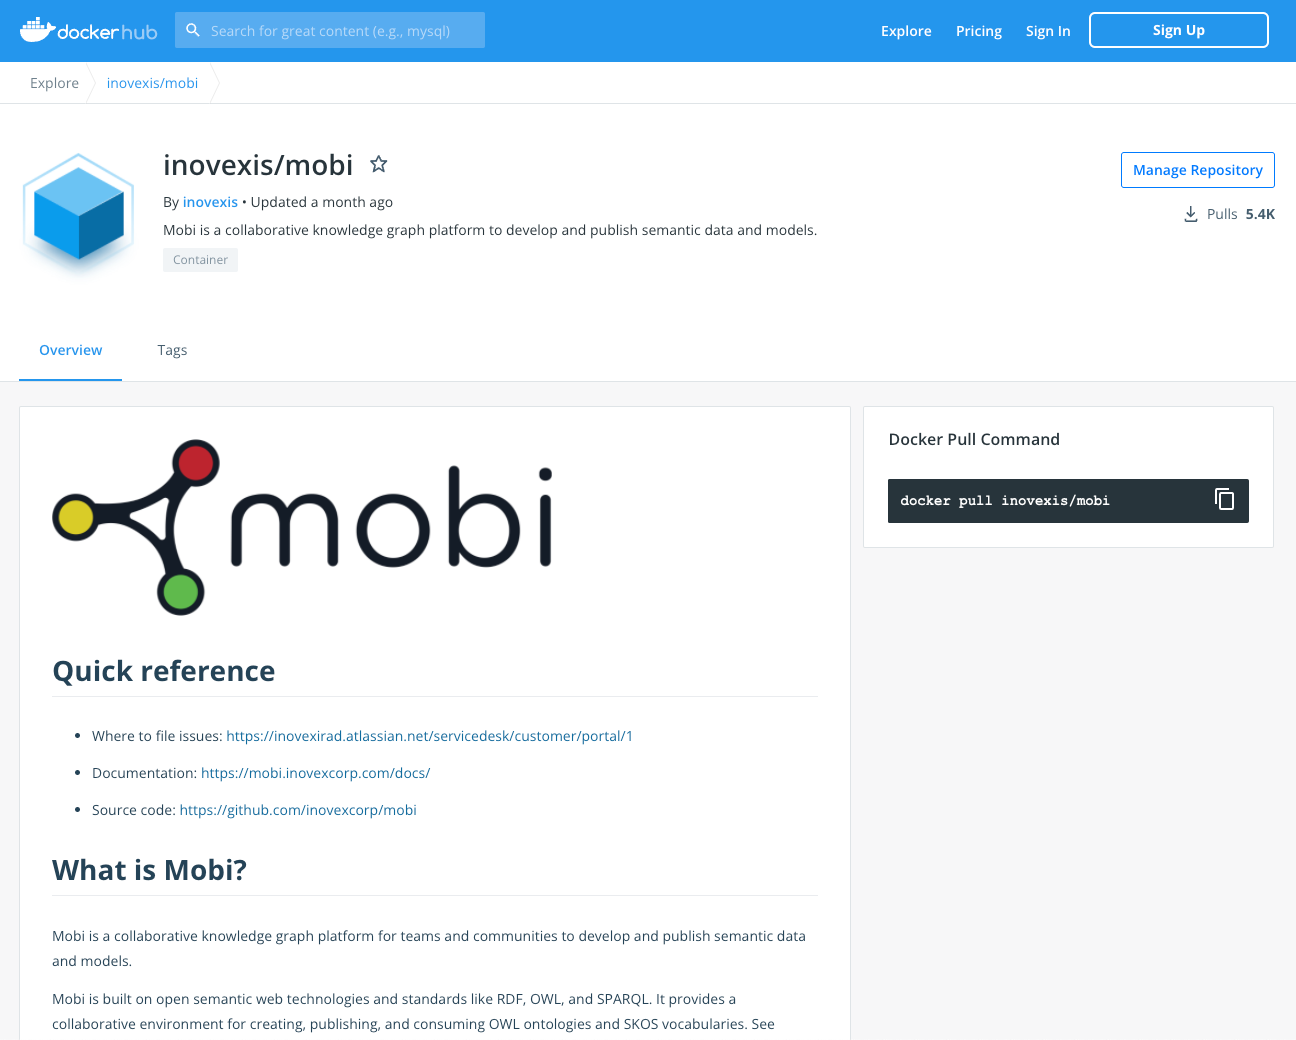
On this page you will see the docker pull command. Open up a terminal and execute the command to pull the Mobi Docker image.
~ % docker pull inovexis/mobi
Using default tag: latest
latest: Pulling from inovexis/mobi
6d827a3ef358: Pull complete
2726297beaf1: Pull complete
7d27bd3d7fec: Pull complete
e61641c845ed: Pull complete
cce4cca5b76b: Pull complete
6826227500b0: Pull complete
c03b117ffd91: Pull complete
821a1547b435: Pull complete
2bd47f6b1b42: Pull complete
e4cf3e9f705c: Pull complete
3733107c5c01: Pull complete
4a9bdb07bcd2: Pull complete
cb3da7c9fe66: Pull complete
Digest: sha256:f387dd12cc2235150a2dd03b2741f01baf872f771ea8fb7e61ebf8bd4acb2155
Status: Downloaded newer image for inovexis/mobi:latest
docker.io/inovexis/mobi:latest
To verify that the image was pulled correctly, you can run the command below to view all pulled images.
~ % docker images -a
REPOSITORY          TAG                 IMAGE ID            CREATED             SIZE
inovexis/mobi       latest              6a5c8e447ec0        3 months ago        795MB
You can then create a Mobi container directly with something like docker run -dp 443:8443 inovexis/mobi or using the Docker Compose. For the latter, create a new directory on your machine and create a file named docker-compose.yml with the following content:
name: mobi
services:
  mobi:
    container_name: mobi
    image: inovexis/mobi:4.2.0 # image name with tag (It is recommended to pin a version and not use latest)
    ports:
      - "443:8443"
    command: bash -c '/opt/mobi/mobi-distribution/docker/docker-start.sh'
    volumes:
      - ./data:/opt/mobi/mobi-distribution/data # persist data volume (triplestore, logs, policies, etc)
      - ./etc:/opt/mobi/mobi-distribution/etc # persist etc volume (karaf configuration files)
      - ./backups:/opt/mobi/mobi-distribution/backups # optional directory mount to access backups on host machine
      - ./restore:/opt/mobi/mobi-distribution/restore # optional directory mount to restore a backup
      - ./license:/root/.mobi # directory mount for enterprise license file. **ENTERPRISE ONLY**
  dagu:
    container_name: dagu
    image: ghcr.io/dagu-org/dagu:1.13.1
    command: sh -c "rm -f /home/dagu/.dagu/dags/hello_world.yaml && exec dagu start-all"
volumes:
  data:
  etc:
Start the Mobi container using the following command from the location of your docker-compose.yml file:
docker compose up -dOnce you’ve created a container with the Mobi Docker image, you can go to Docker Dashboard to see image running.
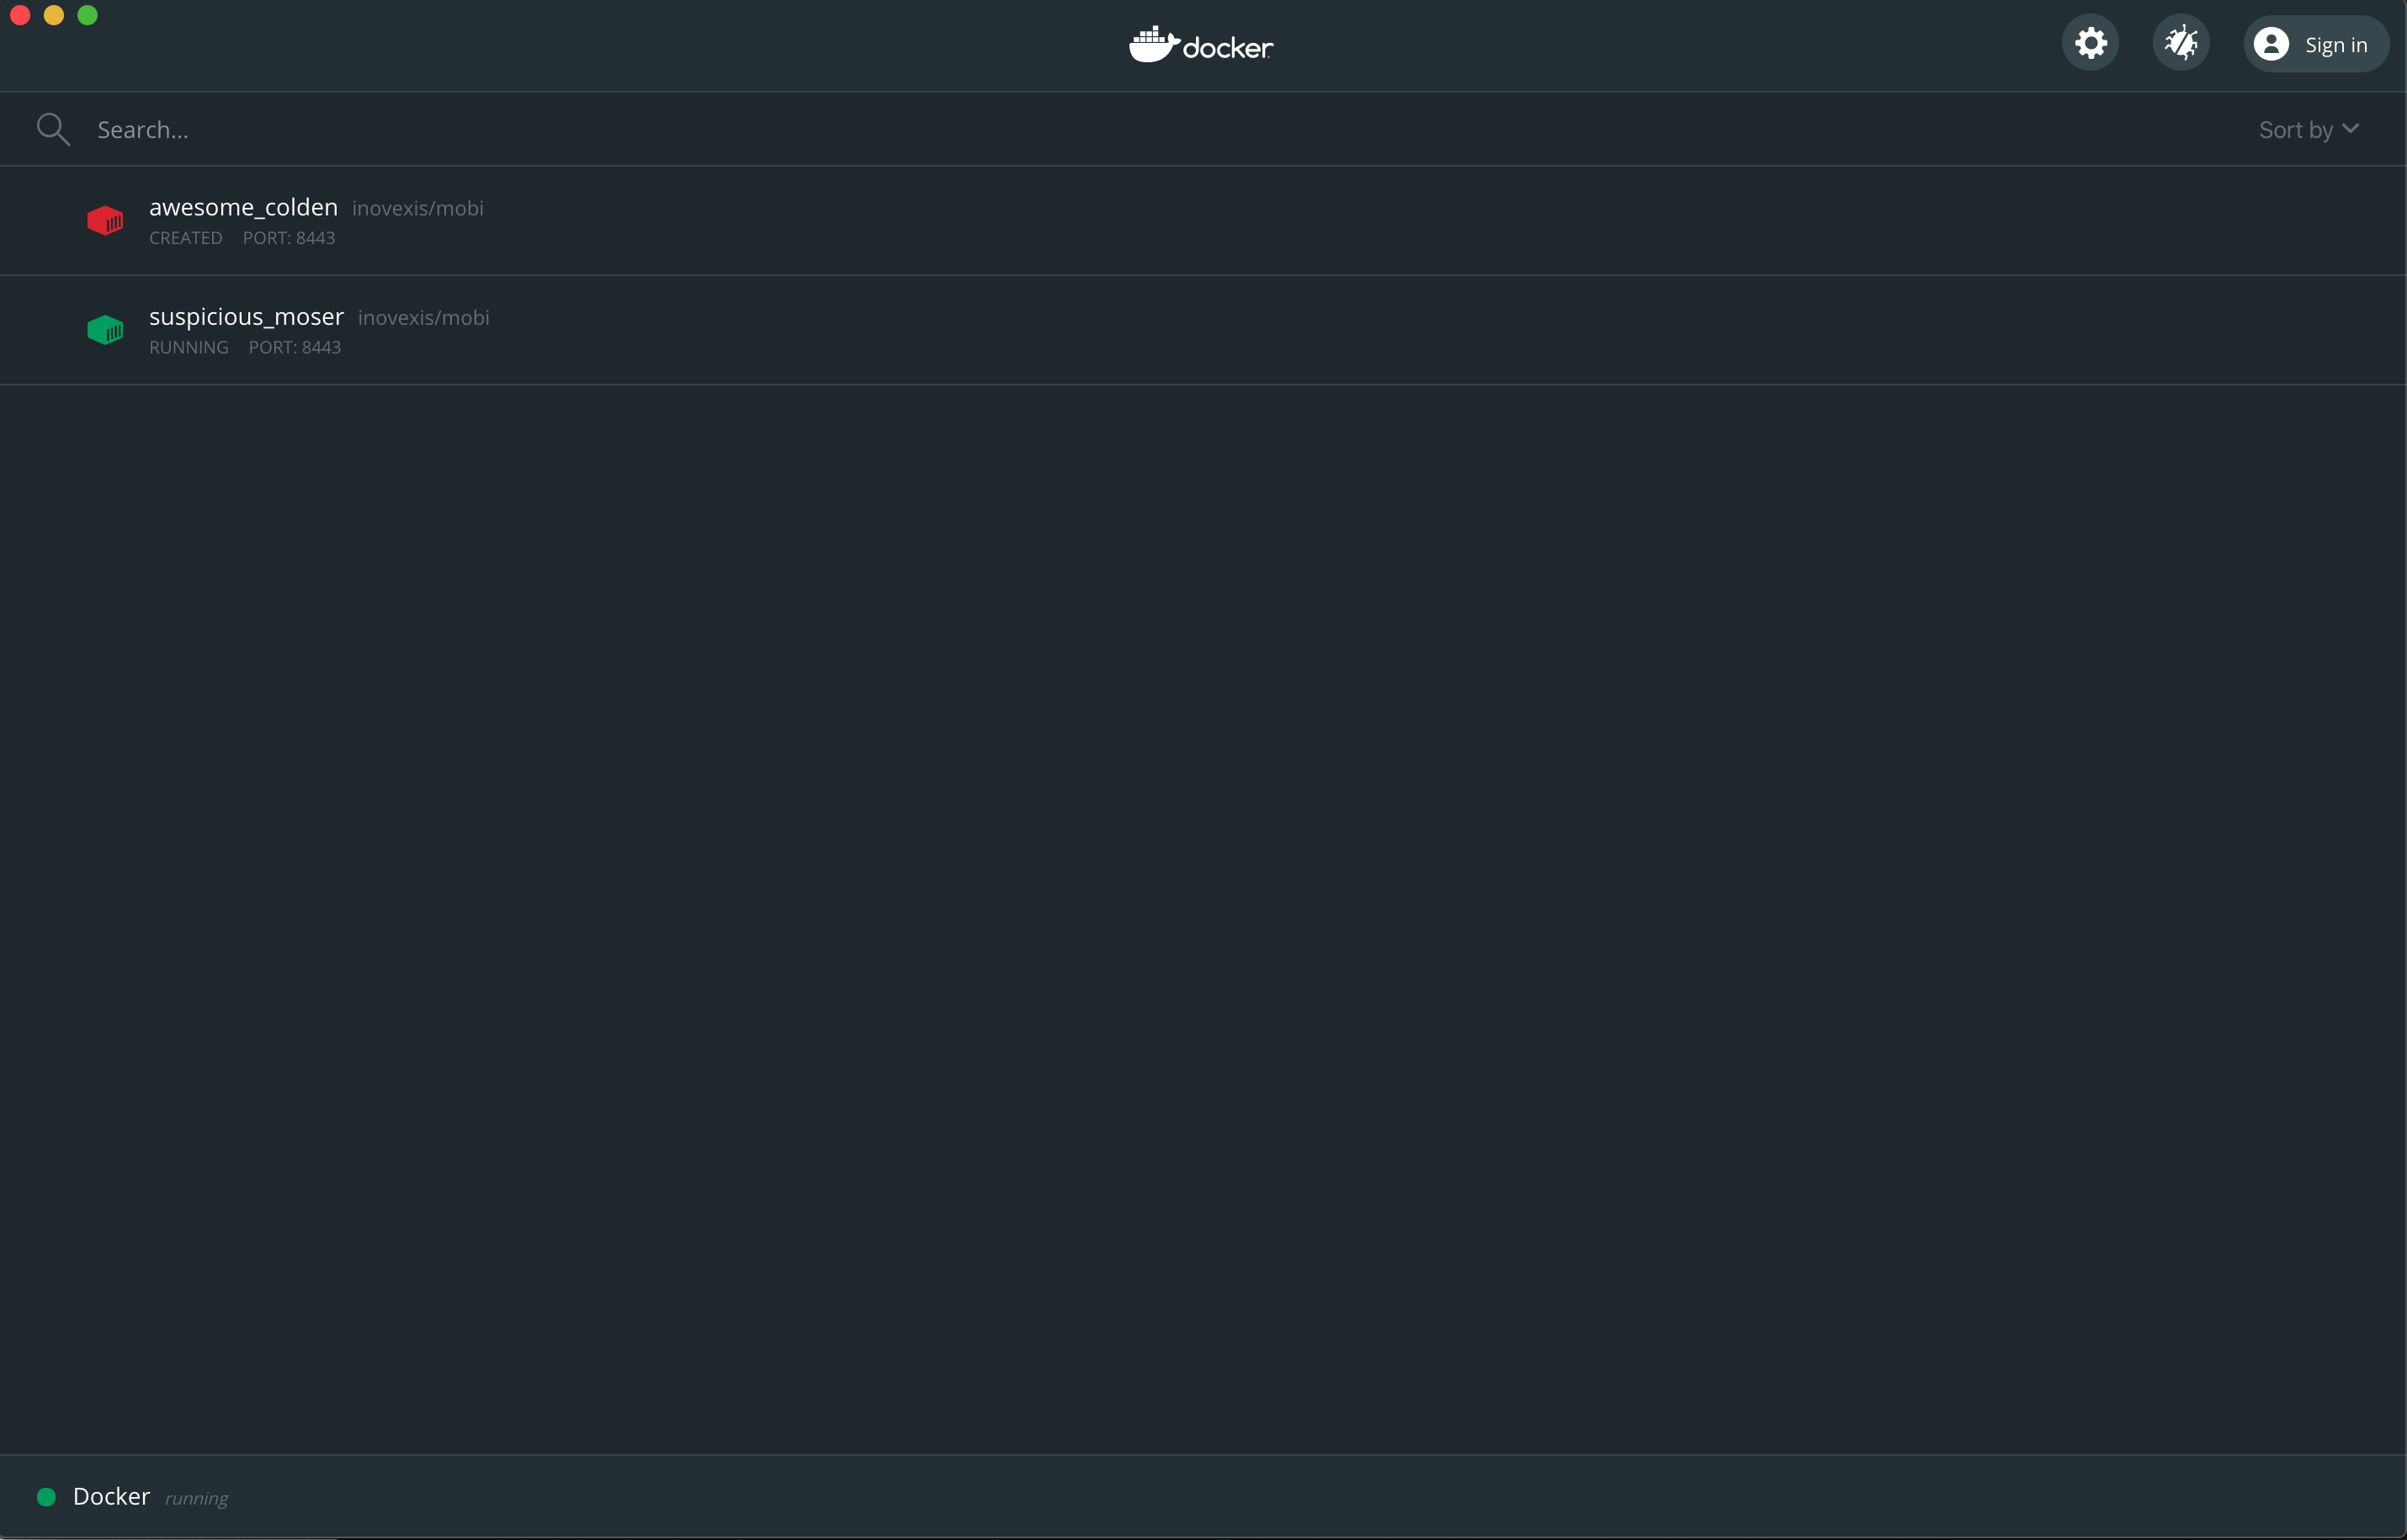
You can also look in the terminal for the Mobi container running.
% docker container list
CONTAINER ID        IMAGE               COMMAND                  CREATED             STATUS              PORTS                    NAMES
9abedac96a93        inovexis/mobi       "/usr/local/bin/mvn-…"   4 seconds ago       Up 2 seconds        0.0.0.0:443->8443/tcp   Mobi
The Mobi image should now be running with the web application accessible at https://localhost:8443/mobi/index.html. The default login credentials are admin:admin.
|
Note
|
Due to the self-signed SSL certificate that Mobi comes with, your browser will likely show you a certificate warning when first loaded. This is safe to proceed past. See Configure Custom SSL Certificates for more details. |
You can use the Exec tool to login in Karaf. Once you click on the Exec tab, it will open up a terminal window where you can login into karaf.
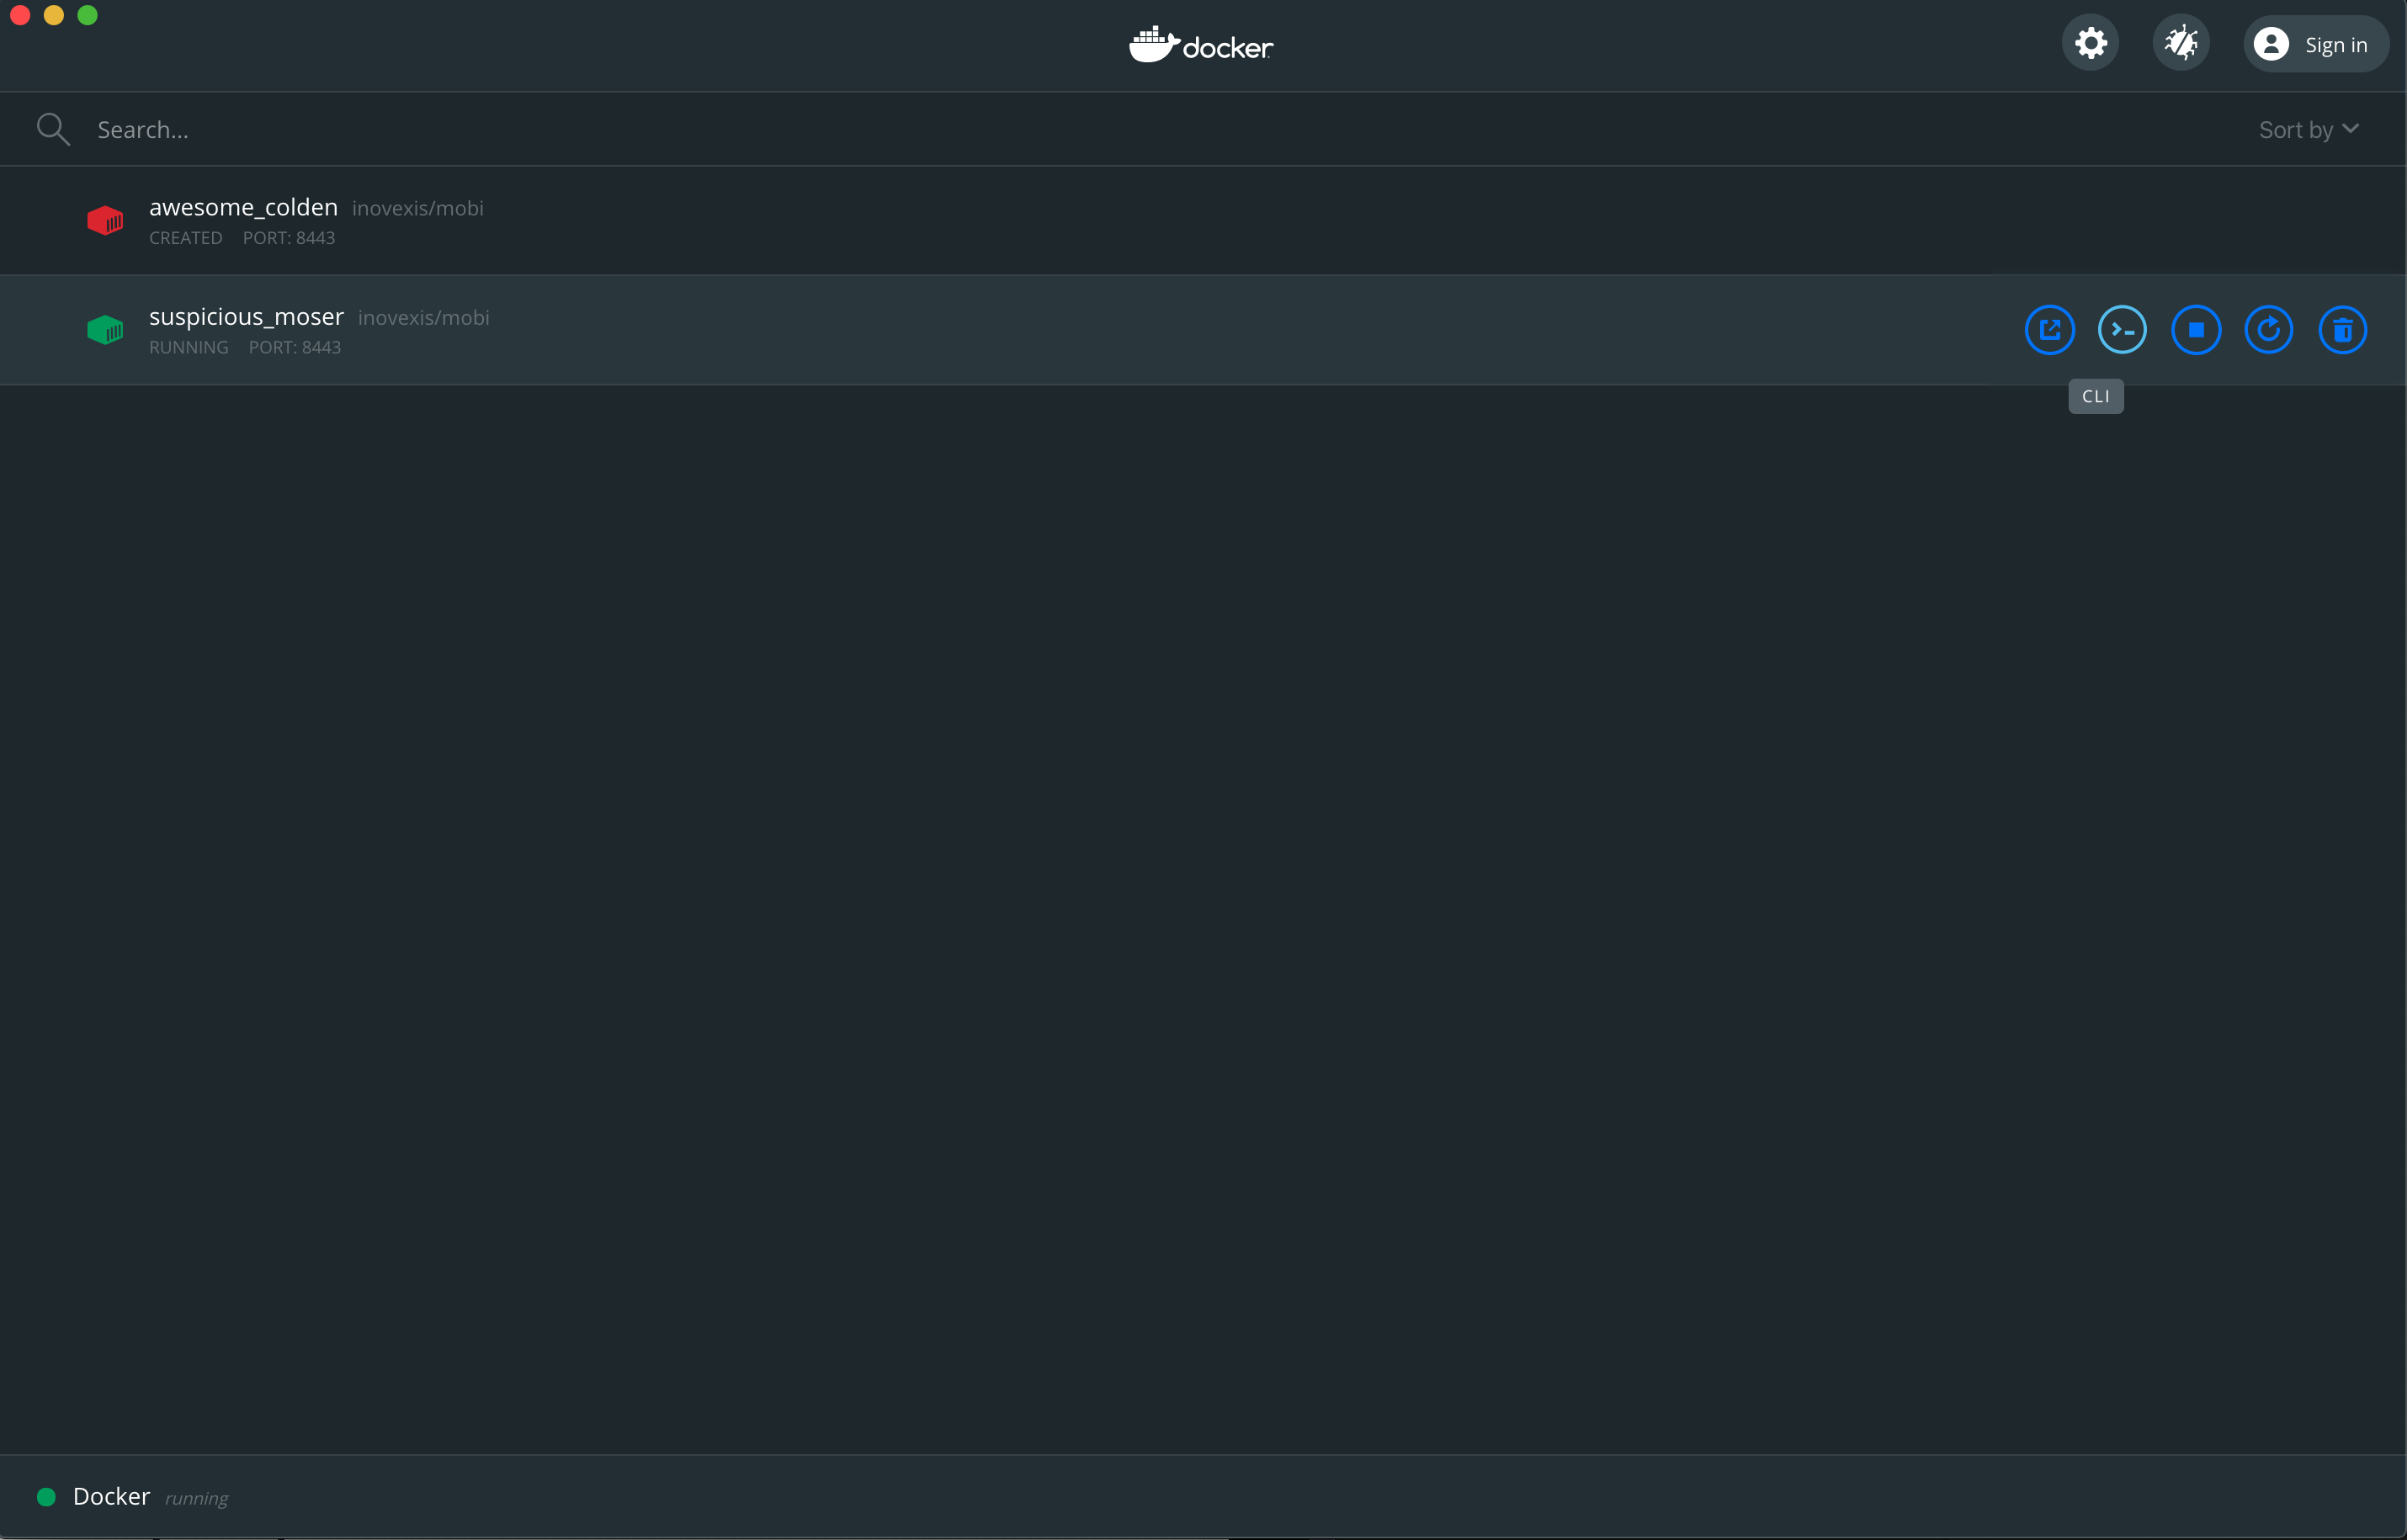
To start or stop the container, you could either use the terminal (from the location of docker-compose.yml) or Docker Dashboard GUI.
docker compose up -d
docker compose down
Installing from the RPM
For Red Hat/CentOS-based Linux systems with rpm package manager, we provide RPM packages for both the Community and Enterprise editions of Mobi. This portion of the guide assumes you are using the Community edition. If you are using the Enterprise edition, please refer to the Administration Guide for more information.
Prerequisites
The Mobi package requires Java SE 17 to run. This can be installed via the yum package manager if available in your OS. An example command to install Java SE 17 is:
yum install java-17-openjdk-develIf the package is not available in your OS, you can download and install Java SE 17 a number of ways. We suggest downloading the Oracle installer from here and running sudo rpm -Uvh jdk-17_linux-x64_bin.rpm or sudo rpm -Uvh jdk-17_linux-aarch64_bin.rpm (depending on your OS) to install.
Package Installation
To proceed you can either download the latest RPM package from our hosted Nexus repository and install it manually or you can configure the repository with your YUM client so you can install it directly. The instructions below show you how to configure the repository and install Mobi using yum.
Create the repo file manually at /etc/yum.repos.d/realmone-mobi.repo:
sudo tee /etc/yum.repos.d/realmone-public.repo > /dev/null <<EOF
[realmone_public]
name=RealmOne Public Repository
baseurl=http://nexus.inovexcorp.com/nexus/repository/public-yum-prod-hosted/
enabled=1
gpgcheck=1
gpgkey=http://nexus.inovexcorp.com/nexus/repository/public-raw-prod-hosted/gpg/prod-public.key
repo_gpgcheck=0
priority=1
EOF
Once configured, clean and refresh YUM Cache.
sudo yum clean all
sudo yum makecache
You should now be able to list all available versions of the package and install Mobi using yum.
sudo yum --showduplicates list mobi-community
sudo yum install mobi-community
If you have systemctl installed on your machine, you can simply start up Mobi using the newly configured service.
sudo systemctl start mobiOtherwise, change into the installed directory and start up the server:
cd /opt/mobi-community/latest
sudo -u mobi-community bin/start
The Mobi web application should now be accessible at https://localhost:8443/mobi/index.html. The default login credentials are admin:admin.
User Guide
The Mobi web application currently has nine main modules:
-
the Catalog,
-
the Entity Search,
-
the Ontology Editor,
-
the Shapes Editor,
-
the Mapping Tool,
-
the Datasets Manager,
-
the Discover Page,
-
and the Workflows module
The web application also has a My Account page to configure various settings and preferences of the logged in user and an Administration page for admin users to configure user accounts and groups. The Configuration for the Mobi software itself is set in configuration files. The Mobi Shell also provides several commands for accessing the application data.
Mobi Enterprise also has a Vocabulary Linking module for discovering relationships between vocabularies for enhanced semantic integration and a Publishing Tool to send semantic artifacts to a configurable list of external systems.
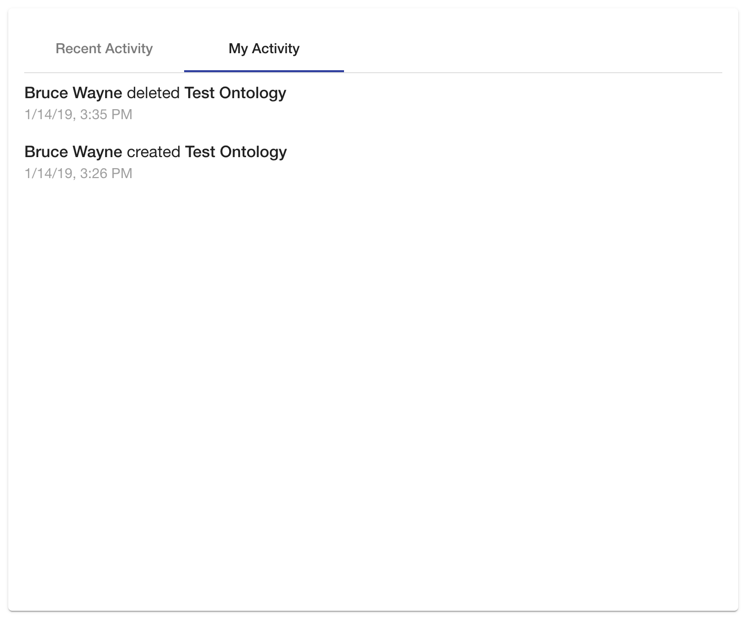
The home page of Mobi includes some quick action buttons for performing common tasks and a display of the latest key activities performed by users throughout the application. Each activity displays a summary about the action performed, who did it, and when it happened. The list is sorted with the latest activities first and is paginated so you can view earlier actions.
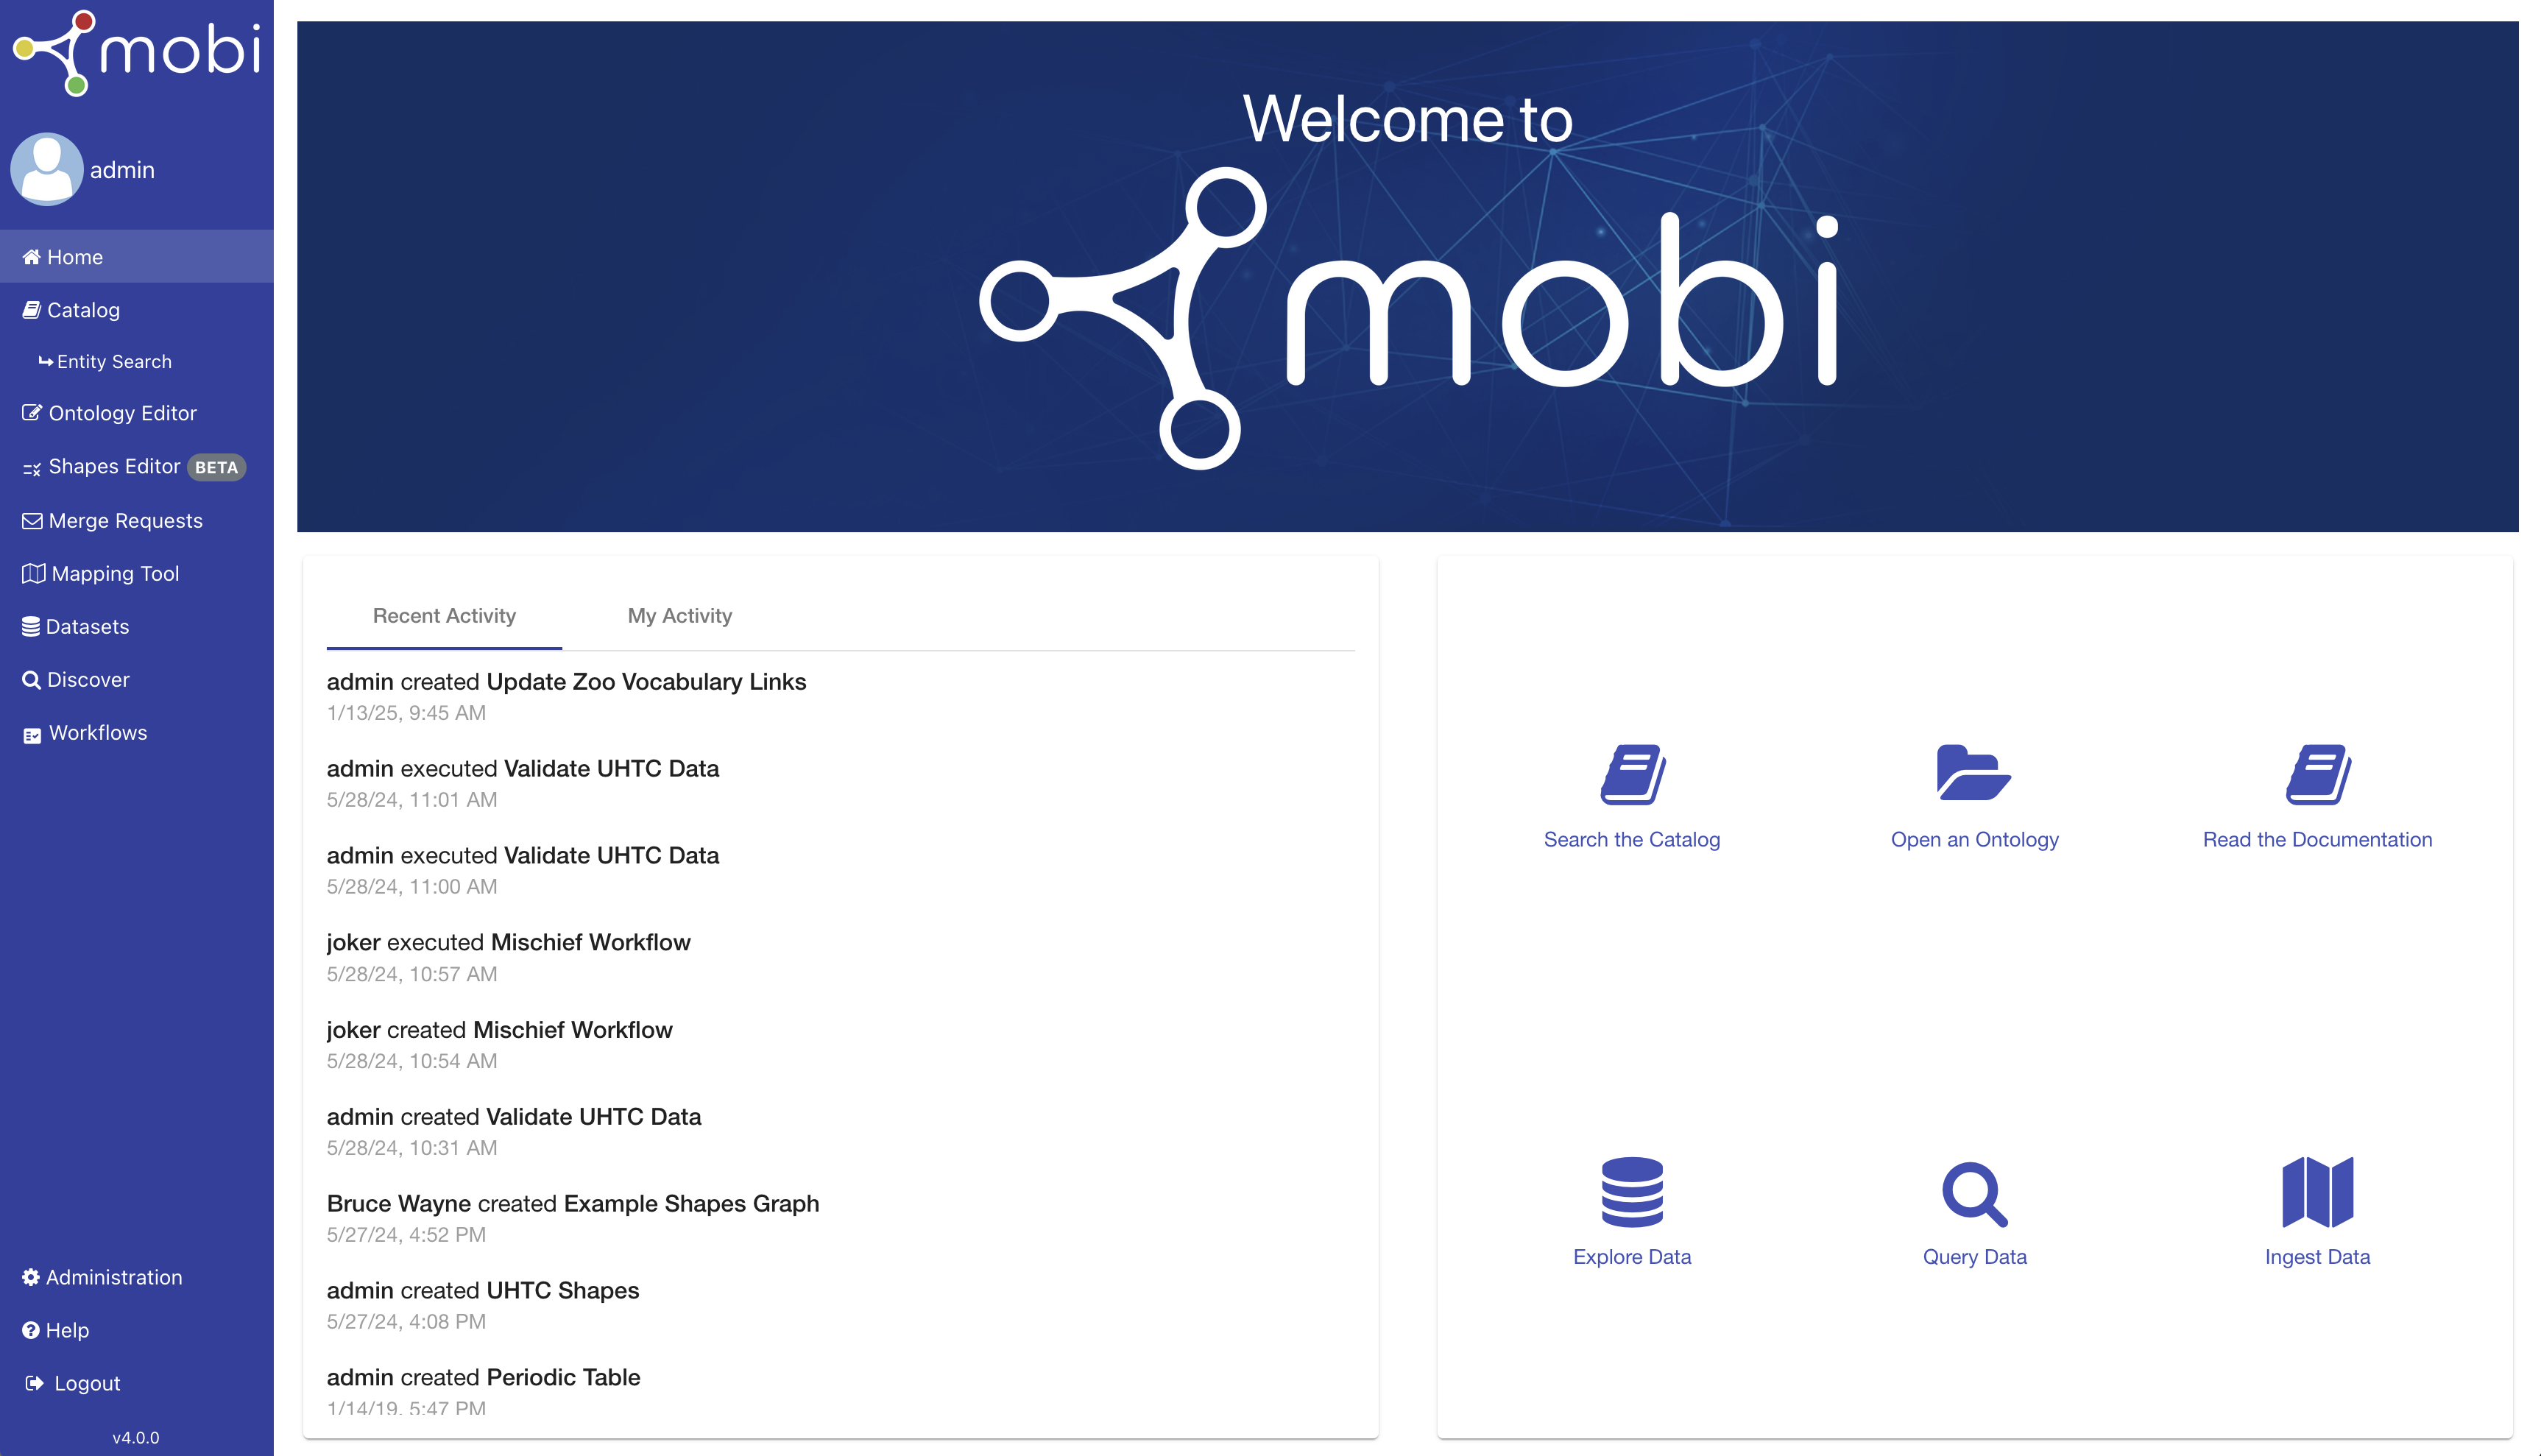
Additionally, the activity display has a tab to view a filtered list of the current user’s activities.
Catalog
The Mobi web-based Catalog allows users to share models, data, validation constraints, dataset descriptions, analytics and other resources. It allows users to control the way their data is shared.
To reach the Catalog click on the link in the left menu.

The Local Catalog of Mobi contains all Records contained within your Mobi node. This includes all versioned ontologies created in the Ontology Editor, versioned mappings created in the Mapping Tool, versioned shapes graphs created in the Shapes Editor, all datasets created in the Datasets Manager, and more.
There are two main views of the Catalog:
-
the Record View
Catalog Landing Page
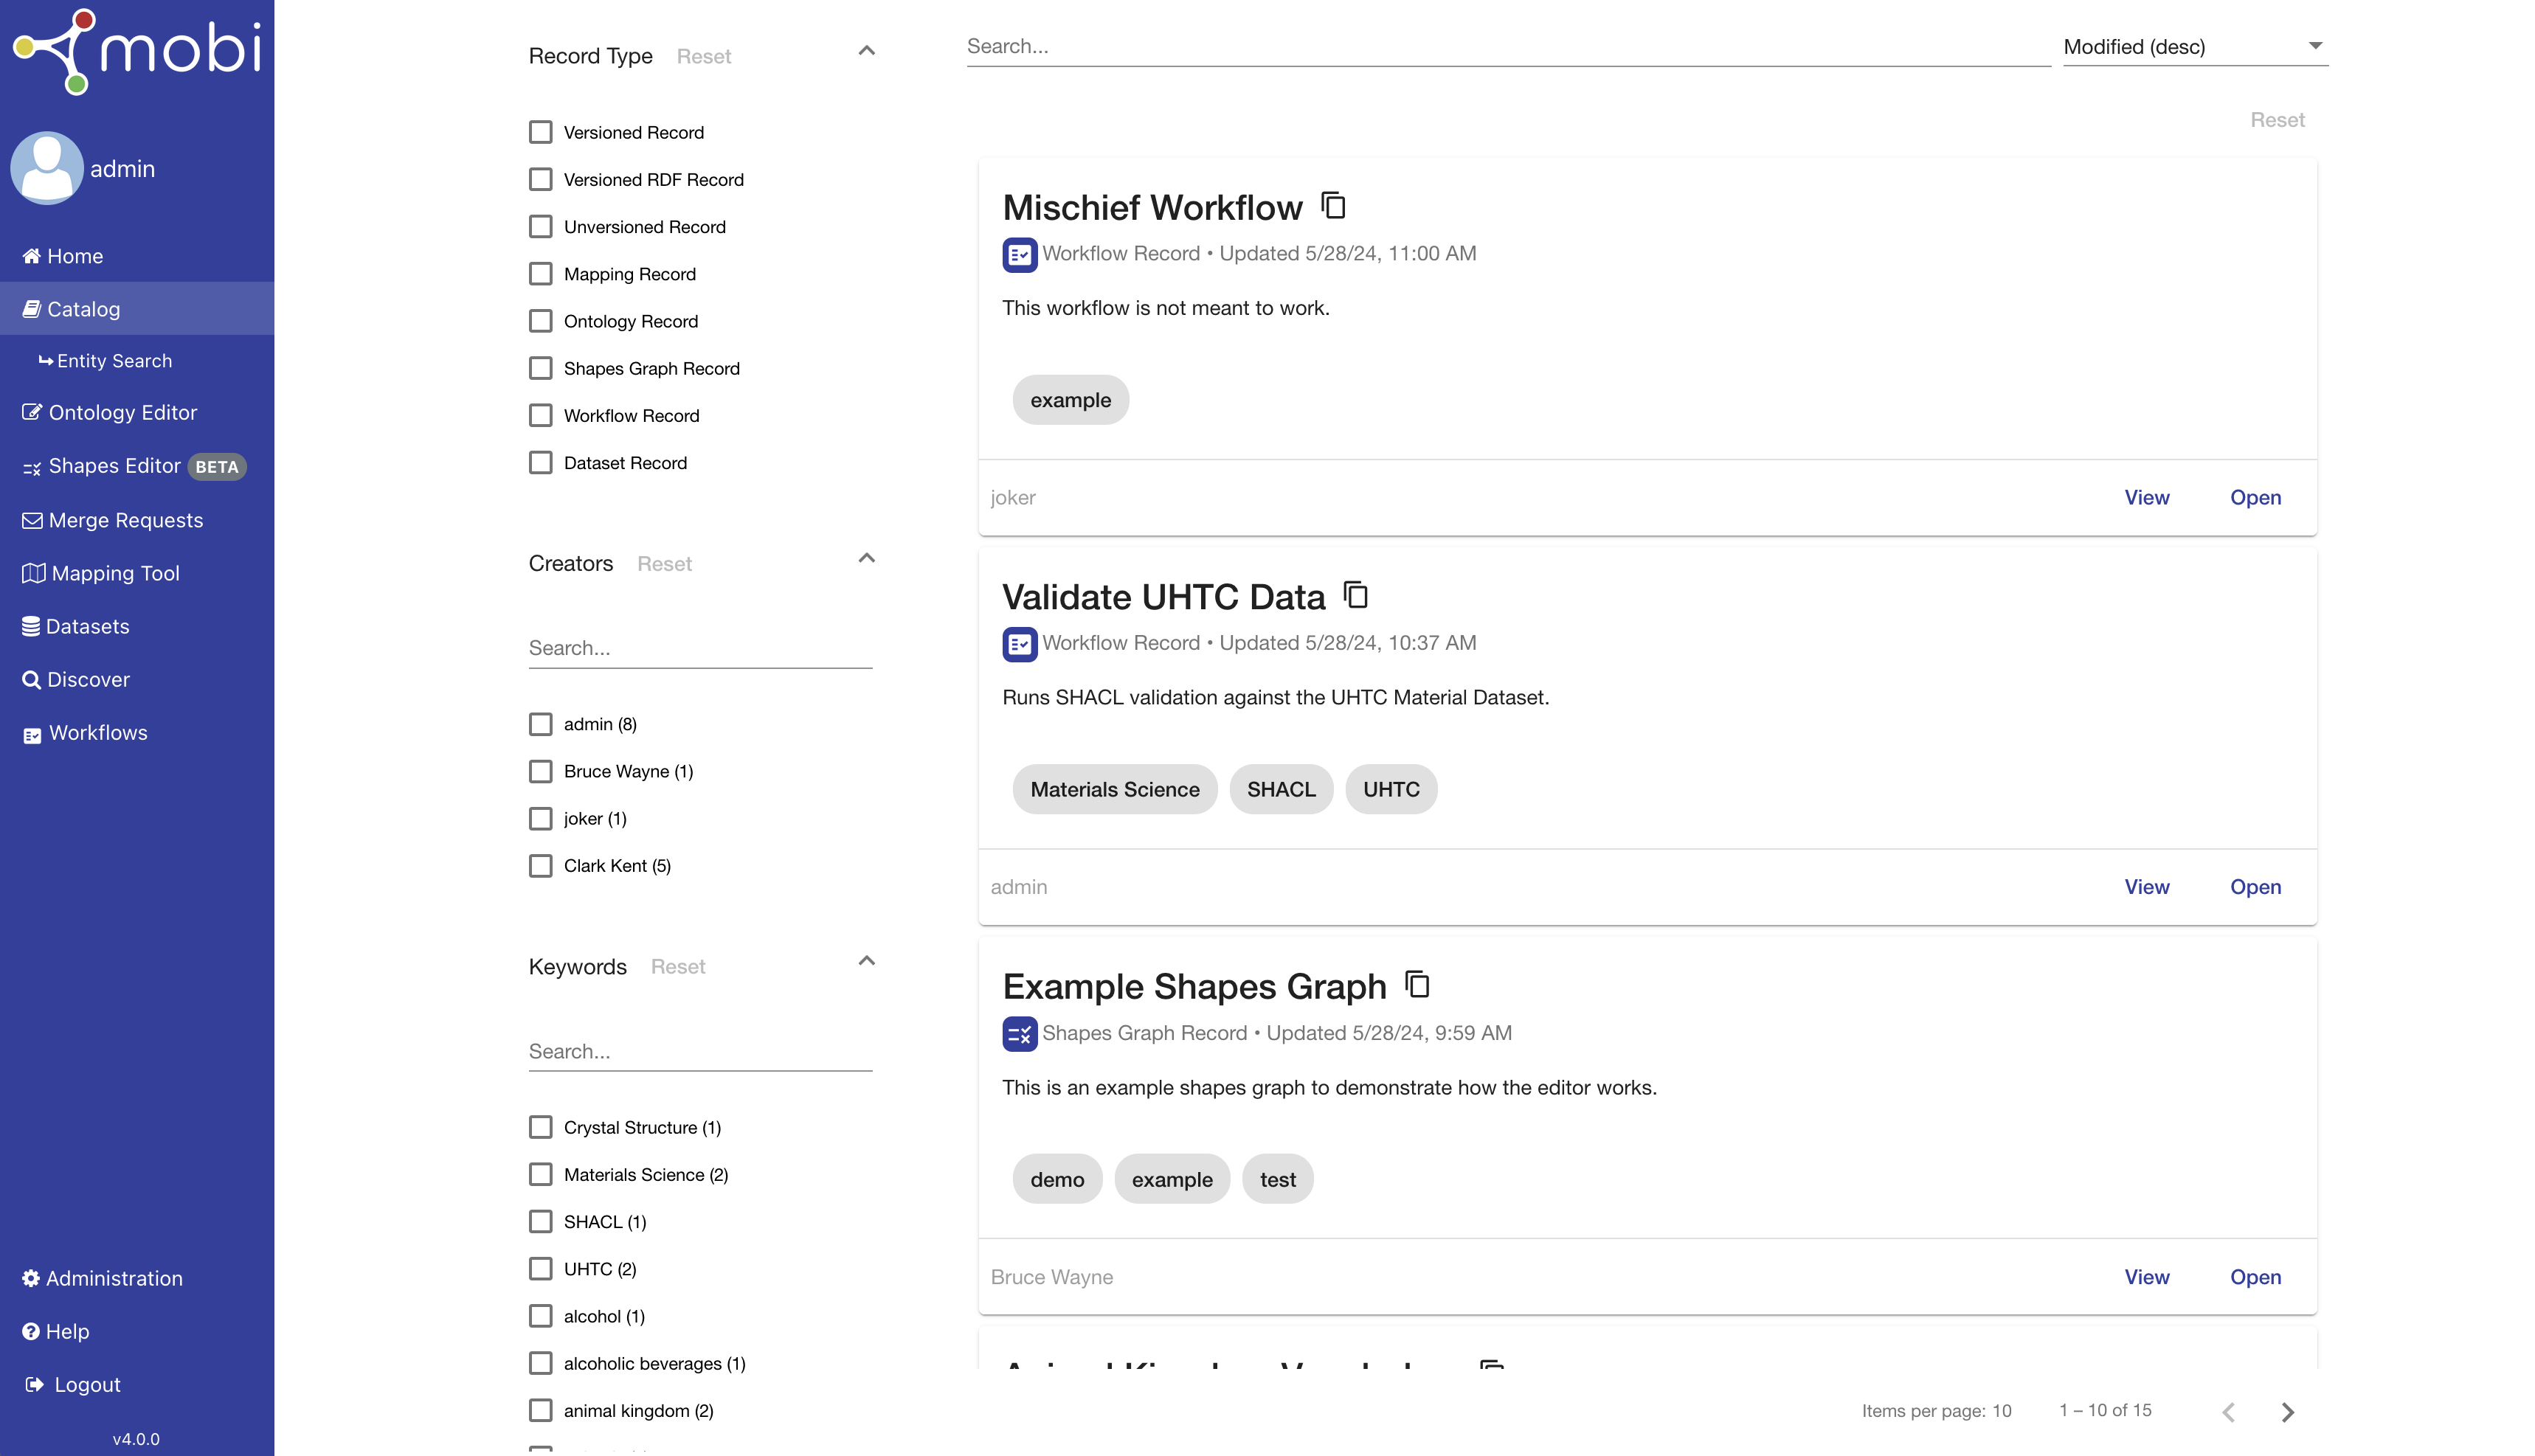
The landing page of the Catalog displays a paginated list of all the Records in the Local Catalog that can be searched, sorted, and filtered. The filters on the left contain all possible types of Records, any user who has created a record, and all possible user keywords. The selected options in each filter group can be reset and all selected filter options will appear beneath the search bar. The search bar allows you to perform a text search through all the Record metadata.
Each Record in the list is displayed as a card with the Record title, type with related icon, last modified date, description, and keywords. Clicking on the title of the Record will copy its unique identifier (IRI). The footer of each Record card shows the username of its creator, a button to Open that Record in its respective module (ontologies in the Ontology Editor, etc.) and a button to View the Record card in the Record View.
Record View
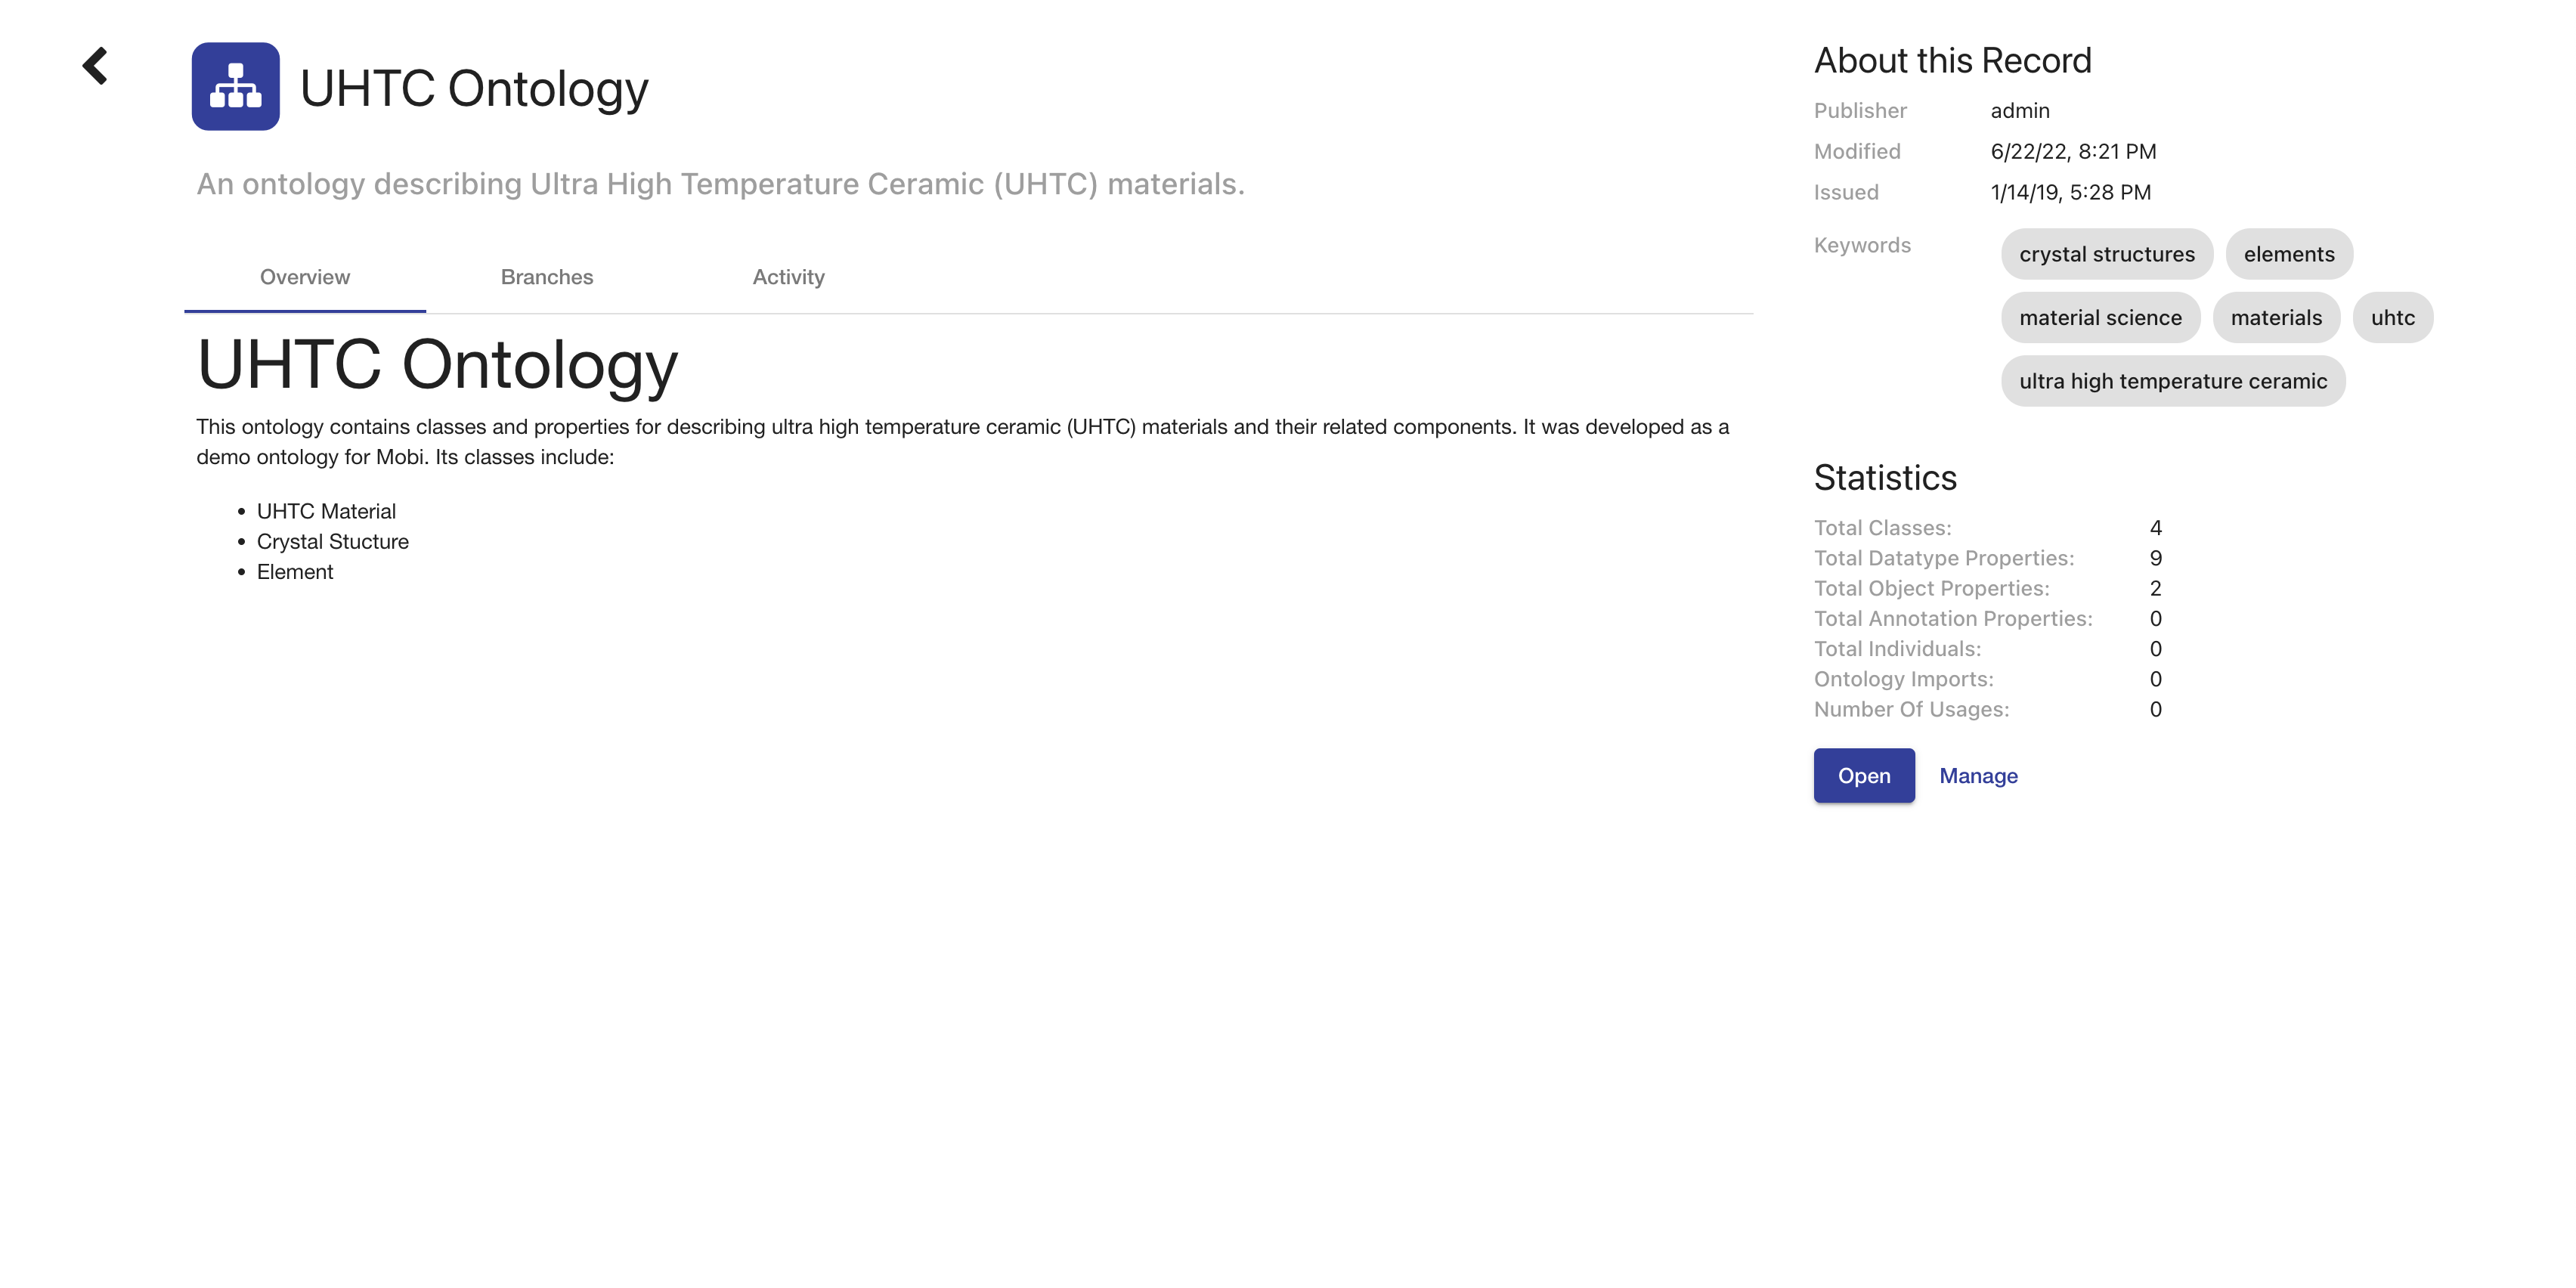
The Record View displays all metadata for the selected Record along with set of tabs that updates based on the type of Record. The top of the Record view shows the Record title, type icon, and its description. The Record description is meant to provide a short summary of the Record.
The right side of the Record View displays metadata, including the publisher’s username, the creation and modification dates, and associated keywords. The view includes a Statistics section that highlights key metrics relevant to the Record, providing a quick overview of its complexity. Each statistic is accompanied by a tooltip explaining its meaning, making it easier to understand the data. The statistics displayed are specifically tailored to the type of Record you are viewing. If no statistics are available for the Record type, the section will display the message "No statistics available.". Underneath all this is a button to open the Record in its associated module (ontologies in the Ontology Editor, etc.).
Every Record type will contain an Overview tab where you can view a Markdown description of the Record that provides more detailed information than the description field. If the Record is a Versioned RDF Record, such as an Ontology Record or Mapping Record, the tabset will also include a tab displaying the list of its Branches. The Branches in the list are expandable to view the description and commit history of the Branch. You can also copy the Branch’s IRI from this tab. The Activity tab will show a list of activities associated with the Record.
If you have the permission to manage the Record, clicking on the title, description, overview, and keywords fields will turn them into editable fields for easy updates. In addition, you will see a Manage button which will navigate you to the Record Permissions page.
Record Permissions
The Record Permissions page enables you to specify which users and groups can perform various actions against a record, such as viewing, deleting, modifying, and managing. Modify refers to the ability to affect the data represented by the record while Manage refers to the ability to edit the Record metadata. Versioned RDF Records like ontologies and mappings will also provide the ability to restrict who can modify the MASTER branch. Each type of Record has its own default permissions that get set uploaded or created.
Permissions can be set to allow all authenticated users (the Everyone slider) or limit access to specific users and groups. To set the permission to a user or group, unselect the Everyone permission, find a user or group in the search box underneath the appropriate box, and select it. To remove a user or group from the permission, click the X button next to the username or group title. After you have finished making the changes you want, make sure to click the save button in the bottom right. You can also click on the back button if you want to go back to the Record View.
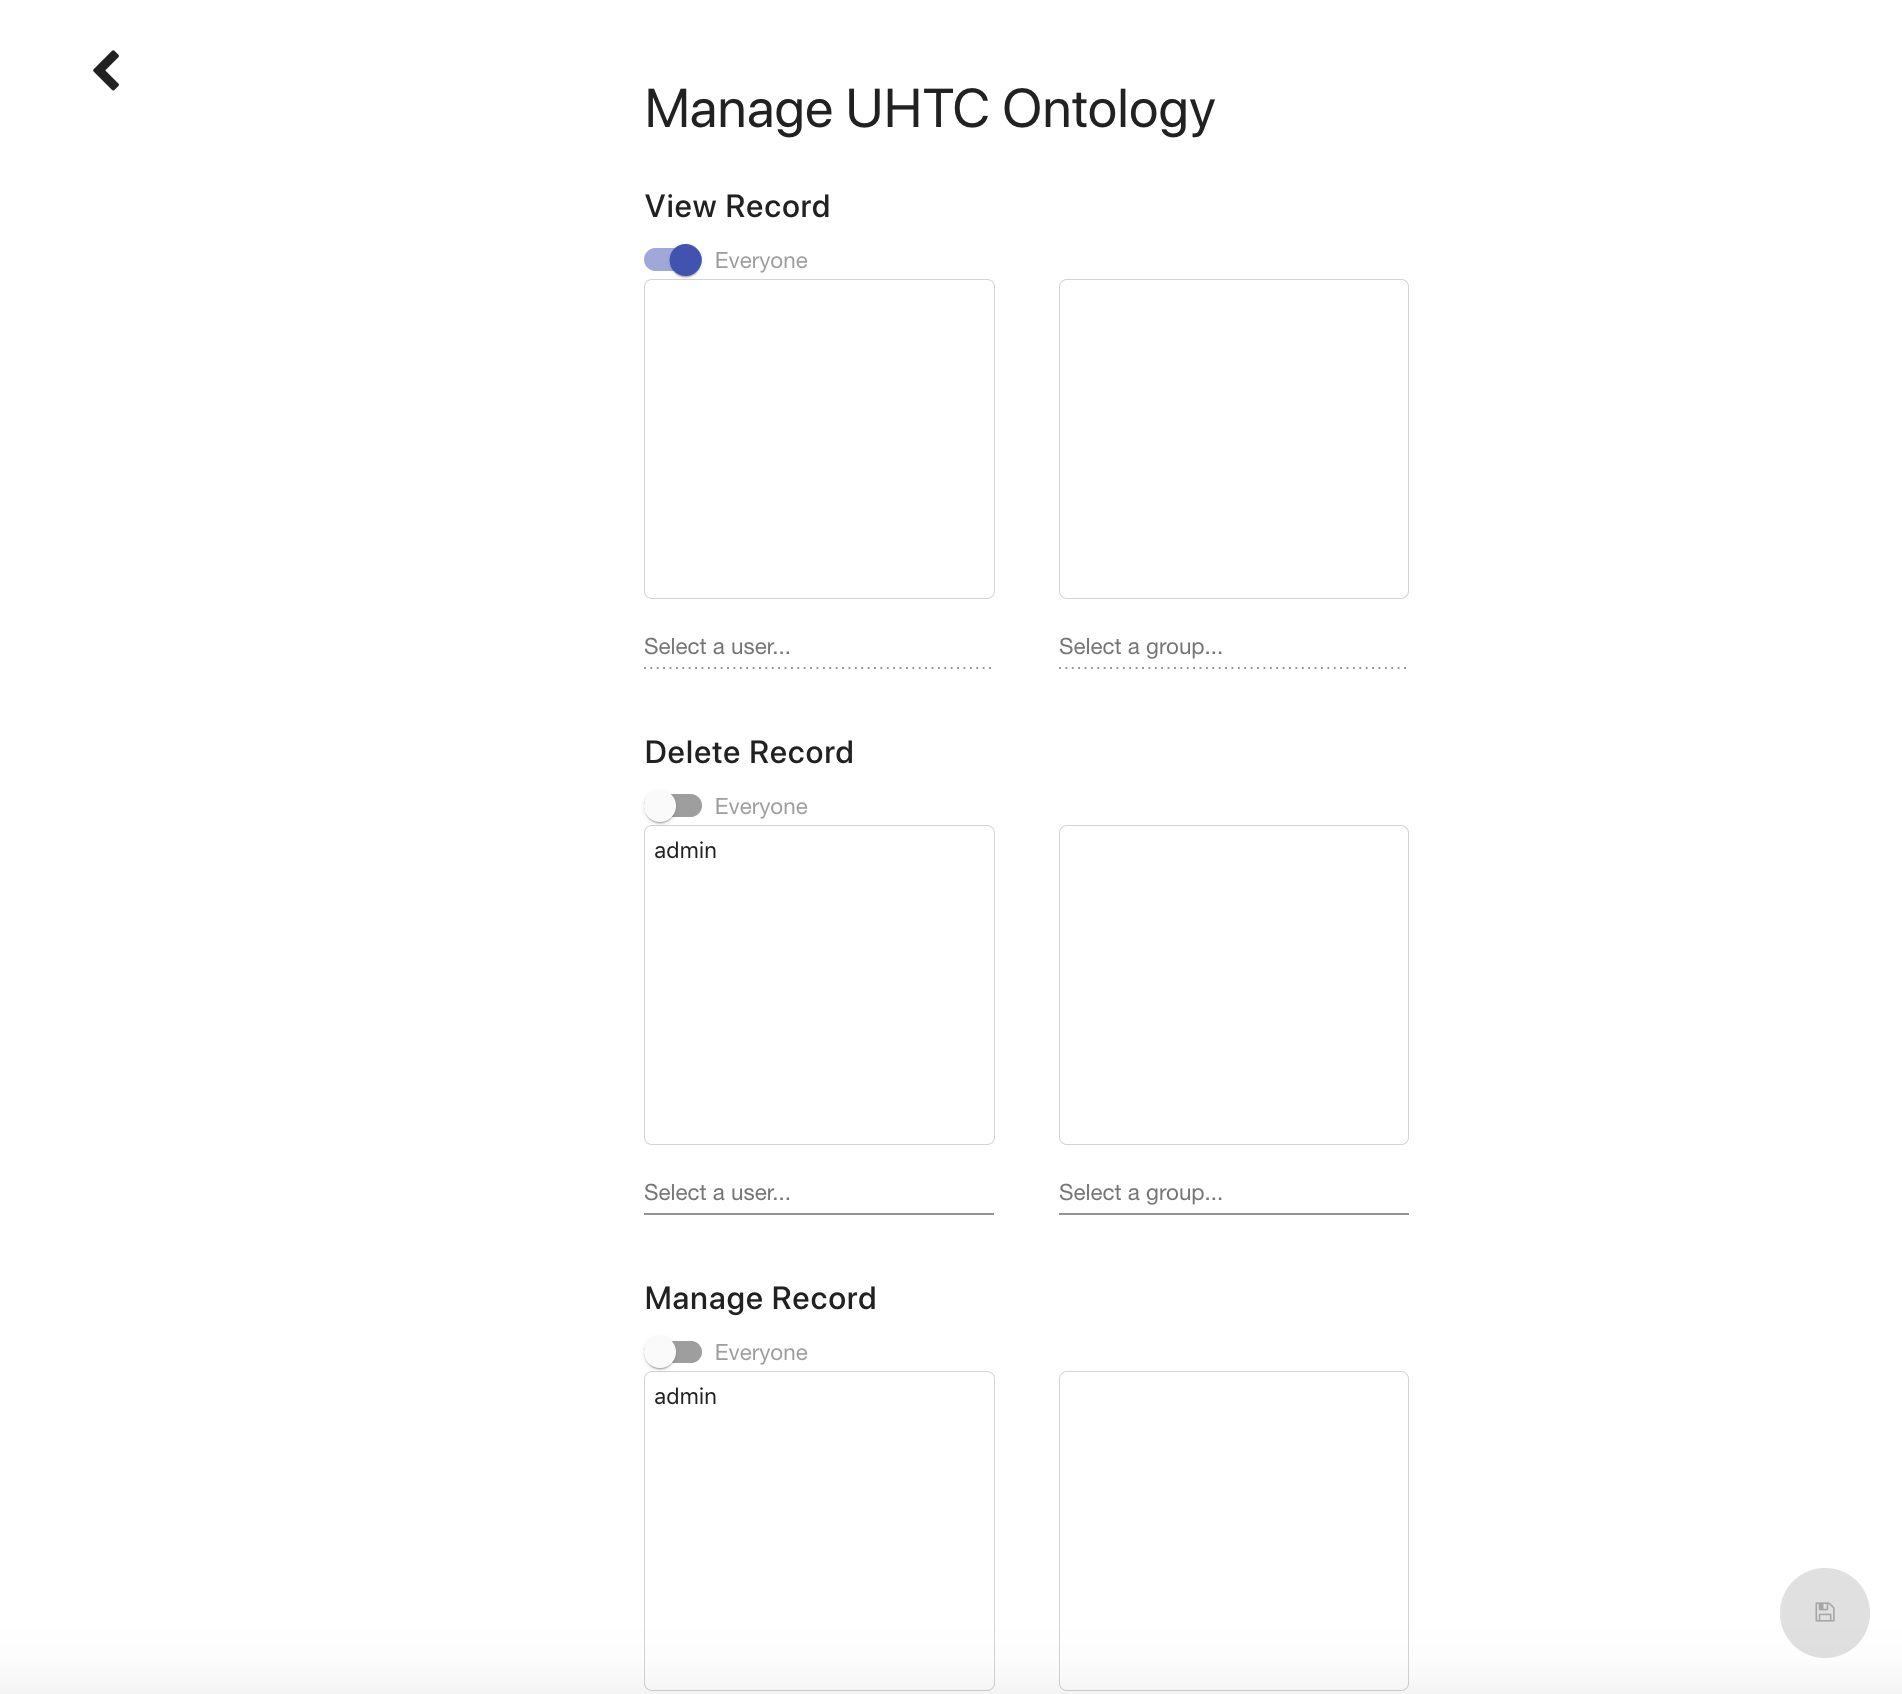
For Versioned RDF records, If a user is not allowed to modify the branch they are currently viewing, all actions in the editor that would affect the branch are disabled or removed. In addition, if a user is not allowed to edit the target branch of a merge request, they will not be able to accept the request.
Entity Search
The Mobi Entity Search tool enables you to find relevant constructs related to your topic of interest across all records in the Catalog, reducing duplication and enhancing collaboration and extensibility across your enterprise.
To reach the Entity Search tool, click on the link in the left menu.
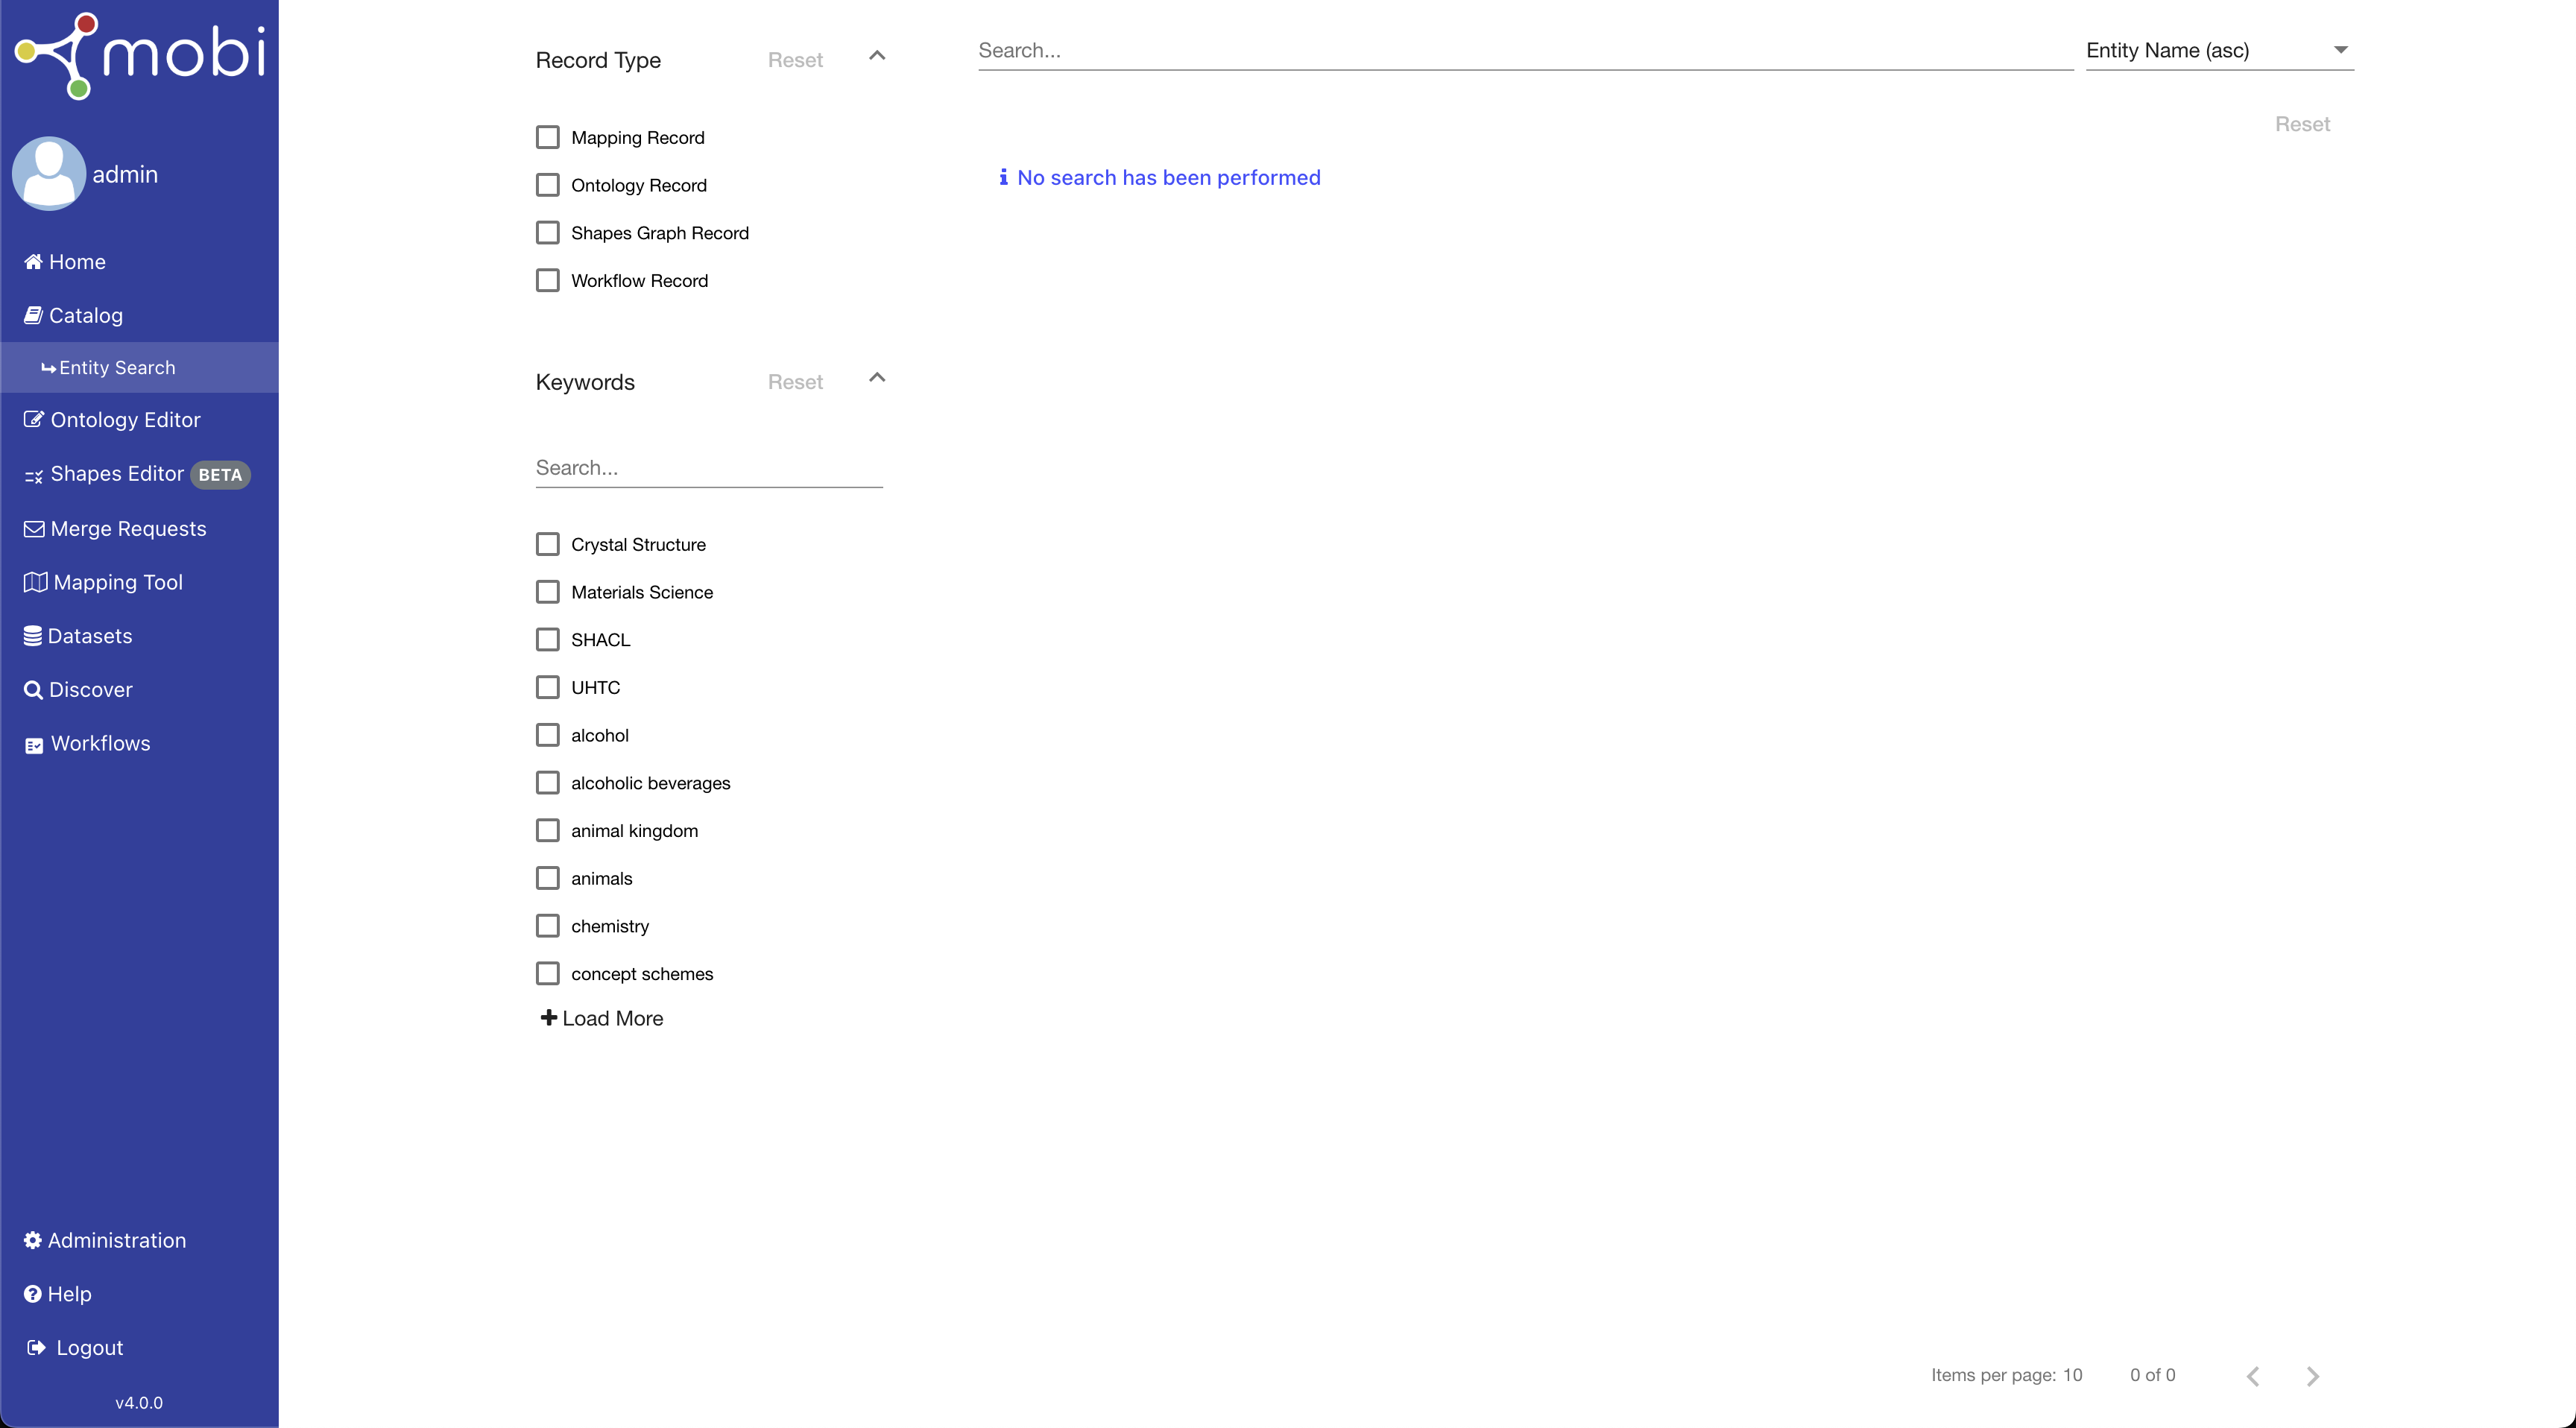
The Entity Search tool provides a filterable, sortable, paginated search across the latest MASTER branch data of all Versioned RDF Records in the Mobi Catalog. This includes Ontology Records, Shapes Graph Records, and more. The tool will always search through the compiled data of the head of the MASTER branch of each individual record, ensuring accurate and up to date results.
To view search results, search text must be entered in the search bar at the top of the right side of the page. Entered search text will be matched on all properties with literal values. The filters on the left contain all possible types of Versioned RDF Records and all possible user keywords. The selected options in each filter group can be reset and all selected filter options will appear beneath the search bar.
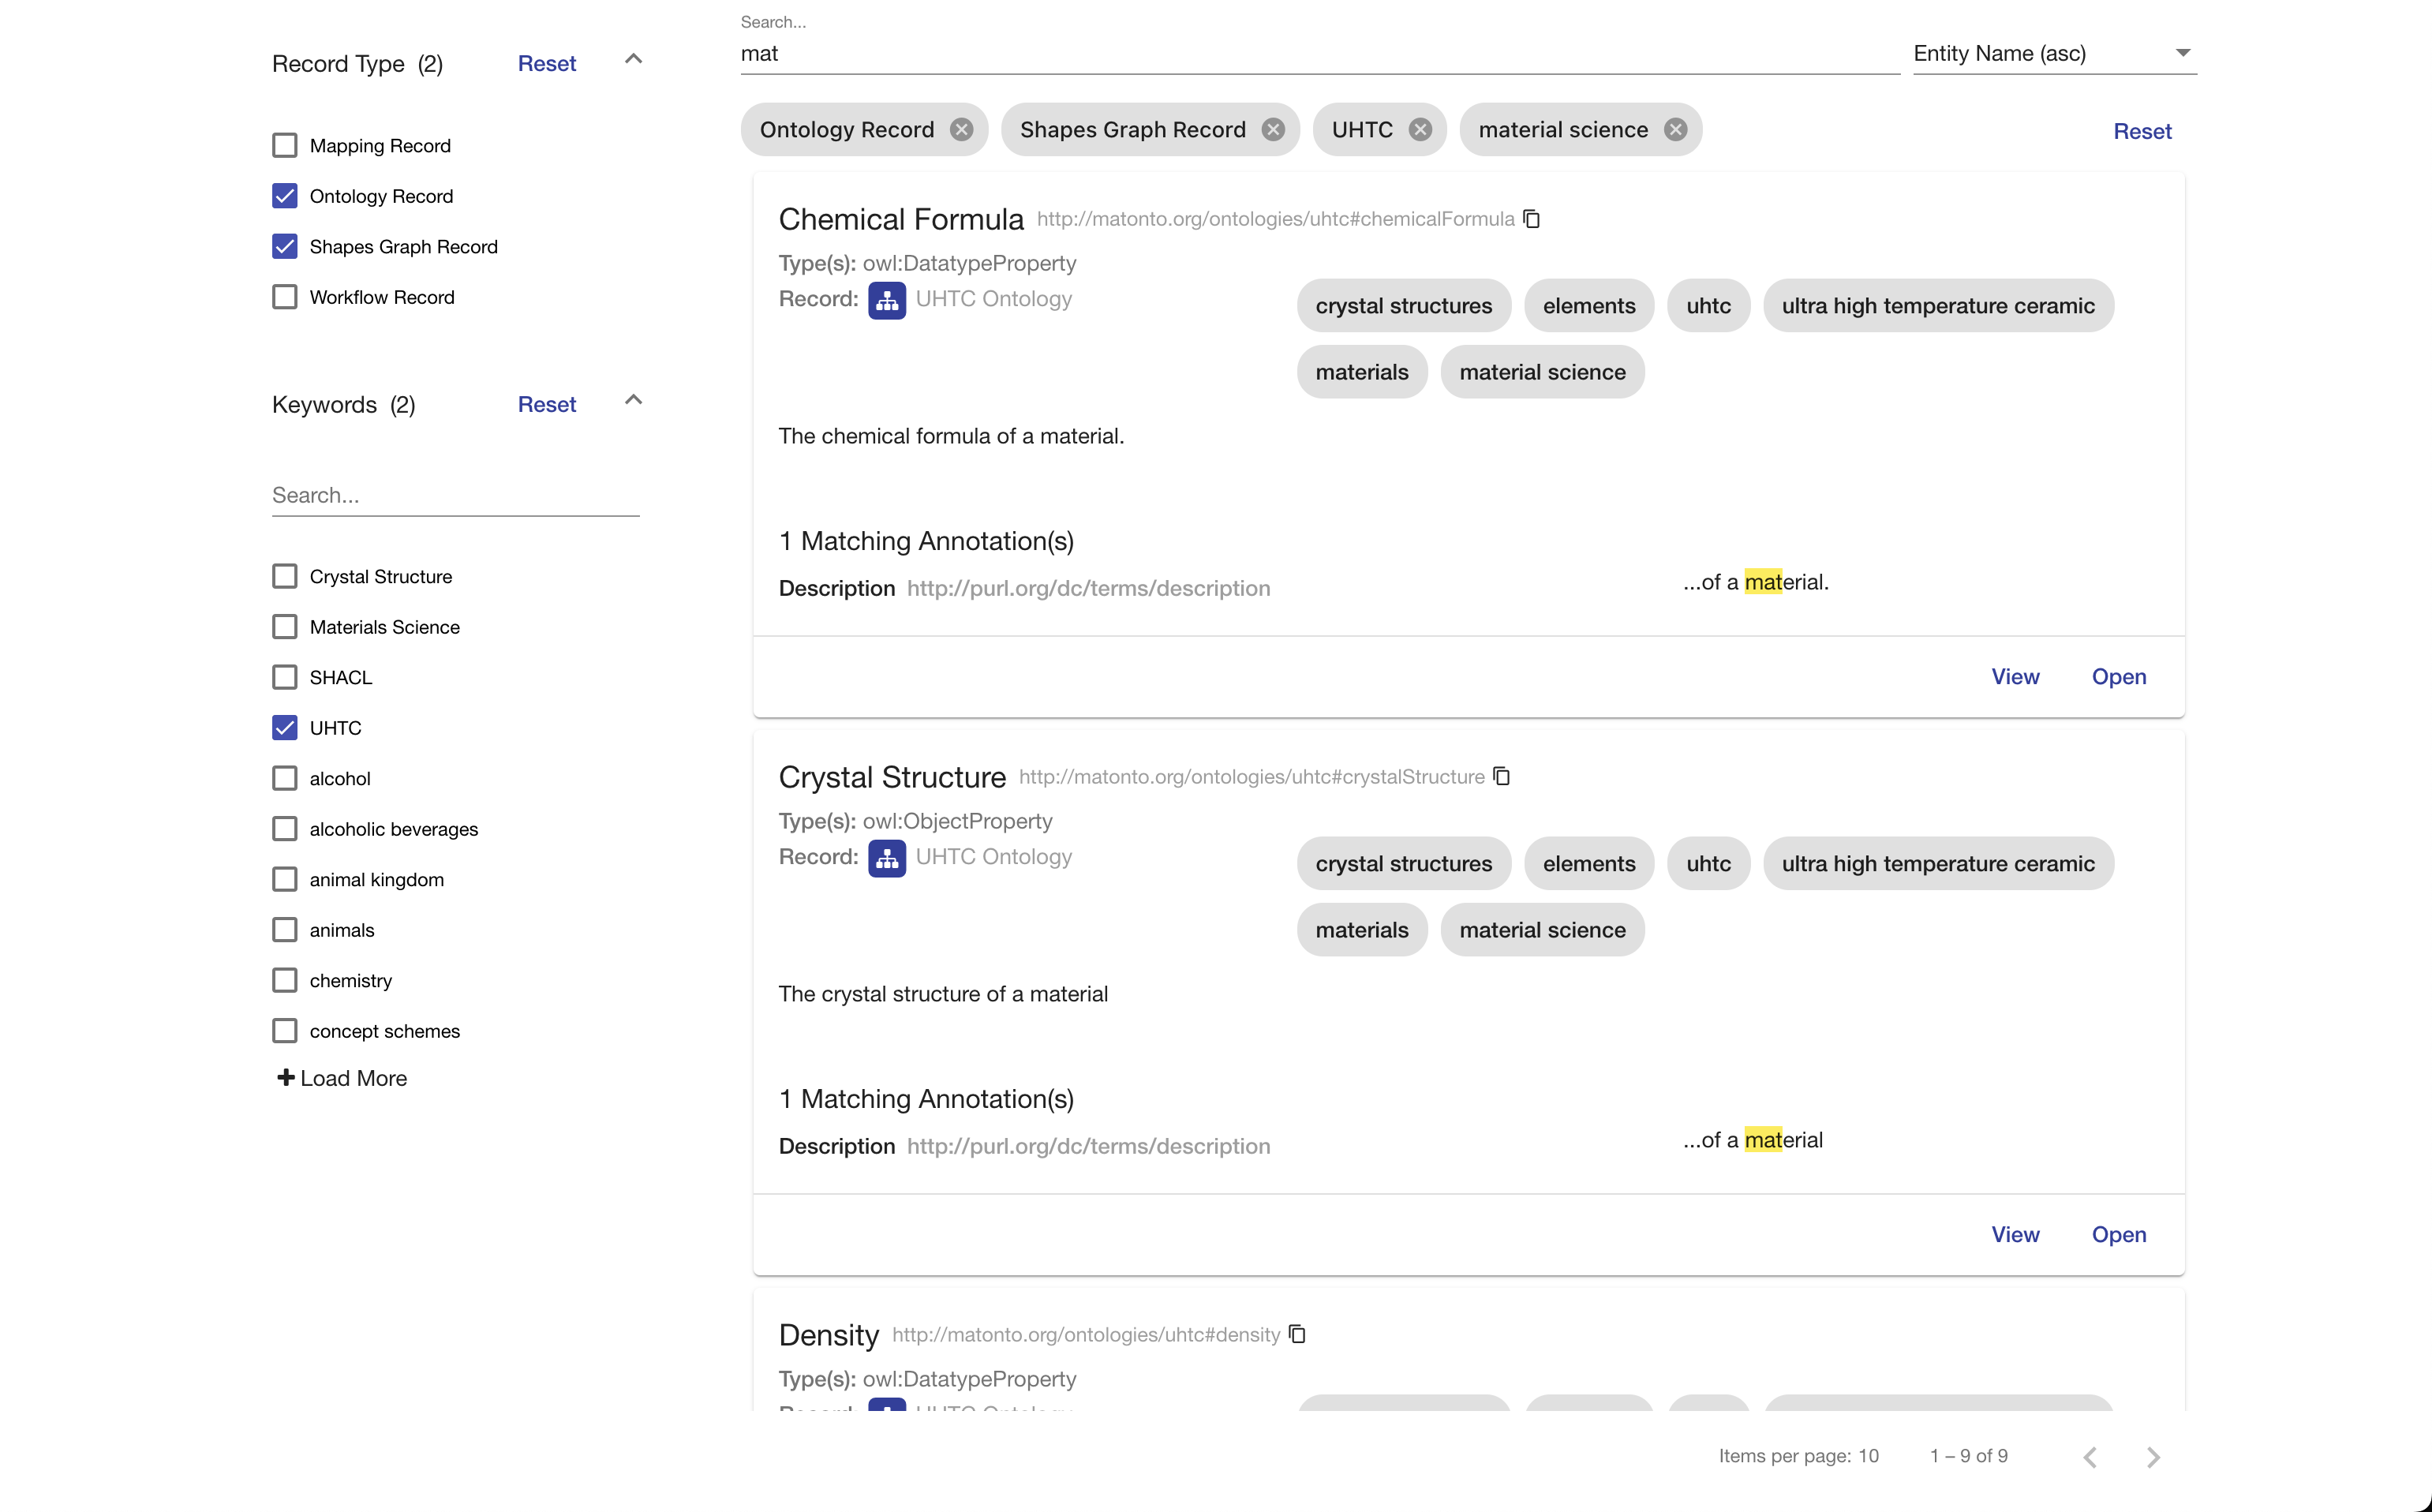
Each search result represents an entity (i.e. a subject in the triple sense) within a Versioned RDF Record and is represented with its IRI, calculated entity name, type(s), description, parent record, and matching annotation values to the search text. The Parent Record is represented with an record type icon, its title, and keywords. The Matching Annotations are displayed with the property name, IRI, and matching highlighted value. The footer of each search result card contains a button to Open that entity in its Parent Record in its respective module (ontologies in the Ontology Editor, etc.) and a button to View the Parent Record card in the Catalog Record View.
|
Note
|
The state of the most recent search will be kept when navigating away and back to the tool and will be refreshed once interacted with (i.e. search submitted, filter changes, pagination control clicked). |
Ontology Editor
The Mobi web-based Ontology Editor provides a Distributed Ontology Management System (DOMS) for local and community development of Web Ontology Language (OWL) ontologies and Simple Knowledge Organization System (SKOS) vocabularies. The DOMS features a knowledge capture, collaboration, access policy management, ontology reuse, and extensibility.
To reach the Ontology Editor, click on the link in the left menu.
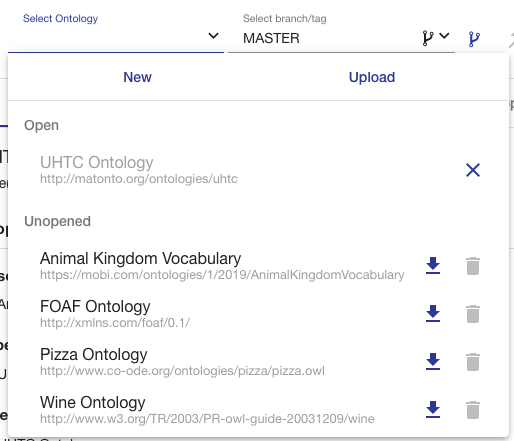
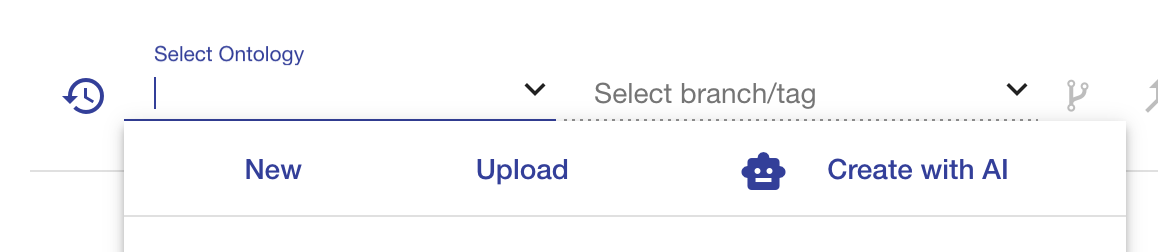
The main Ontology Editor page includes the same top action-bar as the Shapes Editor where all the actions related to opening and versioning the Ontology Record are located. From the action-bar, users can create, filter, and open different Ontology Records, branches, and tags as well as create branches/tags, merge branches, upload/download the ontology data, and make a new commit.

The starting point for any action on the page when you first navigate to the editor is the records dropdown. From here, you can create new ontologies, open existing ones, delete ontologies you have permission to do so, and download the latest version from the head commit of the MASTER branch. Clicking on an ontology will open it in the editor. You can open more than one ontology open at a time for parallel development.
When opening an ontology, the editor will load the previous branch and commit you were viewing. If you have not previously opened the ontology or the branch you were viewing no longer exists, the editor will load the HEAD commit of the ontology’s MASTER branch. For an explanation of commits and branches see the section on Ontology Versioning.
From this screen you can also filter the ontology list, create new ontologies, or upload existing ones.
Creating New Ontologies
To create a new ontology, click the New button in the records dropdown. In the creation dialog, you are required to provide an ontology IRI and title. You can also optionally provide a description and keywords. This metadata is used to describe the ontology in the local catalog.
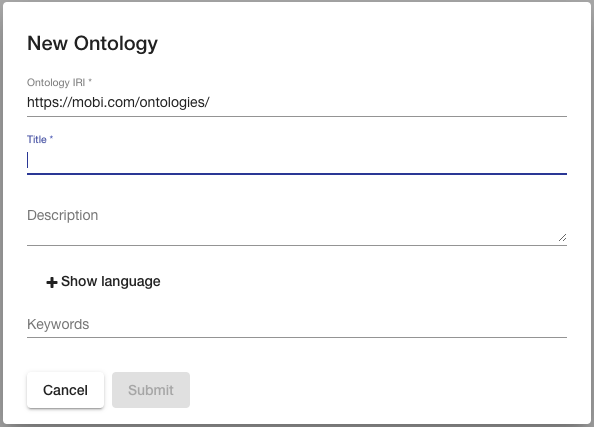
The Ontology IRI is the unique identifier for the new ontology. The editor pre-populates this field with a configurable default namespace and a local name generated from the Title field. You can always override this behavior. The Title field populates the dcterms:title annotations of both the new Ontology Record and the ontology object within the new ontology. The Description field populates the dcterms:description annotations of both the new Ontology Record and the ontology object within the new ontology. The Keywords field will attach the entered values as keywords to the new Ontology Record. When the dialog is submitted, the new ontology will automatically be opened into the editor.
Uploading Existing Ontologies
To upload an existing ontology, click the Upload button in the records dropdown. This will bring up the browser’s native file browser to select one or more files containing initial ontology data.
|
Note
|
Supported ontology file types are .owl, .ttl, .xml, .jsonld, .owx, .json, .n3, .nq, .nt, .rdf, .txt, .json, .ofn, .omn , .owx, and .rdfs.
|
Once the file(s) are selected, a dialog will prompt you for metadata entry for the Ontology Record (title, description, keywords). This metadata is used to describe the ontology in the local catalog. By default, the editor will set the Title to the file name. Metadata for each ontology file can be entered and submitted separately, or default metadata can be entered for all records using the Submit All button. The Title field populates the dcterms:title annotation of the new Ontology Record. The Description field populates the dcterms:description annotation of the new Ontology Record. The Keywords field will attach the entered values as keywords to the new Ontology Record.
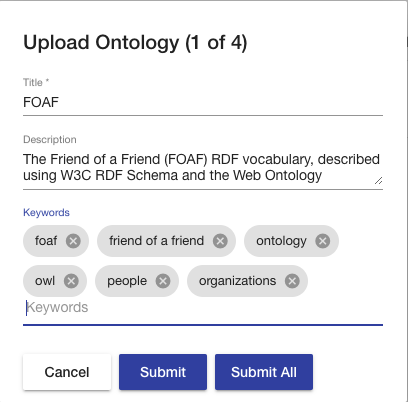
The status of each upload is recorded in the Upload Log which can be opened by clicking the button next to the records dropdown. Any errors will be detailed for each file. The file extension is used to guess the appropriate RDF Format to parse the file contents. If a parsing error occurs, the snackbar will display the error message relevant to guessed RDF Format.

Creating an Ontology with AI (ENTERPRISE)
The Ontology Editor provides an Alpha feature to generate ontologies using an AI assistant. Click the Create with AI button in the records dropdown to open the AI Assistant interface. The assistant guides you through defining your ontology requirements using natural language, then automatically drafts an OWL 2 ontology based on your specifications. This feature is designed to help both newcomers and experienced ontologists quickly create well-structured ontologies.
|
Note
|
The AI Assistant is currently in Alpha. Features and behavior may change in future releases. |
Getting Started
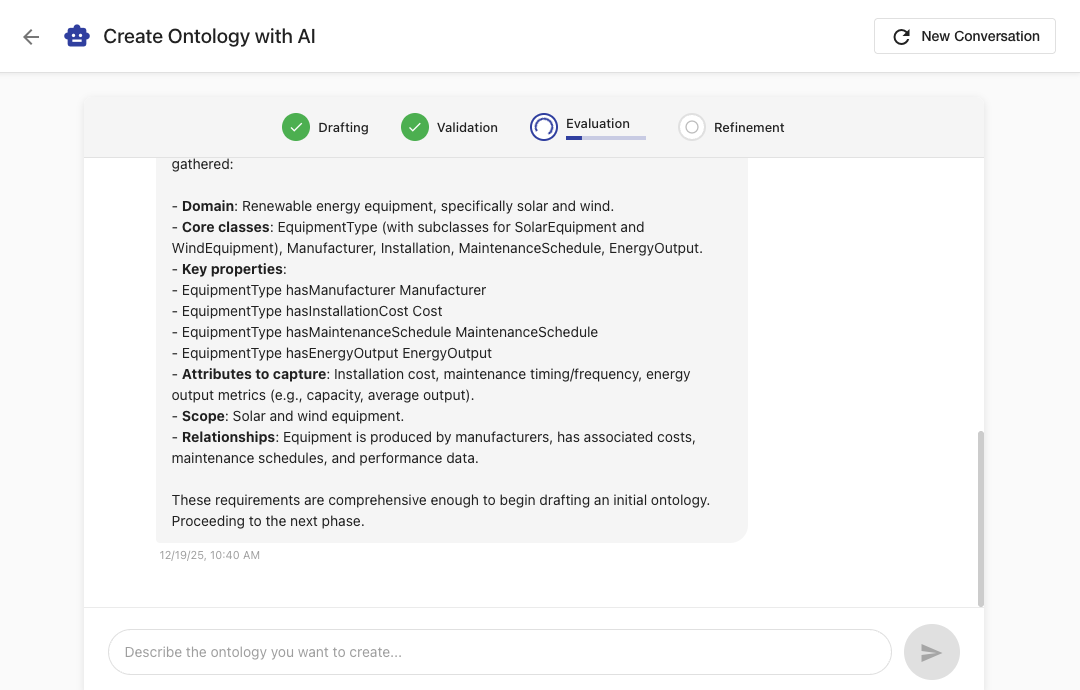
When you first open the AI Assistant, you will see a chat interface where you can begin describing your ontology requirements. The assistant will ask clarifying questions to understand your use case, domain, and the types of information you want to model.
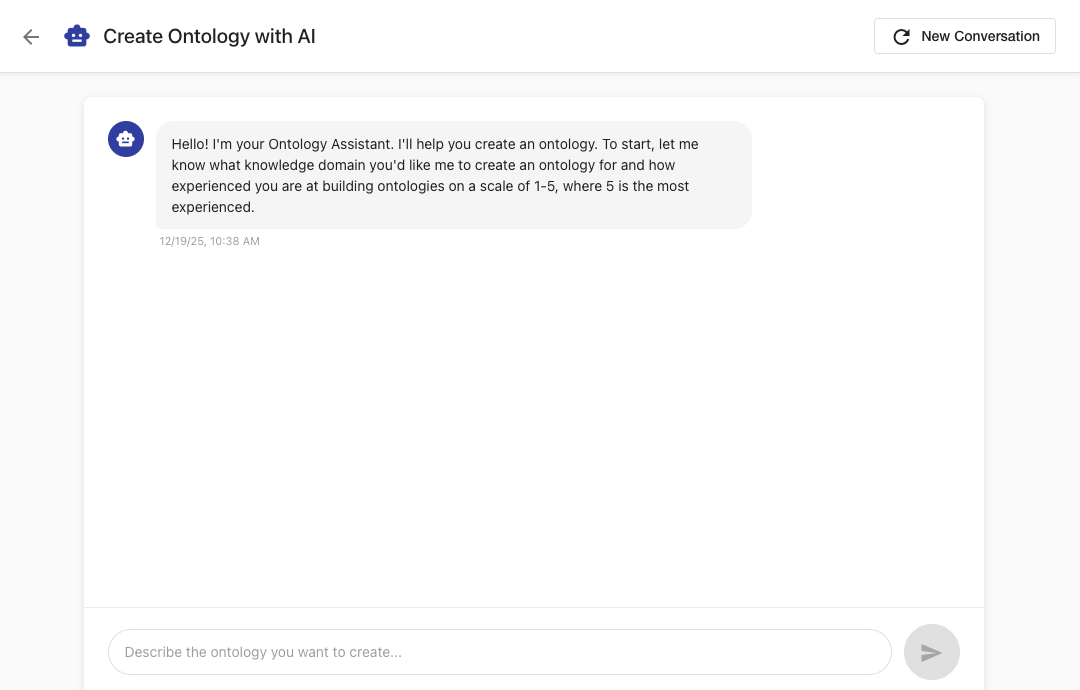
The AI Assistant workflow consists of two main phases:
-
Conversation Phase - Discuss your requirements with the assistant
-
Drafting, Evaluation, and Refinement - The assistant automatically generates, validates, evaluates, and refines your ontology
Conversation Phase
During the conversation phase, the assistant will help you define your ontology requirements. You should describe:
-
The knowledge domain you want to model
-
Your experience level with ontology development
-
Key classes (categories of things) you need
-
Properties and relationships between classes
-
Any specific use cases or competency questions

The assistant will periodically summarize the requirements it has gathered and ask for confirmation. When the requirements are sufficiently defined, the assistant will indicate it is ready to proceed to drafting.
|
Tip
|
Be as specific as possible about your requirements. The more detail you provide, the better the generated ontology will match your needs. |
Drafting, Evaluation, and Refinement
Once requirements are complete, the AI Assistant automatically drafts, evaluates, and refines your ontology. During these phases, a progress indicator shows the current status.
The drafting phase creates an initial OWL 2 ontology based on your requirements, including:
-
Class definitions with appropriate annotations
-
Object properties defining relationships between classes
-
Data properties for attributes
-
Property domains and ranges
-
Ontology metadata (title, description, etc.)
After the initial draft is created, the AI Assistant evaluates the ontology against your stated requirements. If the evaluation identifies areas for improvement, the assistant refines the ontology by adding missing classes or properties, adjusting domains and ranges, improving annotations, and fixing structural issues. This process continues until the ontology meets the quality threshold or a maximum number of iterations is reached.
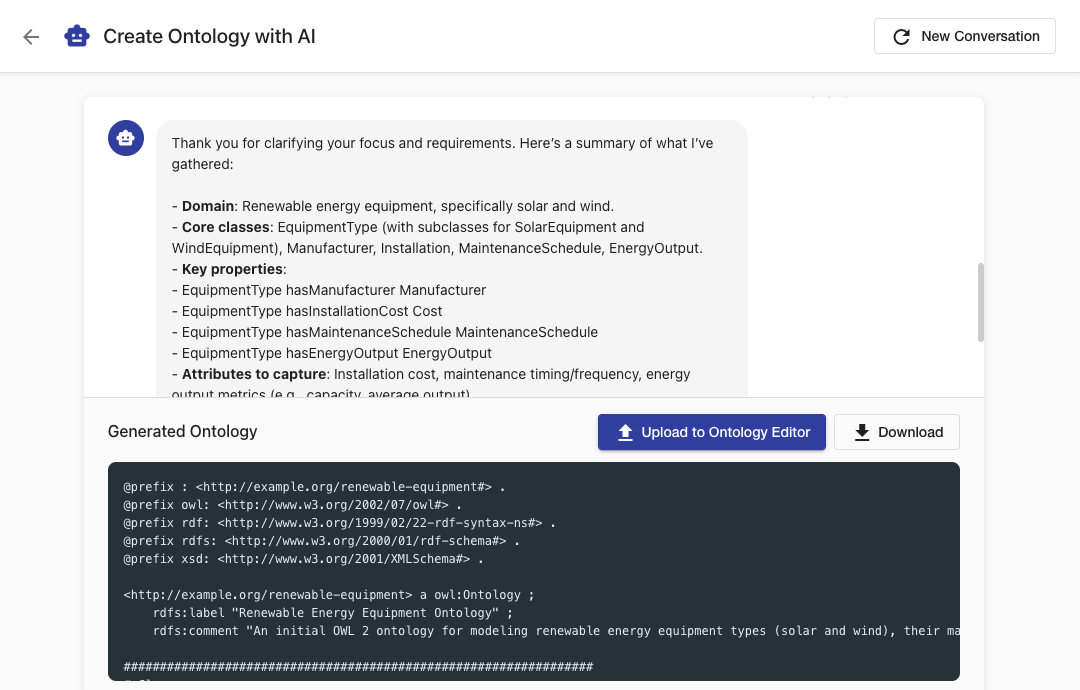
Reviewing the Generated Ontology
When generation is complete, you can review the generated ontology directly in the AI Assistant interface. The ontology is displayed in Turtle format, allowing you to inspect the classes, properties, and structure before importing.
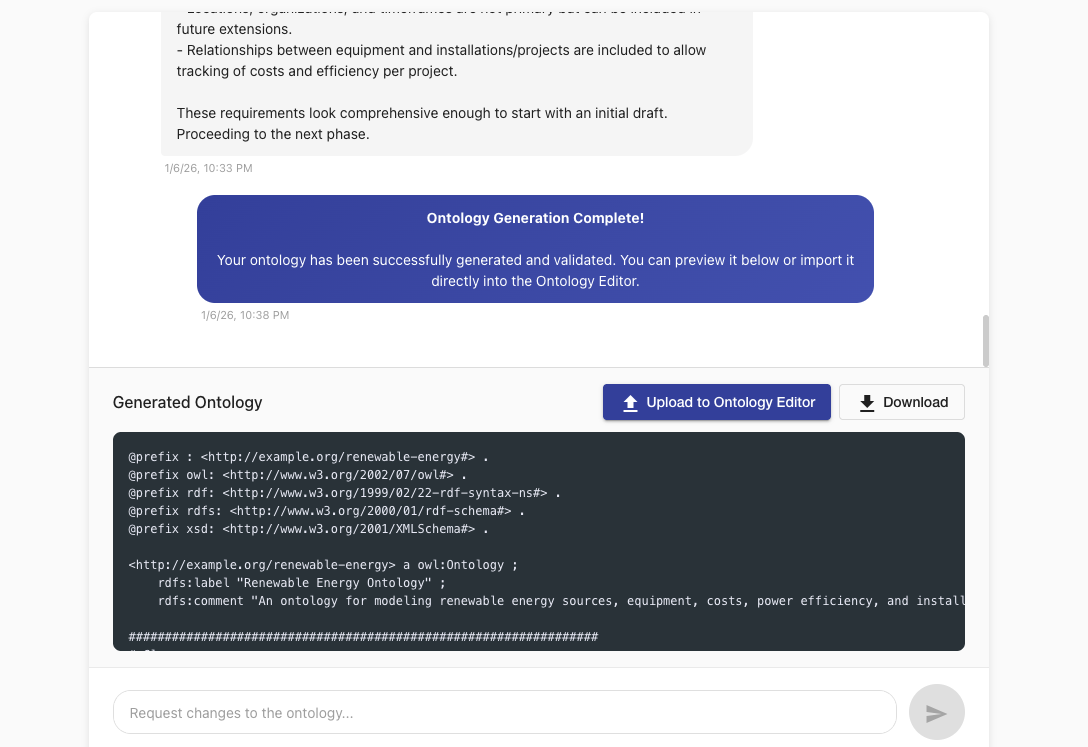
You can scroll through the generated ontology to verify it meets your requirements. If you are not satisfied with the result, you can provide additional feedback to the assistant to request changes.
Uploading to Ontology Editor
Once you are satisfied with the generated ontology, click the Upload to Ontology Editor button in order to take advantage of the Ontology Editor’s semantic versioning and visualization capabilities.
The ontology will be created in the Mobi catalog and opened in the Ontology Editor where you can continue development.
Continuing a Session
If you navigate away from the AI Assistant before completing your ontology, your session is preserved. When you return, you can continue your conversation by clicking Continue AI Session in the Ontology Editor records dropdown.
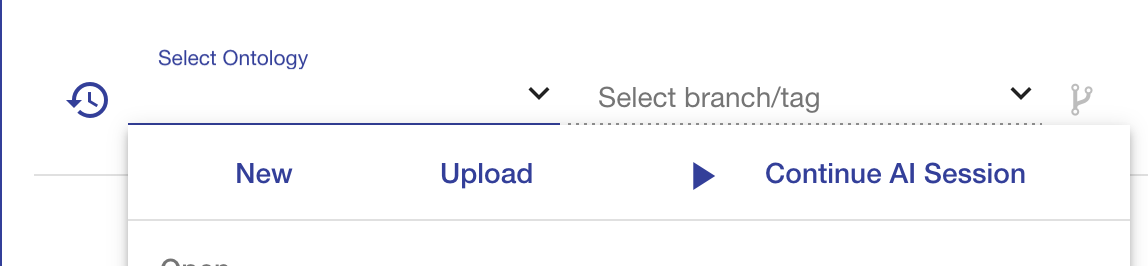
|
Note
|
AI Assistant sessions are preserved for a limited time. If your session expires, you will need to start a new conversation. |
Providing Feedback During Generation
If the generated ontology does not fully meet your requirements, you can provide feedback to request changes. Enter your feedback in the chat interface describing what modifications you would like. The assistant will refine the ontology based on your feedback.
Common types of feedback include:
-
Requesting additional classes or properties
-
Asking for changes to property domains or ranges
-
Requesting more detailed annotations
-
Asking for removal of unnecessary elements
Best Practices
To get the best results from the AI Assistant:
-
Start with a clear goal - Know what domain you want to model and what questions the ontology should answer
-
Be specific about requirements - Describe the classes, properties, and relationships you need
-
Indicate your experience level - The assistant adjusts its recommendations based on your expertise
-
Review the summary - Confirm the assistant has correctly understood your requirements before proceeding to drafting
-
Provide feedback - If the generated ontology needs adjustments, describe what changes you need
-
Iterate if needed - Complex ontologies may require multiple rounds of feedback and refinement
Limitations
The AI Assistant has the following limitations in the current Alpha release:
-
Generated ontologies are drafts and may require manual refinement
-
Complex domain-specific requirements may not be fully captured
-
The assistant does not have knowledge of existing ontologies in Mobi
-
Session timeout may require restarting long conversations
-
Generated ontologies follow common OWL 2 patterns but may not match all organization-specific conventions
Editing an Ontology
The Ontology Editor provides an interface for developing OWL 2 ontologies with additional features directed towards developing Simple Knowledge Organization System (SKOS) vocabularies and extensions thereof, including support for (SKOS-XL)
|
Tip
|
To learn more about OWL ontologies, see the W3C Specification. To learn more about SKOS vocabularies, see the W3C Specification |
The Ontology Editor contains various tabs supporting activities for ontology development, search, and version control.
This section will describe the tools related to ontology development activities. These include:
-
the Overview Tab
-
the Classes Tab
-
the Properties Tab
-
the Individuals Tab
-
the optional Schemes Tab
-
the optional Concepts Tab
-
the Search Tab
The Schemes Tab and Concepts Tab will appear if the editor detects that the opened ontology contains SKOS classes and properties. The easiest way to have access to these tabs is to import the SKOS ontology (http://www.w3.org/2004/02/skos/core).
For a detailed description of the versioning components, refer to the Ontology Versioning section.
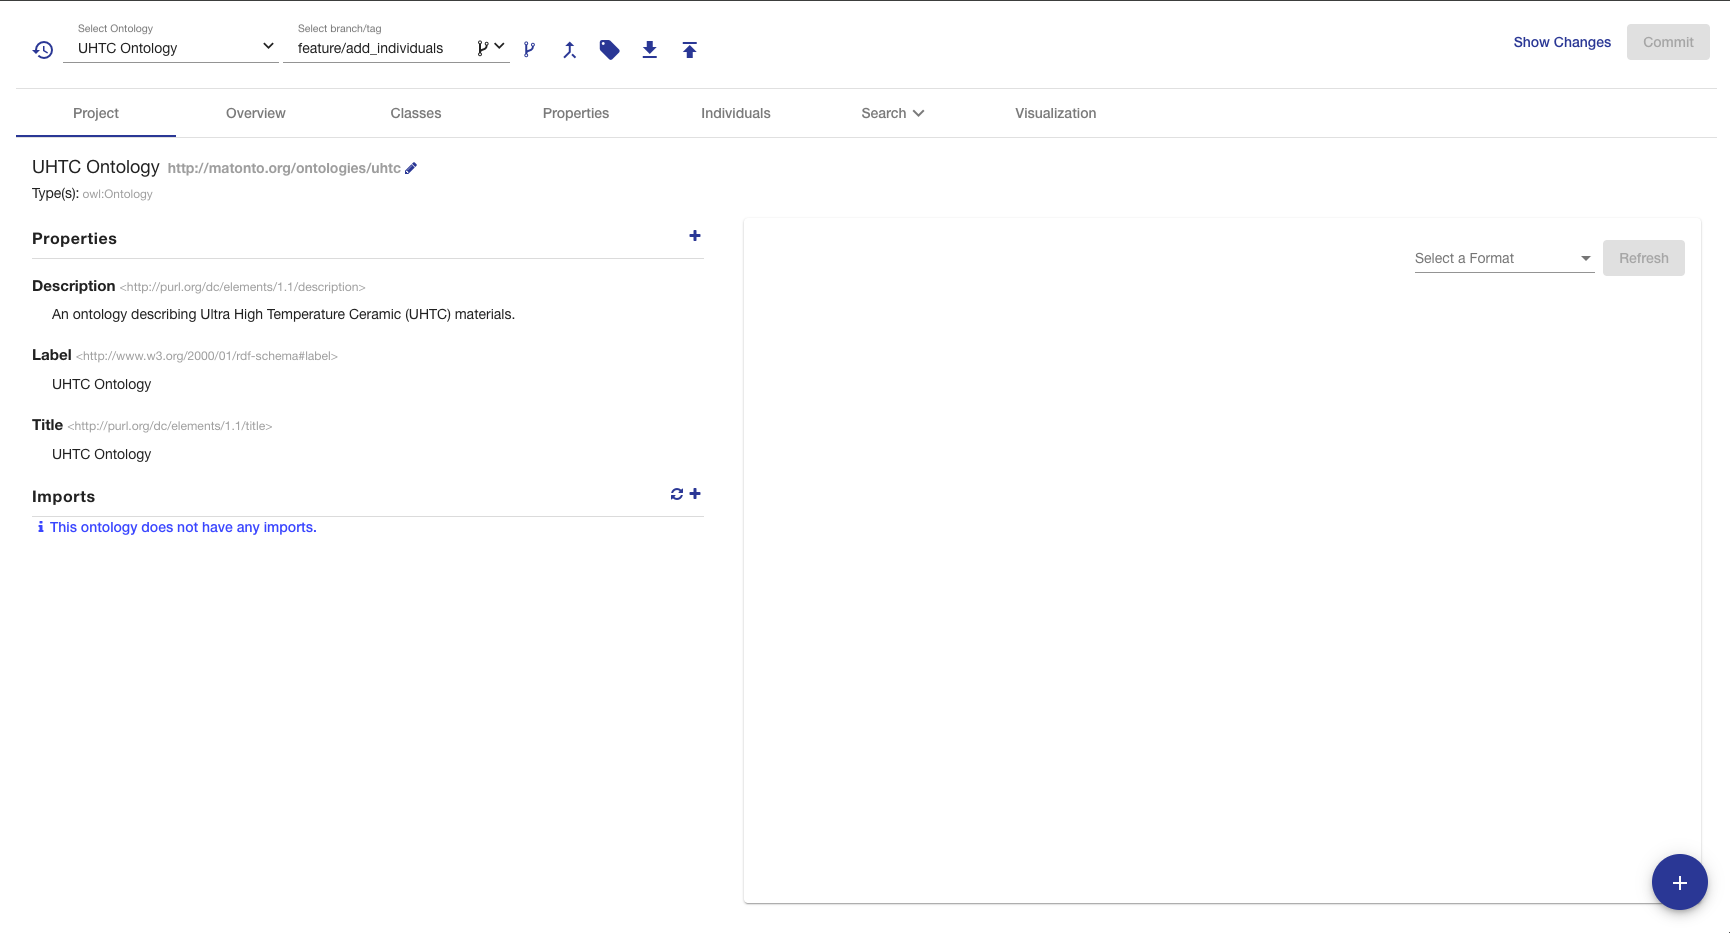
Ontology Project Tab
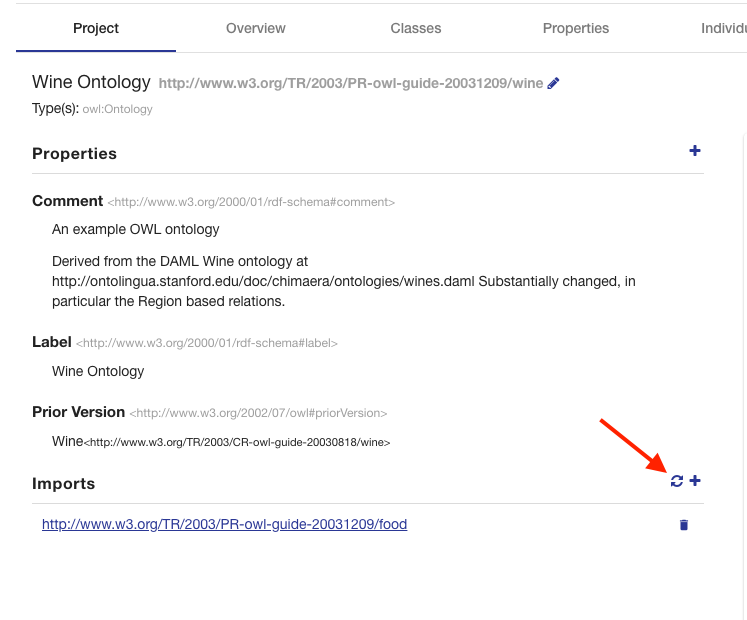
The Ontology Project Tab displays high-level information about the ontology. This includes the ontology annotations and properties, ontology imports, and a preview of the serialized ontology RDF.
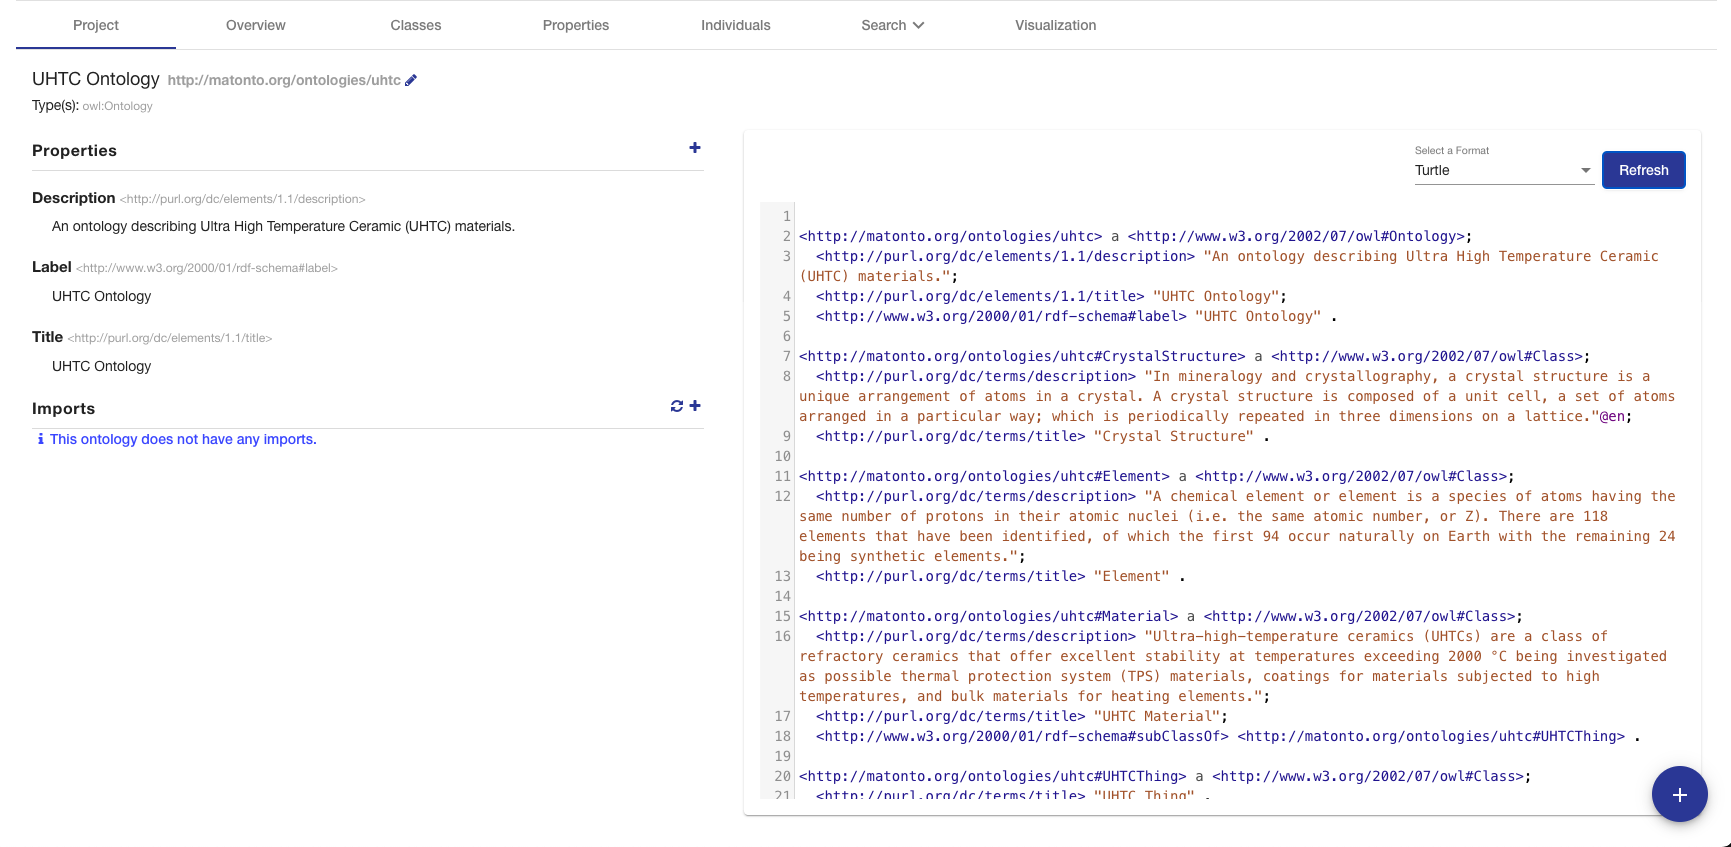
The top of this tab contains the title of the ontology and its IRI. The IRI shown is the Version IRI, ontology IRI, or a blank node identifier. The IRI can be copied quickly by clicking on it.
On the upper left side of this tab is a section containing a list of all the applied OWL Ontology Properties and Annotations. There are controls included to add, remove, and edit these properties.
On the lower left side of this tab is a section containing a list of all direct and indirect ontology imports. If an imported ontology could not be resolved, it will appear red. To add a new imported ontology, click on the plus button and either enter the IRI of an ontology available on the web or select an ontology within Mobi. To refresh the cached versions of the imported ontologies and attempt to resolve any unresolved imports, click on the refresh button.
On the right of this tab is a card used to generate a preview of the ontology as RDF. There is a drop down with several different RDF serializations to choose from. Clicking Refresh will generate a preview of the saved state of the ontology in the specified RDF format in the area below. The preview will be limited to the first 5000 results.
|
Tip
|
The serialized ontology is a representation of data stored in the repository and will not include uncommitted changes. |
Overview Tab
The Overview Tab provides quick access to classes and their associated properties as compared to the Classes and Properties tabs. Properties are associated to classes through the use of rdfs:domain.
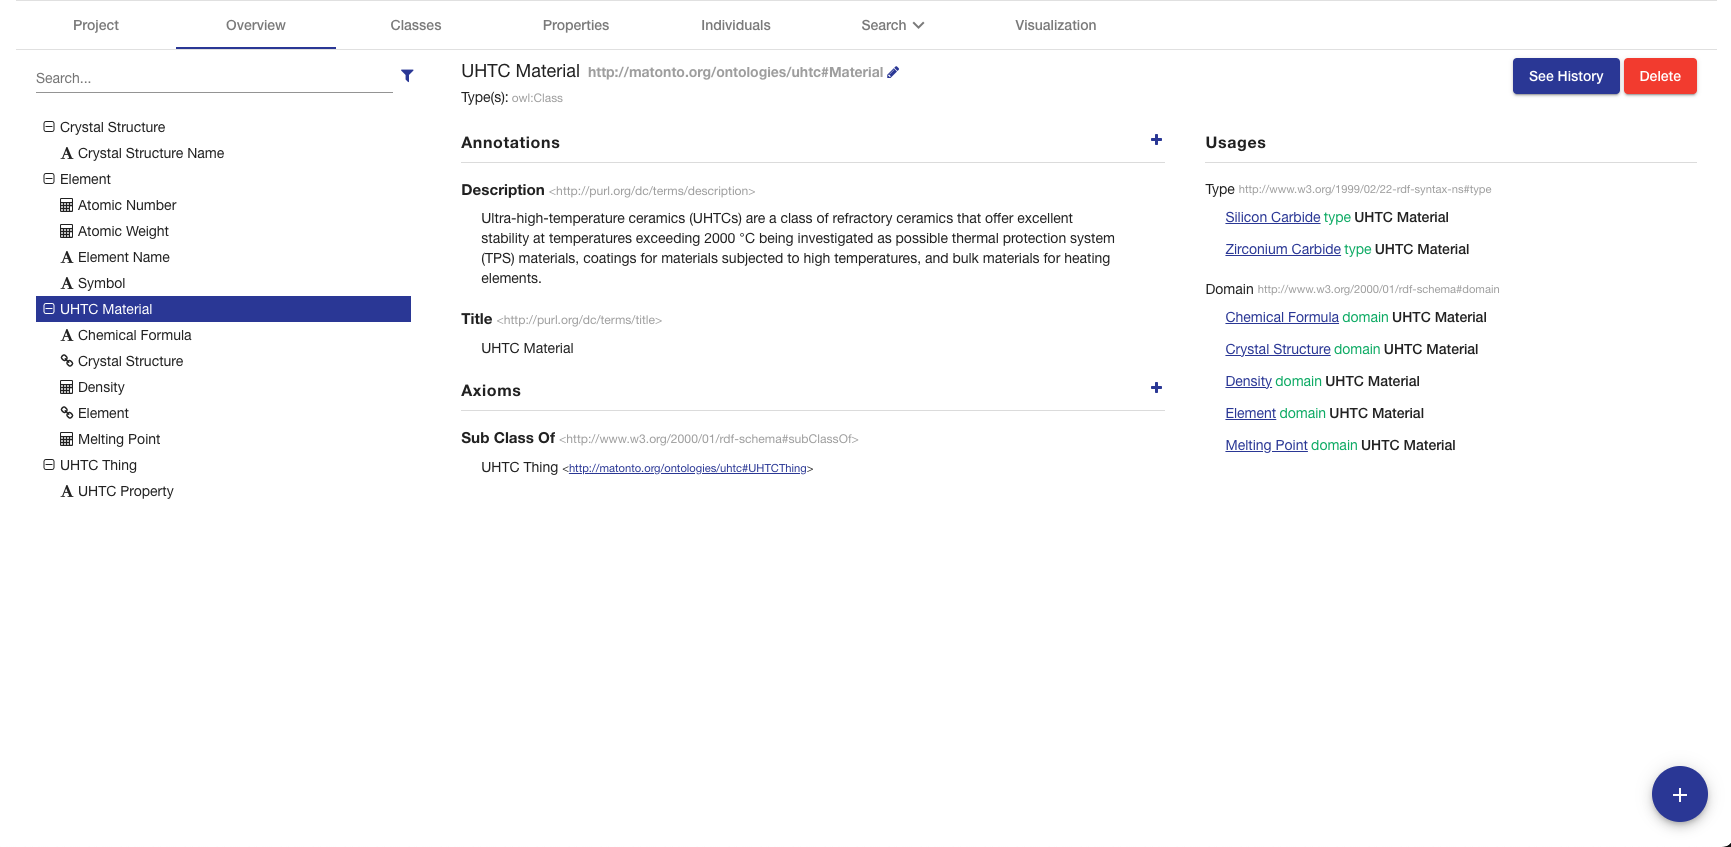
The left side of this tab contains the list of all classes and their associated properties, including imports. Any properties that have no rdfs:domain are grouped into a folder in the hierarchy called "Properties". You can expand a class to view its properties by clicking the "+" icon or double-clicking the class name. Properties are displayed with a symbol representing the data type of the range property. If an entity has been changed and those changes have not been committed, it will appear bold and an indicator will be shown on the right of the entity name. Imported classes and properties will appear grey and italicized. The list also includes a search bar that will filter the list to classes/properties with annotations or local names containing your search query and the ability to apply one or more filters. The Hide unused imports filter will remove all imported entities from the list that are not used by any of the entities defined in the ontology. The Hide deprecated entities filter will remove all entities annotated with the owl:deprecated property.
Clicking on an item in the tree will load that entity’s information into the other sections in this tab.
The title of the selected class or property, its IRI, and its type(s) are displayed at the top of the tab along with buttons to delete the entity and view its change history (see Entity History). The IRI can be copied quickly by clicking on it. The middle sections in this tab allow you to add, remove, and edit Annotations and Axioms for the selected class or property. Imported classes and properties cannot be edited.
If you selected a property, a section with checkboxes for adding different characteristics to the selected property is shown in the top right of the Overview Tab.
|
Tip
|
See the W3C Specification for the definitions of property characteristics. |
The last section on the right displays all the locations where the selected entity is used within the saved state of the ontology. For classes, this is anywhere the selected class is used as the object of a statement. For properties, this is anywhere the selected property is used as the predicate or object of a statement. Usages are grouped by the predicate of the statement and can be collapsed by clicking on the predicate title. Links in the usages section, as with links in various other components of the editor, can be clicked to navigate to that entity. If the number of usages exceeds 100, a button to load the next 100 is shown at the bottom of the section.
Classes Tab
The Classes Tab allows you to view, create, and delete classes in the opened ontology.
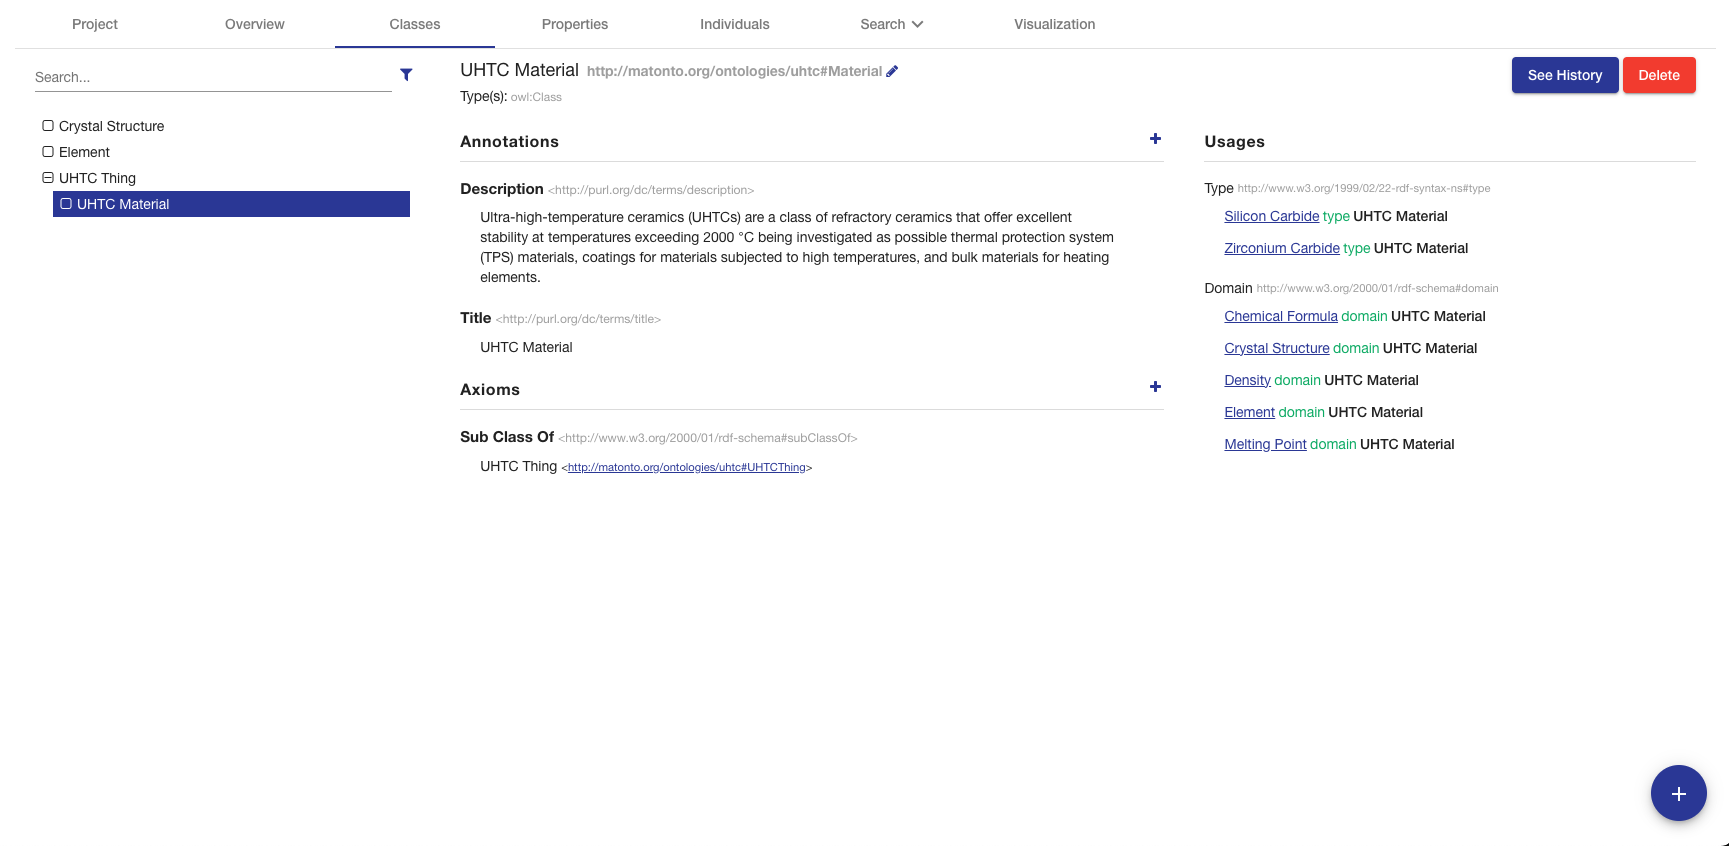
The left side of the tab contains a hierarchical view of the classes, including imports, nested according to their rdfs:subClassOf property. That is, a class’s children are classes which are defined as subclasses of the particular class. Since classes can be defined as a subclass of multiple classes, they may appear several times within the hierarchy. If a class has been changed and those changes have not been committed, it will appear bold and an indicator will be shown on the right of the class name. Imported classes will appear grey and italicized. The list also includes a search bar that will filter the list to classes with annotations or local names containing your search query and the ability to apply one or more filters. The Hide unused imports filter will remove all imported classes from the list that are not used by any of the entities defined in the ontology. The Hide deprecated entities filter will remove all classes annotated with the owl:deprecated property. Clicking on an item in the hierarchy will load that class’s information into the other sections in this tab. Double clicking on a class with children will toggle the display of the children.
The title of the selected class, its IRI, and its type(s) are displayed at the top of the tab along with buttons to delete the class and view its change history (see Entity History). The IRI can be copied quickly by clicking on it. The middle sections in this tab allow you to add, remove, and edit Annotations and Axioms for the selected class. Imported classes cannot be edited.
The section on the right of the Classes Tab displays all the locations where the selected class is used within the saved state of the ontology. That is, anywhere the selected class is used as the object of a statement. Usages are grouped by the predicate of the statement and can be collapsed by clicking on the predicate title. Links in the usages section, as with links in various other components of the editor, can be clicked to navigate to that entity. If the number of usages exceeds 100, a button to load the next 100 is shown at the bottom of the section.
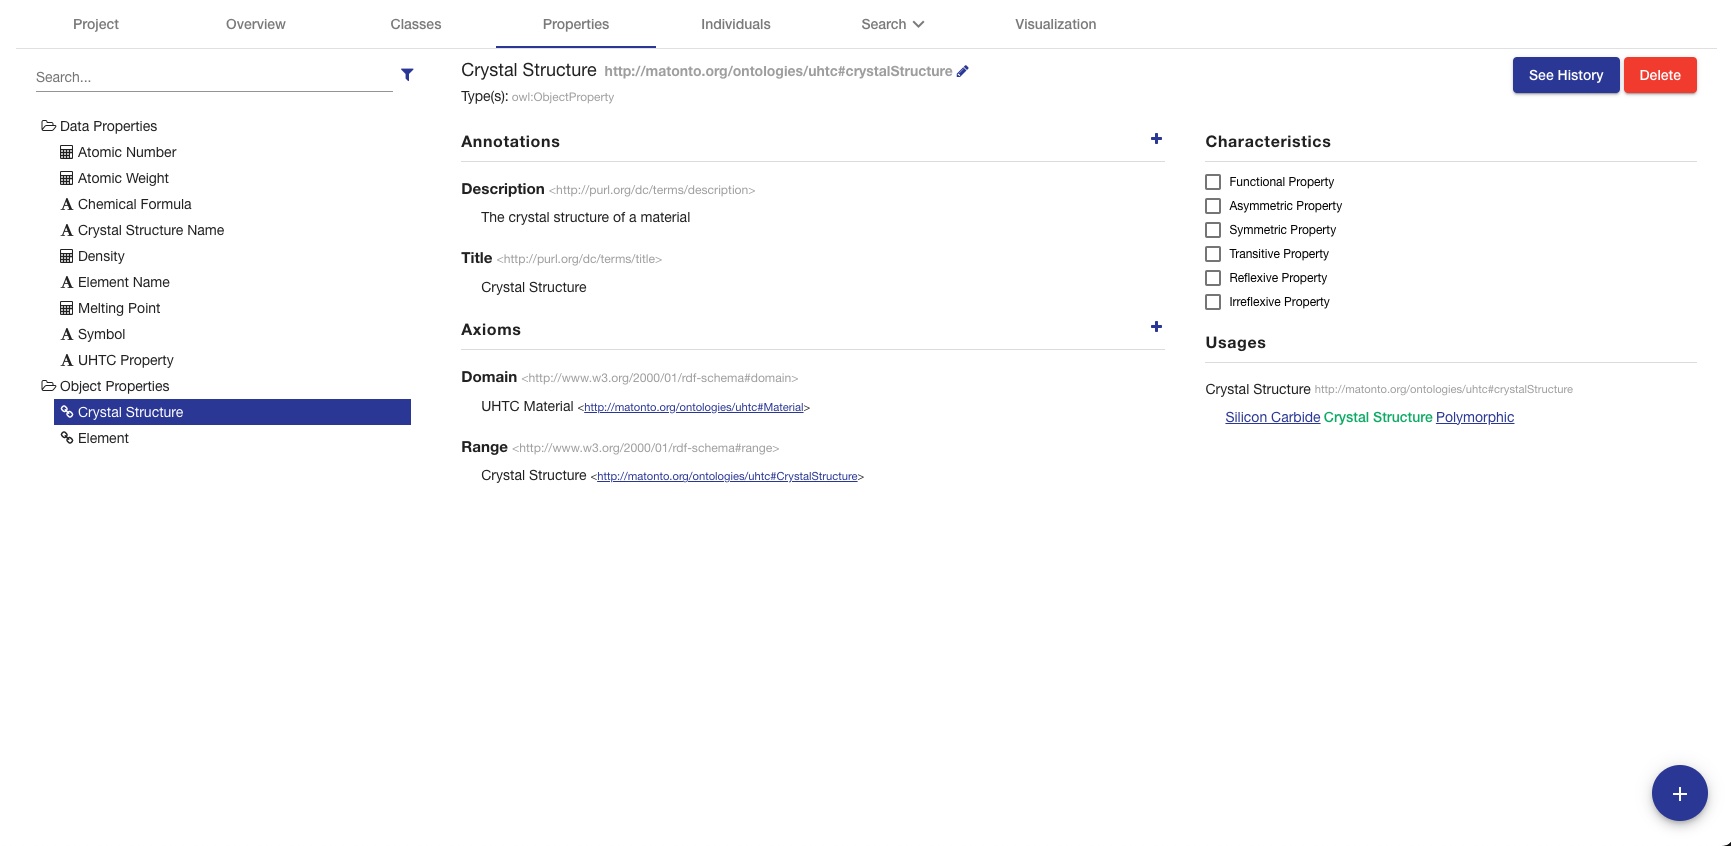
Properties Tab
The Properties Tab allows you to view, create, and delete properties in the opened ontology.
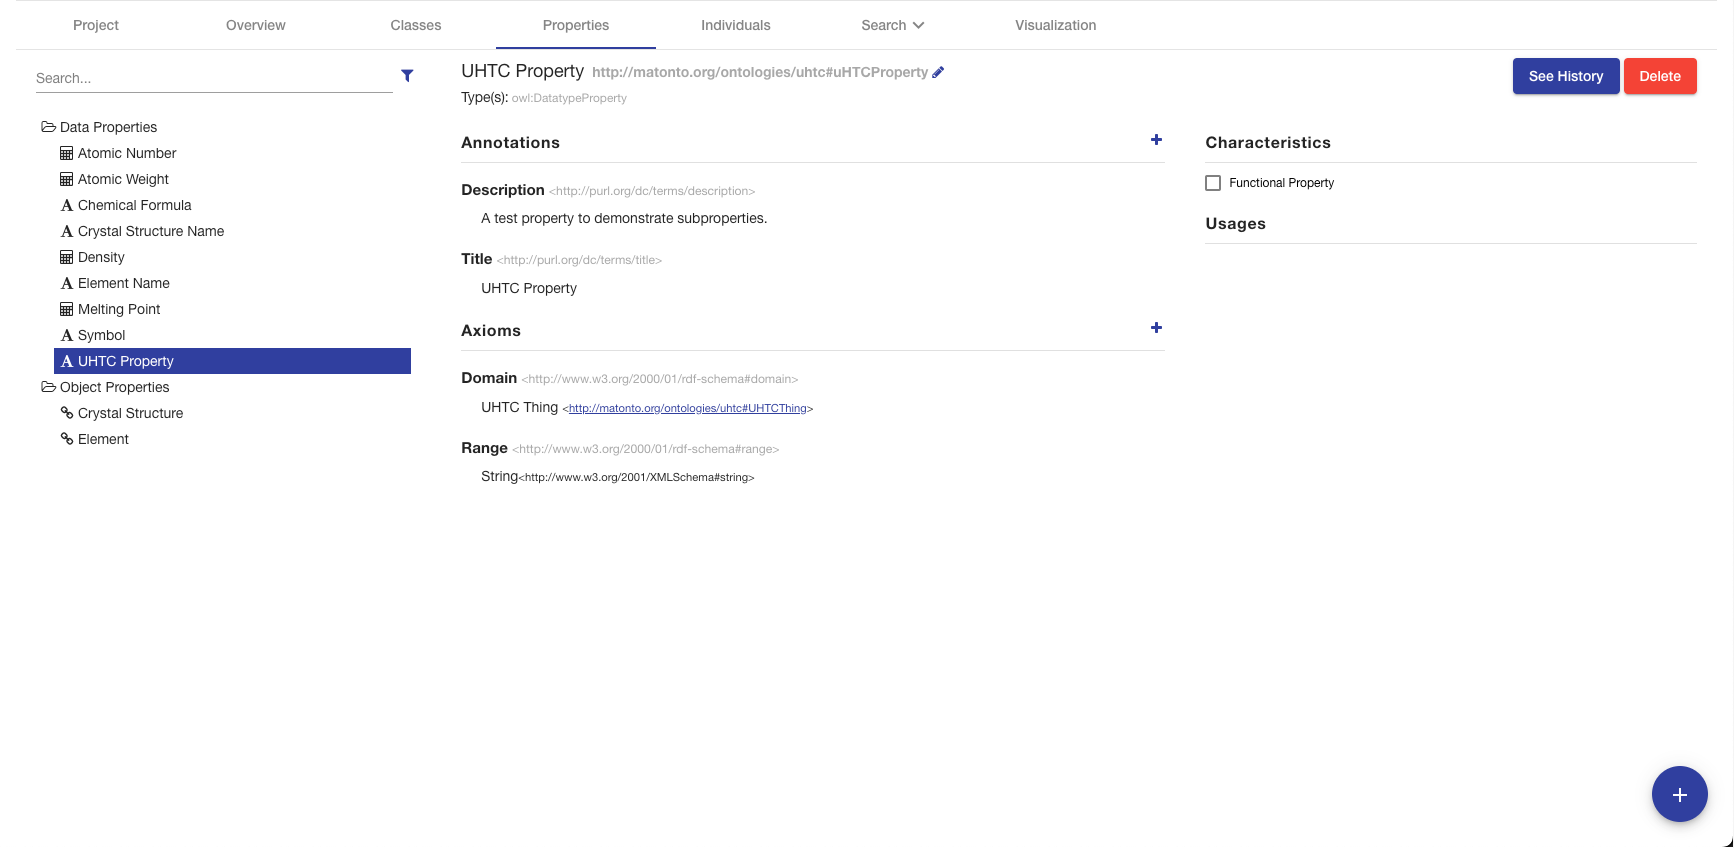
The left side of the tab contains a hierarchical view of the data, object, and annotation properties, including imports. The data, object, and annotation properties are grouped into three separate folders within the hierarchy that will open and close when clicked. Properties are nested according to their rdfs:subPropertyOf property. That is, a property’s children are properties which are defined as subproperties of the particular property. Properties are displayed with a symbol representing the data type of the range property. If a property has been changed and those changes have not been committed, it will appear bold and an indicator will be shown on the right of the property name. Imported properties will appear grey and italicized. The list also includes a search bar that will filter the list to properties with annotations or local names containing your search query and the ability to apply one or more filters. The Hide unused imports filter will remove all imported properties from the list that are not used by any of the entities defined in the ontology. The Hide deprecated entities filter will remove all properties annotated with the owl:deprecated property. Clicking on an item in the hierarchy will load that property’s information into the other sections in this tab. Double clicking on a property with children will toggle the display of the children.
The title of the selected property, its IRI, and its type(s) are displayed at the top of the tab along with buttons to delete the property and view its change history (see Entity History). The IRI can be copied quickly by clicking on it. The middle sections in this tab change depending on whether you have selected a data, object, or annotation property. If the selected property is a data or object property, the sections for adding, removing, and editing Annotations and Axioms are shown. If the selected property is an annotation property, only the Annotation sections is shown. Imported properties cannot be edited.
If the selected property is a data or object property, a block with checkboxes for adding different characteristics to the selected property is shown in the top right of the Properties Tab. Imported properties cannot be edited.
|
Tip
|
See the W3C Specification for the definitions of property characteristics. |
The last section on the right of the tab displays all the locations where the selected property is used within the saved state of the ontology. That is, anywhere the selected property is used as the predicate or object of a statement. Usages are grouped by the predicate of the statement and can be collapsed by clicking on the predicate title. Links in the usages section, as with links in various other components of the editor, can be clicked to navigate to that entity. If the number of usages exceeds 100, a button to load the next 100 is shown at the bottom of the section.
Individuals Tab
The Individuals Tab allows you to view, edit, create, and delete individuals in the opened ontology.
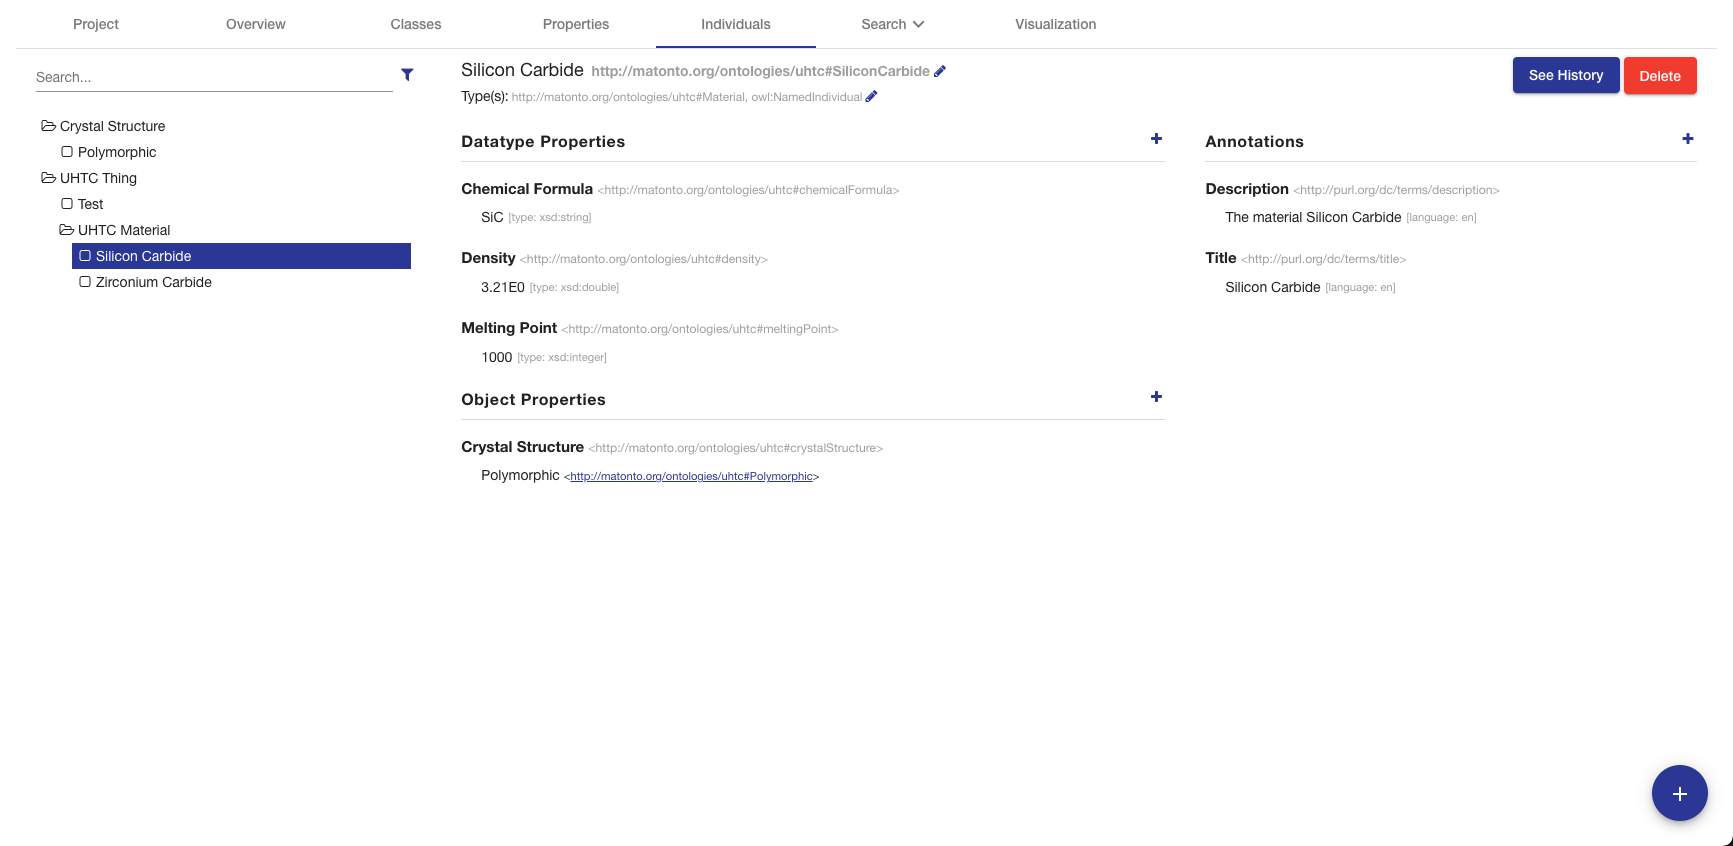
The left side of the tab contains a view of all individuals, including imports, nested under their classes based on the rdfs:subClassOf property. If an individual has been changed and those changes have not been committed, it will appear bold and an indicator will be shown on the right of the individual name. Imported individuals will appear grey and italicized. The list also includes a search bar that will filter the list to individuals with annotations or local names containing your search query and the ability to apply one or more filters. The Hide unused imports filter will remove all imported individuals from the list that are not used by any of the entities defined in the ontology. The Hide deprecated entities filter will remove all individual annotated with the owl:deprecated property. Clicking on an item in the list will load that individual’s information into the other sections in this tab.
The title of the selected individual, its IRI, and its type(s) are displayed at the top of the tab along with buttons to delete the individual and view its change history (see Entity History). The IRI can be copied quickly by clicking on it. The section to the center and right of the tab allow you to add, remove, and edit Data, Object, and Annotation Properties for the selected individual. The options for Data and Object Properties are populated from the ontology and its imports. Furthermore, the Object Property Overlay also pre-filters the list of values based on the range of the property selected. The user entered values in both the annotation and datatype property overlays are validated against the type field of the overlay. Imported individuals cannot be edited.
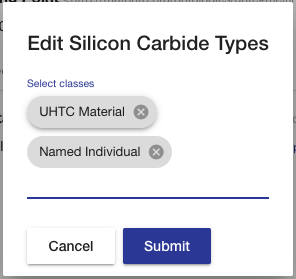
The types of an individual are editable by clicking the pencil icon at the end of the types list. The overlay allows you to add and remove types from the ontology and its imports. The "Named Individual" type is required.
Schemes Tab
The Schemes Tab will appear if the editor detects the opened ontology is a SKOS vocabulary. It displays information about all the concept schemes and their directly related concepts defined in the opened vocabulary.
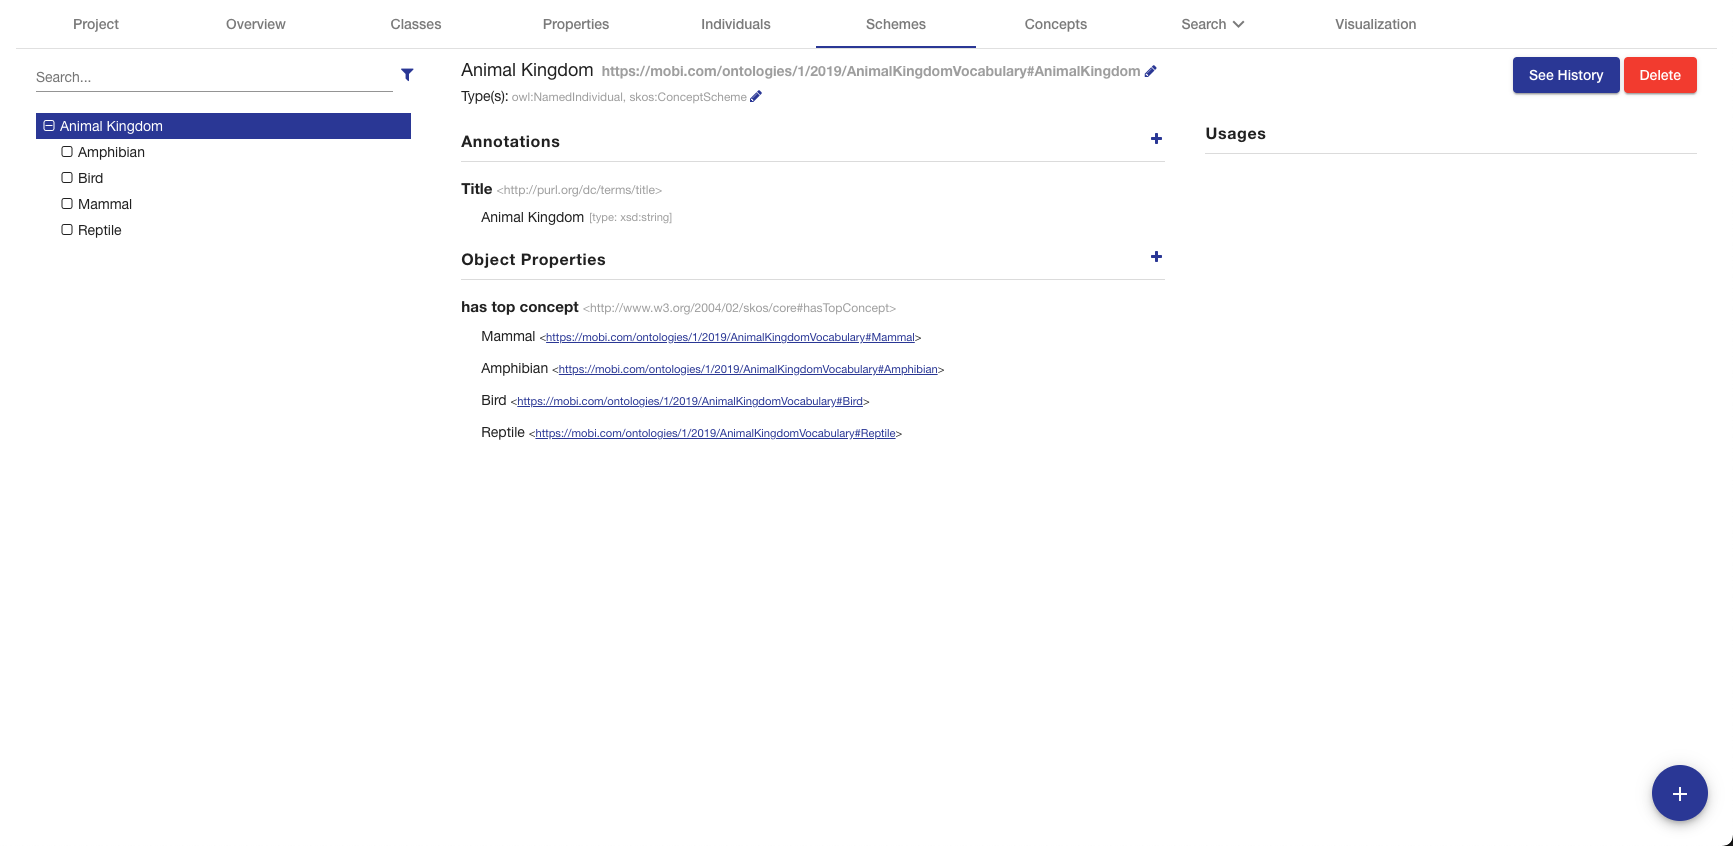
The left side of the tab contains a hierarchical view of the concept schemes, including imports. The top level items are the concept schemes, or subclasses of skos:ConceptScheme, and their children are all concepts, or subclasses of skos:Concept, within that scheme. This could be defined through the skos:hasTopConcept, skos:topConceptOf, or skos:inScheme properties. If a concept scheme or concept has been changed and those changes have not been committed, it will appear bold and an indicator will be shown on the right of its name. Imported concept schemes and concepts will appear grey and italicized. The list also includes a search bar that will filter the list to concepts/schemes with annotations or local names containing your search query and the ability to apply one or more filters. The Hide unused imports filter will remove all imported schemes from the list that are not used by any of the entities defined in the ontology. The Hide deprecated entities filter will remove all schemes annotated with the owl:deprecated property. Clicking on an item in the hierarchy will load that concept scheme’s or concept’s information in the other sections in this tab. Double clicking on a concept scheme with children will toggle the display of the children.
The title of the selected concept scheme or concept, its IRI, and its type(s) are displayed at the top of the tab along with buttons to delete the entity and view its change history (see Entity History). The IRI can be copied quickly by clicking on it. The middle sections in this tab allow you to add, remove, and edit Annotations, Data Properties, and Object Properties for the selected concept scheme or concept. Imported concept schemes and concepts cannot be edited.
The third section on the right of the Schemes Tab displays all the locations where the selected concept scheme or concept is used within the saved state of the vocabulary. This is anywhere the selected concept scheme or concept is used as the object of a statement. Usages are grouped by the predicate of the statement and can be collapsed by clicking on the predicate title. Links in the usages section, as with links in various other components of the editor, can be clicked to navigate to that entity. If the number of usages exceeds 100, a button to load the next 100 is shown at the bottom of the section.
Concepts Tab
The Concepts Tab will appear if the editor detects the opened ontology is a SKOS vocabulary. The Concepts Tab displays information about all the concepts defined in the opened vocabulary.
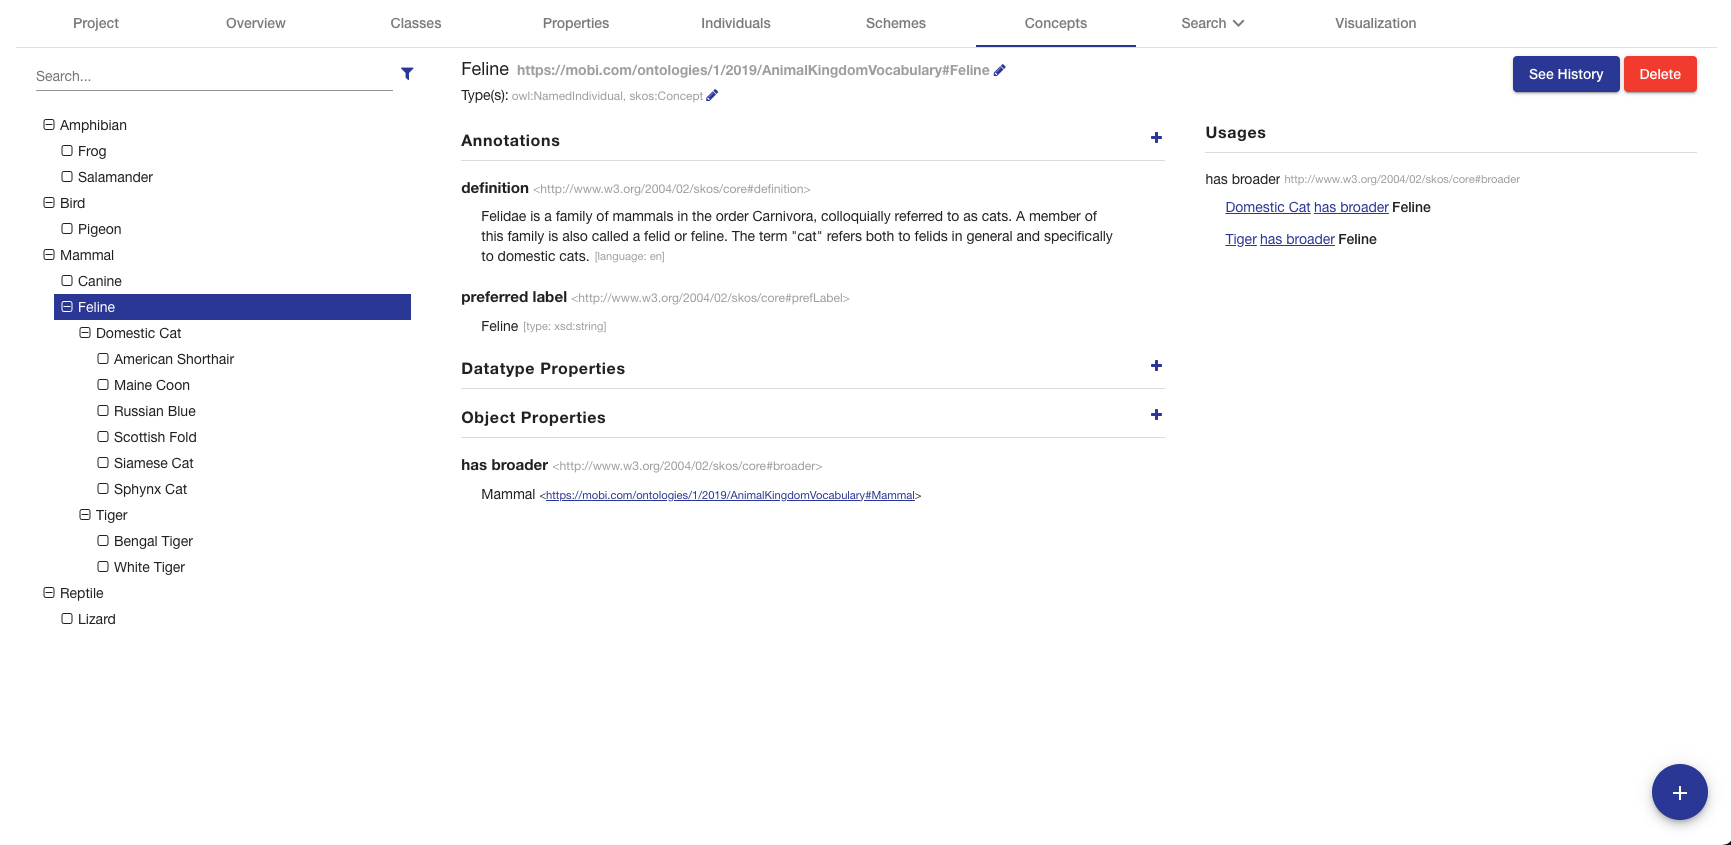
The left side of the tab contains a hierarchical view of the concepts, including imports. The concept hierarchy is determined using all of the SKOS broader and narrower properties. If a concept scheme or concept has been changed and those changes have not been committed, it will appear bold and an indicator will be shown on the right of its name. Imported concepts will appear grey and italicized.
The list also includes a search bar that will filter the list to concepts with annotations or local names containing your search query and the ability to apply one or more filters. The Hide unused imports filter will remove all imported concepts from the list that are not used by any of the entities defined in the ontology. The Hide deprecated entities filter will remove all concepts annotated with the owl:deprecated property. Clicking on an item in the hierarchy will load that concept’s information in the other sections in this tab. Double clicking on a concept with children will toggle the display of the children.
The title of the selected concept, its IRI, and its type(s) are displayed at the top of the tab along with buttons to delete the concept and view its change history (see Entity History). The IRI can be copied quickly by clicking on it. The middle blocks in this tab allow you to add, remove, and edit Annotations, Data Properties, and Object Properties for the selected concept. Imported concepts cannot be edited.
The third section on the right of the Concepts Tab displays all the locations where the selected concept is used within the saved state of the vocabulary. This is anywhere the selected concept is used as the object of a statement. Usages are grouped by the predicate of the statement and can be collapsed by clicking on the predicate title. Links in the usages section, as with links in various other components of the editor, can be clicked to navigate to that entity. If the number of usages exceeds 100, a button to load the next 100 is shown at the bottom of the section.
Search Tab
The Search Tab has two views, Find and Query, accessible through the dropdown. By default, clicking on the Search Tab will take you to the Find View.
Find View
The Find view allows you to perform a keyword search through all the entities within the saved state of the opened ontology and its imports.
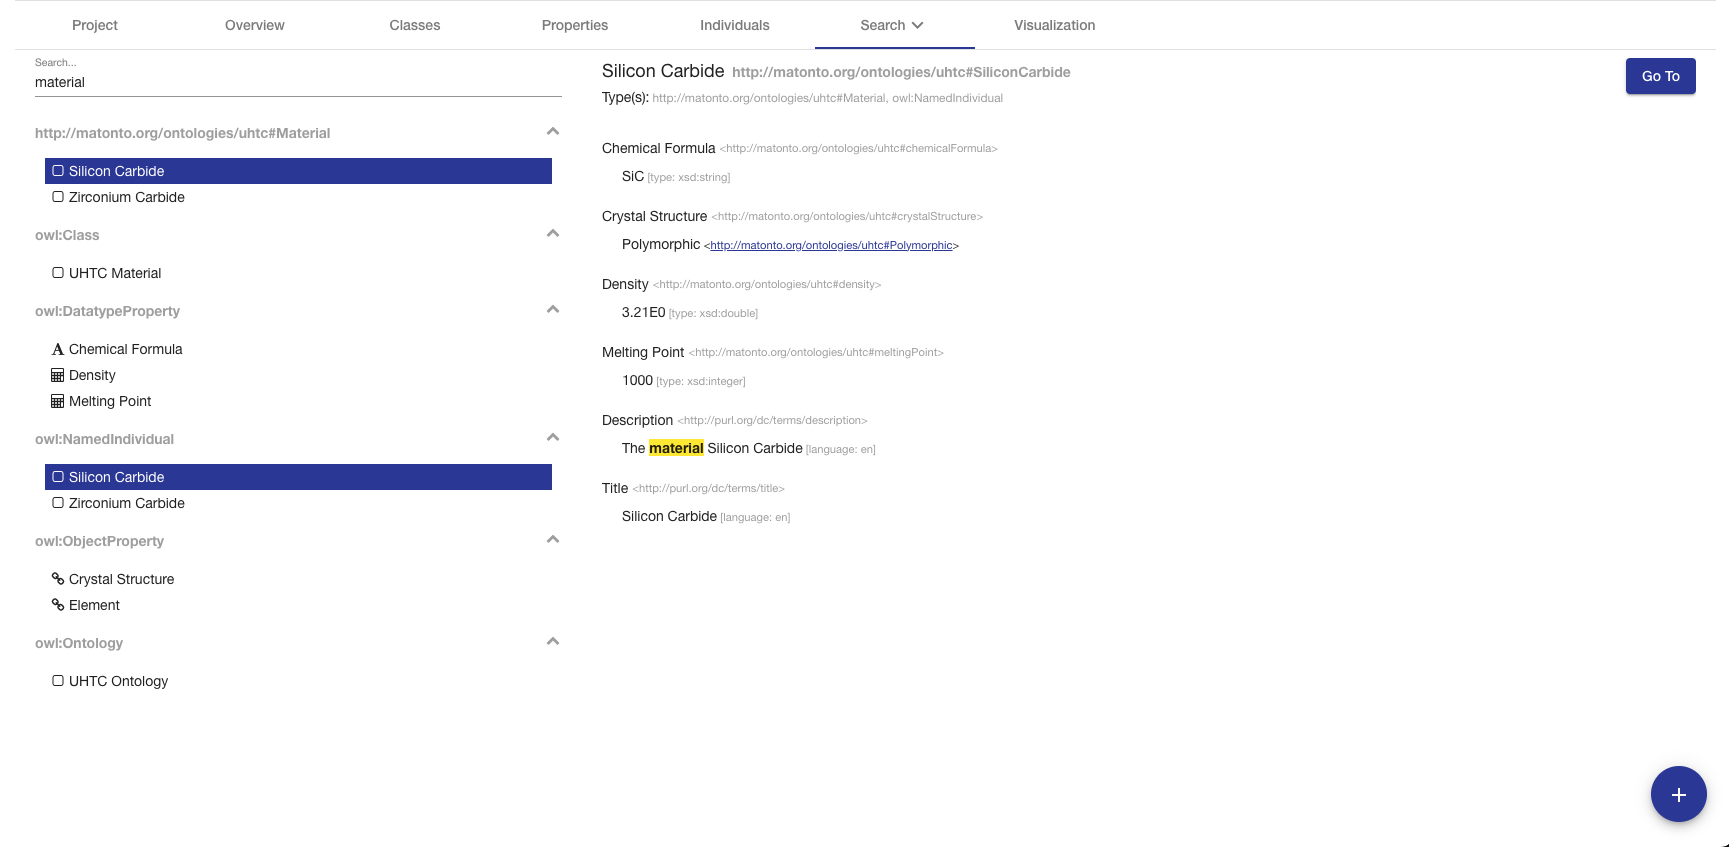
The left side of the Find view contains a simple search bar and a list of search results. To perform a search, type a string into the search bar and press the ENTER key. The results are separated by type headers which are collapsible. Each result is displayed with its display name. Properties are displayed with a symbol representing the data type of the range property. Clicking on a result will load that entity’s information into the right section of this tab. The right section displays the entity’s display name, IRI, types, and properties. The parts of the property values that match the search text will be highlighted. The right section also includes a Go To button that will open the entity in the appropriate tab. Double clicking on an entity in the list will also open that entity in the appropriate tab.
Query View
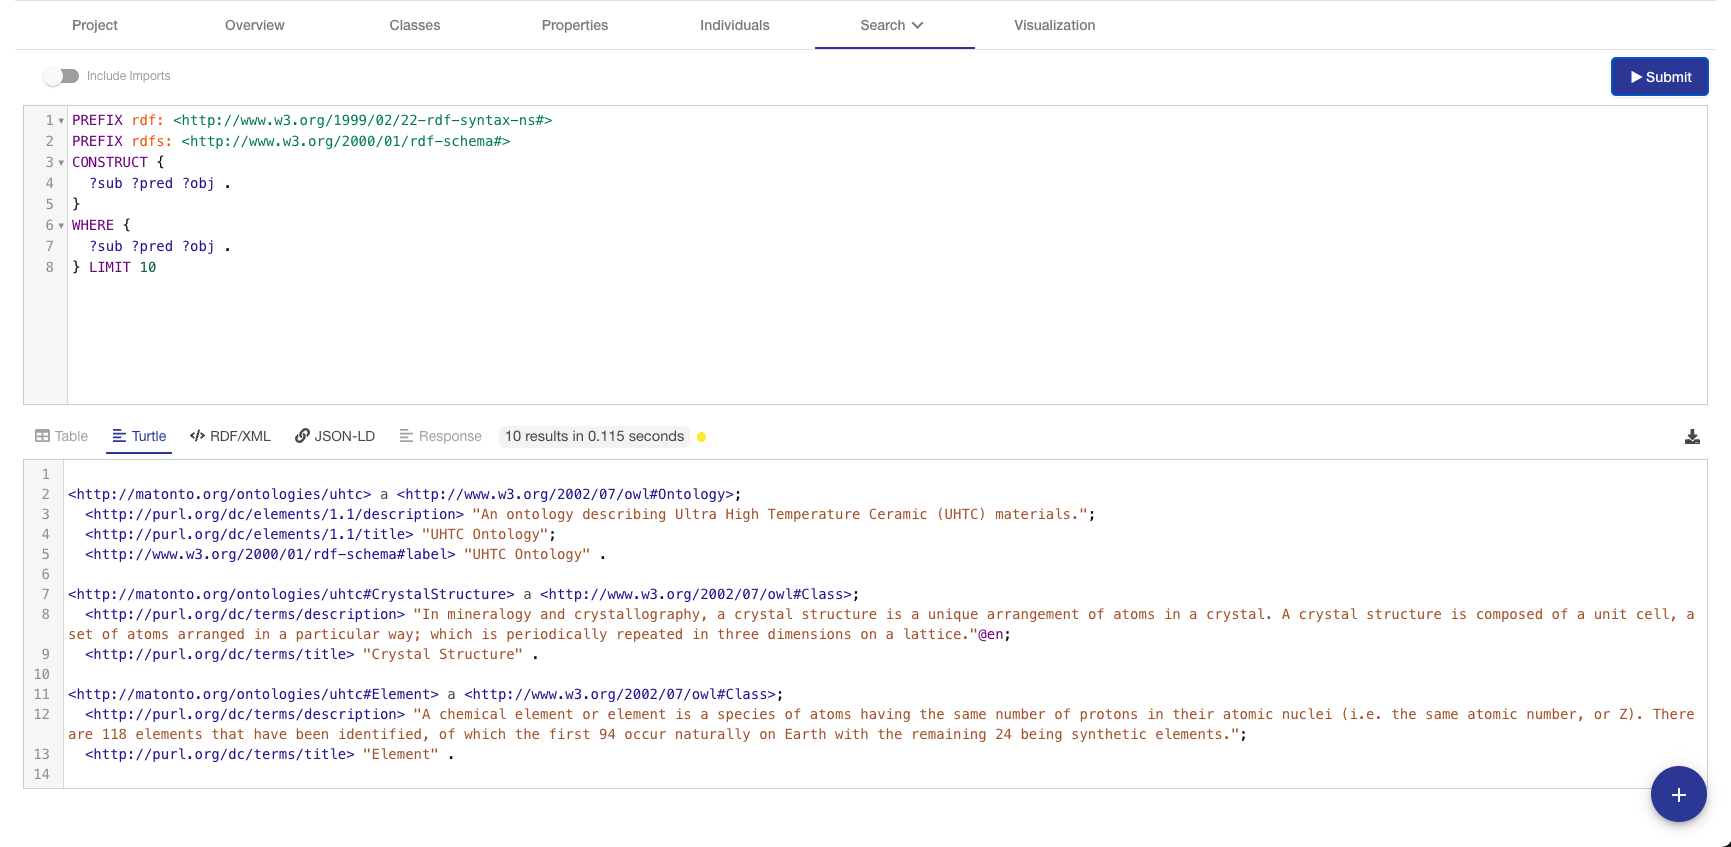
The Query view allows you to perform a SPARQL query against the opened ontology. Similar to the Discover Query Page, the Ontology Query view provides a SPARQL query editor powered by the YASGUI SPARQL library. The top section of the page contains the query editor (powered by YASQE), a toggle of whether to include data from the entire imports closure, and a Submit button. Clicking Submit executes the entered query against the ontology and updates the bottom section with the results.
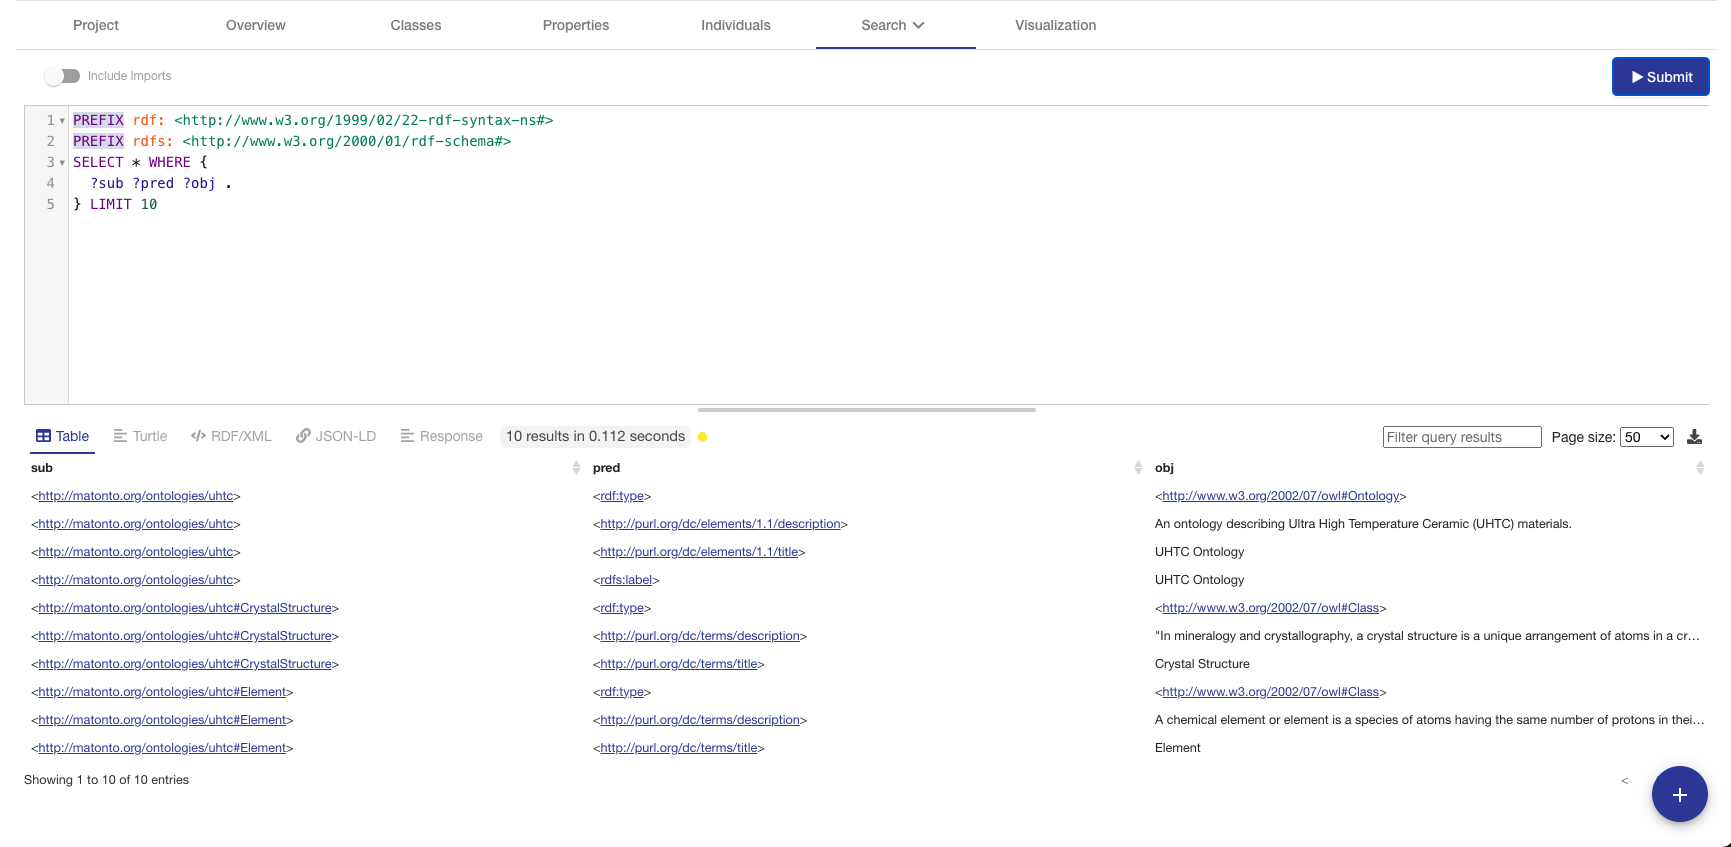
The bottom section displays the results of the most recently submitted SPARQL query (powered by YASR). The section has separate tabs for rendering the query result set depending on the type of SPARQL query submitted. SELECT query results are displayed under the Table tab where the headers of the table are the variables specified in the SPARQL query. The Table comes with features such as filtering, page size, sorting and pagination. CONSTRUCT query results can be displayed under the Turtle, JSON-LD and RDF/XML tabs. The query results are limited to 500 triples/rows for rendering, but the entire result set can be downloaded using the button in the upper right corner of the bottom section.
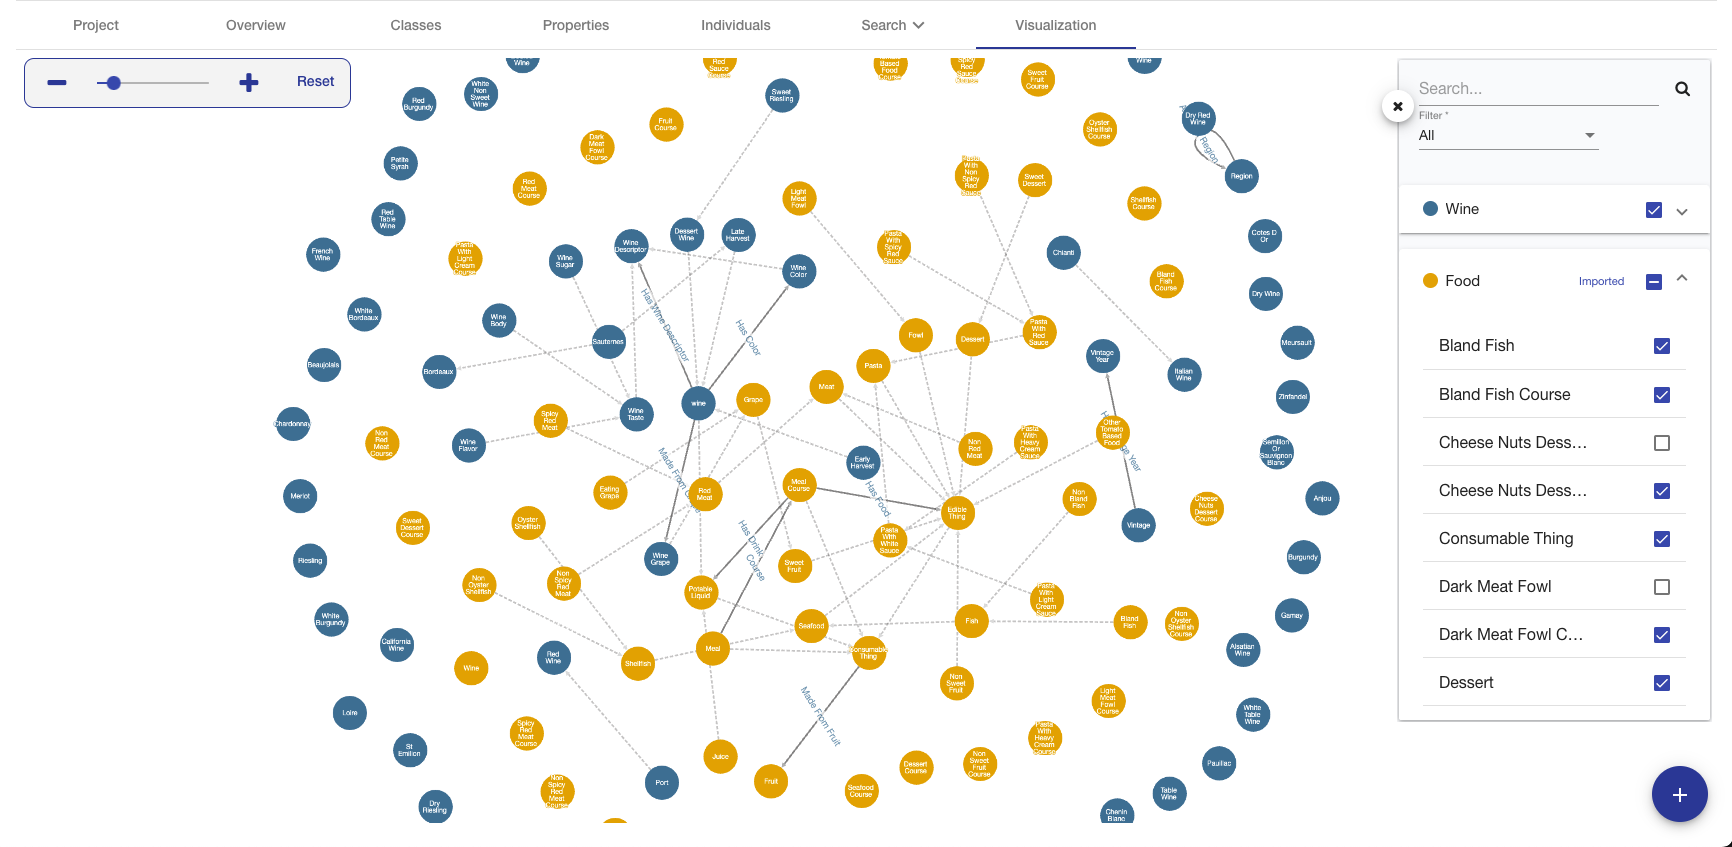
Visualization Tab
The Visualization Tab depicts the ontology in a force-directed graph layout. Each node represents a class, with dotted lines symbolizing the relationship between parent class and subclass, and solid lines representing the object properties. This enables users to easily understand data within an ontology by allowing them to navigate across the classes and their relationships.
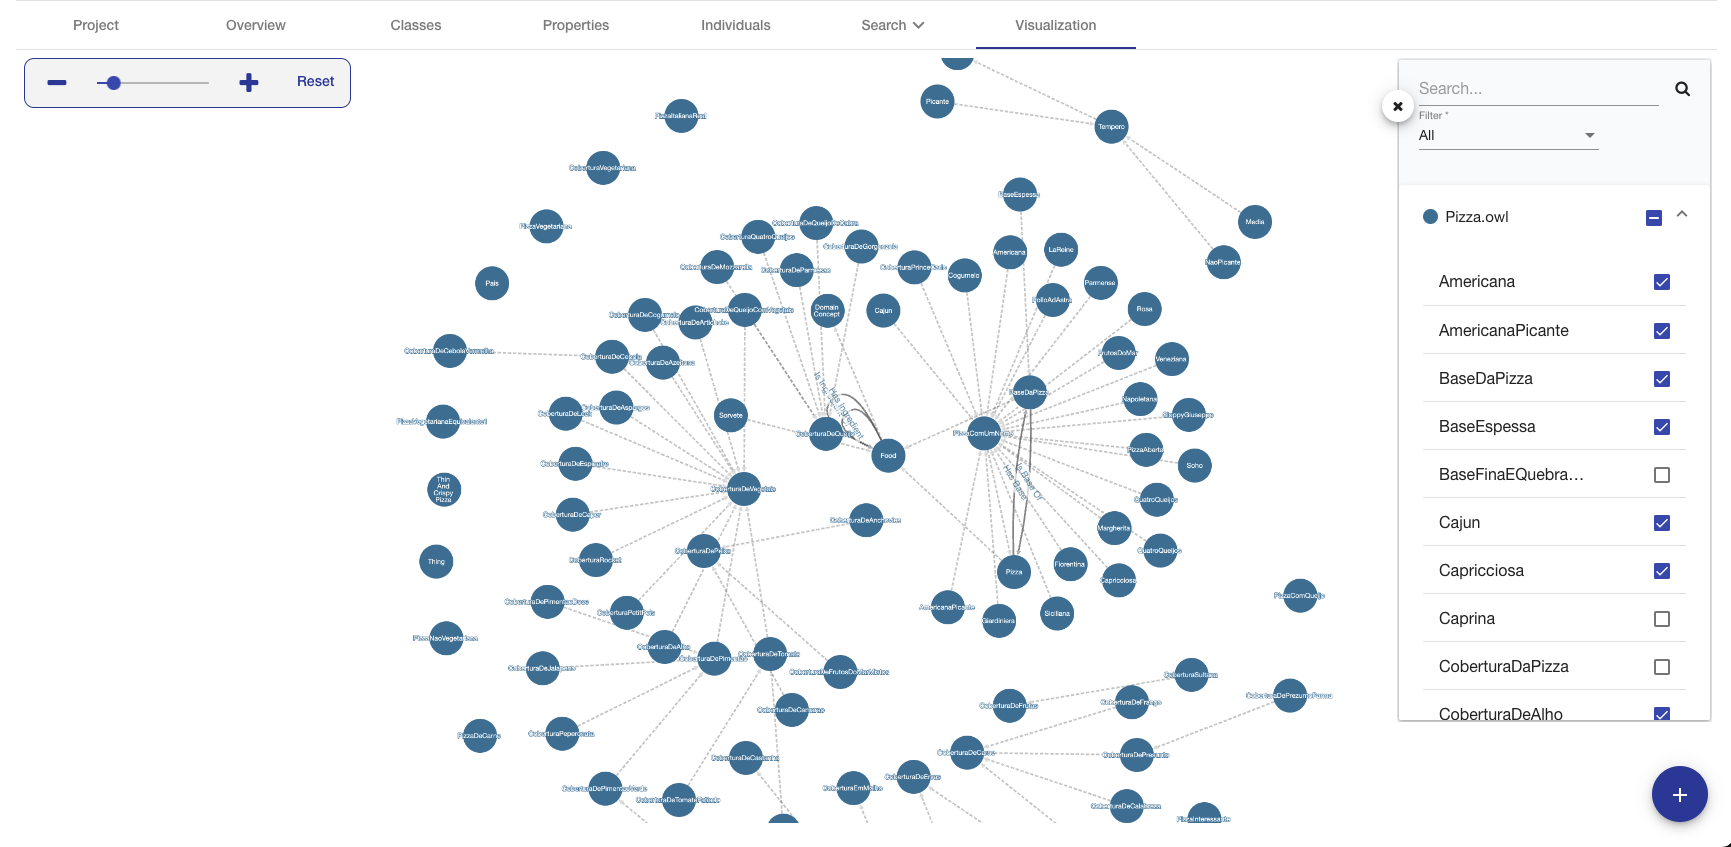
The feature allows users to zoom, pan, select, drag, hover, and click nodes and links. There is also a help menu in the bottom left hand corner with shortcuts and helpful hints for using the tool.
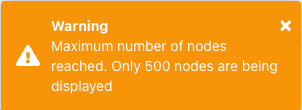
The number of classes displayed is limited to 500. In progress changes you have made will be rendered as well. After initial graph calculation, the state of the graph will persist while users keep the ontology open. The graph will only be re-rendered when there are new changes made.
The side panel of the Visualization tab displays a searchable list of all the classes in the import closure (i.e. direct and imported) grouped by parent ontology. The checkboxes next to each class indicate whether a class is currently shown in the visualization and can be toggled to customize the displayed graph. Selecting the checkbox next to a class will update the graph by adding a new node with the class name, subclass relationships with other displayed classes, and object properties with other displayed classes. Deselecting the checkbox next to a class will remove these three things. Selecting a class in the side panel will highlight the node in the graph if displayed. Selecting a node in the graph will also highlight in the side panel. Double clicking on a class in the side panel will open it in the Classes Tab for further review. The side panel also includes a "Filter" dropdown with three options to help find the classes of interest in the list.
-
“All” which is the default. When selected, the list of classes contains both classes declared in the opened ontology and imported classes
-
“Local” which will filter the list of classes to only those declared in the opened ontology when selected
-
“Imported” which will filter the list of classes to only those from imported ontologies
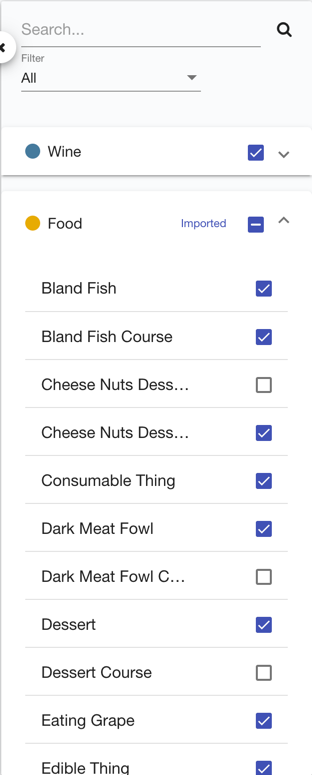
The side panel can be hidden or shown with a button.


Imported Ontologies in the Visual Graph
The rendered graph will include every ontology within the imports closure. The classes in the graph are rendered with different colors based on which ontology within the imports closure they belong to. If a change to an imported ontology is made, the changes will not be rendered until a manual refresh is triggered which will reset the ontology cache or until a new commit is made.
Ontology Versioning
Just like the shapes graphs, each ontology in Mobi is versioned similarly to the Git Version Control System, whereby all changes to an ontology are collected into a chain of "commits" which form a commit history called a "branch". Thus, every version in the history of an ontology can be generated by selecting a commit and applying all the changes in the branch back to the initial commit.
Every ontology is initialized with a MASTER branch that contains the initial commit. Work can be done on this MASTER branch or can be split out into separate branches. Work done on these branches exist in isolation until they are merged back into the MASTER branch, joining any other changes committed in the meantime. When merging two branches, the Ontology Editor does its best to combine any changes made on both branches. If a conflict occurs, the editor allows the user to resolve them manually. More information on merging branches can be found in the section on Merging Branches.
Branches & Tags
In order to create a branch or tag, click the corresponding button in the action-bar. The branch or tag will be associated with the commit that is currently checked out.
|
|


The branches dropdown provides a searchable list of branches and tags which can be checked out. To checkout a branch or tag, simply select the branch in the dropdown menu. Checking out a tag will open the ontology at the tagged commit in read-only mode. If you have checked out a commit from the commit history table, the commit will be in the dropdown list and show as selected. Note that the ability to check out a branch or tag will be disabled if you have any uncommitted changes on the current branch.
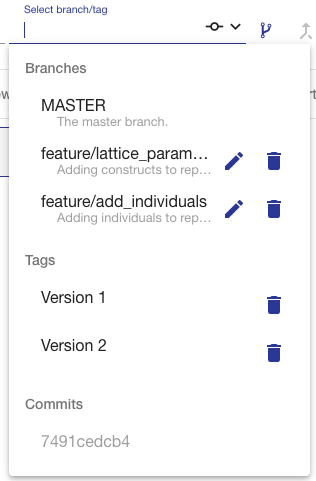
To edit the metadata of a branch or tag that is not checked out, click the pencil icon next to it in the dropdown menu. You cannot edit the MASTER branch of an ontology. To delete a branch or tag, click on the delete icon next to the branch/tag in the dropdown menu. If a branch is deleted, all commits on that branch that are not part of another branch will be removed, as well as the branch itself. If a tag is deleted, the commit is not removed. Note that these actions cannot be undone.
Uploading Changes
The Upload Changes button in the action-bar allows you to upload a new version of your ontology from a file and apply the changes. Clicking this button will bring up an overlay where you can select the file with the changed ontology. Uploaded changes will not be automatically committed, but will allow you to review changes before making a new Commit.

Viewing Saved Changes
Every edit made to an entity within an ontology is automatically saved and an indicator is shown in the action-bar. Users are able to reach the changes page by clicking the Show Changes button found in the right-hand side of the action-bar.
The changes page displays all saved and uncommitted changes in the opened ontology. Saving changes without committing allows a user to edit an ontology through a number of browser sessions before making any commits to the commit history. These changes are unique to the user, and are available to other users once a commit is performed. They are grouped by individual entity and display the triples on the entity grouped by property. When a “Show Full” toggle is active, the changes display is updated to include all the other triples on that changed entity. Clicking the Remove All Changes button will clear all the changes made to the ontology, resetting to the state of the current commit.
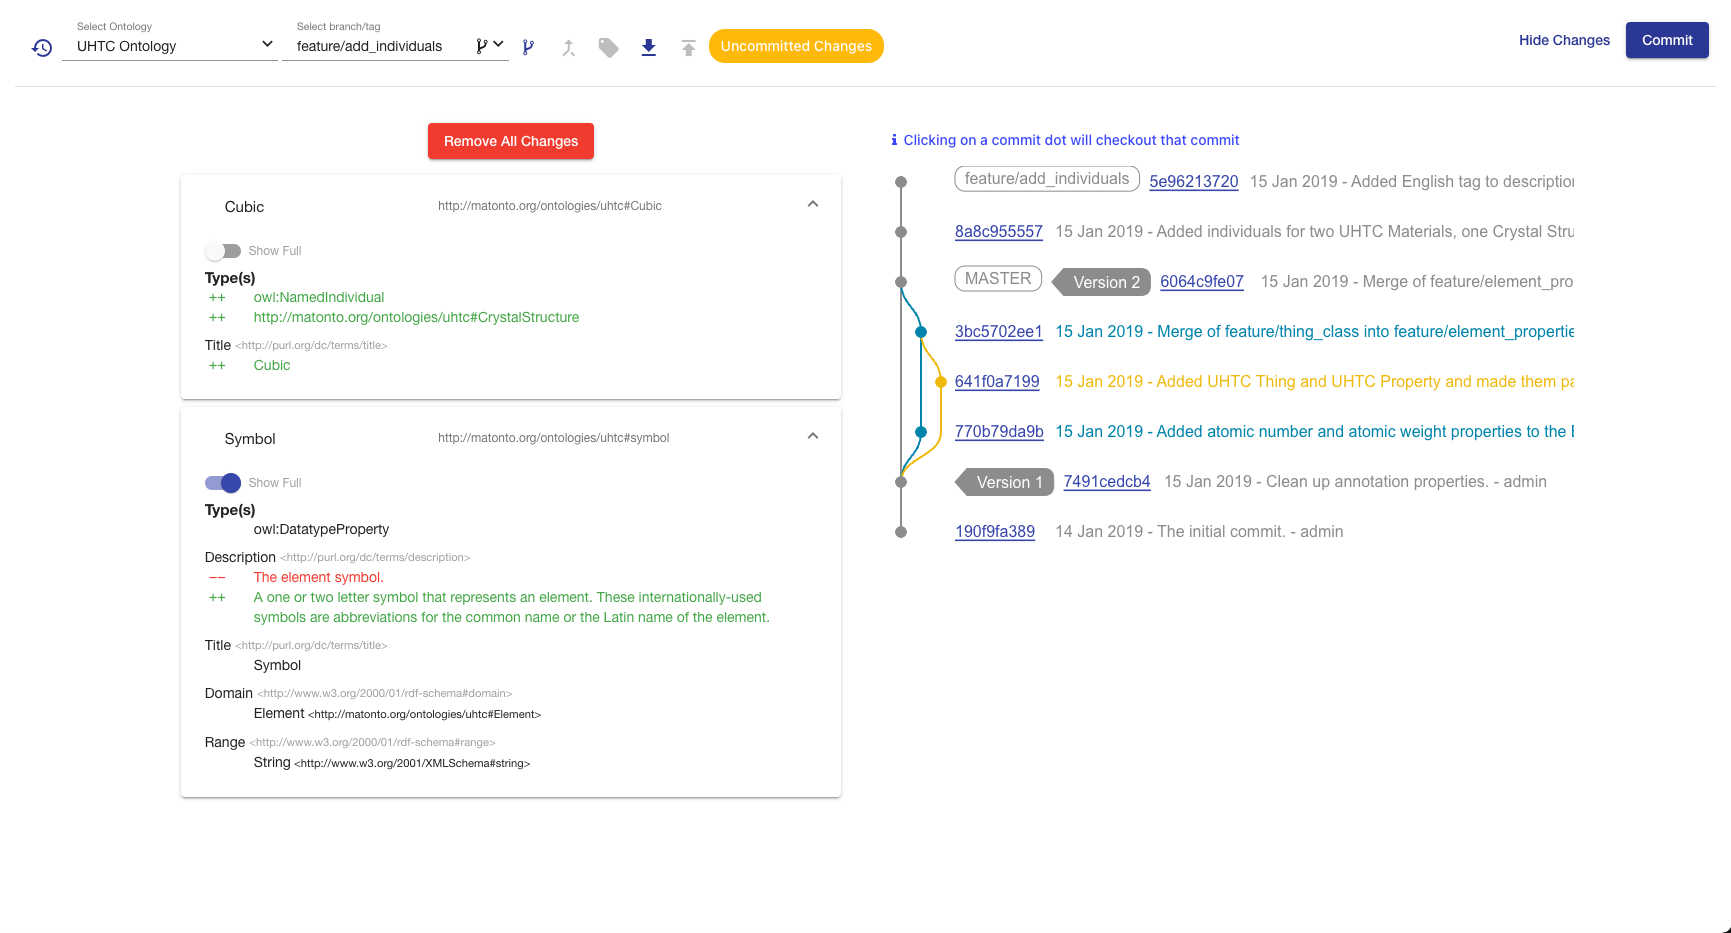
The commit history graph displays of all the commits made in the history of the branch you are currently viewing. The username of the creator, ID, message, and date for each commit are displayed within the graph. The graph displays each commit connected to its parent commits continuing backwards until the initial commit. The graph displays any Tags and Branches associated with visible commits. To view more information about a particular commit in the history, such as the added and deleted statements, click on its hash id to open an informational modal. The graph also includes commit dots for "checking out" a commit in the history. Clicking the Commit dot will open the ontology at that commit in read-only mode.
Making Commits
After changes have been made to an ontology, they can be committed to the history, and thus viewable to others, by clicking the Commit button in the top action-bar. This will bring up a dialog where you can enter a description of the changes that were made in the commit. The commit will be added to the current Branch that is checked out.

Commits cannot be made when a Tag or Commit is checked out or you are behind the HEAD of the current Branch. If you are behind the HEAD of the current branch, an indicator wil be shown in the top action-bar with a button to checkout the latest commit.

Merging Branches
The Ontology Editor supports merging the head commit of the branch you are currently viewing into the head commit of another branch. Two branches can only be merged if there are no conflicts between the head commits of each branch. To perform a merge, click the Merge Branch button found in the action-bar.

The merge view displays the name of the current (source) branch, a select box for the branch (target) you want to merge into, and a checkbox for whether you want the source branch to be deleted after it is merged. The view also shows an aggregated view of all changes made in the source branch that will be merged into the target branch along with a list of all the commits that will be added to the target branch from the source branch.
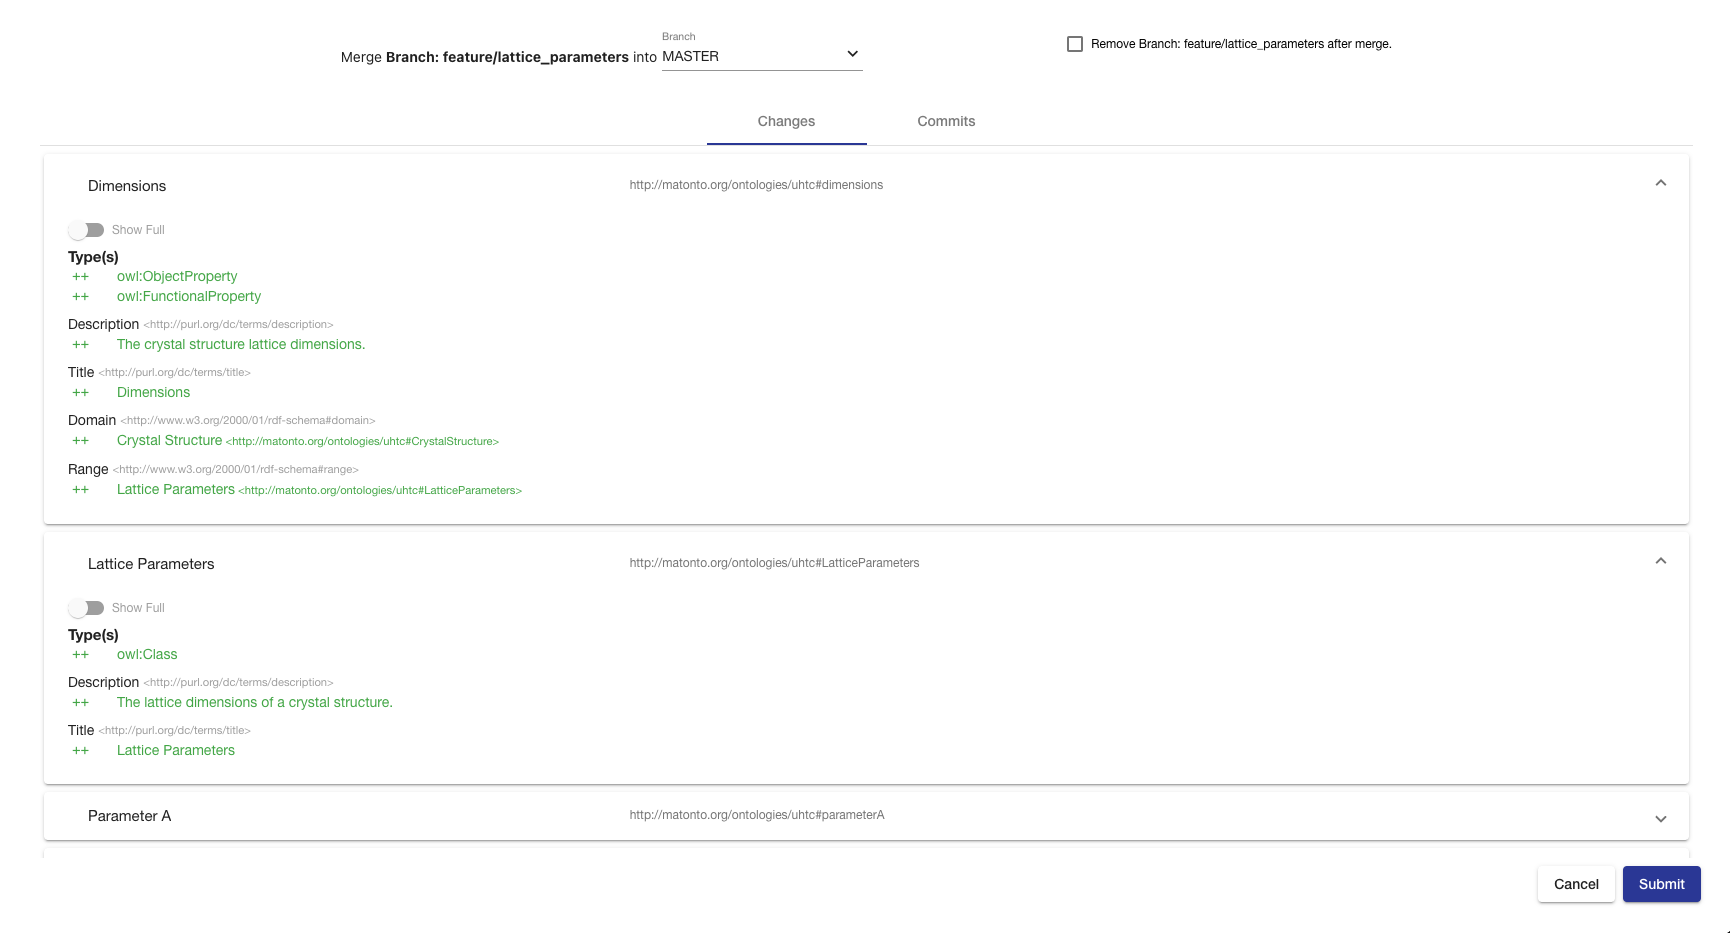
Clicking Submit will attempt to perform the merge. If there are no conflicts between the changes on both branches, a new commit will be created merging the two branches, and a success message will appear in the top right corner of the screen.
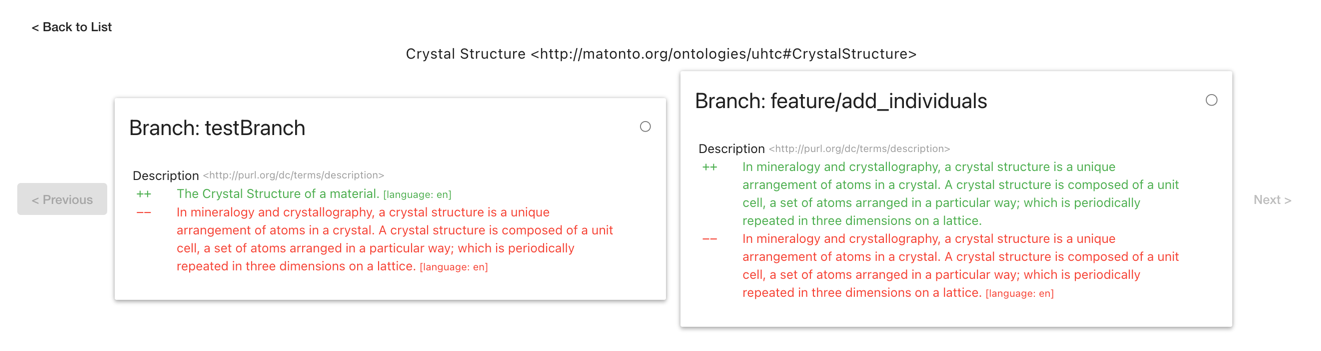
Conflicts arise when the application cannot determine how to automatically merge specific changes to entities between two branches. If conflicts exist between the two branches, the merge process will be halted and the screen will update to notify you of those conflicts and provide you a way to resolve them. Each conflict is listed by entity within the ontology and with a marker indicating whether it has been resolved. Click on a conflict in the list to start resolving them.

When resolving a conflict, the tool displays the changes to the entity from both branches. To resolve the conflict, select the version of the entity you wish to keep. You can either click the Back to List button to go back to the list of all the conflicts or the Previous or Next buttons to iterate through the list of conflicts.
|
Note
|
Currently the editor only supports accepting entire changes. Improvements to give more flexibility in resolving conflicts during a merge operation are coming soon. |
Once all conflicts have been resolved, the Submit with Resolutions button will become active and you can complete the merge operation. Completing the merge will create a new commit that incorporates your conflict resolutions into the target branch, and displays a success message in the upper right corner of the screen.
Entity History
Clicking on a See History button next to a selected entity in one of the tabs will open a view containing the change history of that specific entity in the ontology. The view is split into two columns. The left side contains a dropdown containing all the commits where that entity was changed and defaults to the latest commit. Any added triples will be green and any deleted triples will be red. The right side contains a table of all the commits where that entity was changed. The table behaves the same as the table in the [Commits Tab], just without the graph. To return to the main editor, click the back button in the top left.

Ontology Editor Reference
Edit IRI Overlay
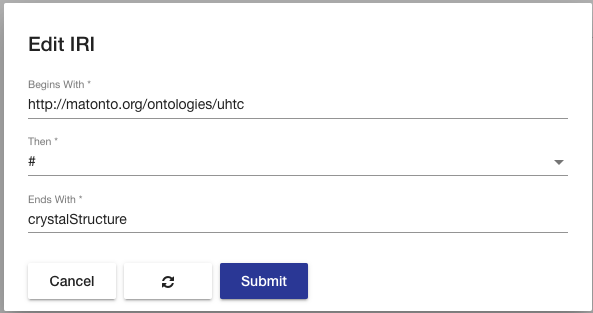
The Edit IRI overlay provides the user with a simple way to edit and create valid IRIs. The Begins with field (required) is the beginning of the IRI. This is more commonly known as the namespace. When editing the IRI of entities within an ontology, this value is typically the ontology IRI. The Then field (required) is the next character in the IRI. This value can be thought of the separator between the namespace and local name (described below). The provided values for the Then field are "#", "/", and ":". The Ends with field (required) is the last part of the IRI. This value is commonly known as the local name. It is used in the drop down lists in this application as the easiest way to identify what the IRI references. Clicking the refresh button on the left will reset the three fields to their original values. You cannot create/save an edited IRI that already exists within the ontology. Clicking Cancel will close the overlay. Clicking Submit will save the IRI with the entered values for the selected entity and update the ontology.
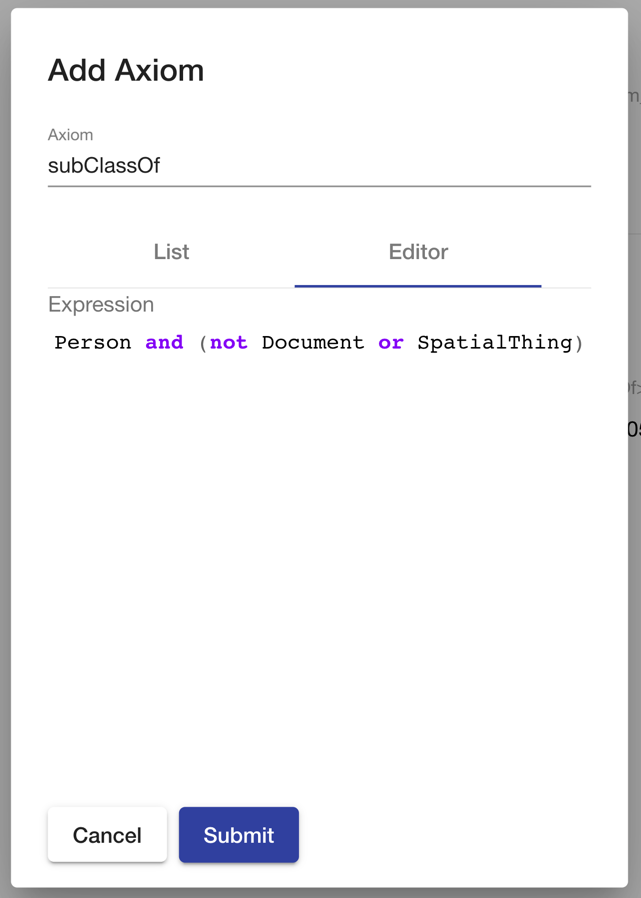
Axiom Overlay
The Axiom Overlay is how you add new axioms to entities in your ontology. The Axiom dropdown provides a list of common axioms for the type of entity you have selected. Once selected, there are two ways to add a value. The first is choosing from a list of entities within the ontology and its imports. The second is writing out a class expression or restriction in Manchester Syntax in the Editor. Entities are referenced by their local name and must be present in the ontology or its imports.
Property Value Displays
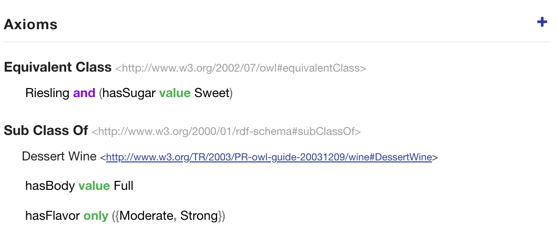
Property Value Displays are a common way Mobi displays multiple values for a property on an entity. These properties could be data properties, object properties, annotations, axioms, etc. The display consists of the title section and the values section. The title section includes a bold title and the property IRI. The values section lists all the values set for the displayed property along with the type, if the value is a literal, and edit and delete buttons when you hover over the value. The functionality of the edit and delete buttons for values differ depending on where the Property Value Display is being used. If a value of a property is a class restriction or expression, it will be represented in a simplified format or Manchester Syntax if it is supported. These values can be deleted, but not edited.
|
Tip
|
See the W3C Specification for information about blank nodes, class/property restrictions, and class/property expressions. |
Create Entity Button
The Create Entity Button is visible in any Ontology Editor tab in the bottom right hand corner of the screen. To add a new entity to the ontology, click on the Create Entity button. This will open an overlay with options for what kind of entity to create and once you have selected an option, an appropriate overlay will be shown for creating that type of entity. After creating the entity, a snackbar will appear at the bottom allowing you to navigate directly to your new entity.


Extension Mappings
The table below describes which file extensions are mapped to which RDF Formats when an ontology file is uploaded to Mobi. In the event more than one RDF Format is possible for a single extension, all RDF Formats are attempted.
| Extension | RDF Format Name |
|---|---|
.json |
RDF/JSON, JSON-LD |
.jsonld |
JSON-LD |
.ttl |
Turtle |
.xml |
Rio OWL XML, RDF/XML |
.ofn |
Rio Functional Syntax |
.omn |
Rio Manchester Syntax |
.owx |
Rio OWL XML |
.rdf |
RDF/XML |
.rdfs |
RDF/XML |
.owl |
RDF/XML, Rio OWL XML |
.trig |
TriG |
.nt |
N-Triples |
.nq |
N-Quads |
.obo |
Open Biological and Biomedical Ontologies |
Link (ENTERPRISE)
The Mobi Vocabulary Linking Tool is an Enterprise only feature that allows you to create semantic links between terms found in two different vocabularies. The tool uses the Levenshtein algorithm by default to determine the similarity of labels between terms
To reach the Vocabulary Linking tool, click on the link in the left menu.
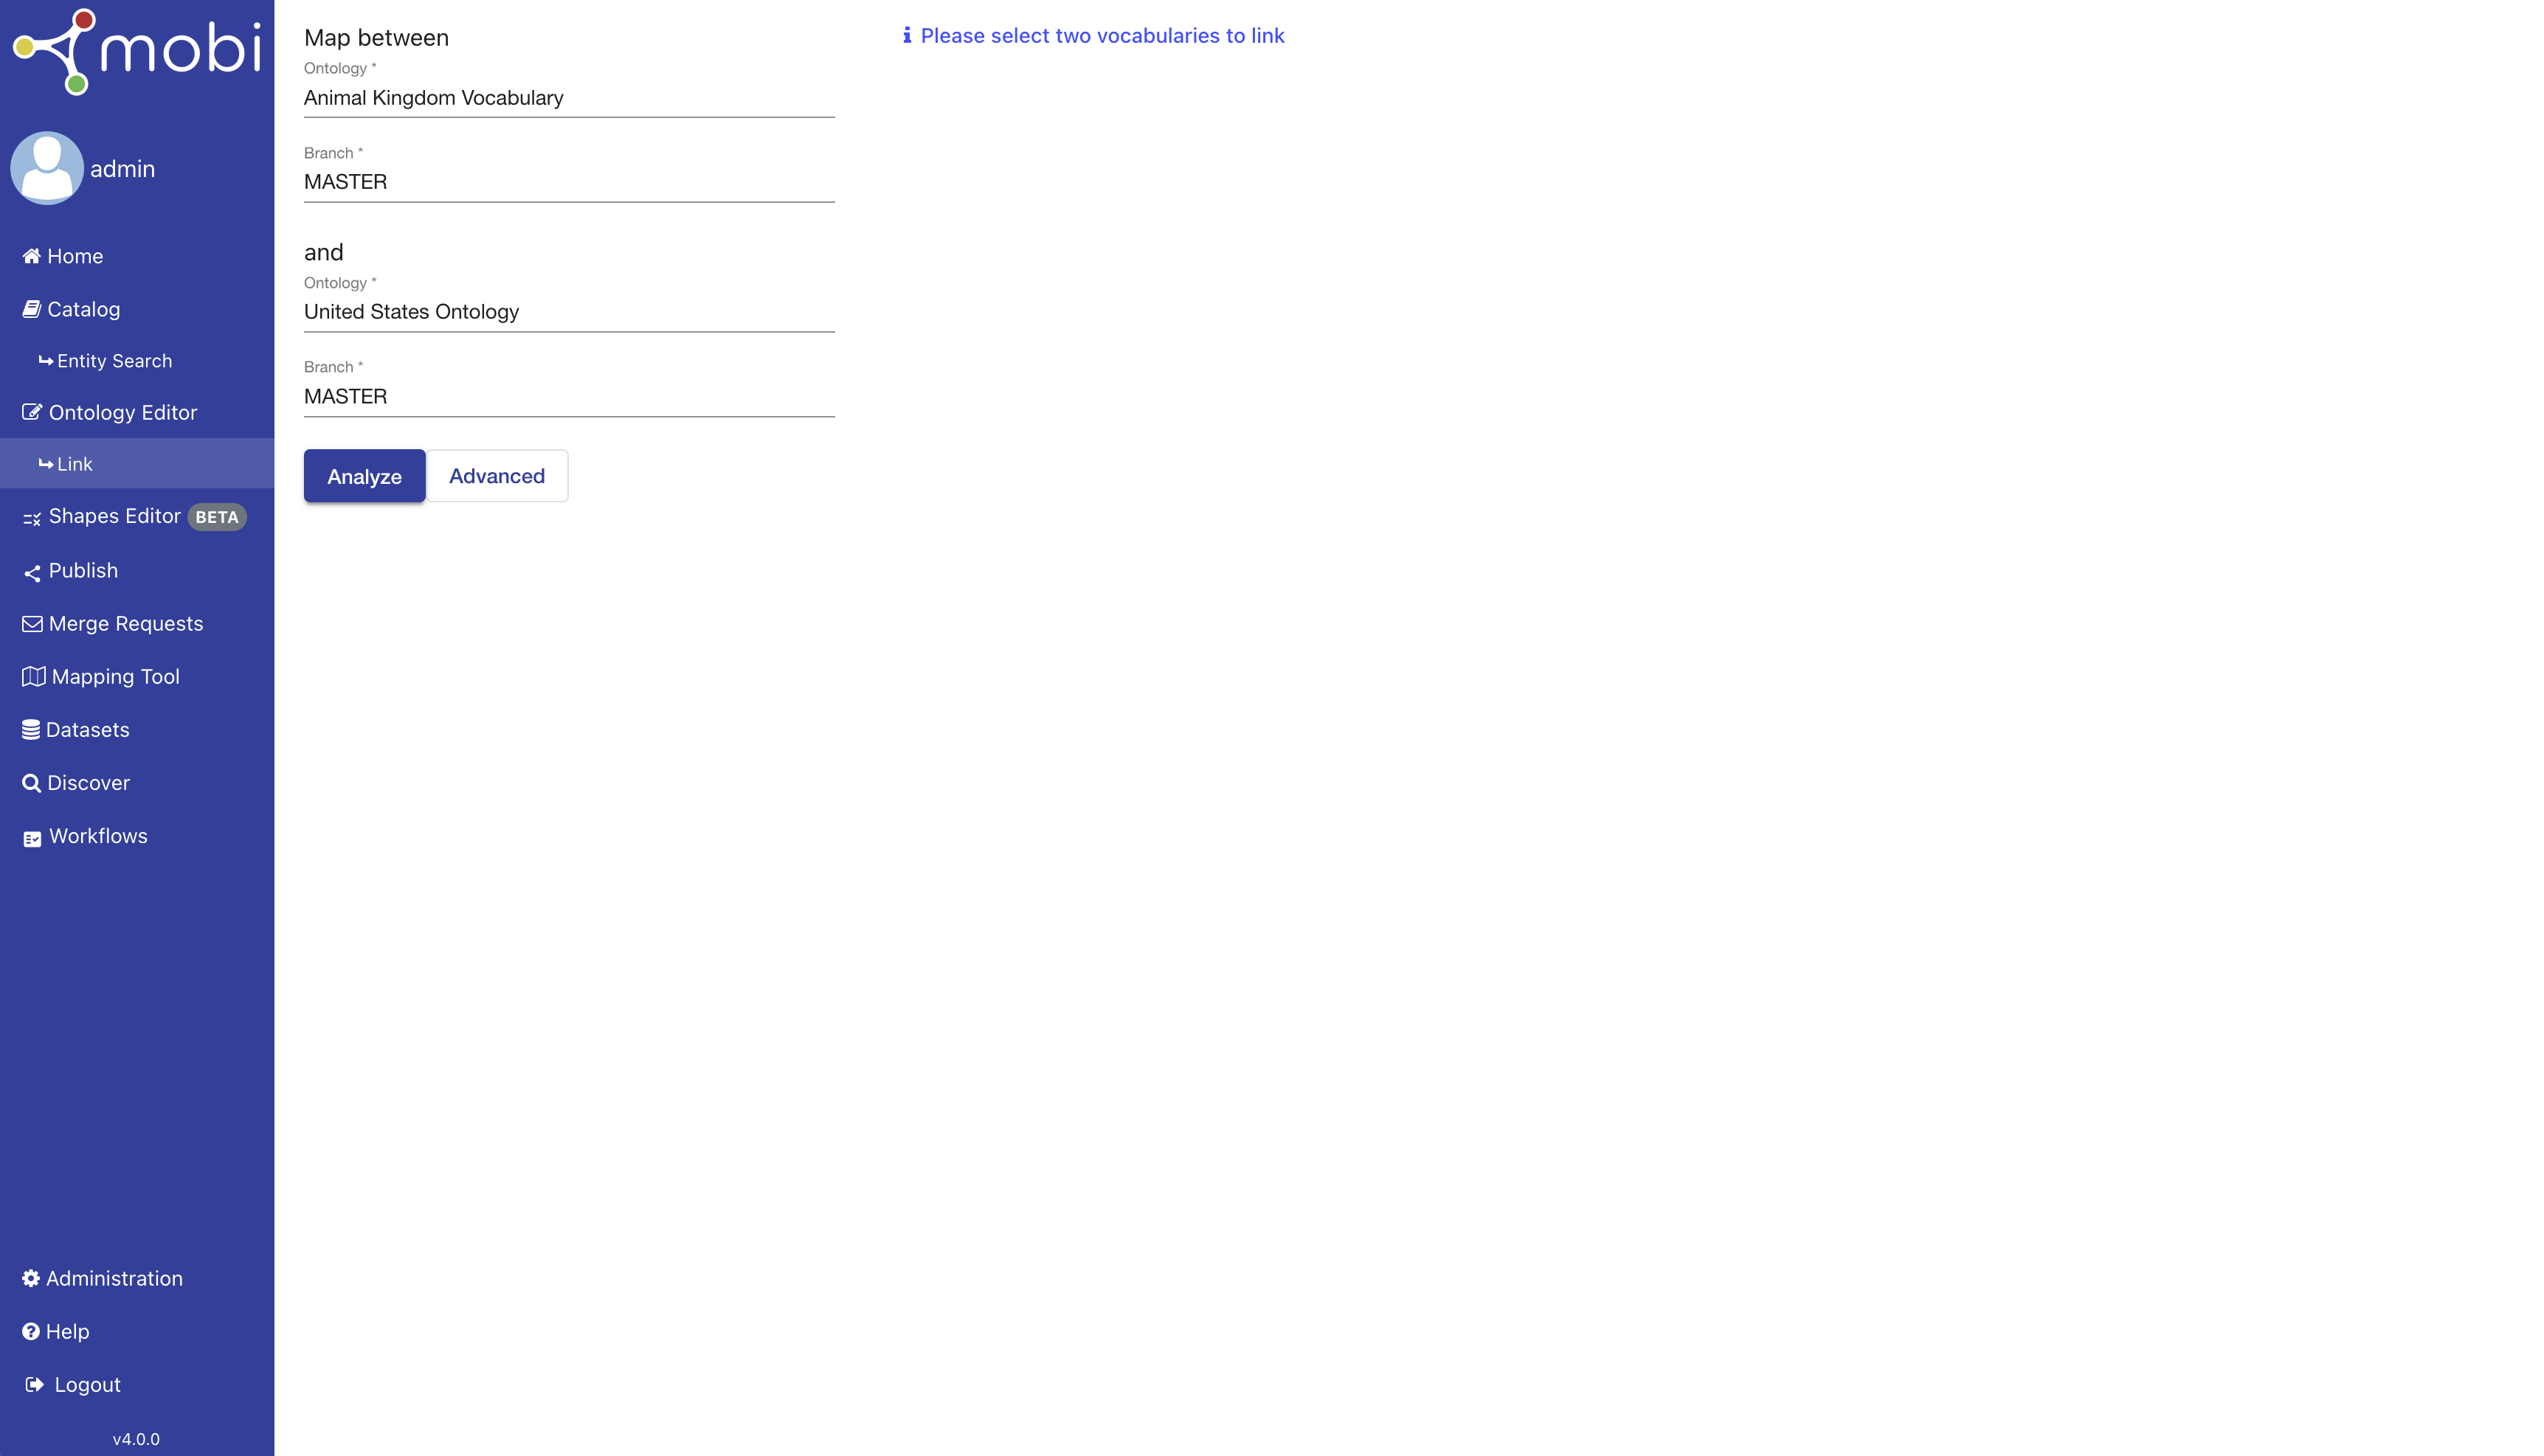
The initial view of the Vocabulary Linking Tool shows a form on the left for selecting the vocabularies and a space for matched terms to be displayed. To select a vocabulary, you must select the Ontology Record and a Branch. All selected semantic relations you wish to add will be committed to the selected branches for both vocabularies.
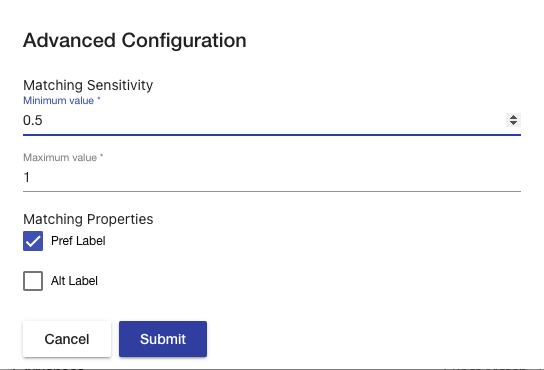
To adjust the configuration for the linking algorithm, click on Advanced and a configuration modal will appear. The modal contains fields for the “Matching Sensitivity”, which controls the range of percentages that matching results must be within to be returned, and the “Matching Properties”, which controls which properties are analyzed for similarity by the linking tool.
After you have selected 2 different ontologies, click on Analyze and the right section of the view will update with the matched terms in a paginated list.
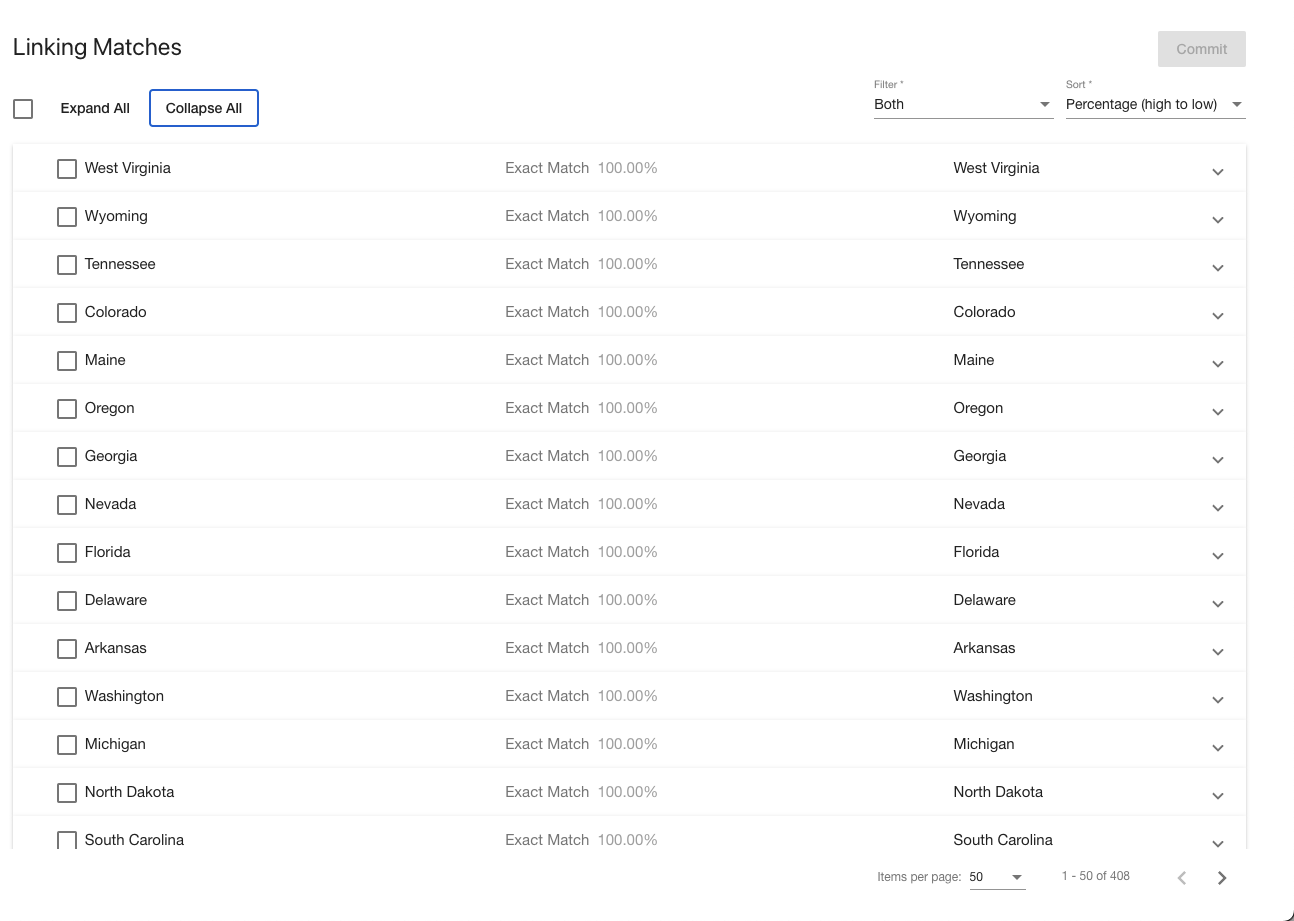
The top of the results section shows a checkbox for selecting or deselecting all the results in addition to two dropdowns. One is for filtering the results based on whether terms have already been semantically linked. The other is for sorting the results based on the highest matched percentage of all the labels of each matched term pair.
Each result in the display shows the display name for each term, which semantic relation will be committed, and the highest matched percentage between labels of both the terms. Each result is also expandable to show all the properties for each term in the pair along with a select for which semantic relation to use. If the terms in a matched pair are already semantically linked, they will be marked as such and the checkbox on the row will be disabled.
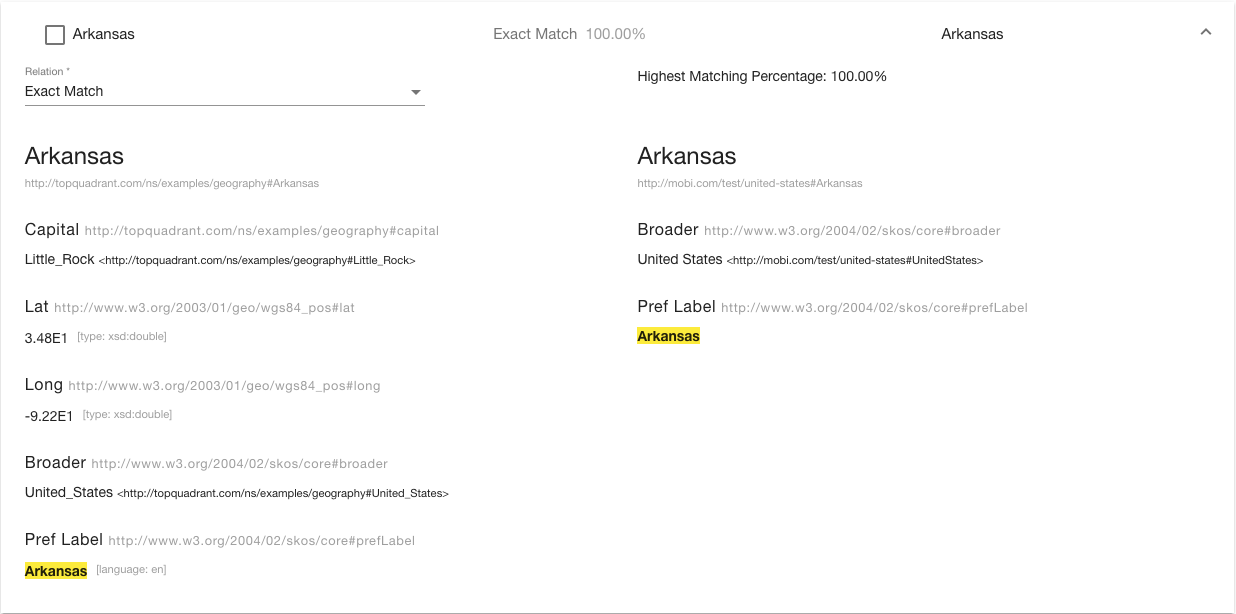

To mark which terms you wish to link, select which relation you wish to use from the select in the expanded section and check the box next to the pair. The options are “Exact Match”, “Close Match”, or “Related”. Use the following as a reference for what each type of relation means:
- Exact Match
-
Used to link two concepts that can always be used interchangeably.
- Close Match
-
Used to link two concepts that can sometimes be used interchangeably depending on the application. Not as strong of a link as “Exact Match”.
- Related
-
Represents associative (non-hierarchical) links.
After you have selected the type of link you would like to make and checked the checkbox for the row, repeat this process for all the terms that you want linked. To commit the links, click on Commit in the top right corner of the page, above the “Sort” dropdown. You should then see a modal open with options for how to commit the selected linking to the ontologies. You have a choice of committing to one ontology or both. Once you have selected which ontology(s) to commit to, click on Submit.
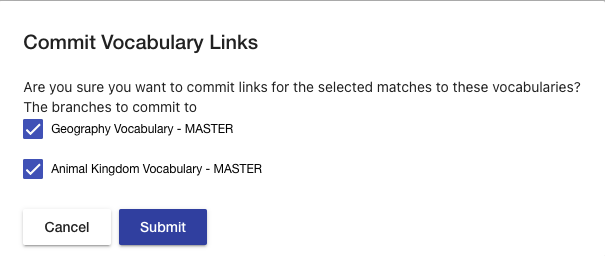
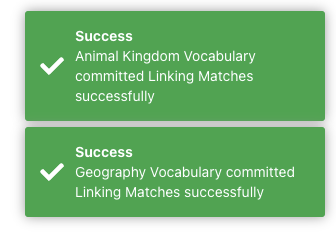
You should then get a message saying that the Linking Matches were successfully committed for each ontology.
Shapes Editor (GAMMA)
The Mobi web-based Shapes Editor is an innovative feature that provides users with a Distributed Management System for local and community development of SHACL Shapes Graphs. The Shapes Editor features constraint capture, collaboration, shapes graph reuse, and extensibility.
|
Important
|
For the best development experience, we recommend separating your ontology and shapes graph development into two different Mobi records, one for the ontology and one for the shapes graph. This allows you to take advantage of Mobi’s Ontology Editor and Shapes Editor features to their fullest extent. |
To reach the Shapes Editor, click on the link in the left menu.
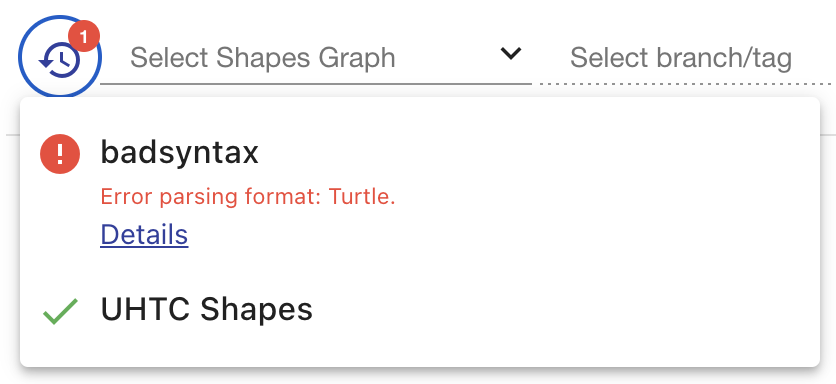
The main Shapes Editor page includes the same top action-bar as the Ontology Editor where all the actions related to opening and versioning the Shapes Graph Record are located. From the action-bar, users can create, filter, and open different Shapes Graph Records, branches, and tags as well as create branches/tags, merge branches, upload/download the shapes graph data, and make a new commit.

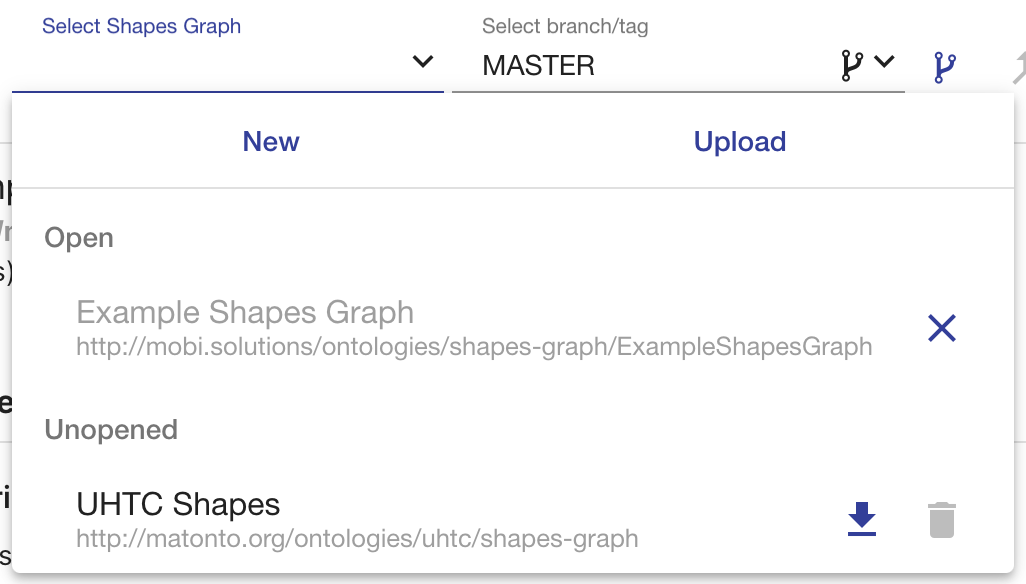
The starting point for any action on the page when you first navigate to the editor is the records dropdown. From here, you can create new shapes graphs, open existing ones, delete shapes graphs you have permission to do so, and download the latest version from the head commit of the MASTER branch. Clicking on a shapes graph will open it in the editor. You can open more than one shapes graph open at a time for parallel development.
When opening a Shapes Graph Record, the editor will load the previous branch and/or commit you were viewing. If you have not previously opened the shapes graph or in the case that the branch you were viewing no longer exists, the editor will load the HEAD commit of the shape graph’s MASTER branch. For an explanation of commits and branches, see the section on Shapes Graph Versioning.
Creating New Shapes Graphs
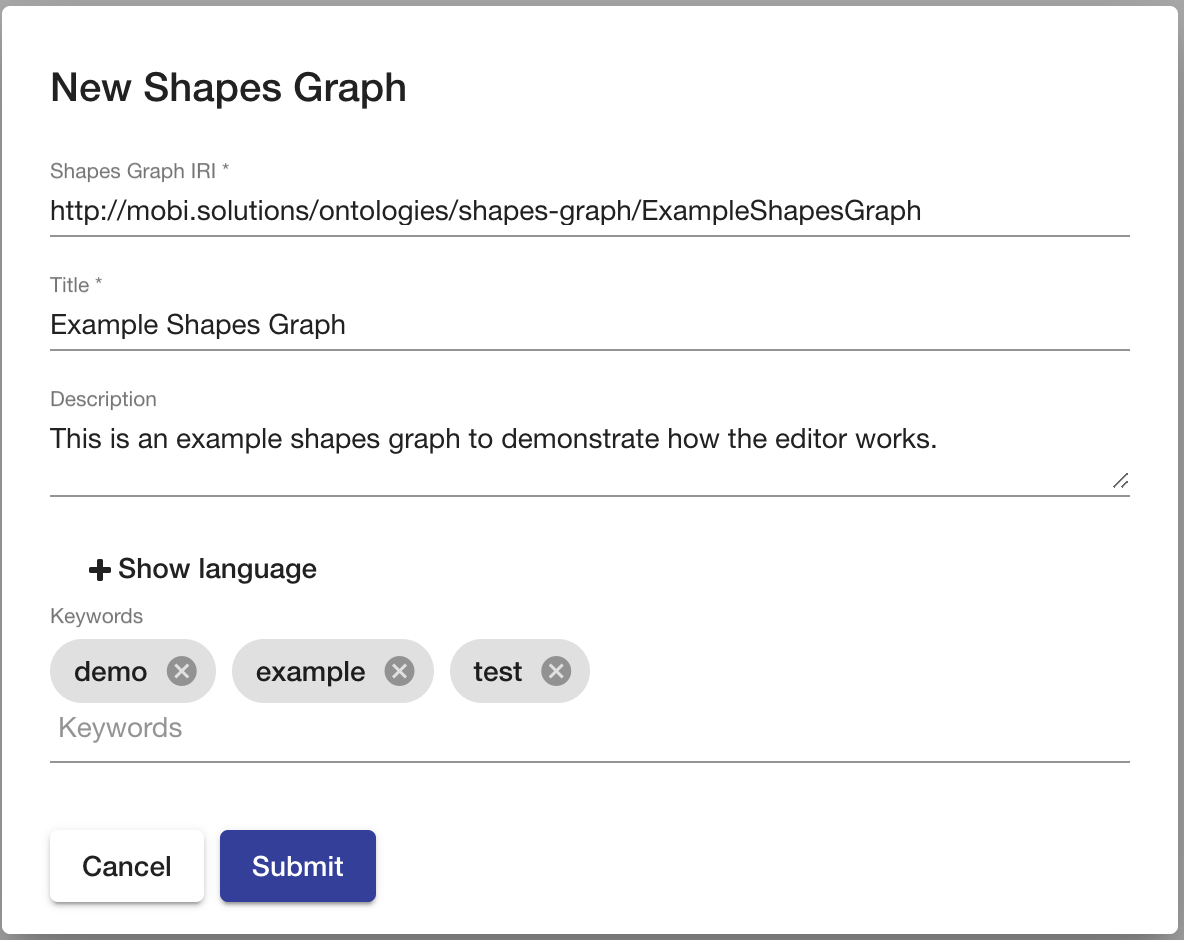
To create a shapes graph, click the New button in the records dropdown. The creation dialog requires a title for the record and an IRI for the shapes graph. You can also optionally a description and keywords which will be used to describe the Shapes Graph Record in the local catalog.
Shapes graphs in Mobi will always include an OWL ontology object to capture high level information about the shapes graph, following best practices from the SHACL W3C specification (see this section as an example).
The Shapes Graph IRI is the unique identifier for the new shapes graph. The editor pre-populates this field with a configurable default namespace and a local name generated from the Title field. You can always override this behavior. The Title field populates the dcterms:title annotations of both the new Shapes Graph Record and the ontology object within the new record. The Description field populates the dcterms:description annotations of both the new Shapes Graph Record and the ontology object within the new record. The Keywords field will attach the entered values as keywords to the new Shapes Graph Record. When the dialog is submitted, the new shapes graph will automatically be opened into the editor.
Uploading Existing Shapes Graphs
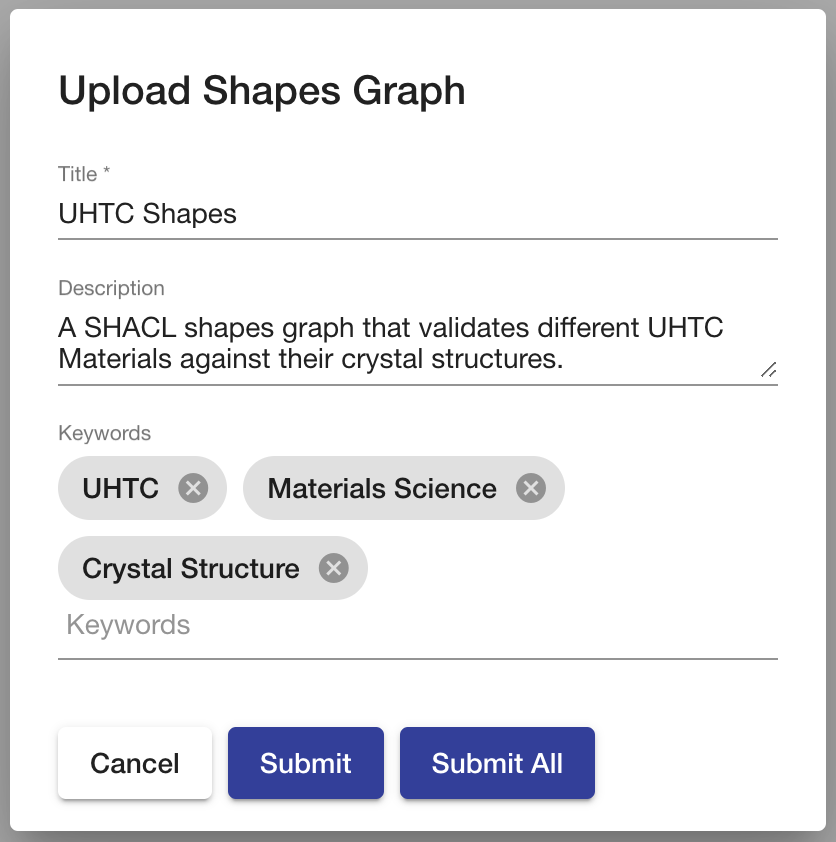
To upload an existing shapes graph, click the Upload button in the records dropdown. This will bring up the browser’s native file browser to select one or more files containing initial shapes graph data (accepts all standard RDF formats).
Once the file(s) are selected, a dialog will prompt you for metadata entry for the Shapes Graph Record (title, description, keywords). This metadata is used to describe the shapes graph in the local catalog. By default, the editor will set the Title to the file name. Metadata for each shapes graph file can be entered and submitted separately, or default metadata can be entered for all records using the Submit All button. The Title field populates the dcterms:title annotation of the new Shapes Graph Record. The Description field populates the dcterms:description annotation of the new Shapes Graph Record. The Keywords field will attach the entered values as keywords to the new Shapes Graph Record.
The status of each upload is recorded in the Upload Log which can be opened by clicking the button next to the records dropdown. Any errors will be detailed for each file. The file extension is used to guess the appropriate RDF Format to parse the file contents. If a parsing error occurs, the snackbar will display the error message relevant to guessed RDF Format.
Editing a Shapes Graph
The Shapes Editor provides an interface for developing SHACL Shapes alongside the OWL 2 ontologies that support them, with full integration into the Ontology Editor.
|
Tip
|
To learn more about SHACL shapes graphs, see the W3C Specification or check out resources like this chapter from the book "Validating RDF Data" by Jose E. Labra Gayo, Eric Prud’hommeaux, Iovka Boneva, and Dimitris Kontokostas. |

The Shapes Editor contains various tabs supporting activities for shapes graph development, search, and version control.
For a detailed description of the versioning components, refer to the Shapes Graph Versioning section.
Shapes Graph Project Tab
The Shapes Graph Project Tag displays high-level information about the shapes graph. This includes a shapes graph’s annotations, properties, imports, and a preview of the shapes graph serialized as RDF in Turtle syntax. Mobi will capture this high level information about a shapes graph with an OWL ontology object, following best practices from the SHACL W3C specification (see this section as an example).
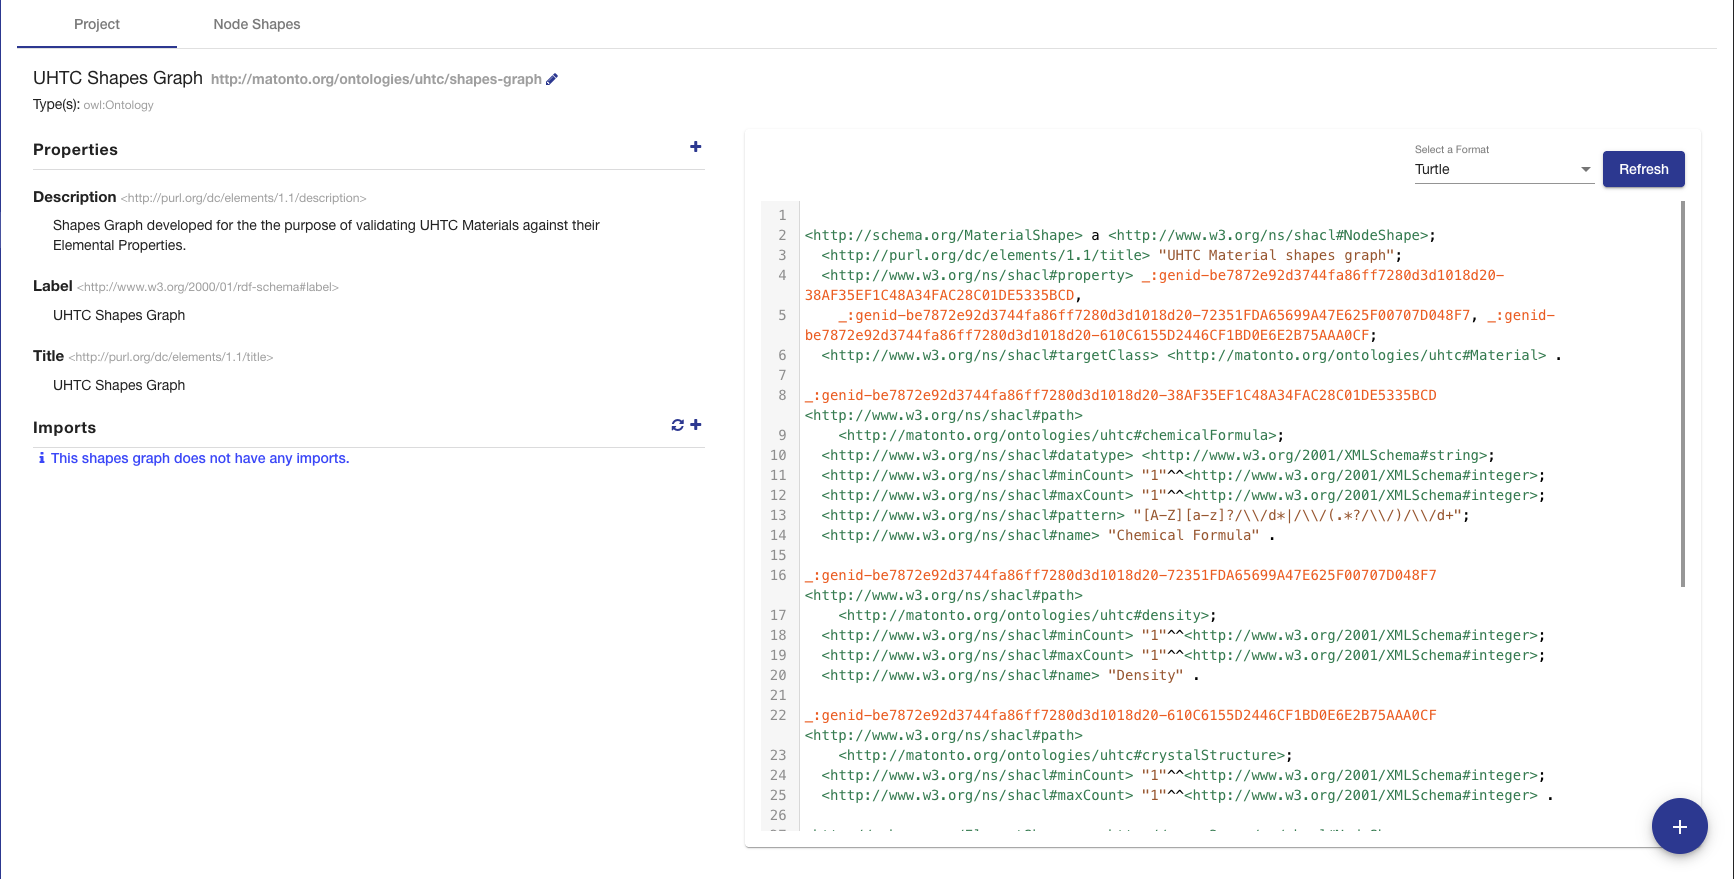
The top of this tab contains the title of the shapes graph and its editable IRI. The IRI shown is the Version IRI, ontology IRI, or a blank node identifier. The IRI can be copied quickly by clicking on it.
On the upper left side of this tab is a section containing a list of all the applied OWL Ontology Properties and Annotations. There are controls included to add, remove, and edit these properties.
On the lower left side of this tab is a section containing a list of all direct and indirect ontology/shapes graph imports. If an import could not be resolved, it will appear red. To add a new import, click on the plus button and either enter the IRI of an ontology/shapes graph available on the web or select an Ontology Record or Shapes Graph Record within Mobi. To refresh the cached versions of the imports and attempt to resolve any unresolved imports, click on the refresh button.
On the right of this tab is a card used to generate a preview of the shapes graph as RDF. There is a drop down with several different RDF serializations to choose from. Clicking Refresh will generate a preview of the saved state of the shapes graph in the specified RDF format in the area below. The preview will be limited to the first 5000 results.
Node Shapes Tab
The Node Shapes Tab allows you to view, create, and delete node shapes with their associated constraints represented with property shapes in the opened shapes graph. A Node Shape in SHACL collects all the constraints to be applied against the Target, i.e. a set of "focus nodes" within your graph. A Property Shape specifies the constraints to be applied against the values at the end of a property path through your graph starting from the focus nodes.
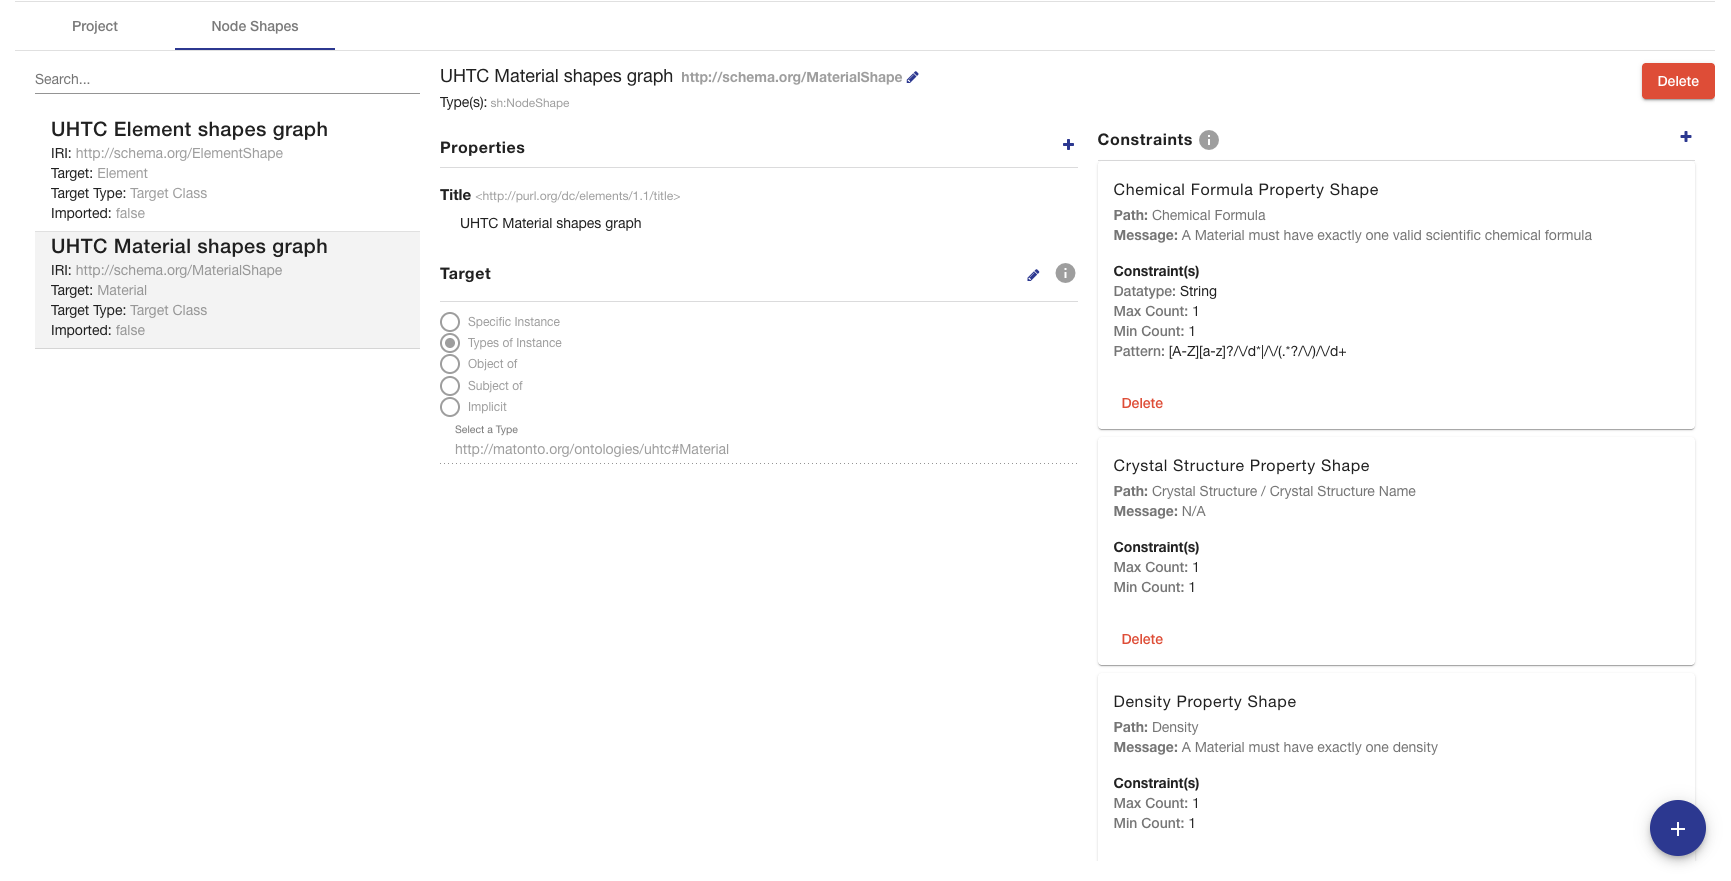
The left side of the tab contains a searchable list of all the node shapes, including imported ones, with metadata about them. The search bar will filter the list to node shapes with annotations or local names containing your search query. Clicking on an item in the hierarchy will load that node shape’s information into the other sections in this tab.
|
Note
|
The Node Shapes list will only contain node shapes with a defined IRI, not blank nodes. Keep an eye out for support for blank node shapes in upcoming versions. |
The title of the selected node shape, its IRI, and its type(s) are displayed at the top of the tab along with a button to delete the node shape. The IRI can be copied quickly by clicking on it. The middle sections in this tab allow you to add, remove, and edit the Properties and Target for the selected node shape. Imported node shapes cannot be edited.
|
Warning
|
If any unsupported SHACL properties are utilized on the selected node shape, a warning symbol will be shown. Current unsupported predicates include the following. Keep an eye out for support in upcoming versions:
|
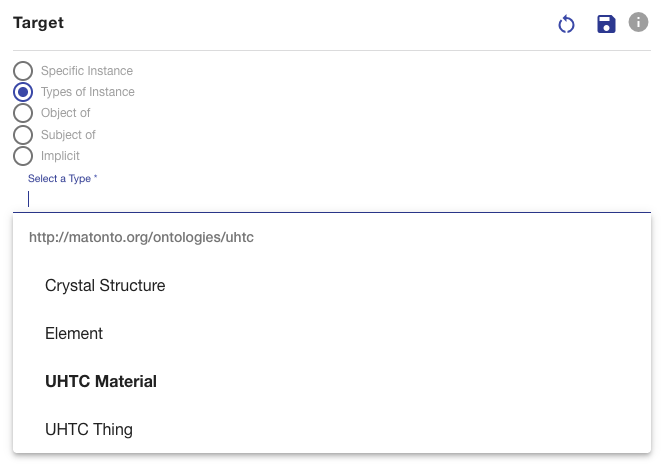
The Target for the selected node shape can be edited by clicking the pencil button next to the section title. This will turn the display editable, but changes will not be saved unless the save icon is clicked next to the section title. The options for a node shapes Target are:
-
Specific Instance: Allows you to enter a fixed IRI of a node in the graph to target with this shape
-
Types of Instance: Allows you to select a class from the imports closure or enter a class IRI to target with this shape
-
Object Of: Allows you to target the values of a selected object property from the imports closure or an entered an object property IRI
-
Subject Of: Allows you to target the nodes with a selected a property from the imports closure or an entered a property IRI
-
Implicit: Indicates that the node shape targets instances defined a type of the node shape’s IRI
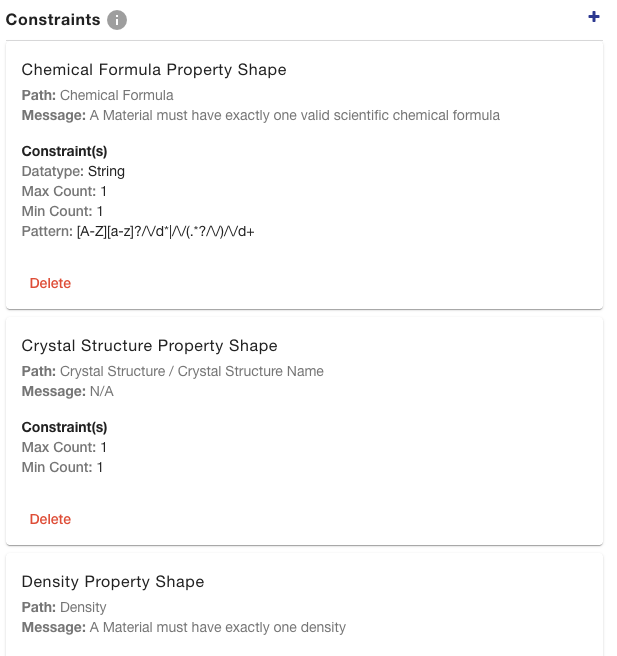
The right side of the tab contains a list of all the constraints set on the selected node shape, separated by property shape. Each property shape is displayed with its title, property path being constrained, error message if set, and list of constraints. The property path will be displayed with the following syntax which is also described in the help icon next to the section header:
- Forward Slash
/ -
Represents a sequential path
- Vertical Bar
| -
Represents an alternative path
- Caret
^ -
Represents an inverse path
- Asterisk
* -
Represents a path to be followed zero or more times
- Plus
+ -
Represents a path to be followed one or more times
- Question Mark
? -
Represents a path to be followed zero or one time
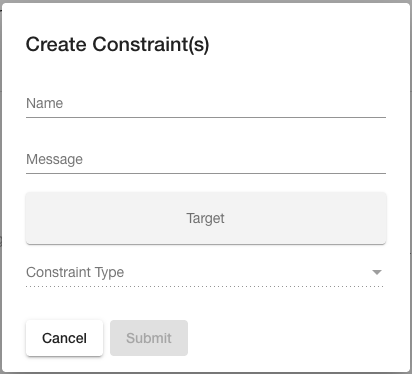
Property shapes can be removed using the Delete button in the footer of the relevant card and added using the plus button in the section header. The Create Constraint(s) Modal allows you to set the Name and Message of the generated Property Shape, configure the path, and associate any number of constraints.
|
|
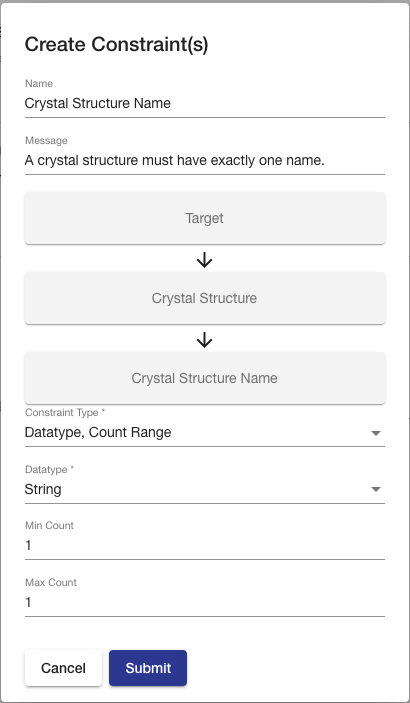
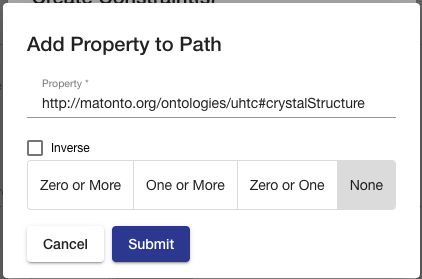
To add to the path, hover over either the bottom or the right side of a path block to either add to the sequence or add an alternative path. The Add Property to Path modal allows you to either select a property from the imports closure or enter a custom property IRI and select whether the path should be inversely followed and any cardinality characteristics (zero or more, one or more, zero or one).
Shapes Graph Versioning
Just like ontologies, each shapes graph in Mobi is versioned similarly to the Git Version Control System, whereby all changes to a shapes graph are collected into a chain of "commits" which form a commit history called a "branch". Thus, every version in the history of a shapes graph can be generated by selecting a commit and applying all the changes in the branch back to the initial commit.
Every shapes graph is also initialized with a MASTER branch that contains the initial commit. Work can be done on this MASTER branch or can be split out into separate branches. Work done on these branches exist in isolation until they are merged back into the MASTER branch, joining any other changes committed in the meantime. When merging two branches, the Shapes Editor does its best to combine any changes made on both branches. If a conflict occurs, the editor allows the user to resolve them manually. More information on merging branches can be found in the section on Merging Branches.
Branches & Tags in Shapes Graphs
In order to create a branch or tag, click the corresponding button in the action-bar. The branch or tag will be associated with the commit that is currently checked out.
|
|


The branches dropdown provides a searchable list of branches and tags which can be checked out. To checkout a branch or tag, simply select the branch in the dropdown menu. Checking out a tag will open the shapes graph at the tagged commit in read-only mode. If you have checked out a commit from the commit history table, the commit will be in the dropdown list and show as selected. Note that the ability to check out a branch or tag will be disabled if you have any uncommitted changes on the current branch.
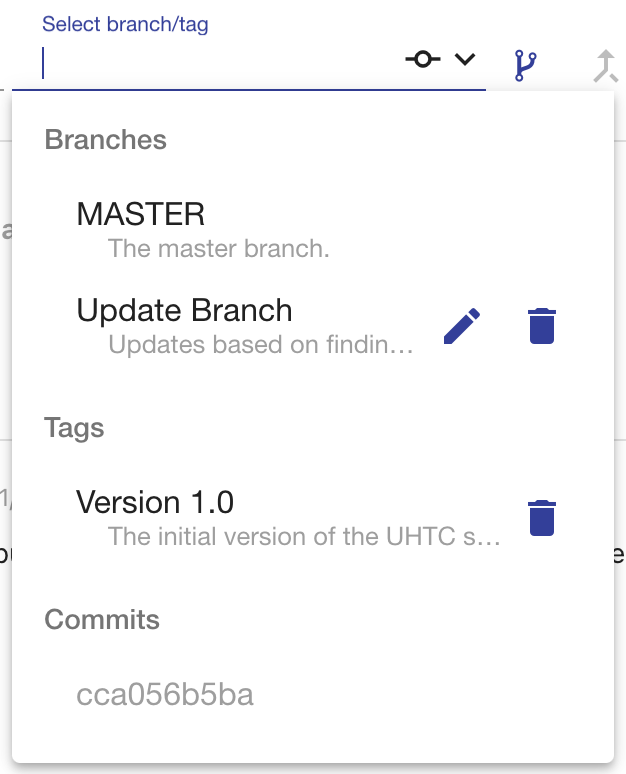
To edit the metadata of a branch or tag that is not checked out, click the pencil icon next to it in the dropdown menu. You cannot edit the MASTER branch of a shapes graph. To delete a branch or tag, click on the delete icon next to the branch/tag in the dropdown menu. If a branch is deleted, all commits on that branch that are not part of another branch will be removed, as well as the branch itself. If a tag is deleted, the commit is not removed. Note that these actions cannot be undone.
Uploading Changes to Shapes Graphs
The Upload Changes button in the action-bar allows you to upload a new version of your shapes graph from a file and apply the changes. Clicking this button will bring up an overlay where you can select the file with the changed shapes graph. Uploaded changes will not be automatically committed, but will allow you to review changes before making a new Commit.

Viewing Saved Changes on Shapes Graphs
Changes that have been made to a Shapes Graph Record are automatically saved and an indicator is shown in the action-bar. Users are able to reach the changes page by clicking the Show Changes button found in the right-hand side of the action-bar.
The changes page displays all saved and uncommitted changes in the opened shape graph. Saving changes without committing allows a user to edit an shape graph through a number of browser sessions before making any commits to the commit history. These changes are unique to the user, and are available to other users once a commit is performed. They are grouped by individual entity and display the triples on the entity grouped by property. When a “Show Full” toggle is active, the changes display is updated to include all the other triples on that changed entity. Clicking the Remove All Changes button will clear all the changes made to the shape graph, resetting to the state of the current commit.
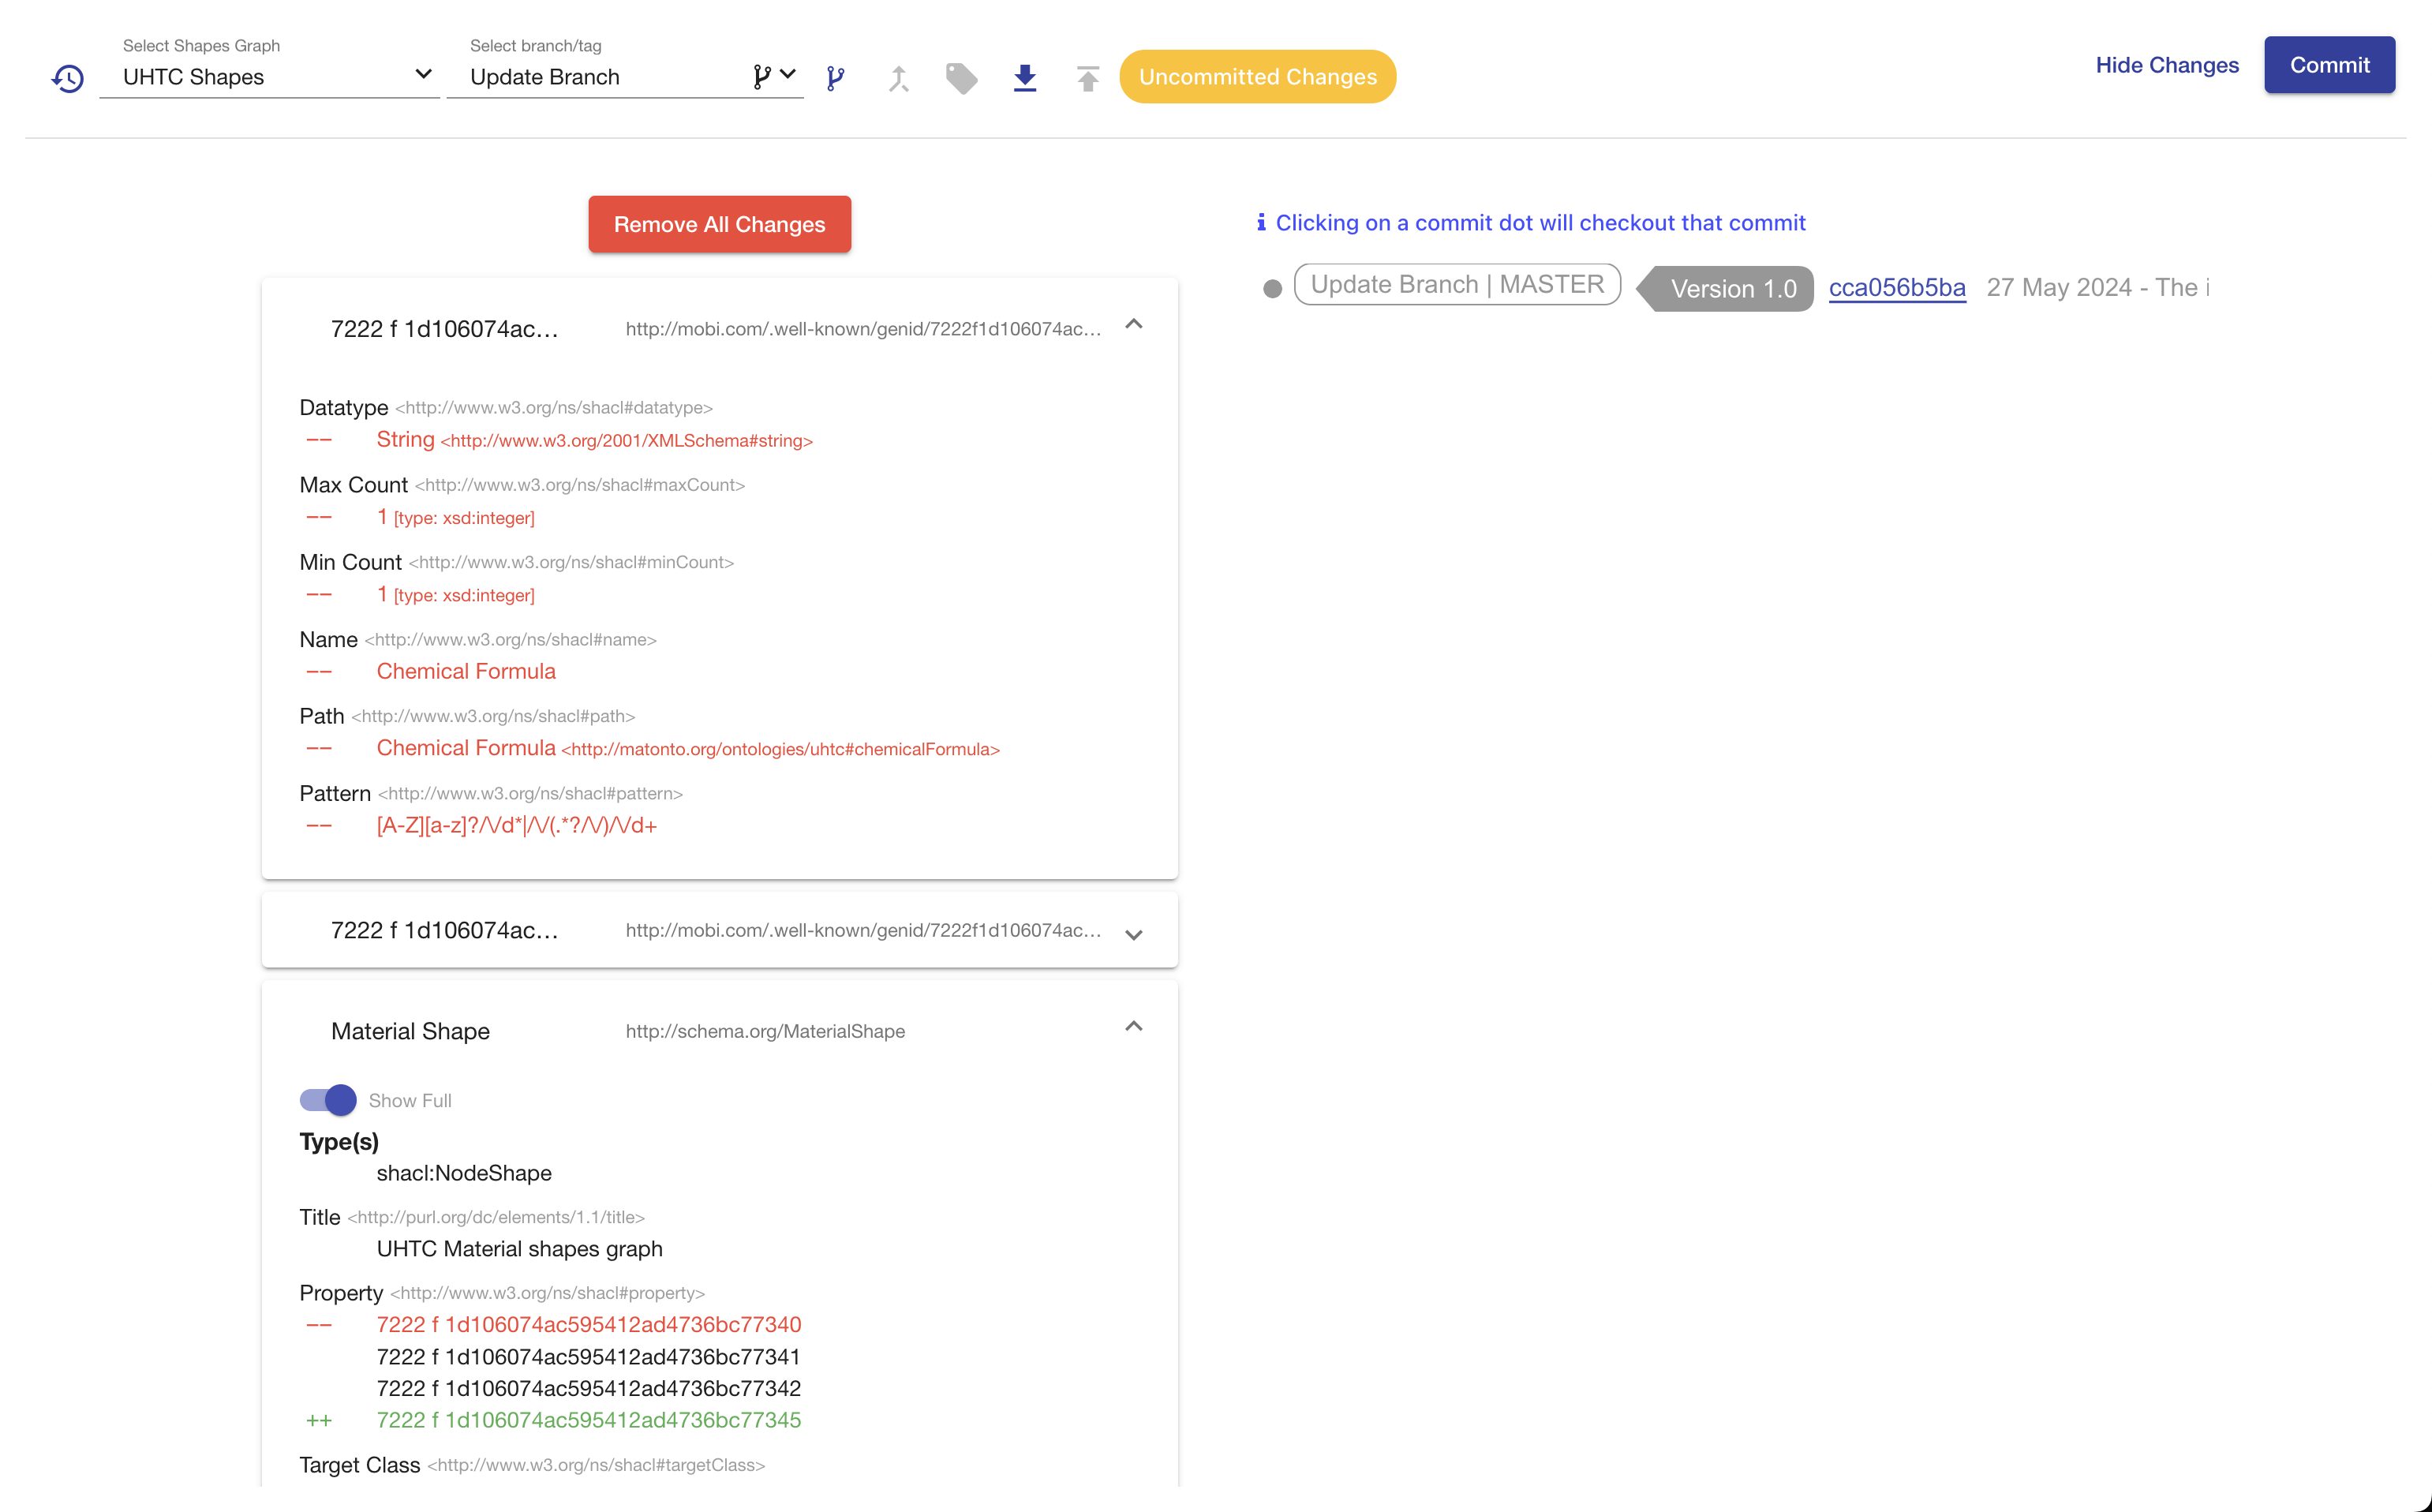
The commit history graph displays of all the commits made in the history of the branch you are currently viewing. The username of the creator, ID, message, and date for each commit are displayed within the graph. The graph displays each commit connected to its parent commits continuing backwards until the initial commit. The graph displays any Tags and Branches associated with visible commits. To view more information about a particular commit in the history, such as the added and deleted statements, click on its hash id to open an informational modal. The graph also includes commit dots for "checking out" a commit in the history. Clicking the Commit dot will open the shapes graph at that commit in read-only mode.
Making Commits to Shapes Graphs
After changes have been made to a shapes graph, they can be committed to the history, and thus viewable to others, by clicking the Commit button in the top action-bar. This will bring up a dialog where you can enter a description of the changes that were made in the commit. The commit will be added to the current Branch that is checked out.

Commits cannot be made when a Tag or Commit is checked out or you are behind the HEAD of the current Branch. If you are behind the HEAD of the current branch, an indicator wil be shown in the top action-bar with a button to checkout the latest commit.

Merging Branches on Shapes Graphs
The Shapes Editor supports merging the head commit of the branch you are currently viewing into the head commit of another branch. Two branches can only be merged if there are no conflicts between the head commits of each branch. To perform a merge, click the Merge Branch button found in the action-bar.

The merge view displays the name of the current (source) branch, a select box for the branch (target) you want to merge into, and a checkbox for whether you want the source branch to be deleted after it is merged. The view also shows an aggregated view of all changes made in the source branch that will be merged into the target branch along with a list of all the commits that will be added to the target branch from the source branch.

Clicking Submit will attempt to perform the merge. If there are no conflicts between the changes on both branches, a new commit will be created merging the two branches, and a success message will appear in the top right corner of the screen.
Conflicts arise when the application cannot determine how to automatically merge specific changes to entities between two branches. If conflicts exist between the two branches, the merge process will be halted and the screen will update to notify you of those conflicts and provide you a way to resolve them. Each conflict is listed by entity within the shapes graph and with a marker indicating whether it has been resolved. Click on a conflict in the list to start resolving them.

When resolving a conflict, the tool displays the changes to the entity from both branches. To resolve the conflict, select the version of the entity you wish to keep. You can either click the Back to List button to go back to the list of all the conflicts or the Previous or Next buttons to iterate through the list of conflicts.
|
Note
|
Currently the editor only supports accepting entire changes. Improvements to give more flexibility in resolving conflicts during a merge operation are coming soon. |

Once all conflicts have been resolved, the Submit with Resolutions button will become active and you can complete the merge operation. Completing the merge will create a new commit that incorporates your conflict resolutions into the target branch, and displays a success message in the upper right corner of the screen.
Shapes Editor Reference
Create Node Shape Button
The Create Node Shape Button is visible in any Shapes Editor tab in the bottom right hand corner of the screen. To add a new node shape to the shapes graph, click on the Create Node Shape button. This will open an overlay with fields for configuring the new node shape to be created.
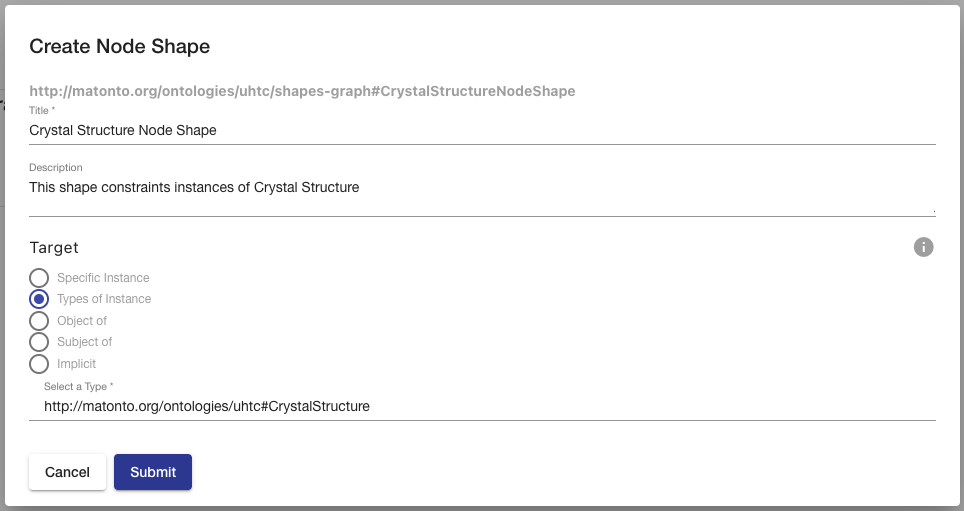
The Create Node Shape modal contains fields to set the Title and Description of the new node shape, which populate the dcterms:title and dcterms:description annotations respectively. You can also set the new node shape’s target using the same experience as the Target section of a selected node shape.
After creating the node shape, a snackbar will appear at the bottom allowing you to navigate directly to your new node shape.

Publish (ENTERPRISE)
The Publish Page is an Enterprise only feature that allows you to push versioned RDF data to external systems such as a GraphDB instance or an Altair Graph Studio instance. This enables downstream processing and usage of ontologies, vocabularies, and shapes graphs to support full semantic solutions. The publish capability is extensible and custom publish targets can be easily added via the Extensible Publishing Framework.
To reach the Publish Page, click on the link in the left menu.
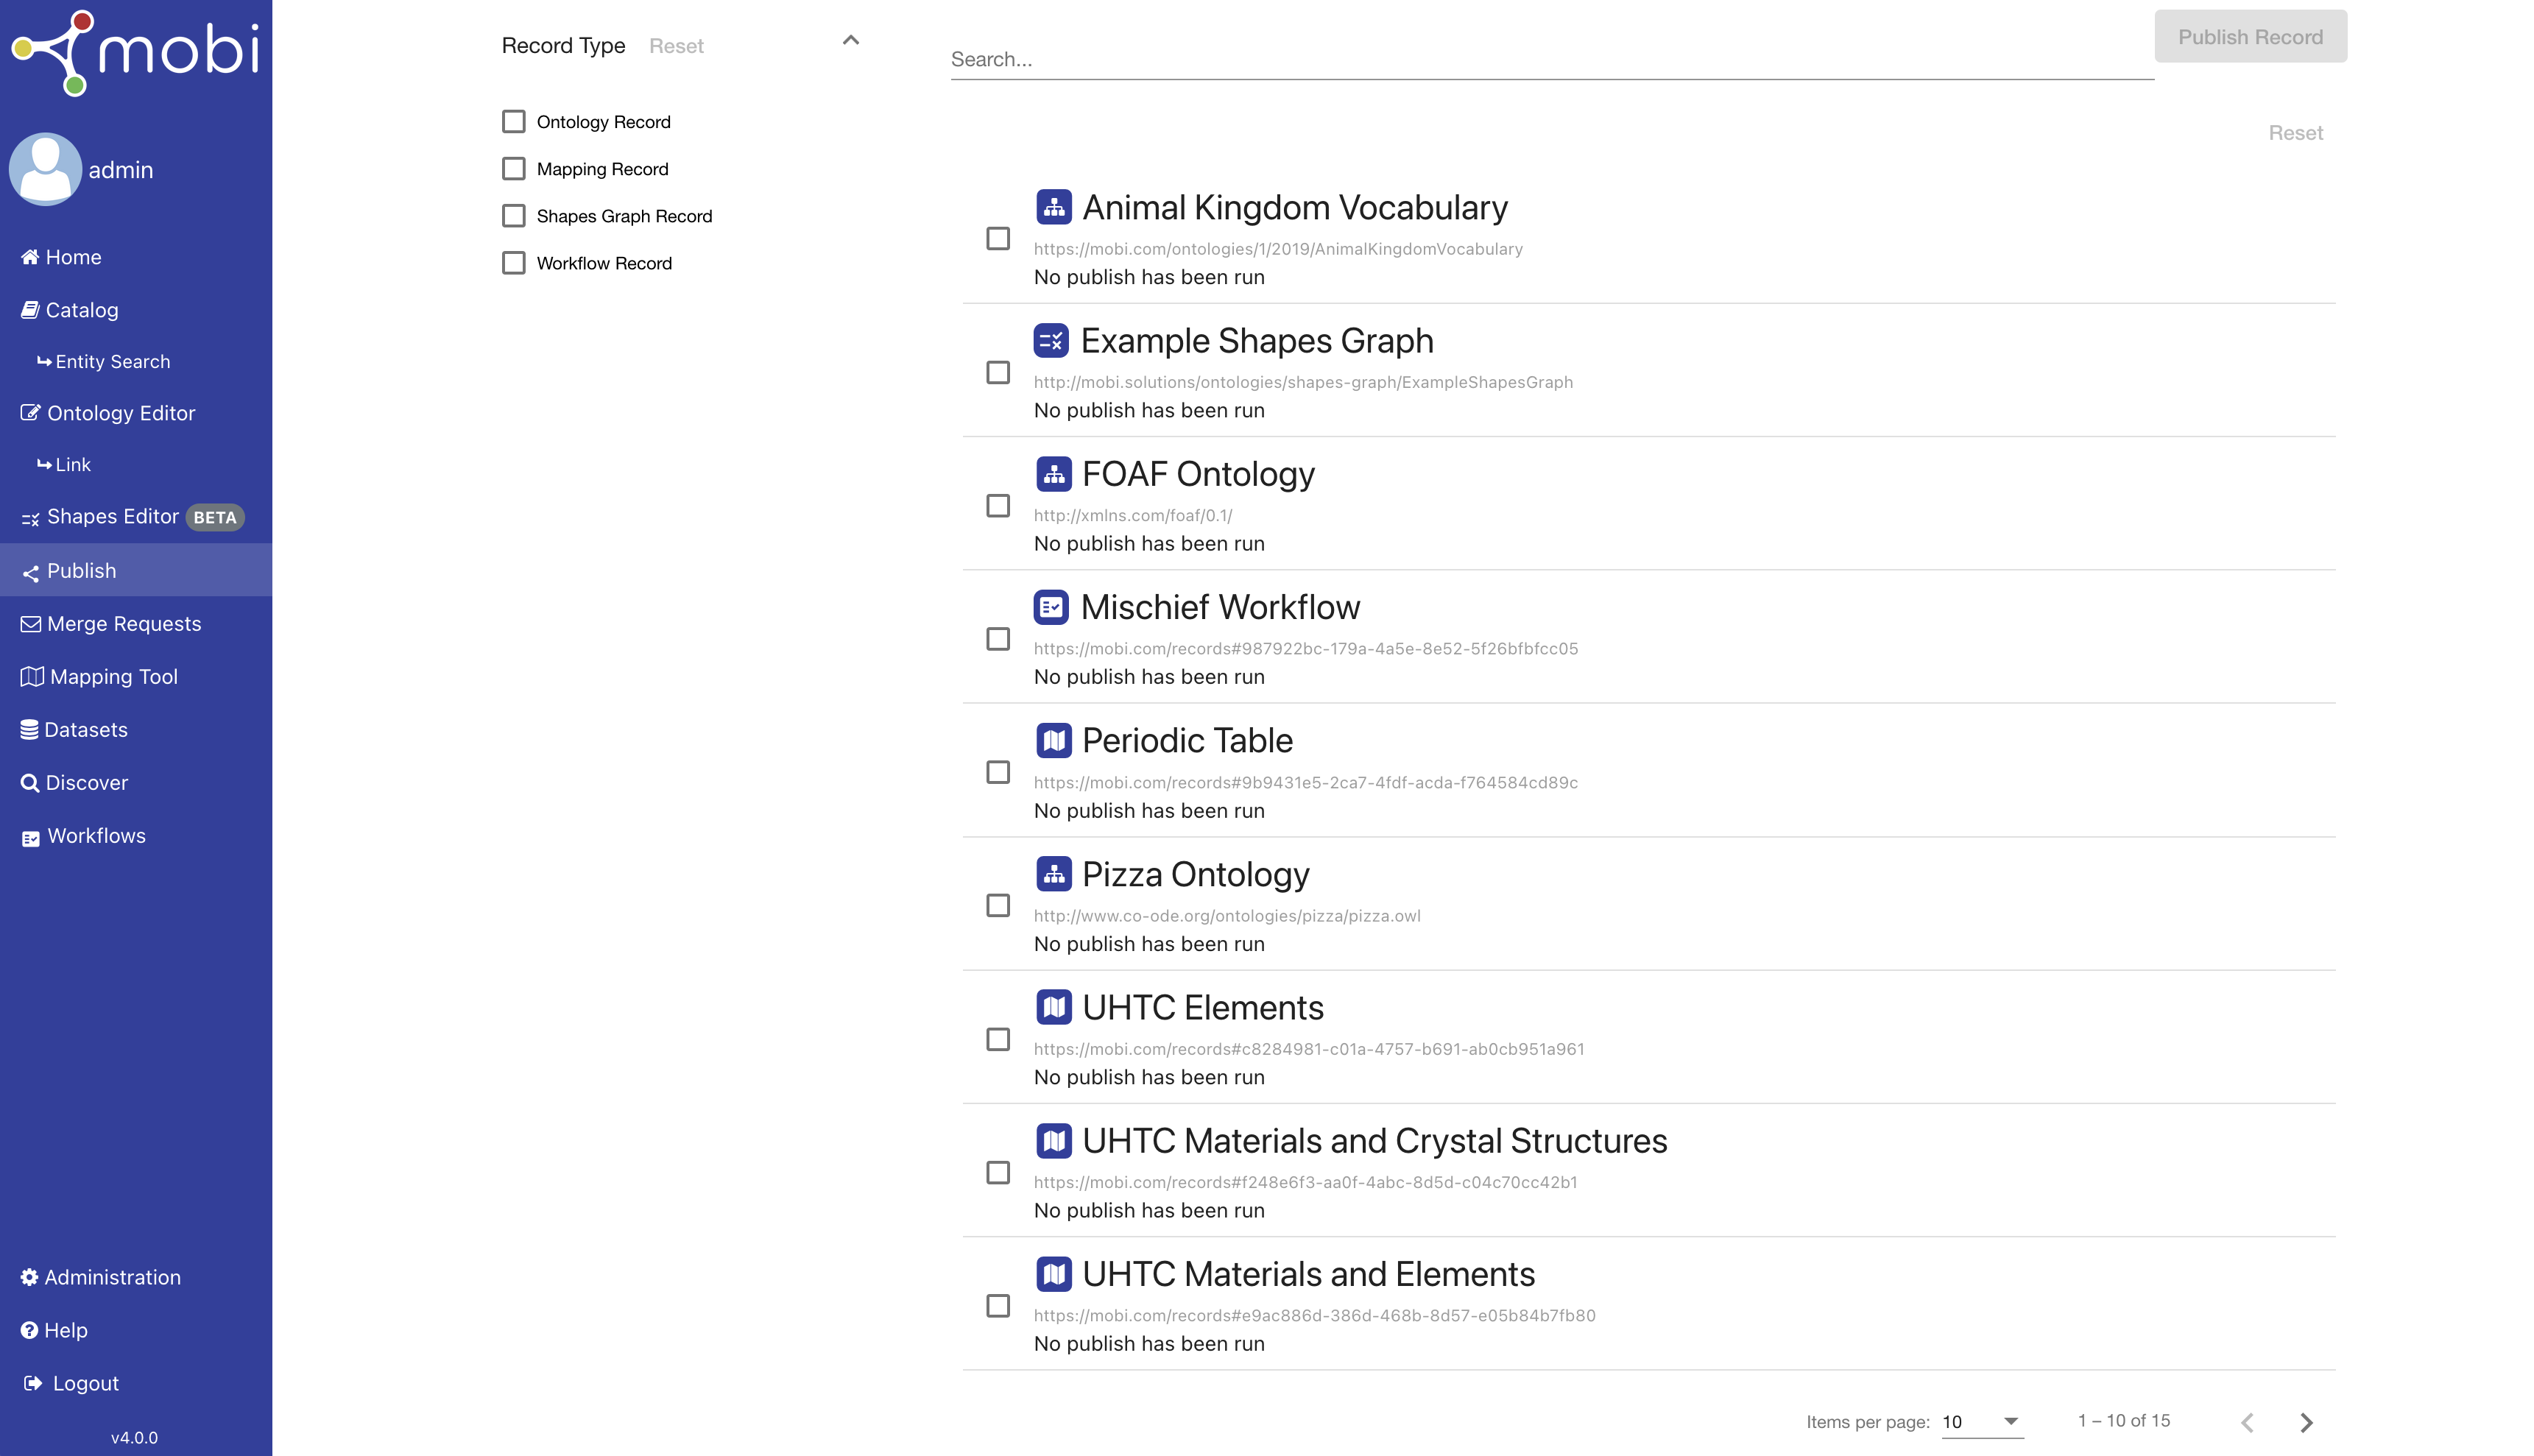
The initial view of the Publish Page shows a filterable, searchable, and paginated list of all the current Versioned RDF Records in Mobi, including Ontology Records and Shapes Graph Records. The filters on the left contain all possible types of versioned RDF Records. The selected options in each filter group can be reset and all selected filter options will appear beneath the search bar.
Each Record is displayed with a title, an icon representing the type of Record, the identifier IRI for the latest data in the Record, and the provenance data of the latest publish successfully completed, including which publish service was used. To publish a Record to an external system, click the checkbox found on the corresponding row and click the Publish Record button, prompting a configuration modal to appear. This modal displays a list of all registered publish services compatible with the type of Record you selected. Each publish service comes with its own configuration options to customize how the data is sent to the external system.
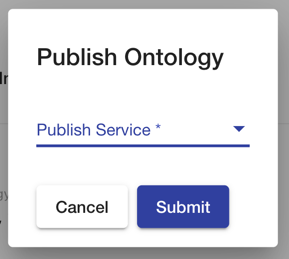
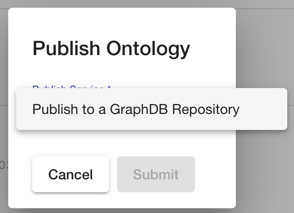
If no services are registered or no services are compatible with the type of Record you selected, an error message will be displayed on the publish modal.
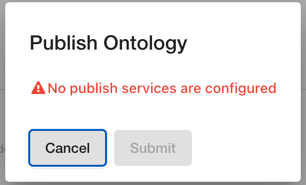
To view more details about the publish history of a particular Versioned RDF Record, click on the Record in the Publish Landing Page. The Publish History page displays each publish executed for the Record as well as relevant metadata including the publish service that was used, the user who published, the head commit at the time of publishing, and the time of the publish. In addition, each activity can be expanded to view all the request parameters that were chosen for that particular publish.
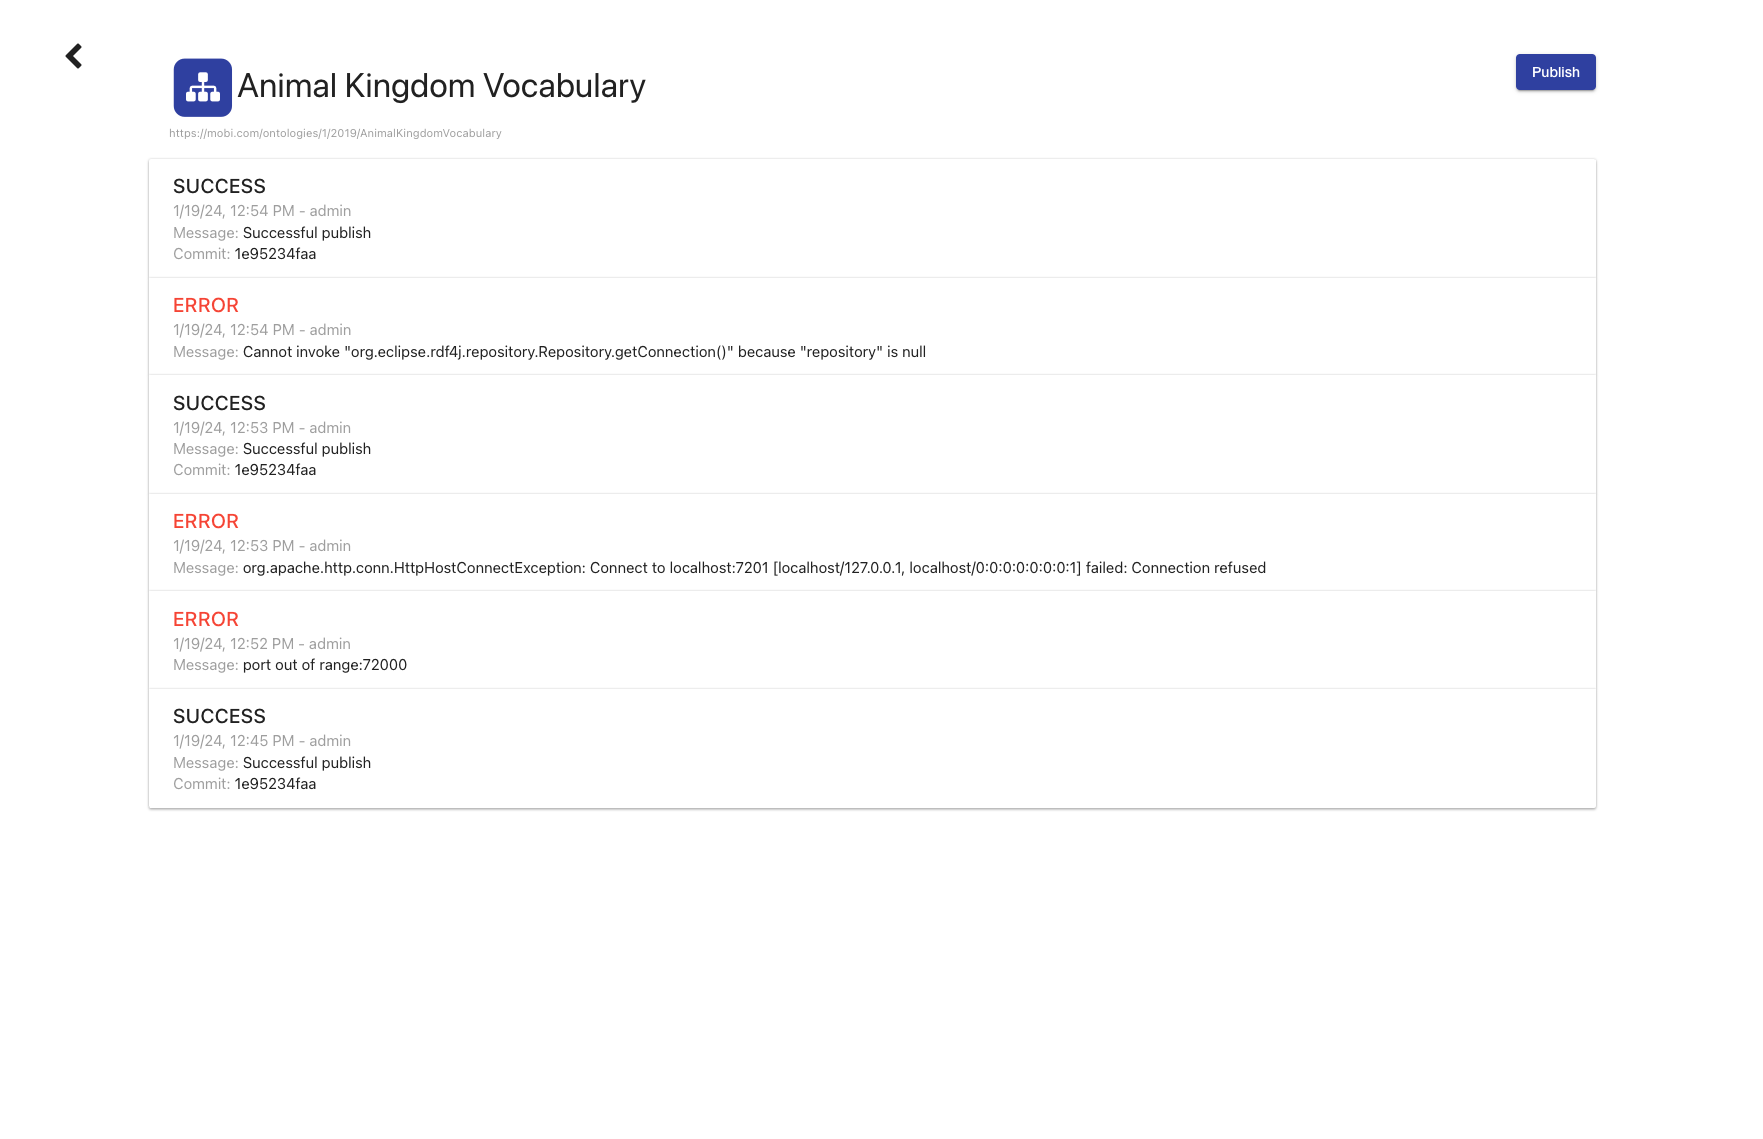
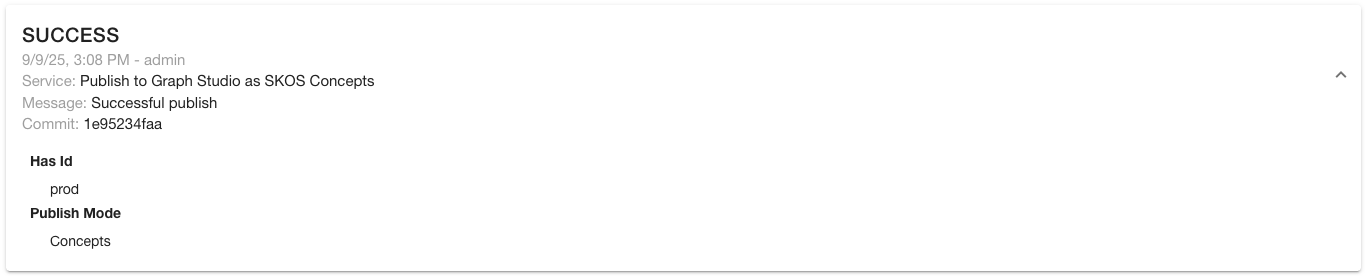
GraphDB Publishing
Mobi Enterprise comes with a publish service for pushing ontologies, vocabularies, and shapes graphs to an external GraphDB instance. This publish service will publish the HEAD of the MASTER branch of the selected Ontology or Shapes Graph Record into a remote GraphDB repository. The service allows you to specify which configured GraphDB instance to publish to. By default, the service will put the data into named graph of the ontology/shapes graph IRI unless a different named graph is specified. The service provides a toggle for overwriting the existing published data in the named graph if it exists in GraphDB or appending the published data to a graph with pre-existing data.
|
Note
|
GraphDB repositories are configured with a specific named graph for SHACL shapes graphs by default. Pay close attention to the named graph IRI you enter and whether you check the overwrite box as overwriting the SHACL data within that managed graph will remove any other SHACL data within it. |
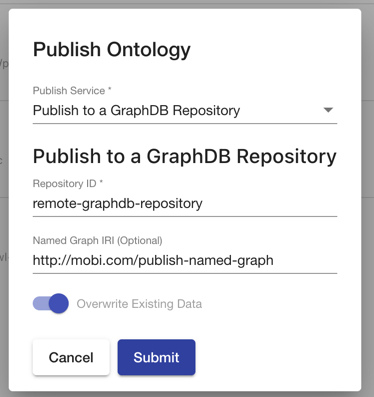
After selecting the target GraphDB instance and repository (and optionally a target named graph), click Submit, and Mobi Enterprise will publish the data to the external system.
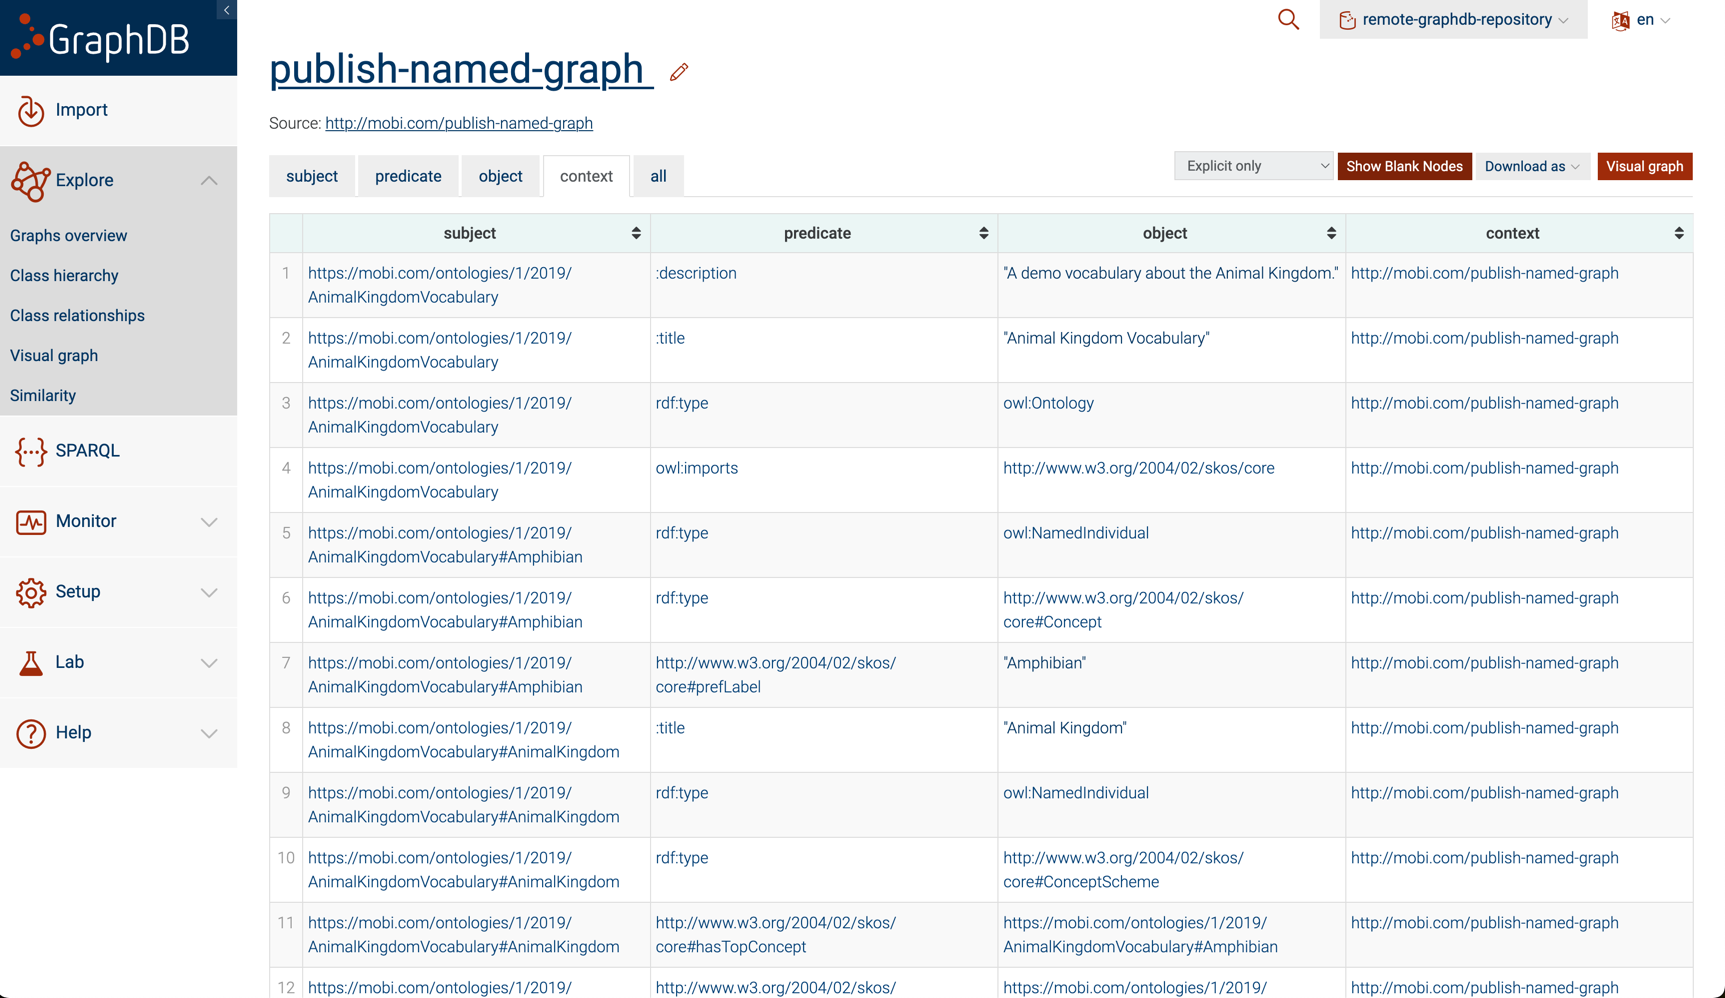
Graph Studio Publishing
Mobi Enterprise comes with three publish services for pushing ontologies, vocabularies, and shapes graphs to an external Graph Studio instance’s Catalog. All of these publish service will allow you to specify which configured Graph Studio instance to publish to.
The "Publish to Graph Studio as SKOS Concepts" service allows Mobi users to select whether to publish the concept hierarchy, the class hierarchy or both as SKOS vocabulary concepts.
|
Note
|
When publishing the concept hierarchy, all individuals who are instances of SKOS Concept and of a subclass of SKOS Concept will be included. |
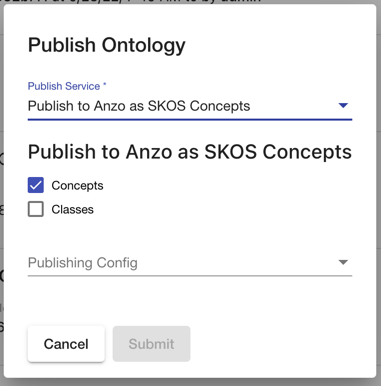
The "Publish to Graph Studio as OWL Dataset/Model" service allows Mobi users to publish the entire contents of an Ontology Record to either an Graph Studio model or dataset.
|
Warning
|
When publishing large ontologies, it’s recommended to publish as an Graph Studio dataset rather than an Graph Studio model as the Graph Studio Model Editor does not support ontologies at that scale. |
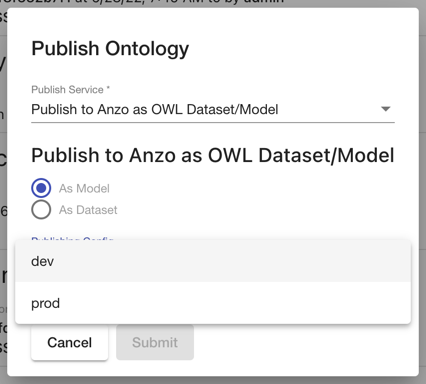
The "Publish Shapes Graph to Graph Studio" service allows Mobi users to create an Graph Studio dataset containing their shapes graph data for use in validation logic within Graphmarts.
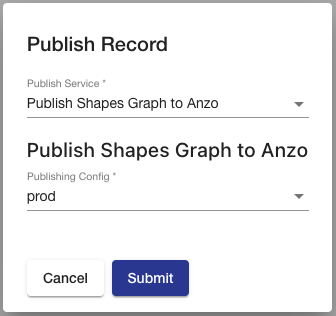
After selecting either the entity types or target location, click Submit, and Mobi Enterprise will push the ontology/vocabulary/shapes graph data to Graph Studio.
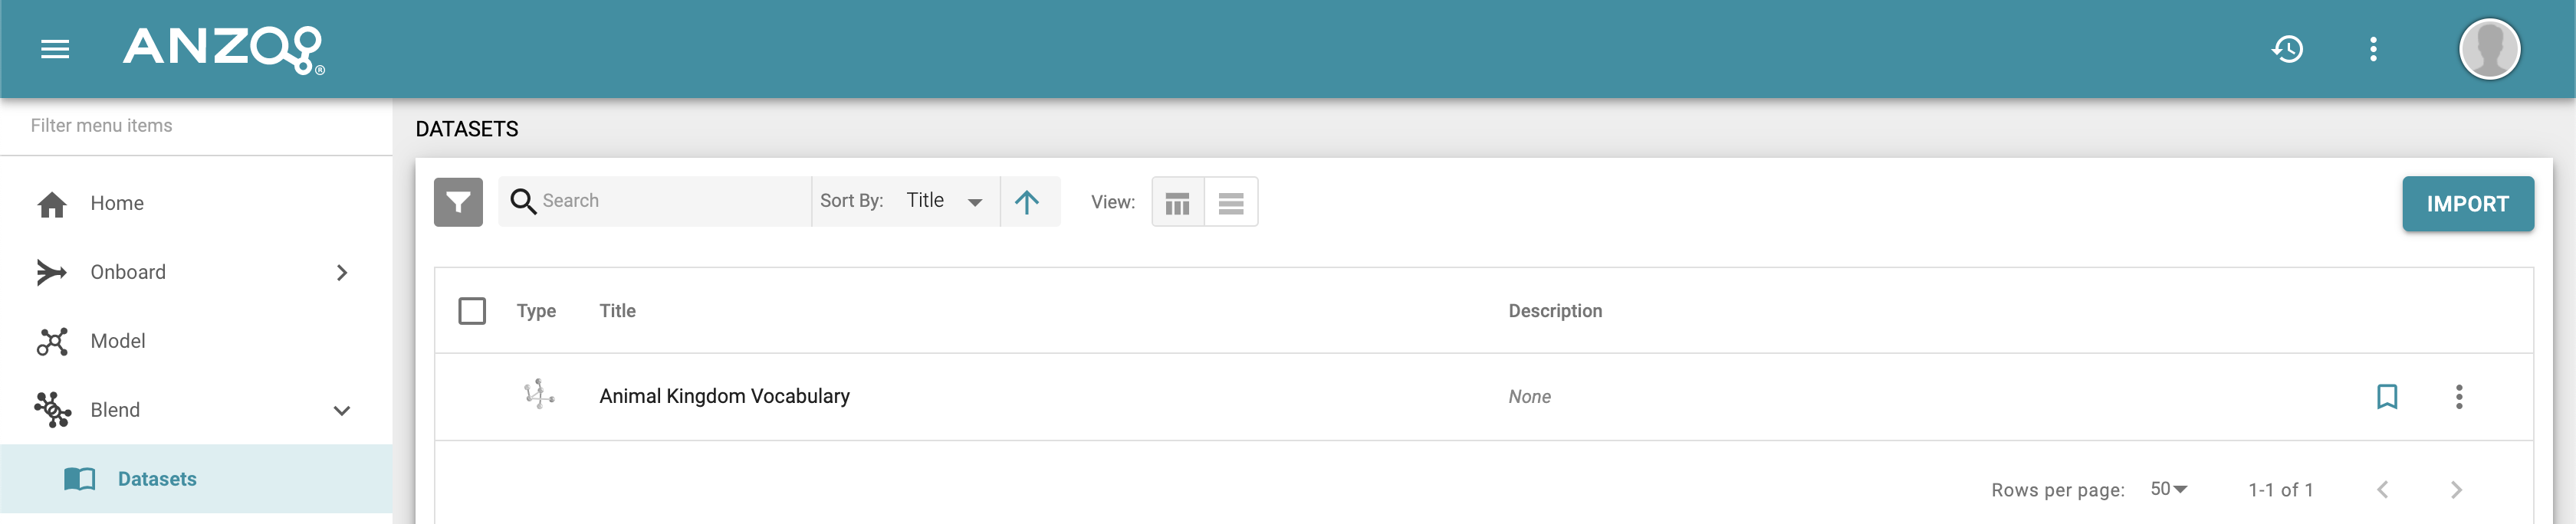

Merge Requests
The Mobi Merge Requests module allows users to create long lived representations of a merge between two branches of a record to provide checks and balances before including changes into the object the record represents. Each merge request is connected to a particular Versioned RDF Record in the local Catalog and specifies a "source" and "target" branch. The request represents what would occur if the "source" branch were merged into the "target" branch.
To reach the Merge Requests module, click on the link in the left menu.
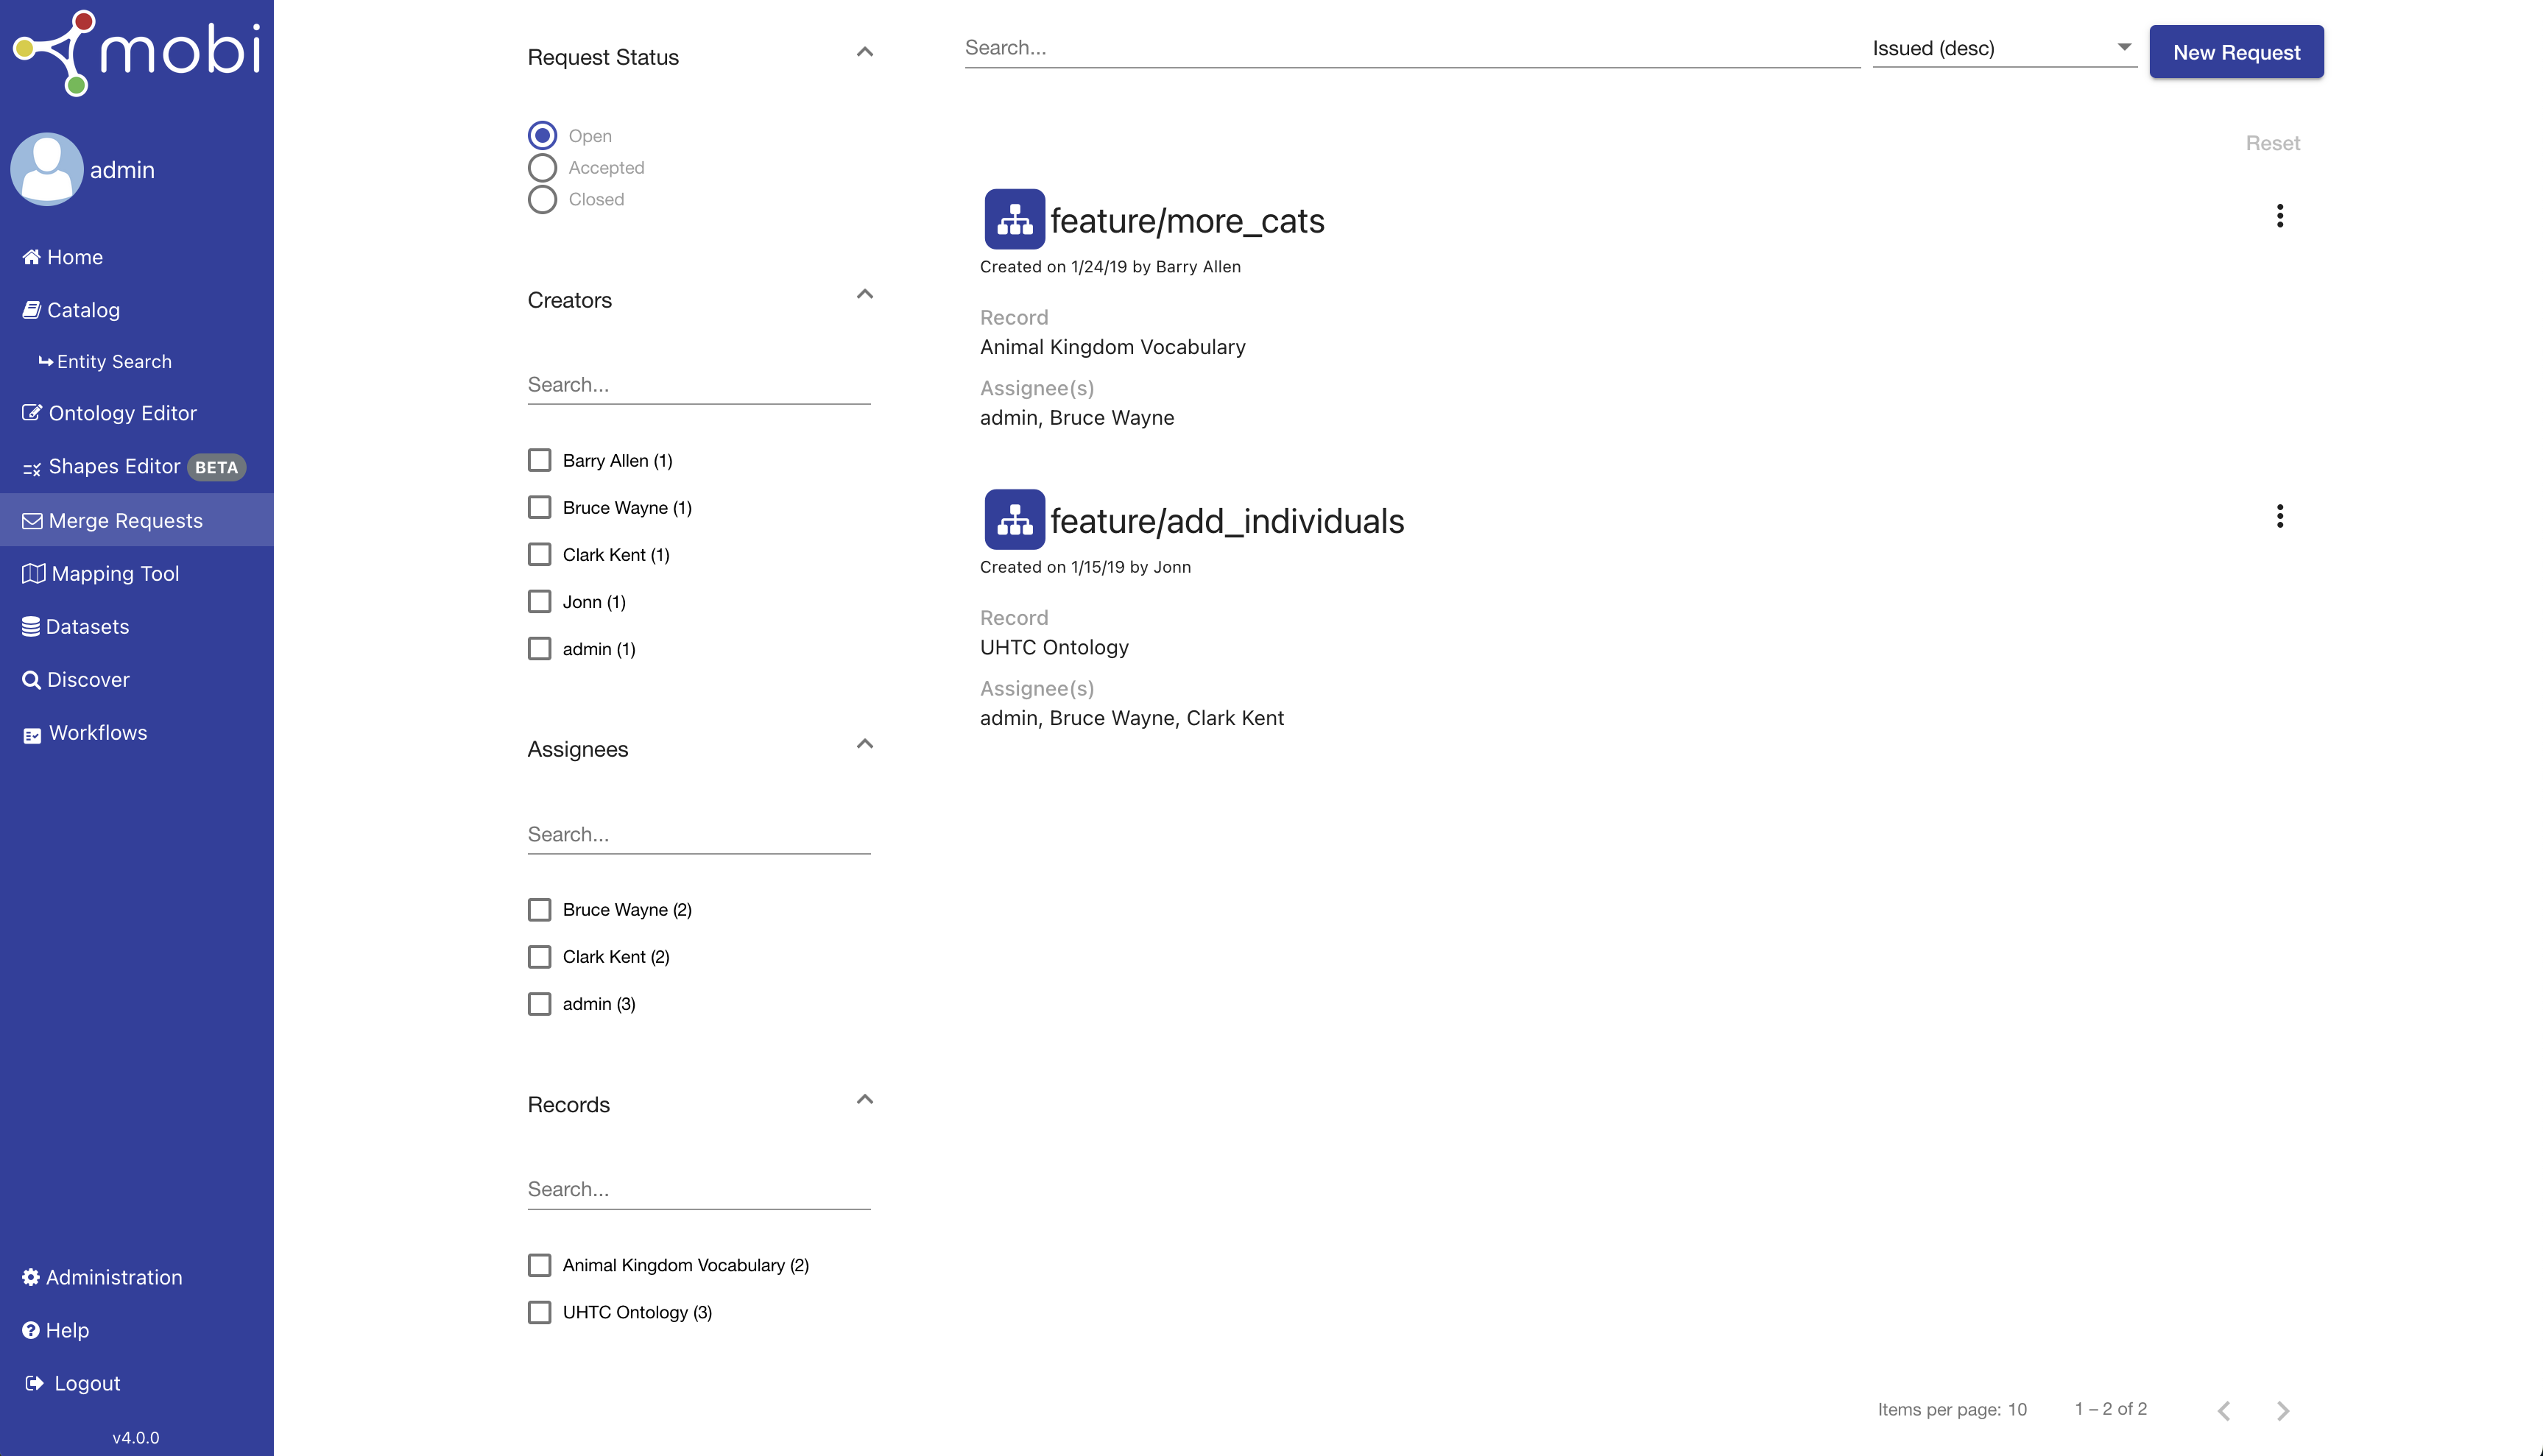
The initial view of the Merge Requests module displays a list of all currently open merge requests. The list can be searched and sorted by the issued date and title, and the list can also be filtered by multiple parameters: the request status, the creator, the assignees, or the attached Record. The selected options in each filter group can be reset and all selected filter options will appear beneath the search bar. The search bar, sort options, and the create a merge request button are located in the top right corner of the page.
Each merge request in the list displays a preview of the request metadata, an icon representing the type of Versioned RDF Record associated with the request, and a button to delete the request. Clicking on a merge request in the list displays the individual merge request.
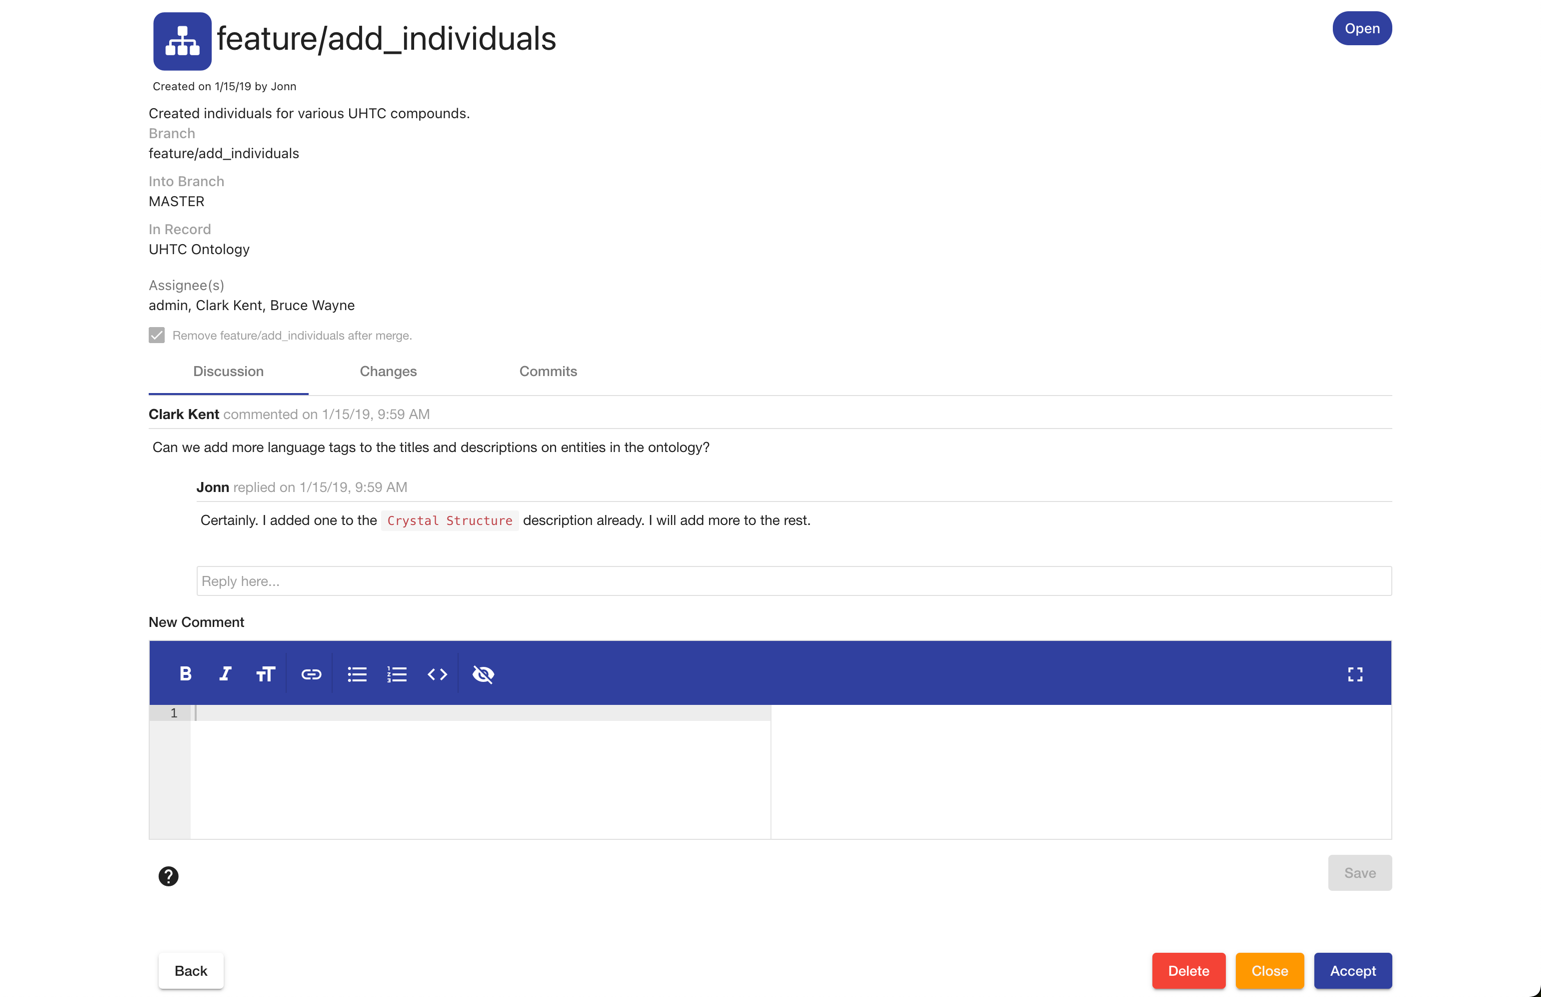
The individual merge request view displays all information regarding the merge request. The top displays more metadata about the request including the request’s description and whether the source branch will be removed once the request is accepted. Below the metadata are a series of tabs containing the discussion on the request, the changes between the source and target branch, and commits that will be added from the source to the target branch. The bottom of the view contains a button to delete the request, a button to accept the request if it not already accepted, a button to close the request, and a button to go back to the main list of merge requests.
The discussion tab allows users to comment and discuss the changes within the request to facilitate more collaboration in a distributed environment. You can create new comments to start new threads of communication or you can reply to existing comments and further the discussion. Comments can also be edited and deleted by the user who created the comment.
|
Note
|
The comment editor supports GitHub flavored Markdown which you can find more information about here. |
The Changes tab displays the full difference of the source branch from the target branch. They are grouped by individual entity and display the triples on the entity grouped by property. When a “Show Full” toggle is active, the changes display is updated to include all the other triples on that changed entity.
The metadata of a request can be edited by hovering over the area and clicking the pencil button. In the resulting overlay, you can change the Title, Description, target branch, Assignees, and whether the source branch should be removed on acceptance.
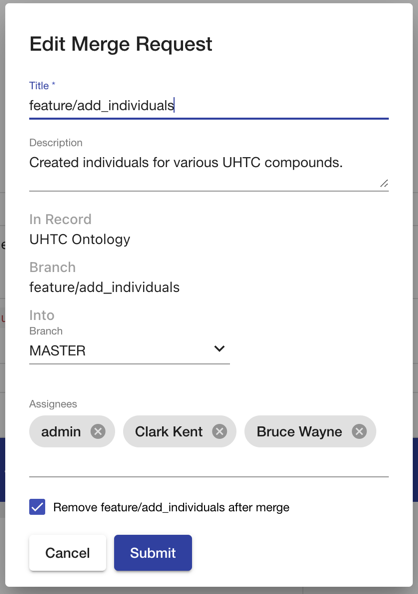
Create a Merge Request
To create a merge request, click New Request on the initial view of the Merge Requests module. Creating a merge request is a three part process. The first step is to select which record in Mobi to attached to the new request by searching within the displayed paginated list of records. All types of Versioned RDF Records are supported by the tool. This currently includes: Ontology Records, Shapes Graph Records, Mapping Records, and Workflow Records. Once you have selected a record, click Next.
|
Important
|
If the record a request is attached to is deleted, that request is removed. If the source branch of a request is removed, that request will also be removed. |

The second step of creating a merge request is to pick the "source" and "target" branch from the attached record. The source branch will be the branch in the first select box and the target branch will be in the second select box. Once both are selected, you will see an aggregated view of all changes made in the source branch that will be merged into the target branch along with all the commits from the source branch that will be included in the target branch. Once you have selected the branches you want to merge, click Next.
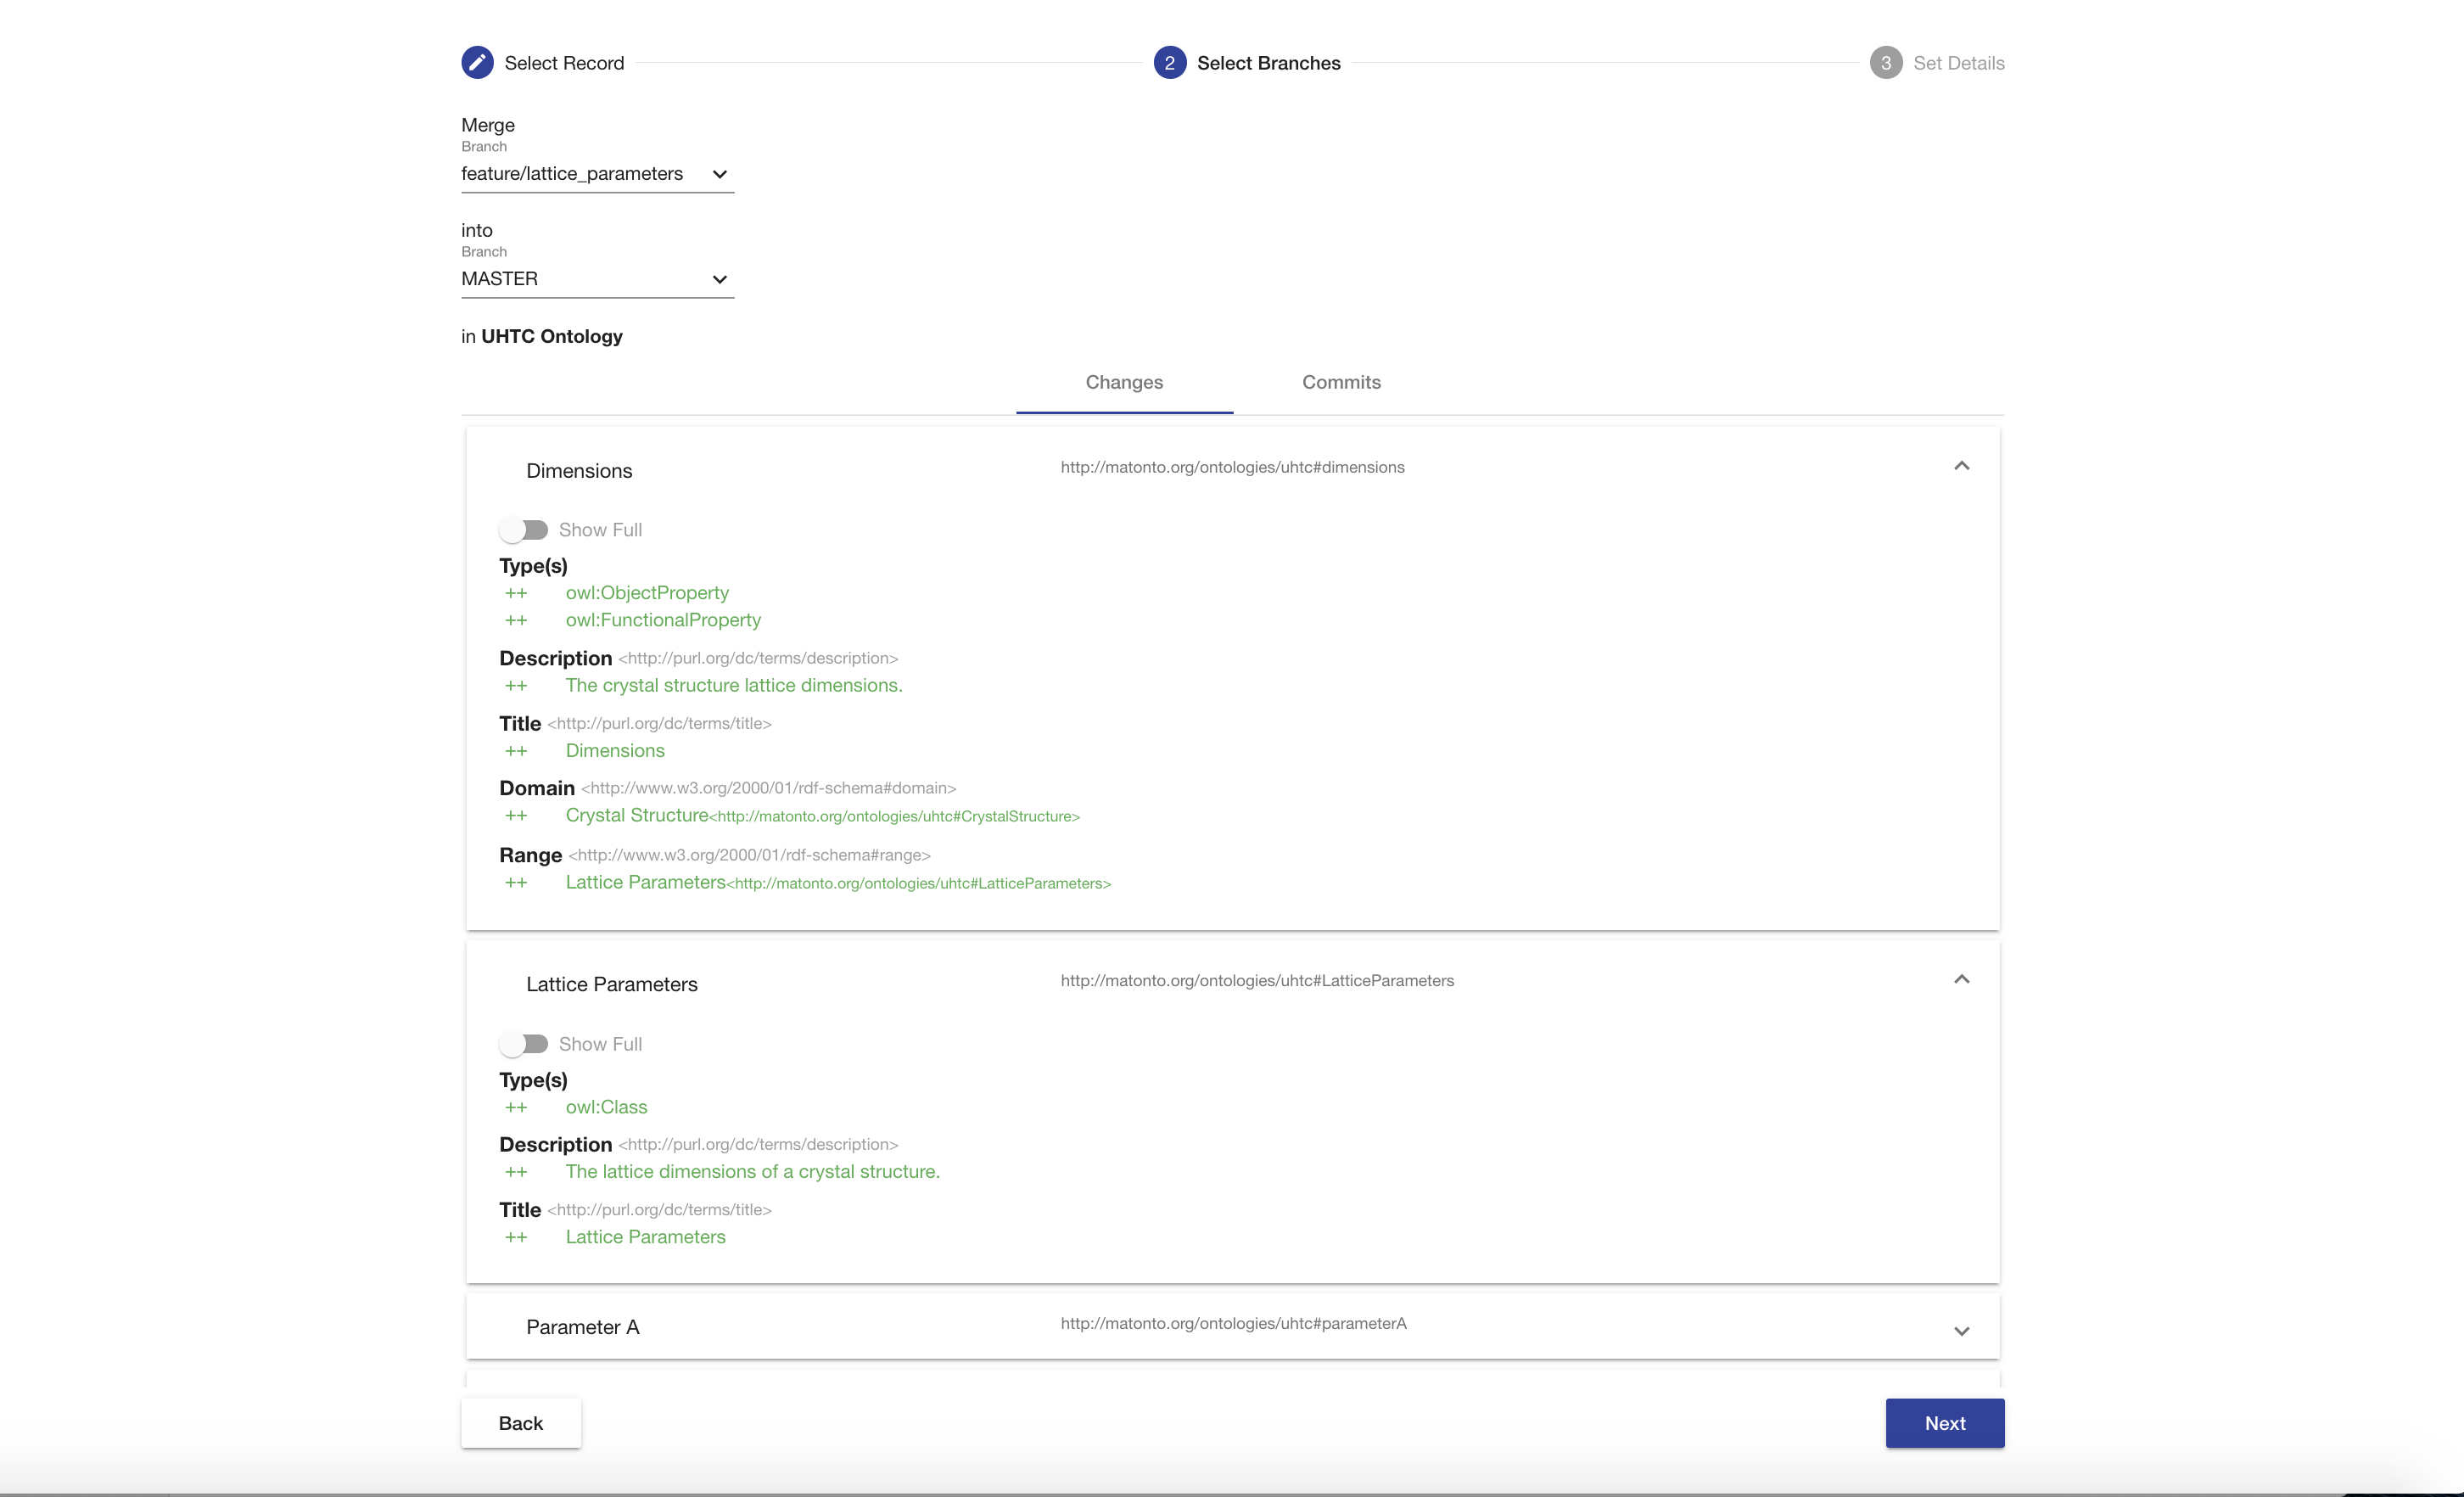
The third step of creating a merge request is to provide any metadata you want to include about the request. This includes the required Title, optional Description, any Assignees of the request, and whether the source branch should be removed when the request is accepted. Once you have provided the metadata you wish to include, click Submit and a new Merge Request with your selections will be created.
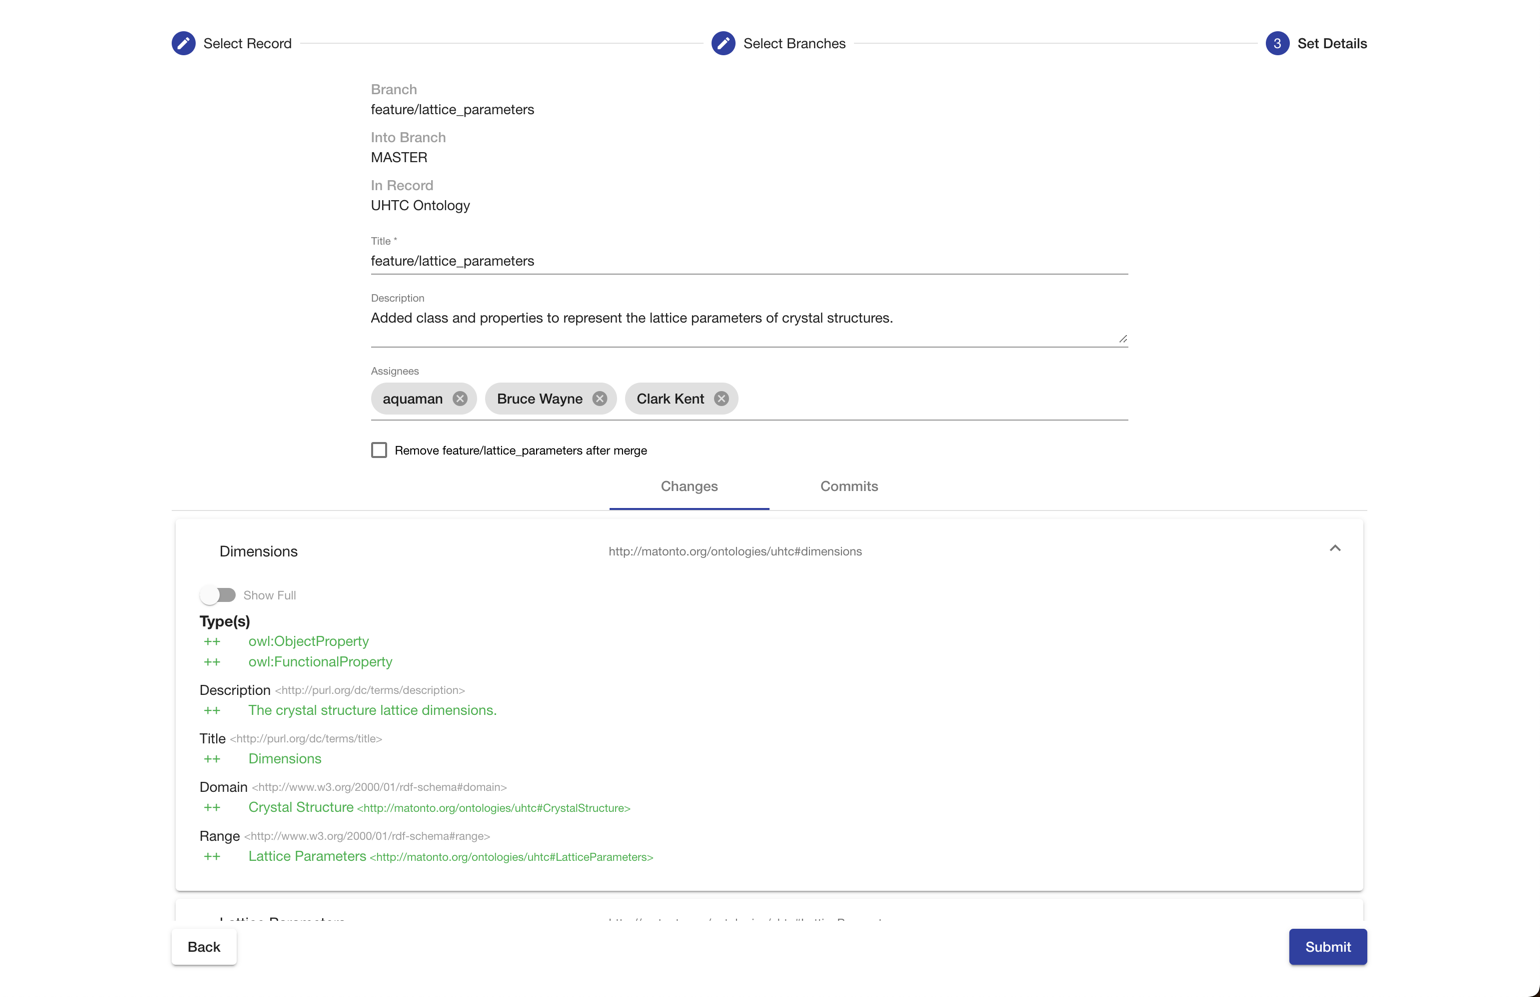
Accepting a Merge Request
A merge request can be accepted only if there are no conflicts between the source and target branch and the user accepting the request has permission to modify the target (see Record Permissions). If there are conflicts between the source and target branches, a notification will be shown with the option to resolve the conflicts from within the Merge Requests module. Resolving conflicts behaves the same as in the Ontology and Shapes Editor, except that the resolution will become a commit on the source branch.
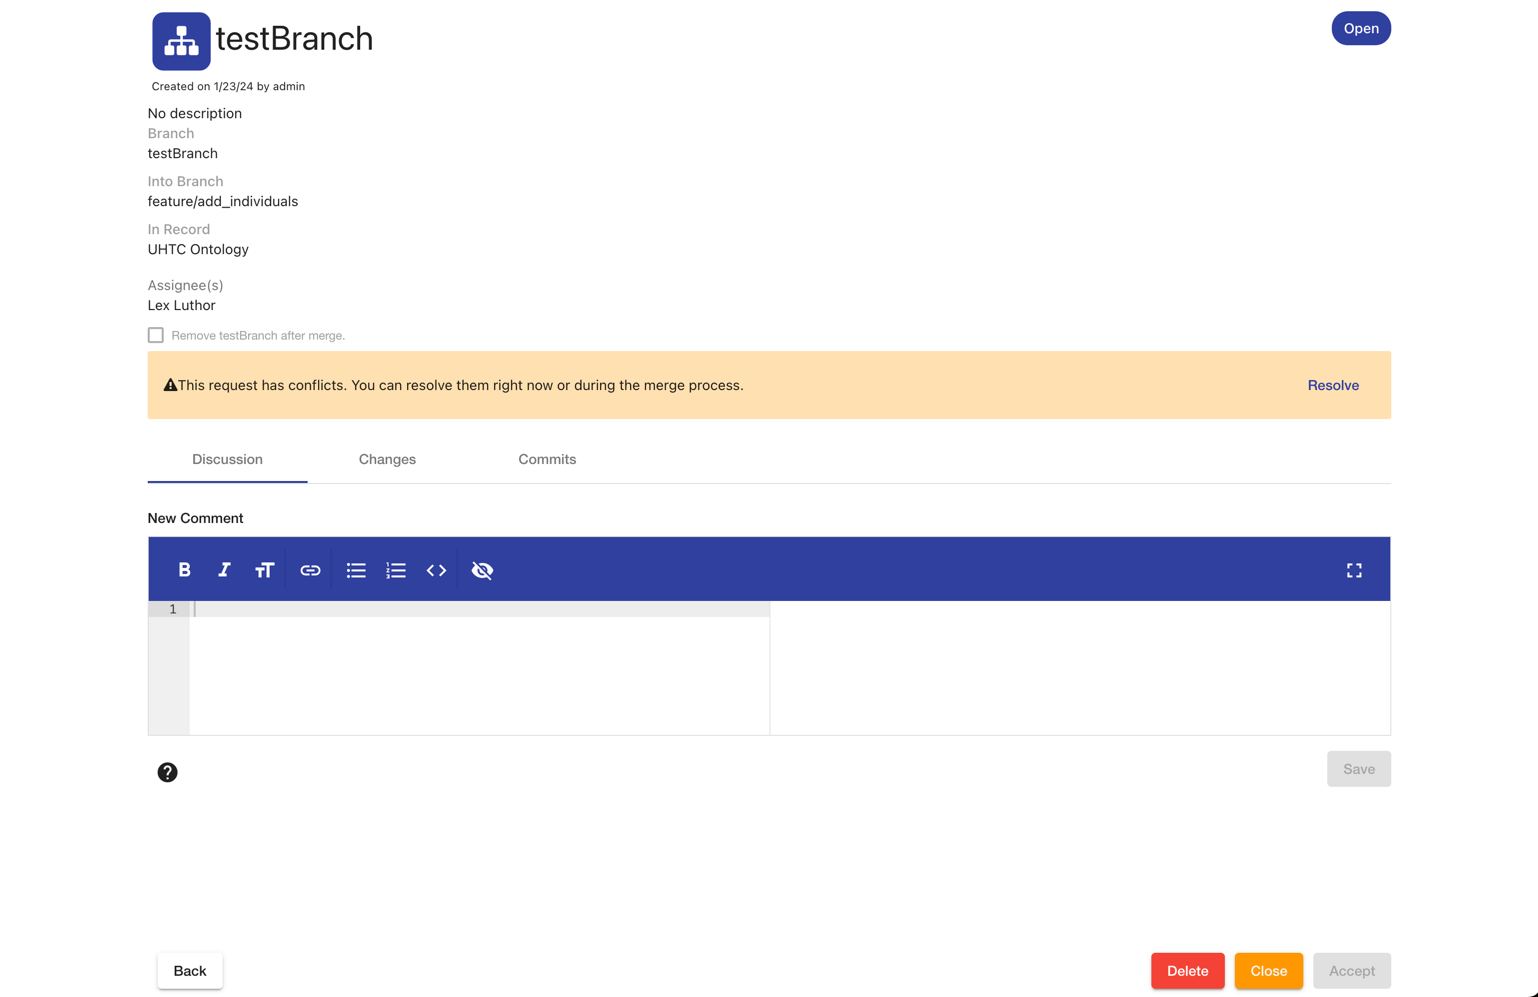
If a merge request is accepted, the merge will be preformed from the source into the target and the request will be moved into an Accepted state. All accepted merge requests are saved within the application for provenance and governance tracking.
Closing a Merge Request
A merge request can be closed so that the history of the proposed changes and the discussion can be kept, but the merge will not be performed. Users can still make comments on a closed merge request, but it cannot be edited. A closed merge request can be reopened as long as the source and target branches on the request still exist.
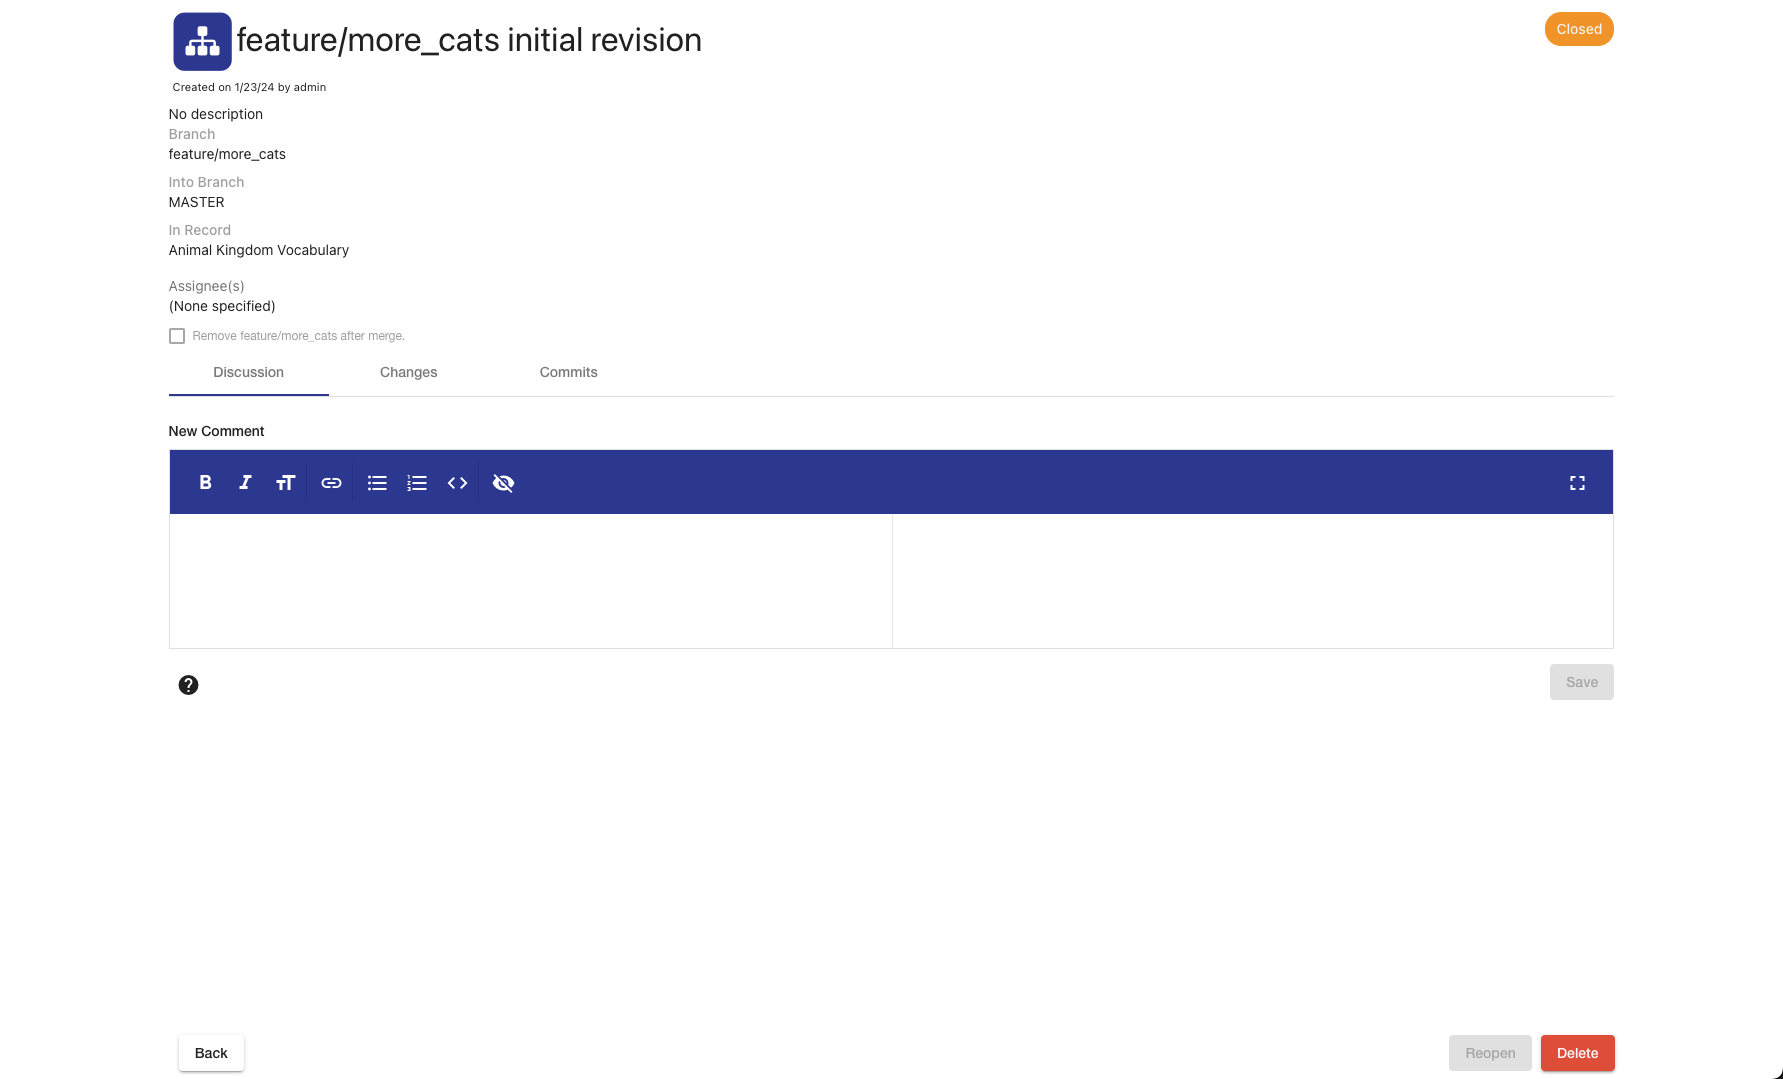
Mapping Tool
The Mobi web-based Mapping Tool allows users to define custom, ontology-driven definitions to control and execute input data transformations to the Resource Description Framework (RDF) semantic data model. User-defined mappings load semantic data into the Mobi store for analysis, sharing and linking.
To reach the Mapping Tool, click on the link in the left menu.
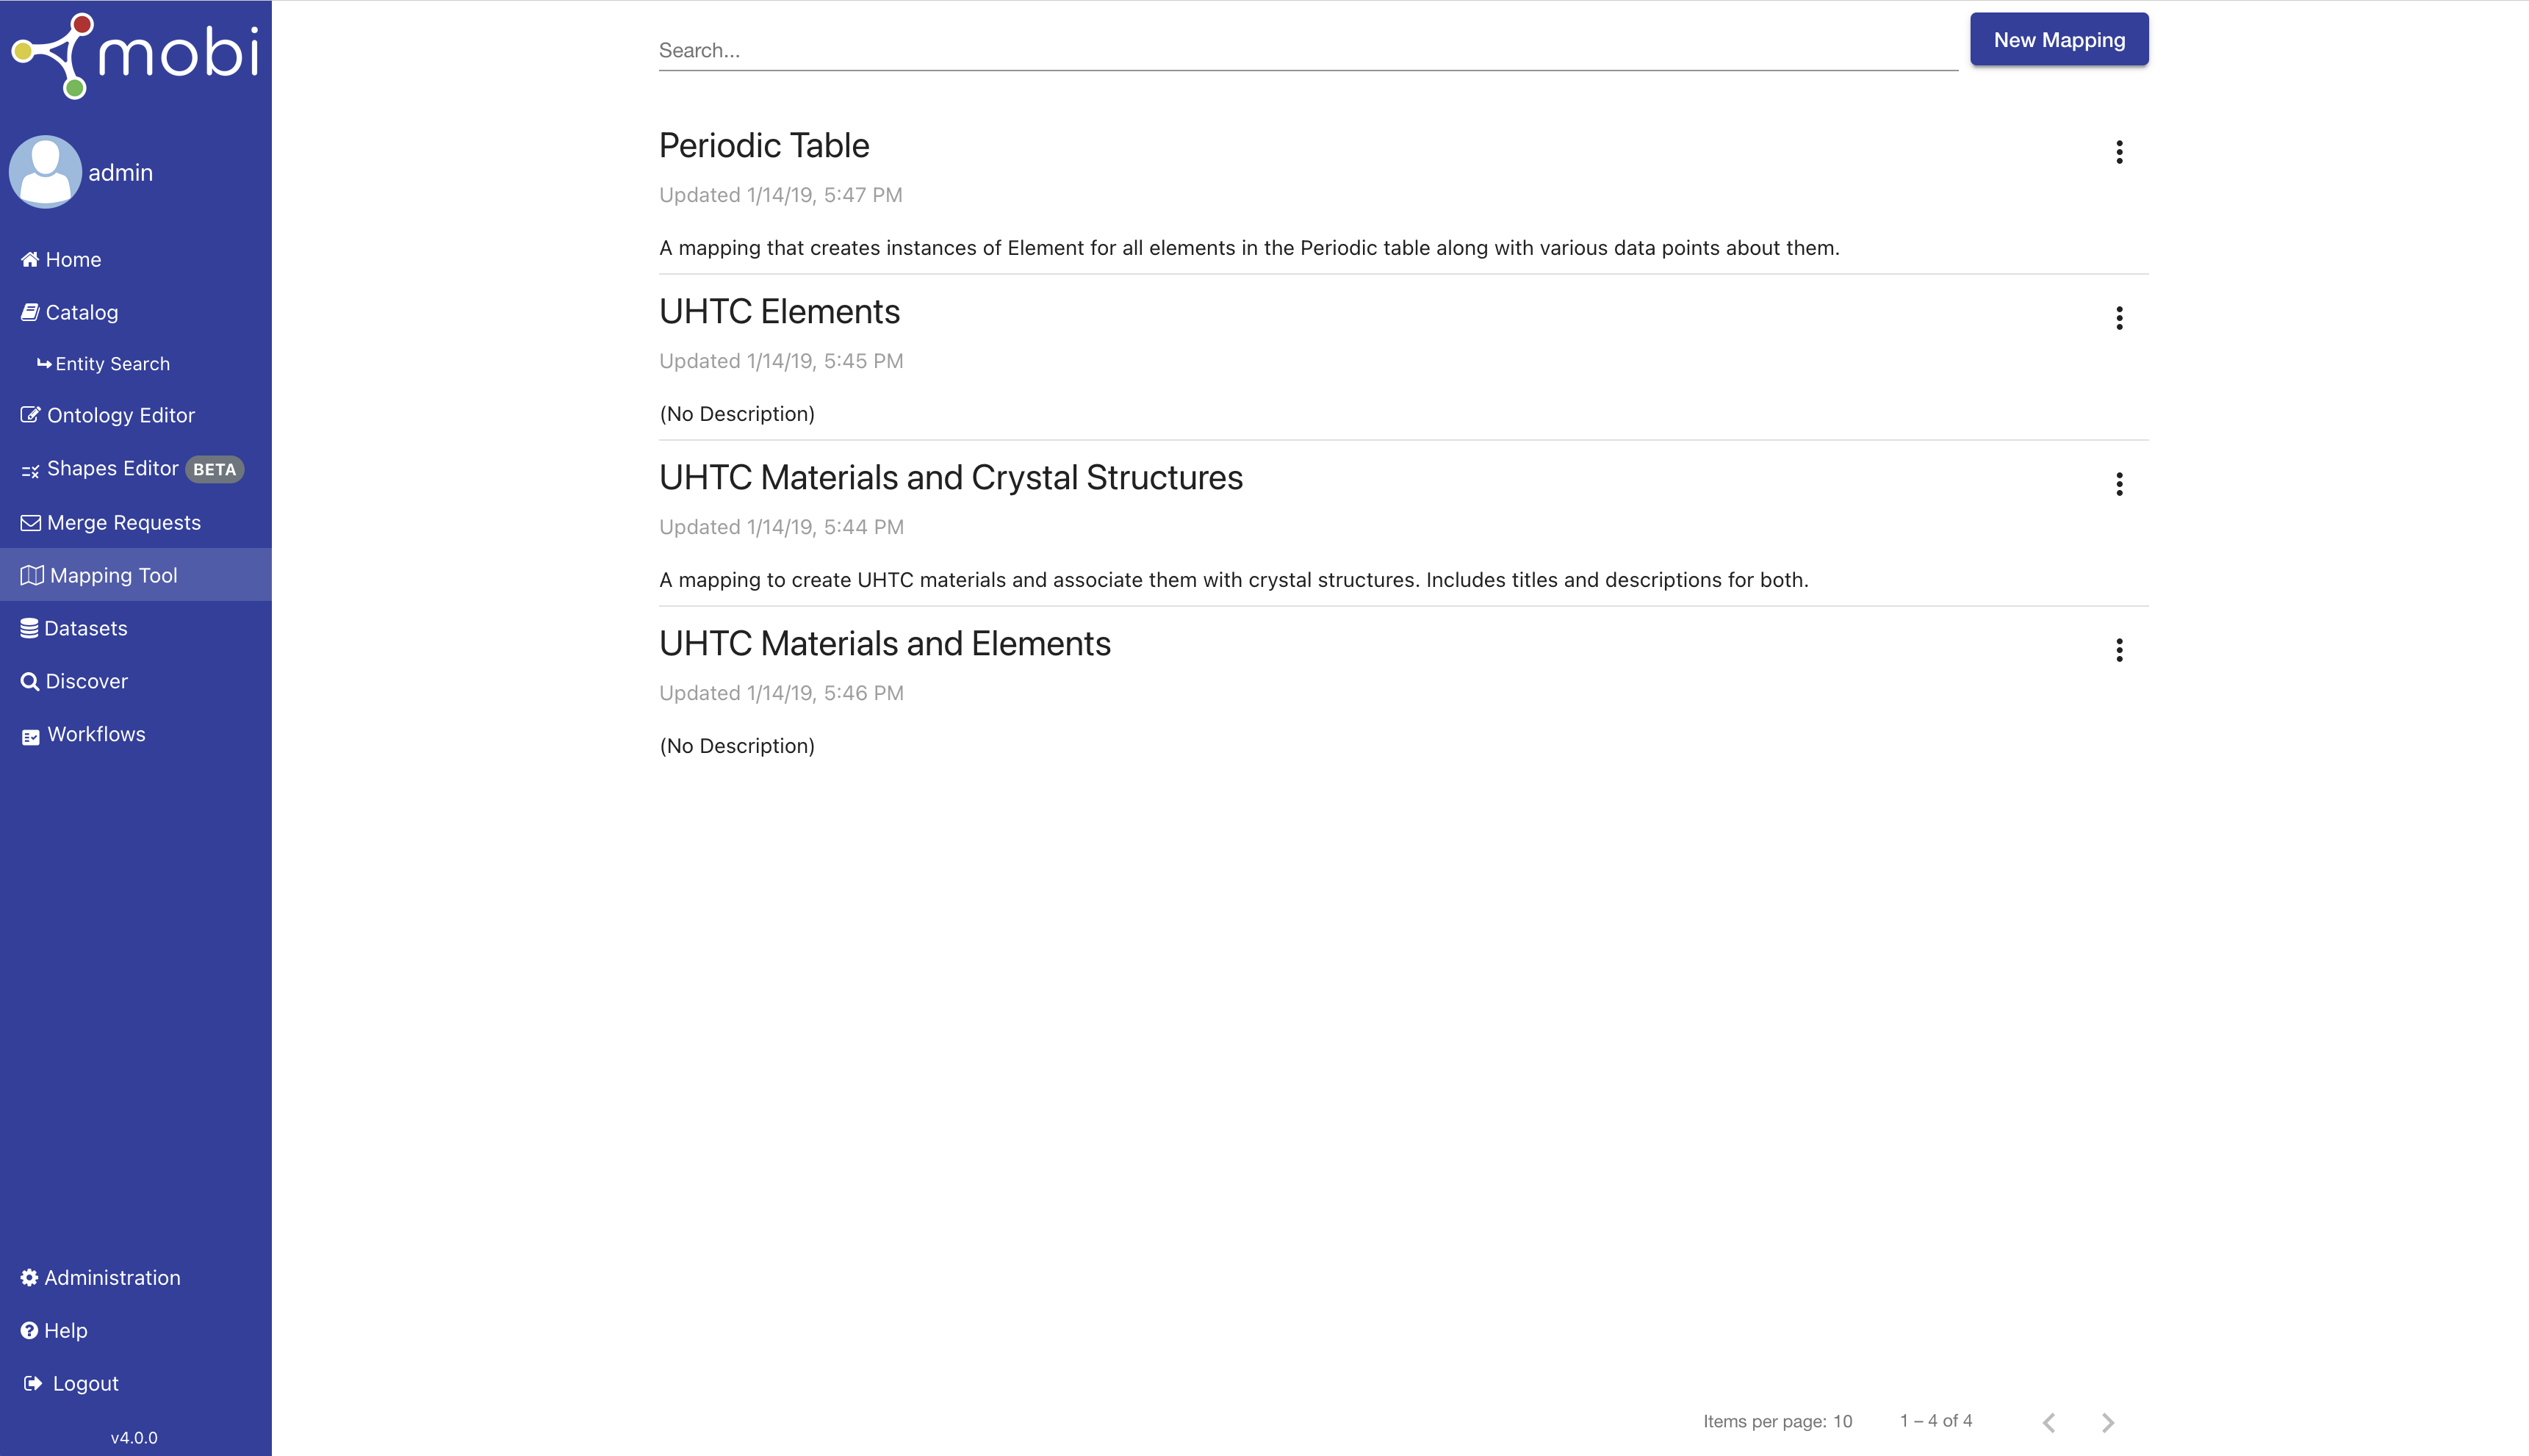
To use the Mapping Tool to map data, an ontology must be in the Mobi repository, but it does not have to be opened to access it. If there are no available ontologies, you will not be able to map delimited data. To upload an ontology go to the [ontology_editor] and follow the steps for uploading ontologies or creating a new ontology.
The initial view of the Mapping Tool shows the Mapping Select Page which contains a searchable paginated list of the mappings within the local Mobi repository. Each mapping is displayed with a portion of its metadata along with a dropdown menu with buttons to preview, duplicate, edit, run, download, and delete the mapping. The Preview button will bring up a display of the mapped classes and properties along with the title of the source ontology. If the selected source ontology no longer exists in the local Mobi repository, you will not be able to edit, run, or duplicate the mapping. Click New Mapping to create.
Creating a Mapping
To create a new mapping, click Create Mapping on the Mapping Select Page. The creation overlay requires you to enter a Title which will populate the dcterms:title annotation of the new mapping record. The Description field populates the dcterms:description annotation of the new mapping record. The Keywords field will attach the entered values as keywords to the new mapping record.
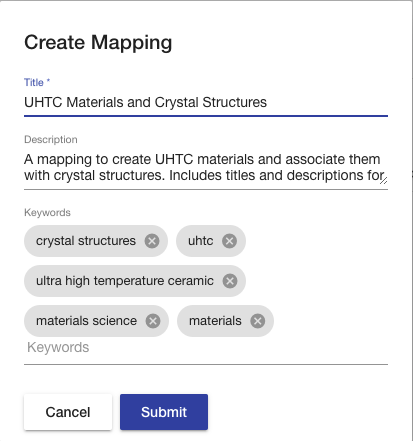
Clicking Submit brings you to the File Upload Page to continue the process of creating a mapping. You must upload a delimited file to use as a standard for the mapping. You can also check whether the file contains a header row and select the separator character if the file is CSV. The accepted file formats are .csv, .tsv, .xls, and .xlsx. Selecting a file in the form on the left loads a preview of the first 50 rows and columns of the delimited file into the table on the right. Clicking Continue brings you to the Edit Mapping Page.

The Edit Mapping Page contains three tabs: Edit, Preview, and Commits. The Edit tab contains a section for displaying the currently selected source ontology, the list of class mappings, and a list of property mappings for a particular class. For every row in the delimited data, an instance of a mapped class will be made according to each class mapping. Each created class instance will have a set of properties as defined by the property mappings associated with the class mapping. The values of data properties will have assigned datatypes based on the range of the mapped data property unless otherwise specified. The Preview tab allows you to map the first 10 rows of the selected delimited file using the current state of the mapping in a variety of different RDF serializations. Just like ontologies, mappings are versioned with commits which can be viewed in the Commits tab.
|
Tip
|
To learn about the structure of a mapping, refer to the Mobi Mappings Appendix. |
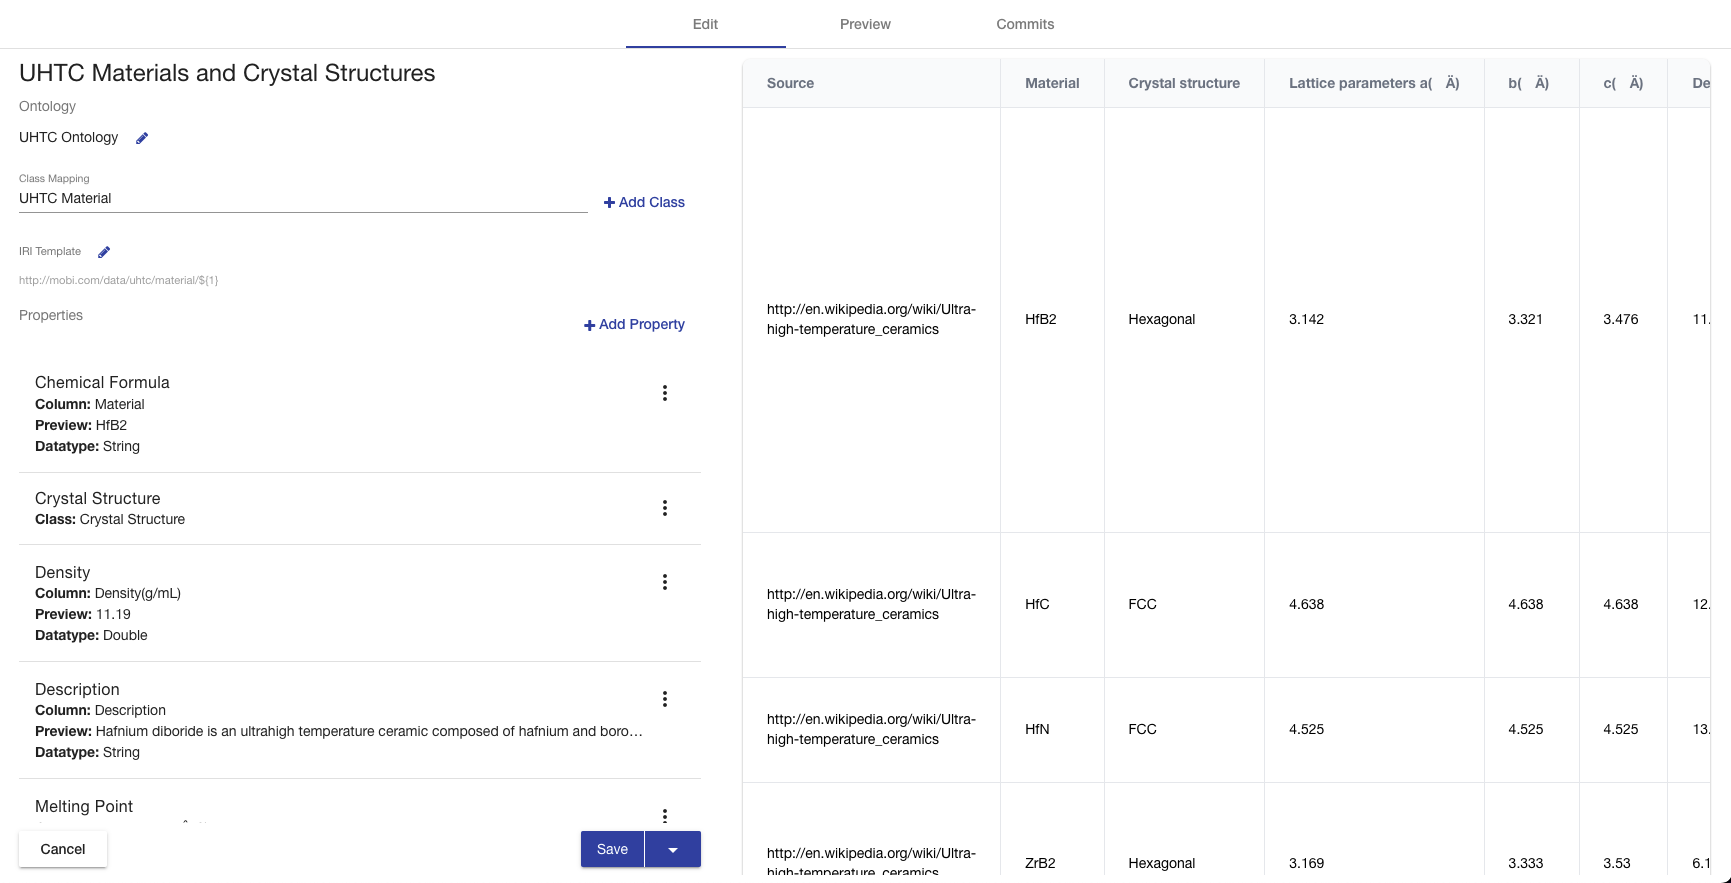
When creating a mapping, the first thing you will see is the Source Ontology Overlay. This setting can always be changed by clicking the pencil button next to the ontology name in the Edit tab. The Class section contains a select box with all the class mappings, a button to delete a specific class mapping, and a button to create a new class mapping. Clicking Add Class opens an overlay where you can select a class in the imports closure of the source ontology that has not been deprecated.
The IRI Template section displays the template Mobi will use when generating IRIs for the created class instances from the selected class mapping. The value within the ${} indicates what will be used for the local name of each class instance’s IRI. "UUID" means that a unique identifier will be generated for each class instance. An integer means that Mobi will grab the value from the column with that index (zero-based) for each row and use each value with all white space removed as the local name for the class instance. This template can be edited by clicking the pencil button next to the section title and filling in the fields in the IRI Template Overlay.
The Properties section lists all the property mappings for the selected class mapping with a button to add a new property mapping. Object property mappings are displayed with the name of the class mapping whose instances will be used as the range of the property. Data or Annotation property mappings are displayed with the name of the column whose values will be used as the range of the property, a preview of what the first value would be, the datatype for the mapped value, and the language for the values if specified. Each property mapping also provides a button to edit and delete. If a data property mapping is invalid, meaning it points to a column that does not exist in the delimited file, it must be handled before the mapping can be saved or run.
Clicking Add Property opens an overlay where you can select a property in the imports closure of the source ontology that has not been deprecated or a common annotation. The common annotations that can be mapped are rdfs:label, rdfs:comment, dcterms:title, and dcterms:description. The list of properties from the imports closure is determined by searching for properties that meet the following criteria.
-
The class (or a superclass) of the class mapping is a direct
rdfs:domainon the property (or one of the property’s super properties) -
The class (or a superclass) of the class mapping is enumerated in a
owl:unionOfrestriction on therdfs:domainof the property (or one of the property’s super properties) -
The property and none of its super properties has no
rdfs:domaindefined
If you select a data property or an annotation, a select box appears containing identifiers for each column in the delimited file along with a preview of the first value of the selected column. At this point, you can also specify a manual datatype override which the mapper will use over the range of the property if set. If a property has more than one rdfs:range value, the datatype override box will be displayed and you must select which type the generated values must be. You can also specify the language for the property values by selecting rdfs:langString as the type and then a language select will appear underneath.
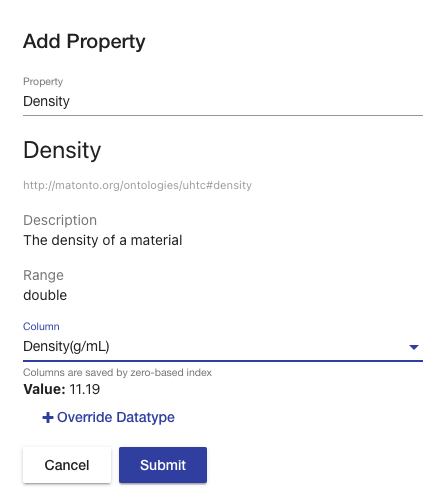
If you select an object property, a select field appears containing the titles of all class mappings of the appropriate type along with an option to create a new class mapping. The list of class mappings displayed is determined by the rdfs:range that is set on the selected property and its super-properties. If no range has been set on the property or there is a range of owl:Thing a full list of class mappings becomes available alongside the ability to create a new class mapping with all classes within the imports closure being an option.
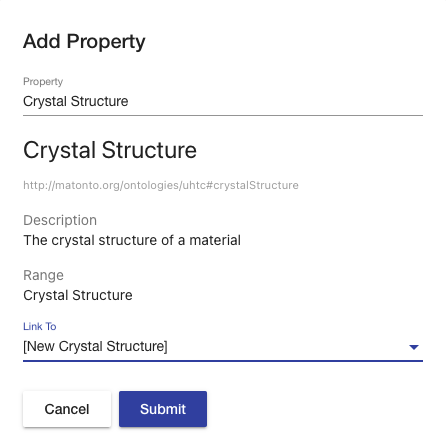

Clicking the main Save button at the bottom of either the Edit or Preview tab saves the current state of the mapping and brings you back to the Mapping Select Page. Clicking on the arrow to the right of the Save button provides you options for running the mapping in addition to saving it. These options are downloading the mapped data, uploading the mapped data into a data within a Mobi repository, or committing the mapped data to a specific branch of an ontology. Each option will bring up an appropriate overlay for choosing a RDF format and file name, a dataset, or an ontology and branch respectively. Clicking Submit in an overlay will save the current state of the mapping and run it.
|
Tip
|
To learn about datasets in Mobi, refer to the Datasets Manager. |
|
Note
|
For more information about running a mapping into an ontology, refer to Mapping into an Ontology. |
Editing a Mapping
To edit a mapping, click Edit on the Mapping Select Page. The application performs a quick check to see if the source ontology or its imported ontologies changed in such a way that the mapping is no longer valid. If this check does not pass, an overlay is displayed informing you of the error and giving you the option to continue and have the tool automatically remove incompatible mappings. If you continue or the check passes, you are brought to the File Upload Page where you must upload a delimited file to use as a standard for the mapping. If the delimited file you choose does not contain enough columns for the mapping’s data property mappings, a list of the missing columns are displayed under the file select. However, you can still edit the mapping as long as those data properties are fixed. From there, editing the mapping works the same as creating a mapping.
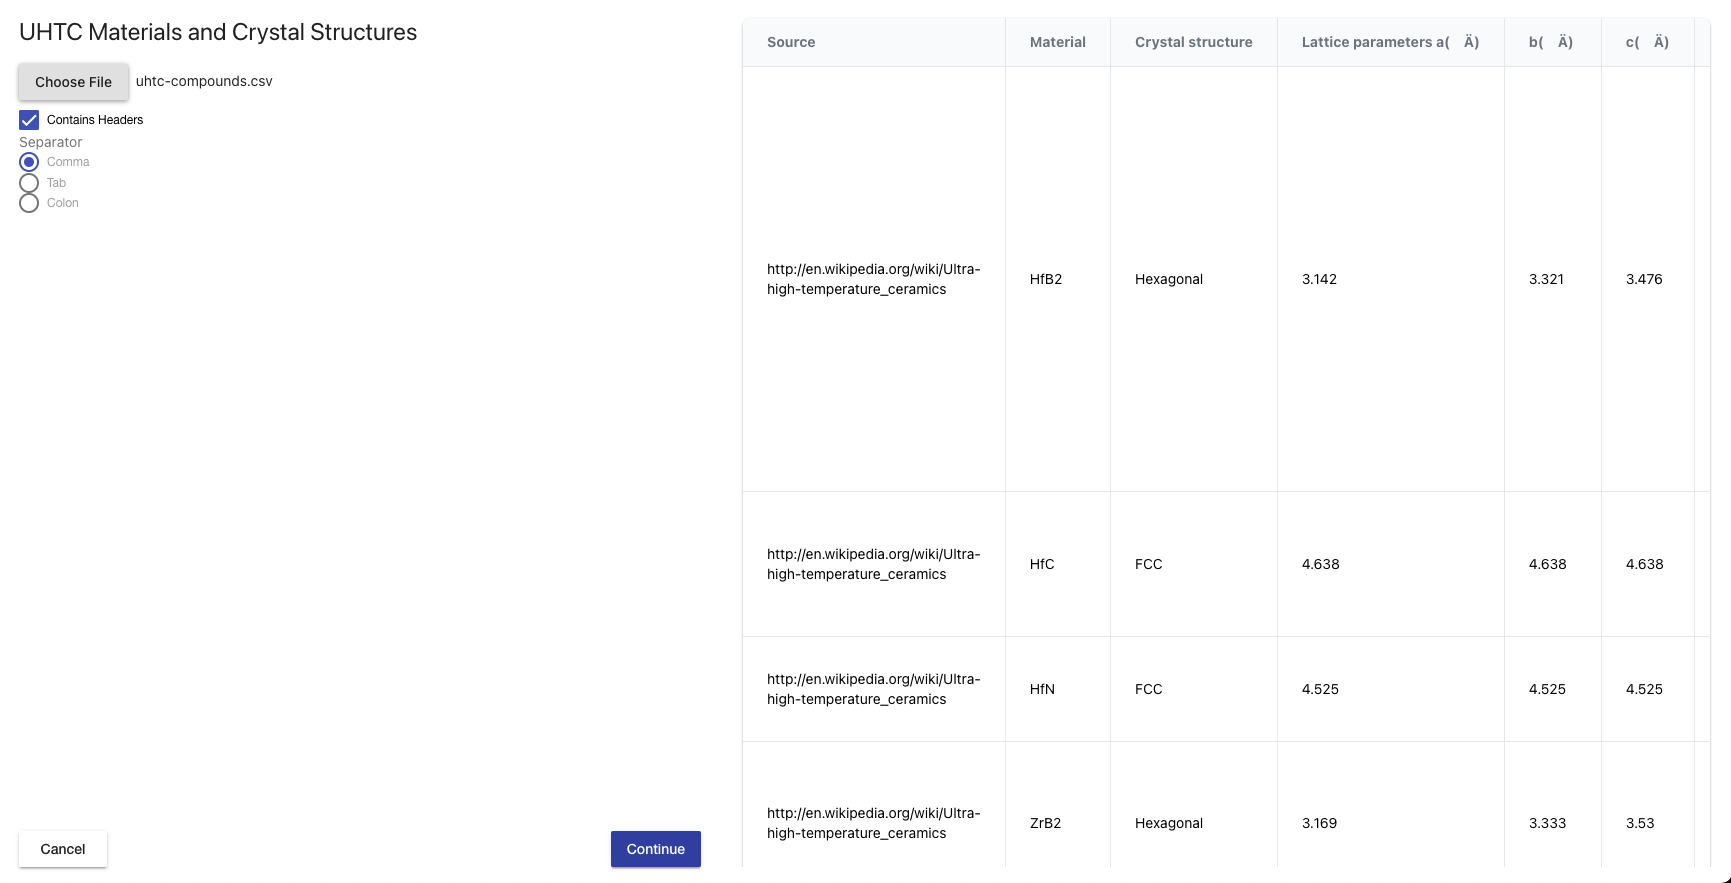
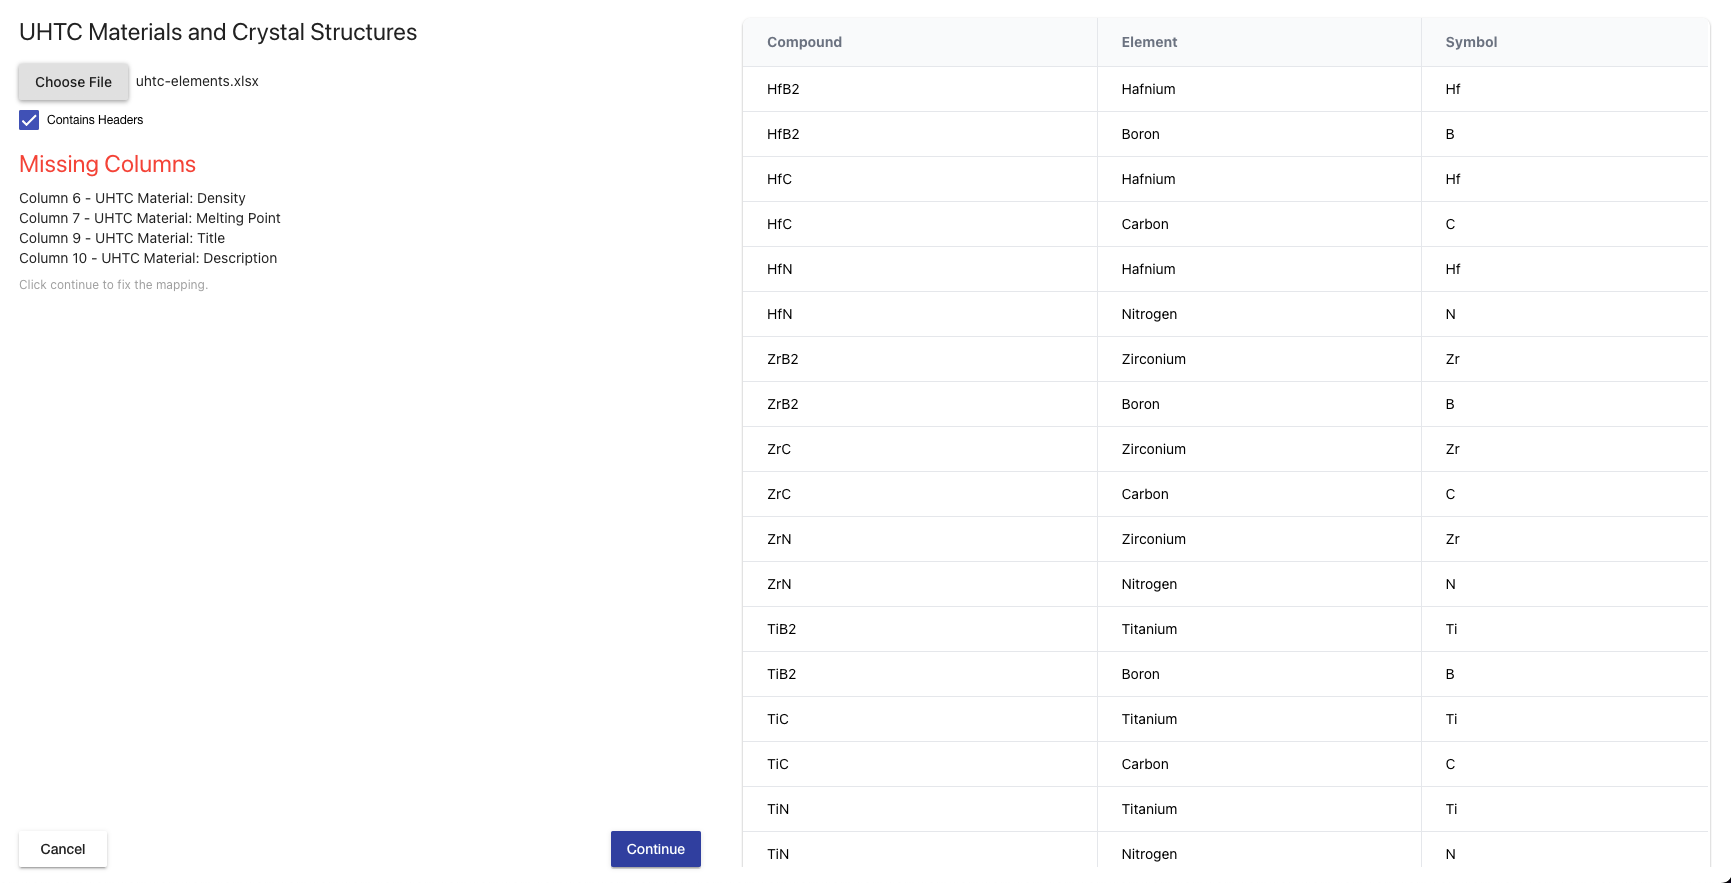
Duplicating a Mapping
To duplicate a mapping, click Duplicate on the Mapping Select Page. The application performs a quick check to see if the source ontology or its imported ontologies changed in such a way that the mapping is no longer valid. If this check does not pass, an overlay is displayed informing you of the error and giving you the option to continue and have the tool automatically remove incompatible mappings. If you continue or the check passes, the Create Mapping overlay will appear allowing you to choose new values for the Title, Description, and Keywords. The rest of the process is the same as editing a mapping including how missing columns are handled.
Running a Mapping
To run a mapping against delimited data without editing it, click Run on the Mapping Select Page. The application performs a quick check to see if the source ontology or its imported ontologies changed in such a way that the mapping is no longer valid. If this check does not pass, an overlay is displayed informing you of the error and giving you the option to continue and have the tool automatically remove incompatible mappings. If you continue or the check passes, you are brought to the File Upload Page where you must upload a delimited file to be used when generating RDF data. You can also check whether the file contains a header row and select the separator character if the file is CSV. The accepted file formats are .csv, .tsv, .xls, and .xlsx. The classes and properties that will be created using the mapping are displayed under the file select. The columns that must be present in the delimited file are highlighted in the table on the right. Selecting a file in the form on the left loads a preview of the first 50 rows and columns of the delimited file into the table. If the delimited file you choose does not contain enough columns for the mapping’s data property mappings, the properties that are missing columns turn red and you will not be able to run the mapping.
|
Tip
|
To learn about datasets in Mobi, refer to the Datasets Manager. |
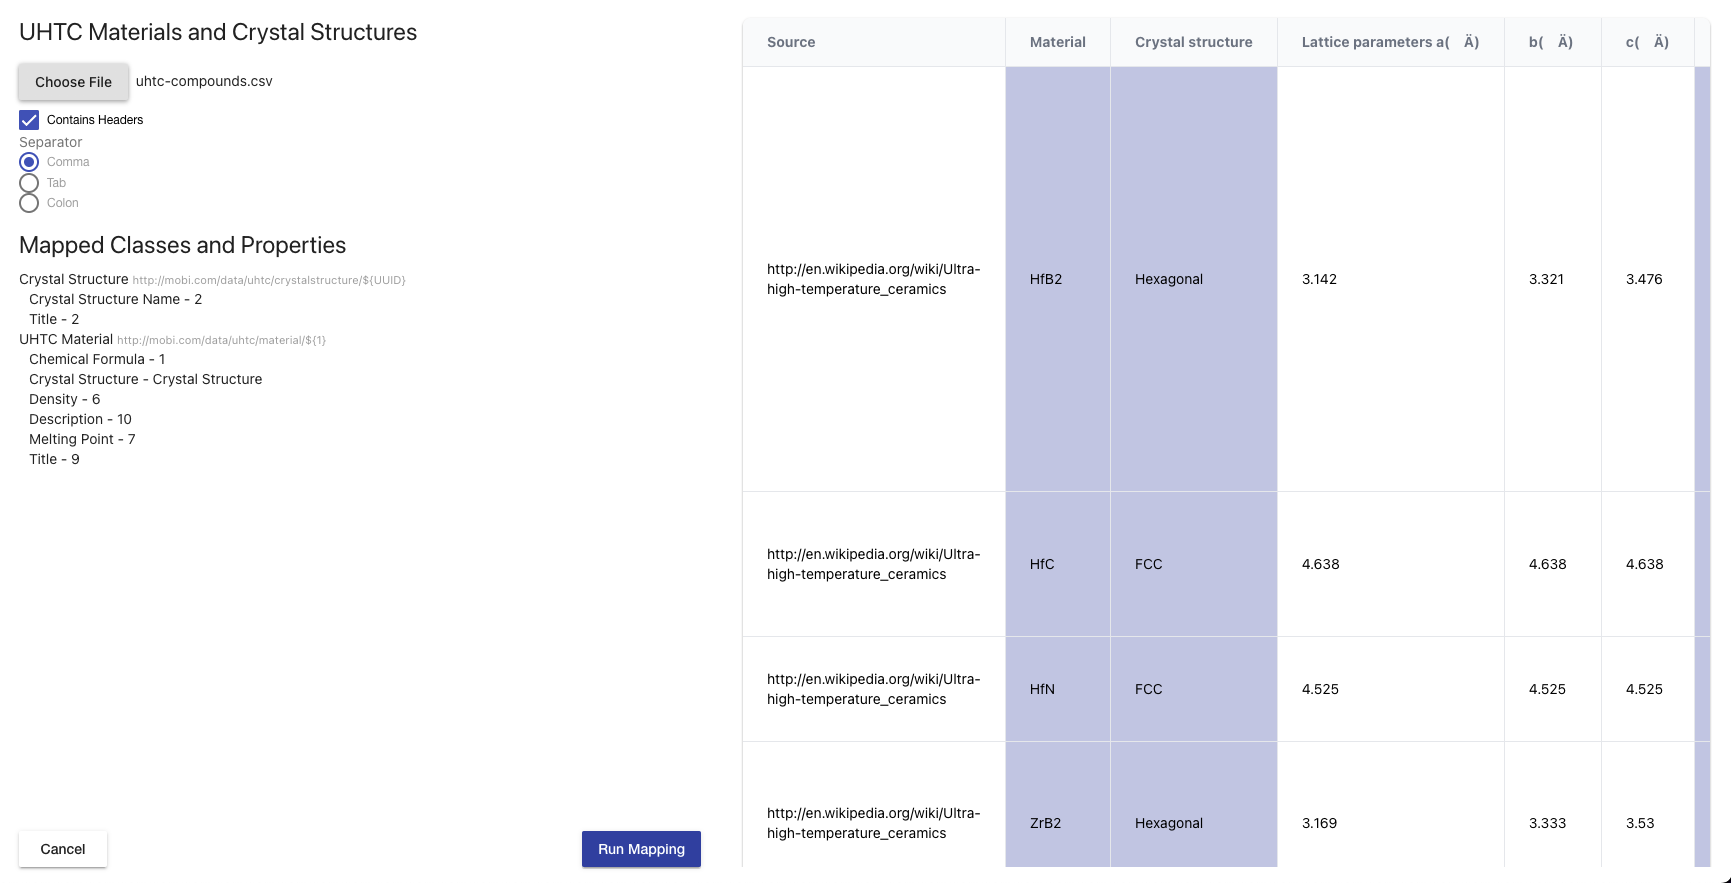
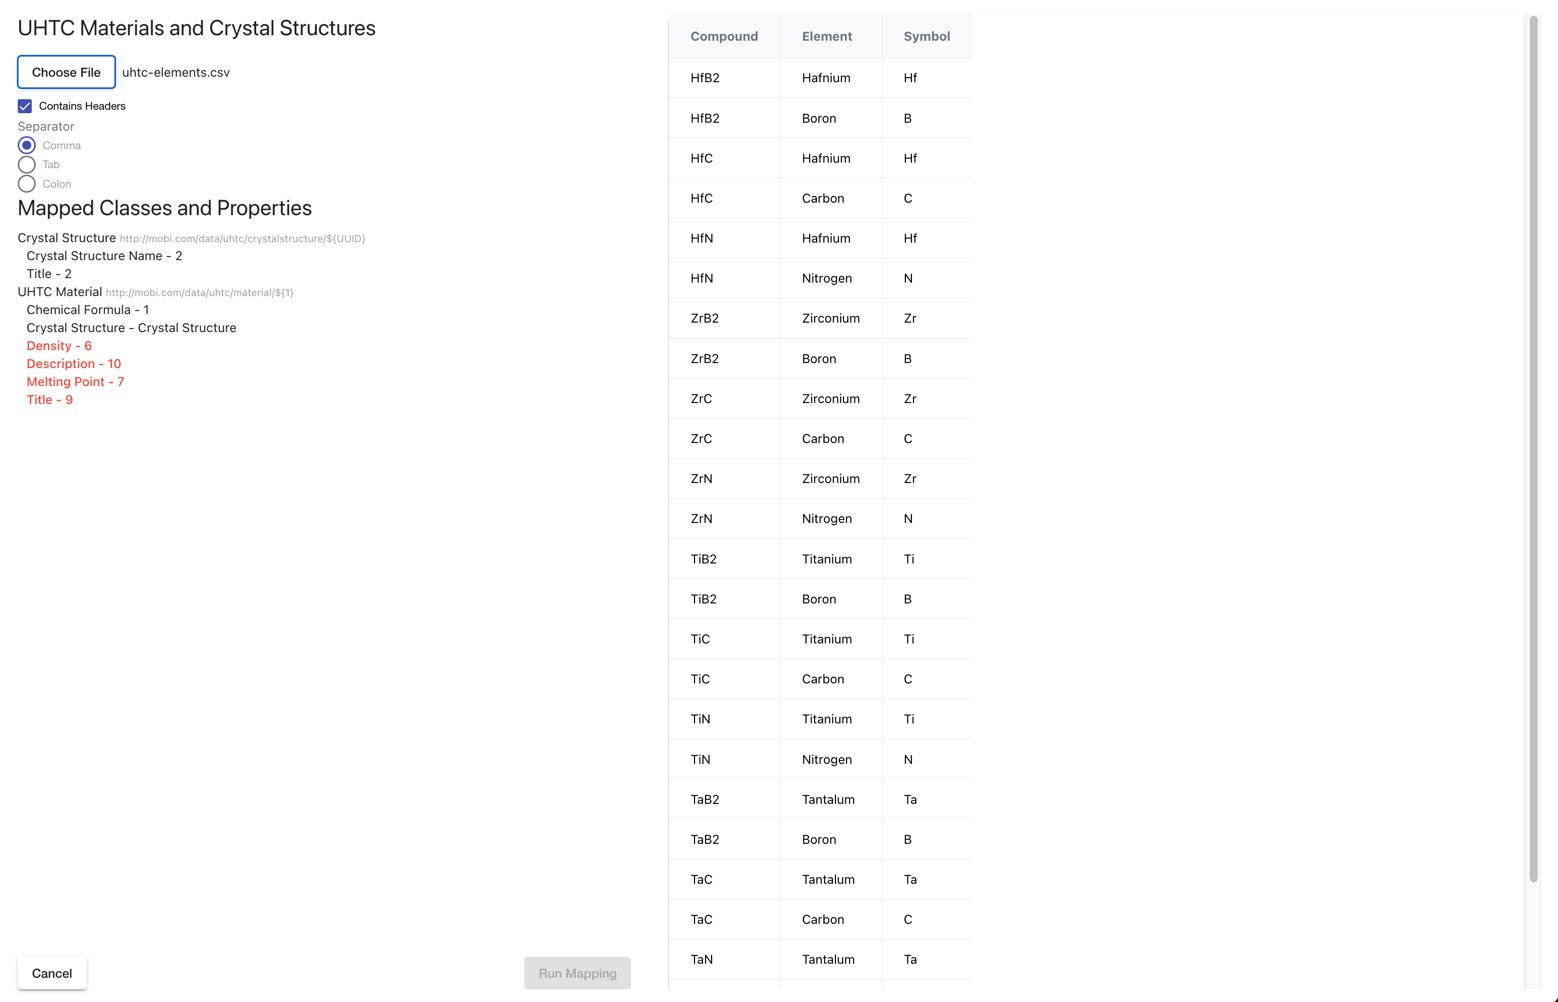
Clicking Run Mapping will provide you with options for downloading the mapped data, uploading the mapped data into a data within a Mobi repository, or committing the mapped data to a specific branch of an ontology. Each option will bring up an appropriate overlay for choosing a RDF format and file name, a dataset, or an ontology and branch respectively.
|
Note
|
For more information about running a mapping into an ontology, refer to Mapping into an Ontology. |
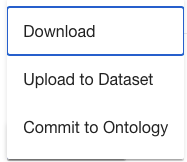
Mapping Tool Reference
Source Ontology Overlay
The Source Ontology Overlay allows you to select the source ontology for the mapping from all uploaded ontologies in the local Mobi repository.
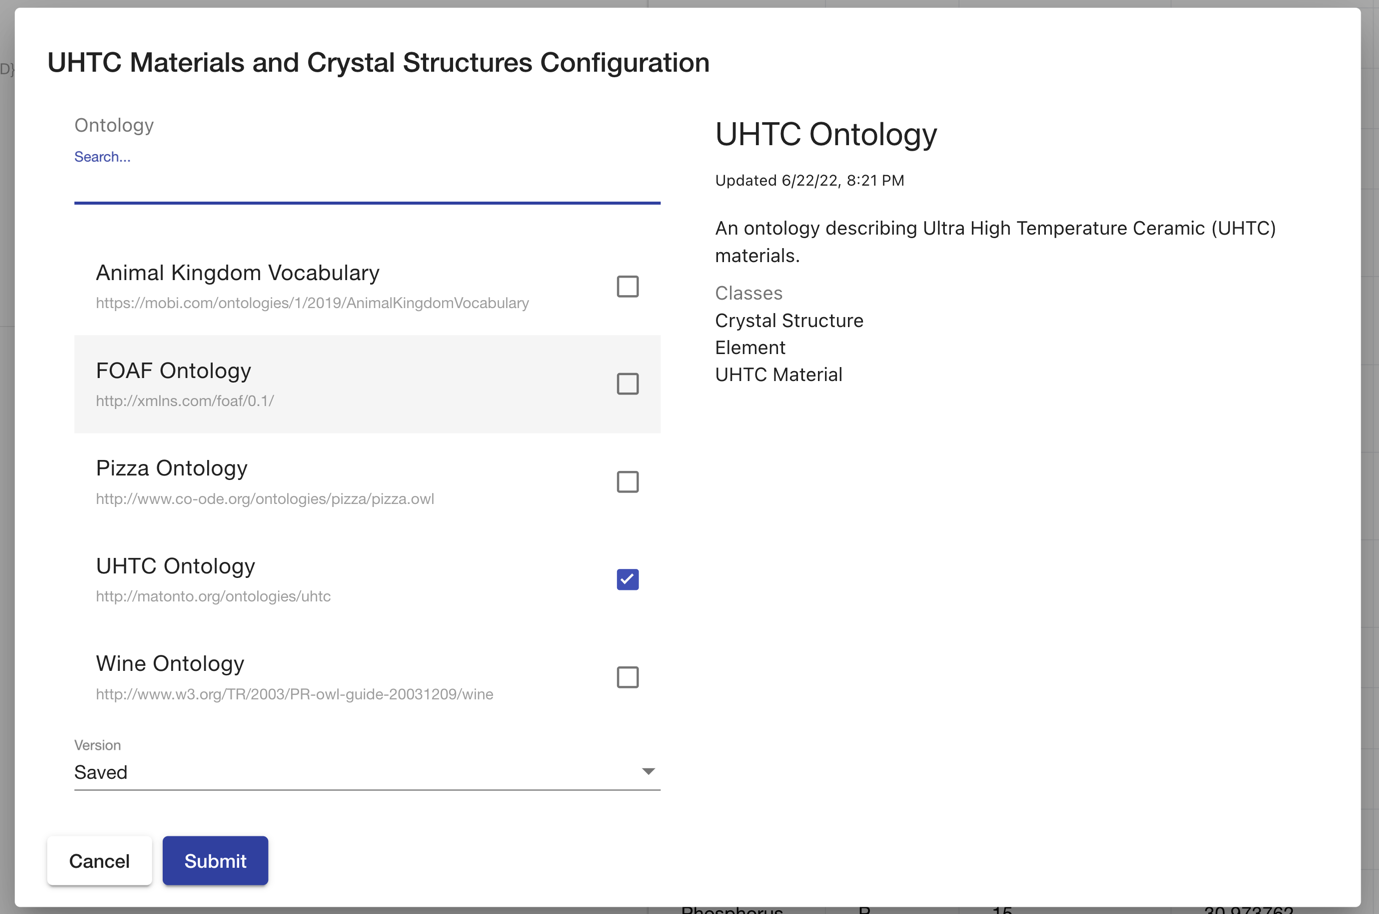
The left side of the overlay contains a searchable list of all the ontologies in the local Mobi repository and a select for the version of the ontology to use. For most ontologies, this will only contain the "Latest" value. However, if an ontology was previously selected for a mapping and that ontology has changed since then, there will be an option for the "Saved" version of the ontology. The right side of the overlay displays information about the ontology from its record in the Catalog and a sample of the classes in that ontology. Setting the source ontology will remove any class and property mappings in the mapping that are incompatible. The criteria for incompatible mappings are as follows:
-
The referenced class or property no longer exists in the imports closure of the source ontology
-
The referenced class or property is now deprecated
-
The referenced property has changed from a datatype property to an object property or vice versa
-
The range of the referenced object property has changed such that the target class mapping is no longer valid
-
The class of the range class mapping of the referenced object property is incompatible
IRI Template Overlay
The IRI Template overlay provides you a way to edit each portion of the IRI template of a class mapping. The template will be used to generate the IRIs for each instance created by a class mapping.
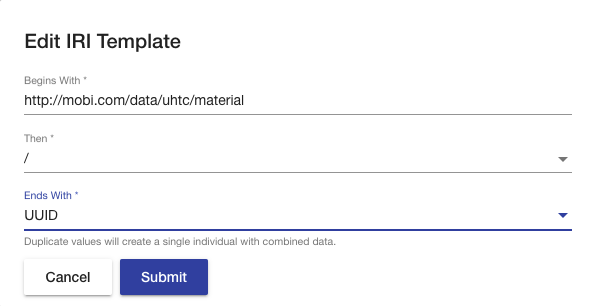
The Begins with field (required) is the beginning of the IRI. This is more commonly known as the namespace. The Then field (required) is the next character in the IRI. This value can be thought of the separator between the namespace and local name (described below). The provided values for the Then field are "#", "/", and ":". The Ends with dropdown field (required) is the last part of the IRI. This value is commonly known as the local name. The values in this dropdown are "UUID", which represents generating a unique identifier as the local name for each generated instance of each row, and the title of each column, which represents using the value of that column as the local name for each generated instance of each row. Clicking Cancel will close the overlay. Clicking Submit will save the IRI template.
Mapping into an Ontology
The overlay for mapping into an ontology contains several configurations on how the mapping result data will be committed. First, you must select the Ontology and Branch that will receive the new commit. After that, there are radio buttons that will determine how the mapping result data will be treated when the commit is made. The first option will treat all the mapping result data as new data, meaning no existing data in the ontology branch will be removed. The second option will treat all the mapping result data as changes to the existing data on the ontology branch. This means that if there are entities or properties on entities in the ontology that are not present in the mapping result data, they will be removed.
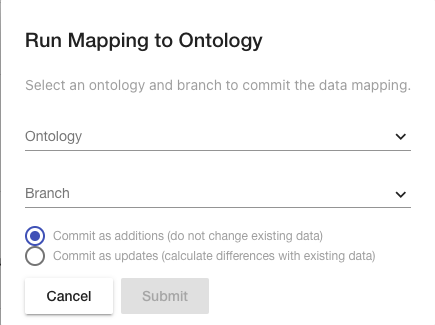
A sample workflow using this tool would be to create an ontology in the Ontology Editor and create a branch that will received all mapped data commits. Then run your mapping from the Mapping Tool, committing to the new branch as additions. Finally in the Ontology Editor, merge that branch with the mapped data commit into the MASTER branch. Then any subsequent runs of the mapping with updated data would be committed as changes to the mapped data branch and merged into the MASTER branch.
Datasets Manager
The Mobi Datasets Manager allows users to create, edit, clear, and delete datasets within the application to group and store Resource Description Framework (RDF) semantic data into various graphs for enhanced query isolation, data segmentation, and management.
|
Tip
|
To learn more about the structure of a dataset, refer to the Mobi Datasets Appendix. |
To reach the Datasets Manager, click on the link in the left menu.
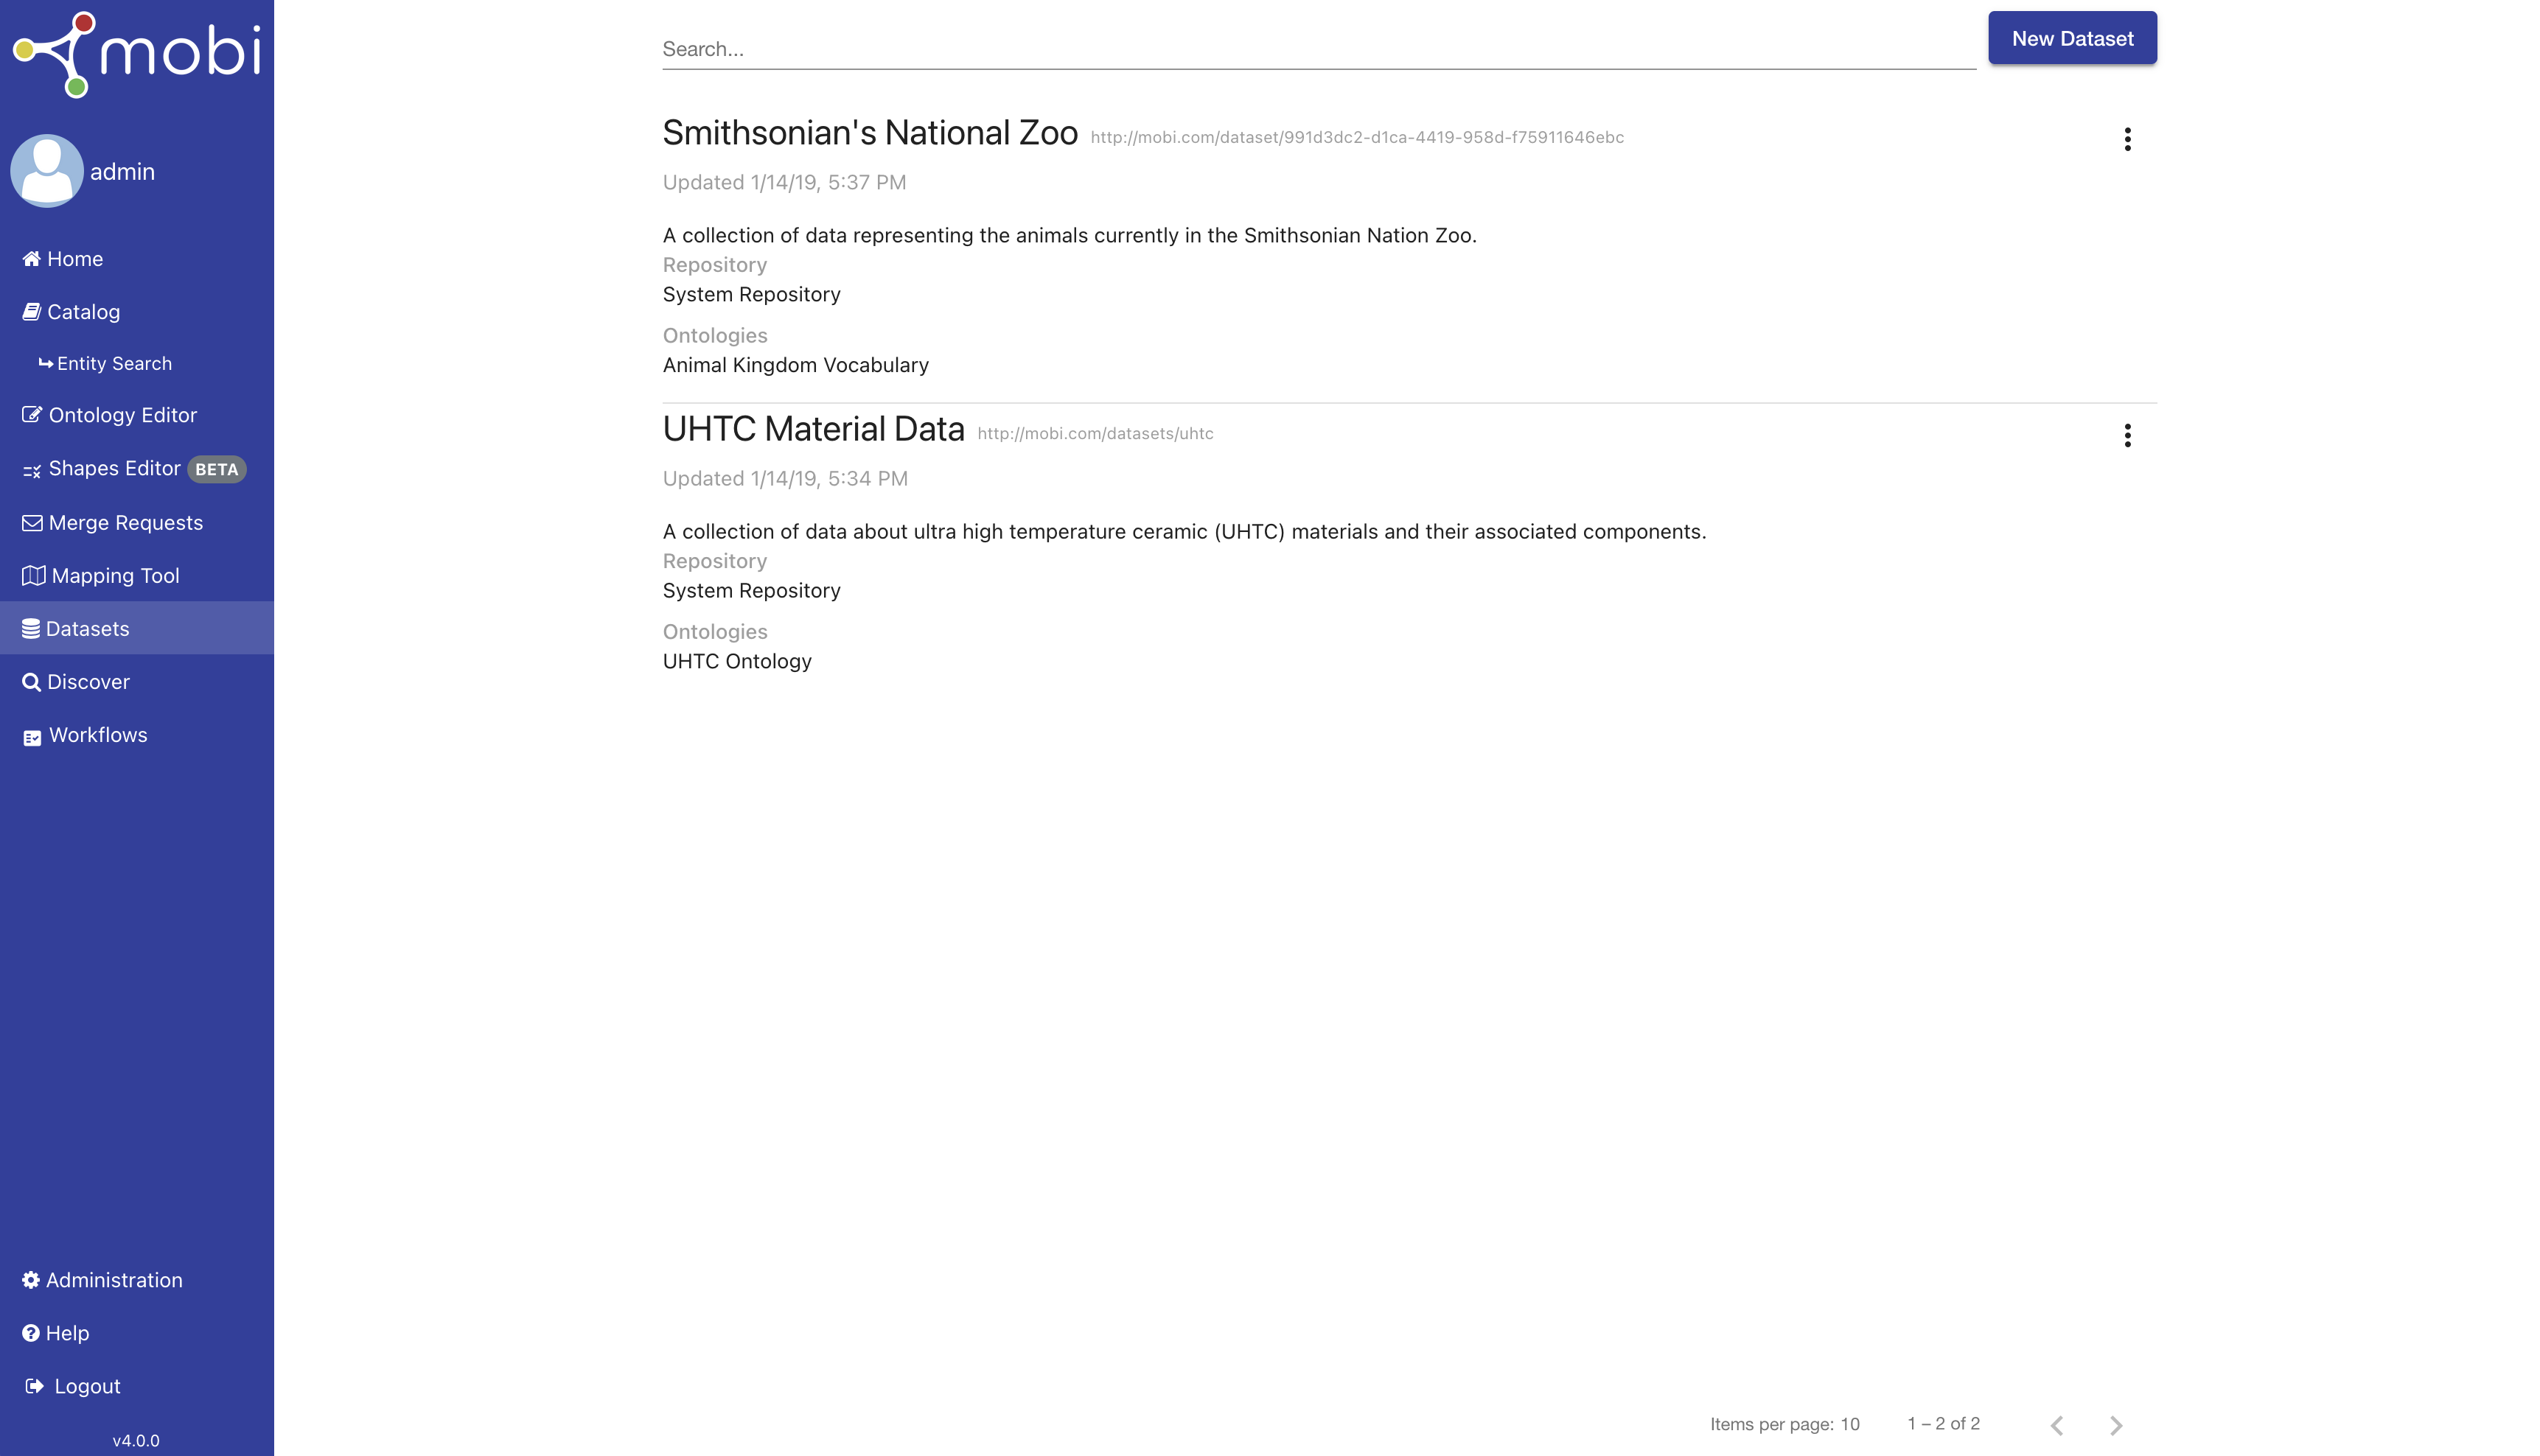
The page displays a searchable paginated list of all the datasets within the local Mobi repository. Each dataset in the list displays a preview of the dataset metadata and a dropdown menu with upload data, edit, clear, and delete buttons. Deleting a dataset deletes the dataset, catalog record, and all associated data graphs. Clearing a dataset removes all associated data graphs except the system default named graph. Clearing a dataset does not remove the dataset or the catalog record. Editing a dataset allows to you to change some information about the dataset. The Upload Data button allows you to upload graph data to the dataset from a file.
To create a new dataset, click New Dataset and fill out the information in the creation overlay.
Create Dataset
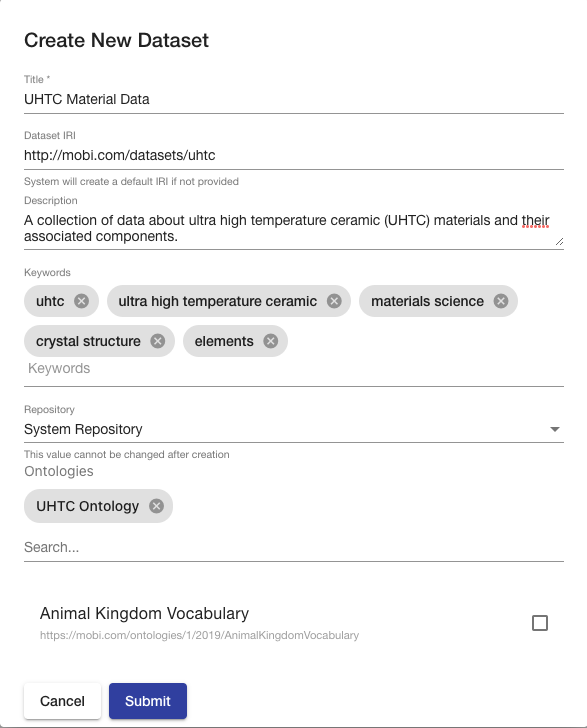
The Create New Dataset overlay contains several sections. The Title field populates the dcterms:title annotation of the new dataset record. The Dataset IRI field allows you to specify what the IRI of the new dataset should be. If not provided, the system will create a unique one for you. The Description field populates the dcterms:description annotation of the new dataset record. The Keywords field will attach the entered values as keywords to the new dataset record. The Repository field allows you to specity the identifier of the repository registered within AVM where the dataset and all associated named graphs will be stored. The default option is the system repository and should be used in most cases. Finally, you can select which ontologies should be used as the basis for the data. Select an ontology from the searchable list of ontologies to add it to the dataset. To remove a selected ontology, click the x next to the ontology name. Clicking Cancel will close the overlay. Clicking Submit will create the dataset with the provided metadata.
|
Note
|
The ability to create new repositories in Mobi is coming soon! |
Edit Dataset
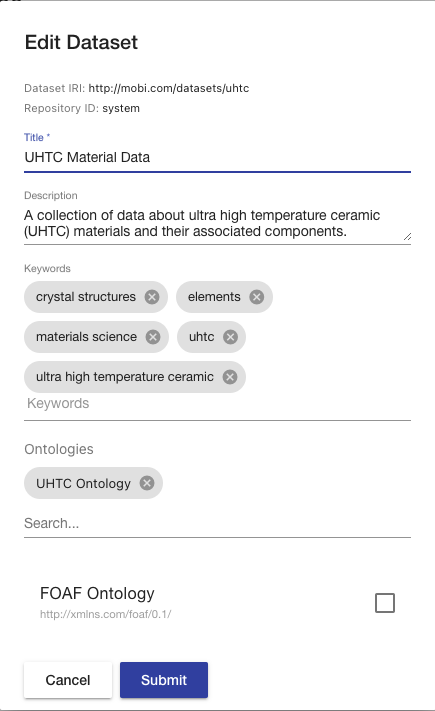
The Edit Dataset overlay allows you to modify information about the dataset. The Title field modifies the value of the dcterms:title annotation of the dataset record. The Description field modifies the value of the dcterms:description annotation of the dataset record. The Keywords field allows you to add/remove keywords attached to the dataset record. The ontologies area allows you to modify the ontologies associated with the dataset record; just as during creation. Clicking Update will update the dataset record with the new metadata.
|
Caution
|
Datasets are associated with specific versions (commits) of an Ontology Record. In order to update a dataset to the latest version of an Ontology Record, you’ll need to remove the ontology, click Submit, then add that ontology back to the dataset. |
Discover
The Mobi web-based Discover module allows users to quickly search and explore their knowledge graphs. The Explore tab provides an intuitive interface for quickly navigating through ontology-defined entities. The Query tab allows users to develop and execute SPARQL queries.
|
Tip
|
To learn more about SPARQL queries, see the W3C Specification. |
|
Note
|
The ability to save, publish, share and reuse SPARQL queries as part of applications or larger workflows is coming soon! |
To reach the Discover page, click on the link in the left menu. The first tab shown is the Explore tab.
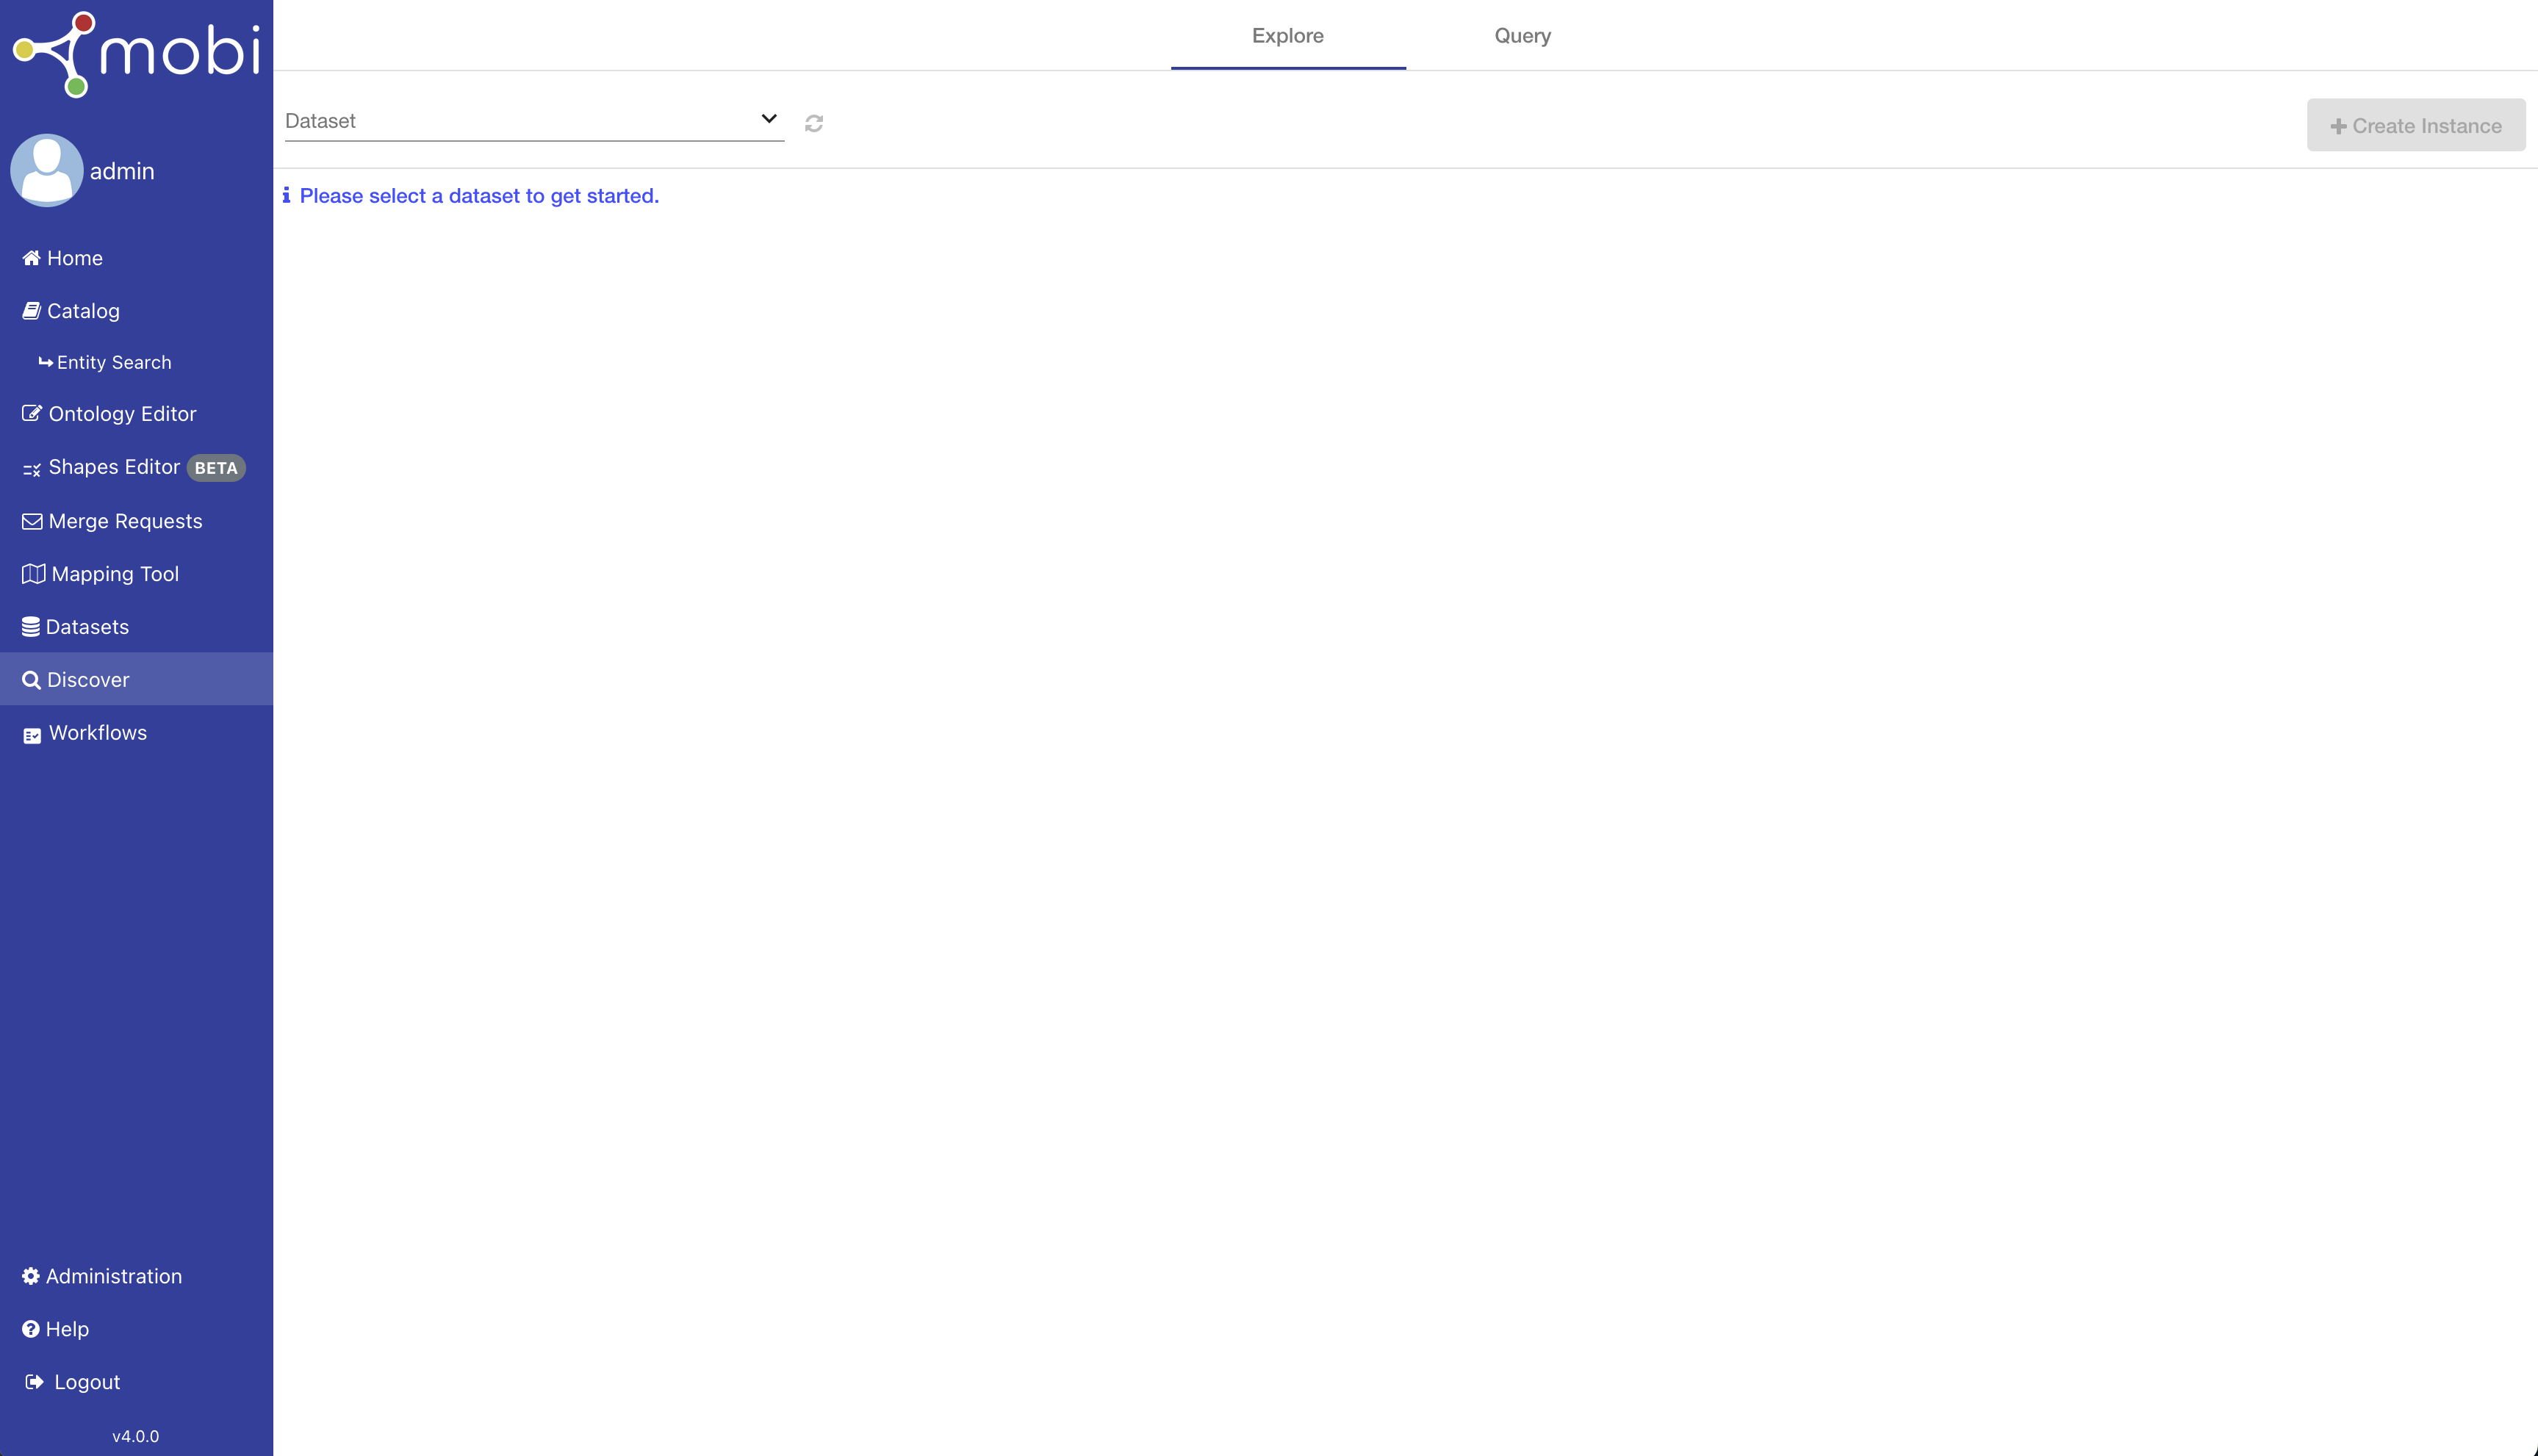
Explore
The Explore tab of the Discover page allows you to get a high-level overview of the structure of your data within a dataset.
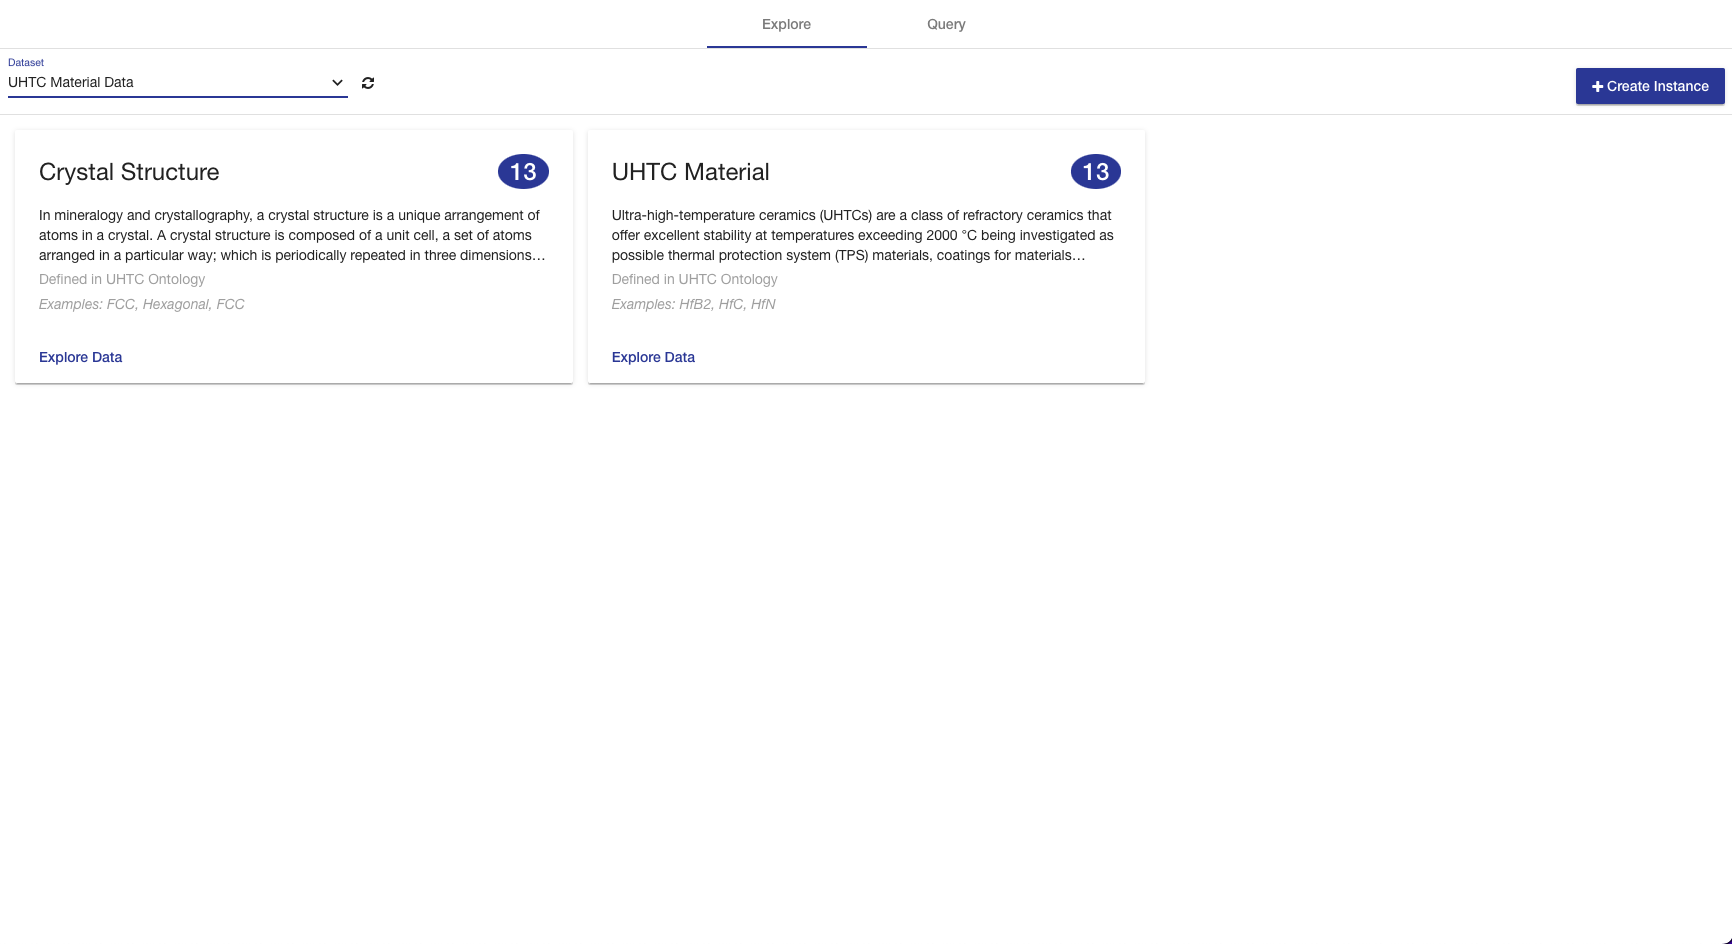
The Explore tab opens with a view of all the classes found within the selected dataset and a button to create a new instance. Each card displays the label and a brief description about a class, the number of instances defined as that class, a few of those instances, and a button to explore the instances themselves. Clicking Explore Data opens the instances view.
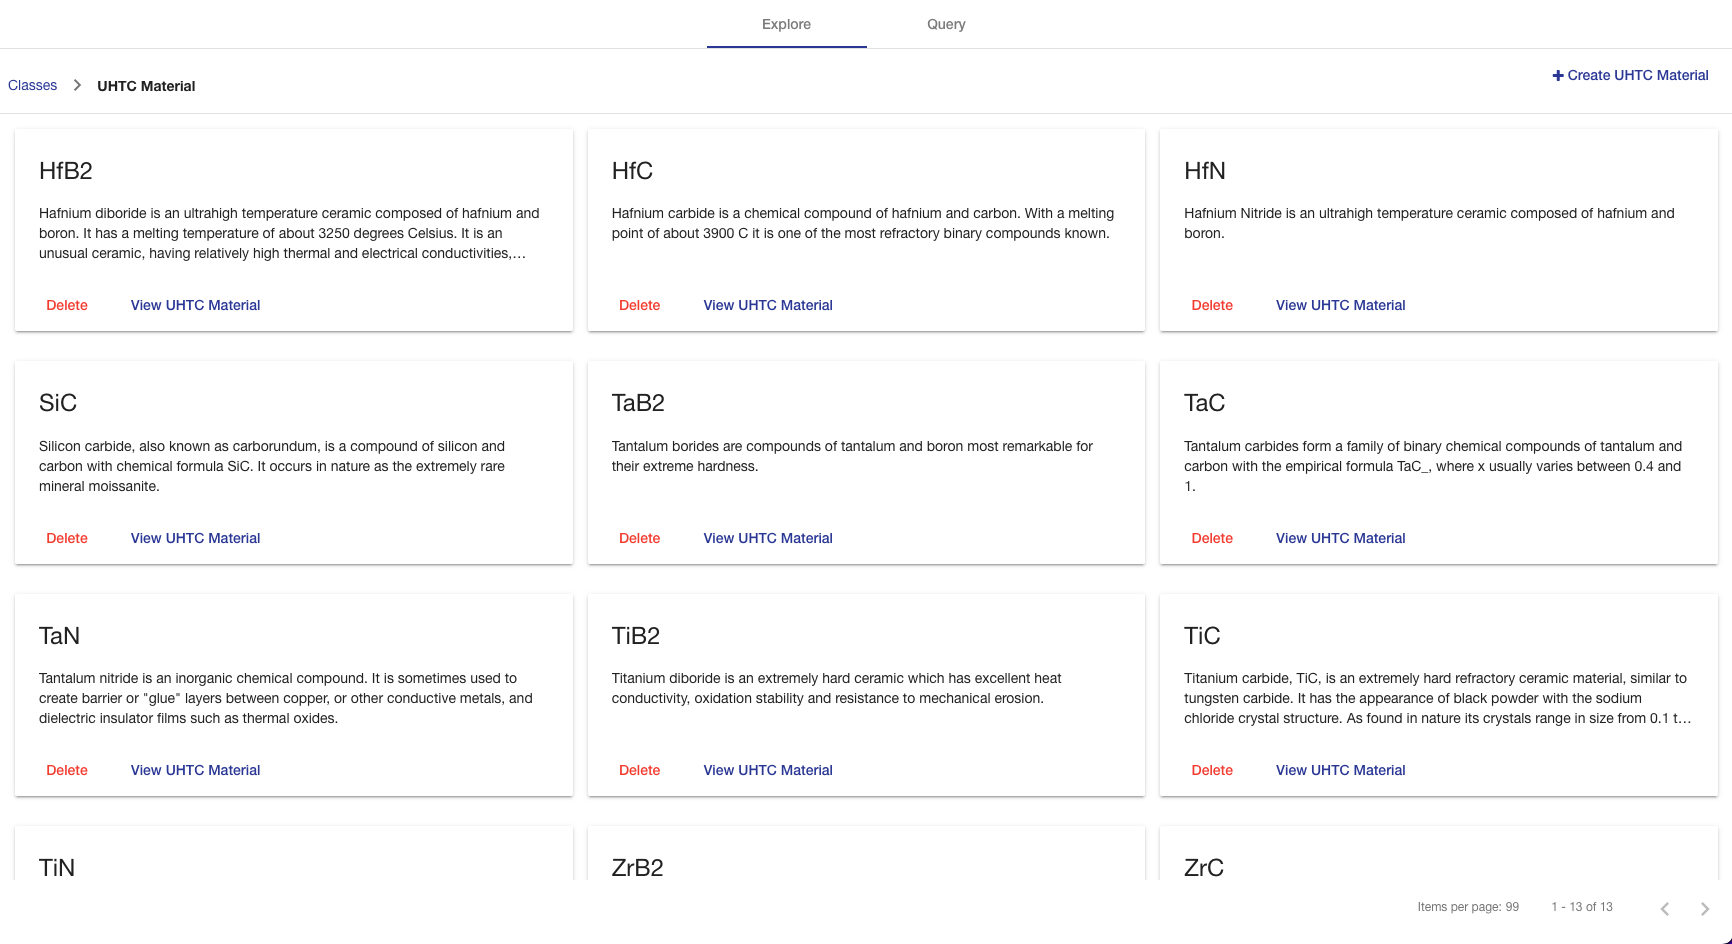
The instances view contains a paginated list of all the instances defined as a particular class. Each card displays the label, brief description about an instance, a button to explore the instance itself, and a button to delete the instance. The label is determined based on the values of the rdfs:label, dc:title, or dcterms:title properties on the instance. The description is based on the values of the rdfs:comment, dc:description, or dcterms:description properties on the instance. You can navigate back to the classes view using the breadcrumb trail in the top left. Clicking View Class Name opens the single instance view. Clicking Create Class Name opens the single instance editor. If the particular class has been deprecated in the ontology, you will not be able to create a new instance.
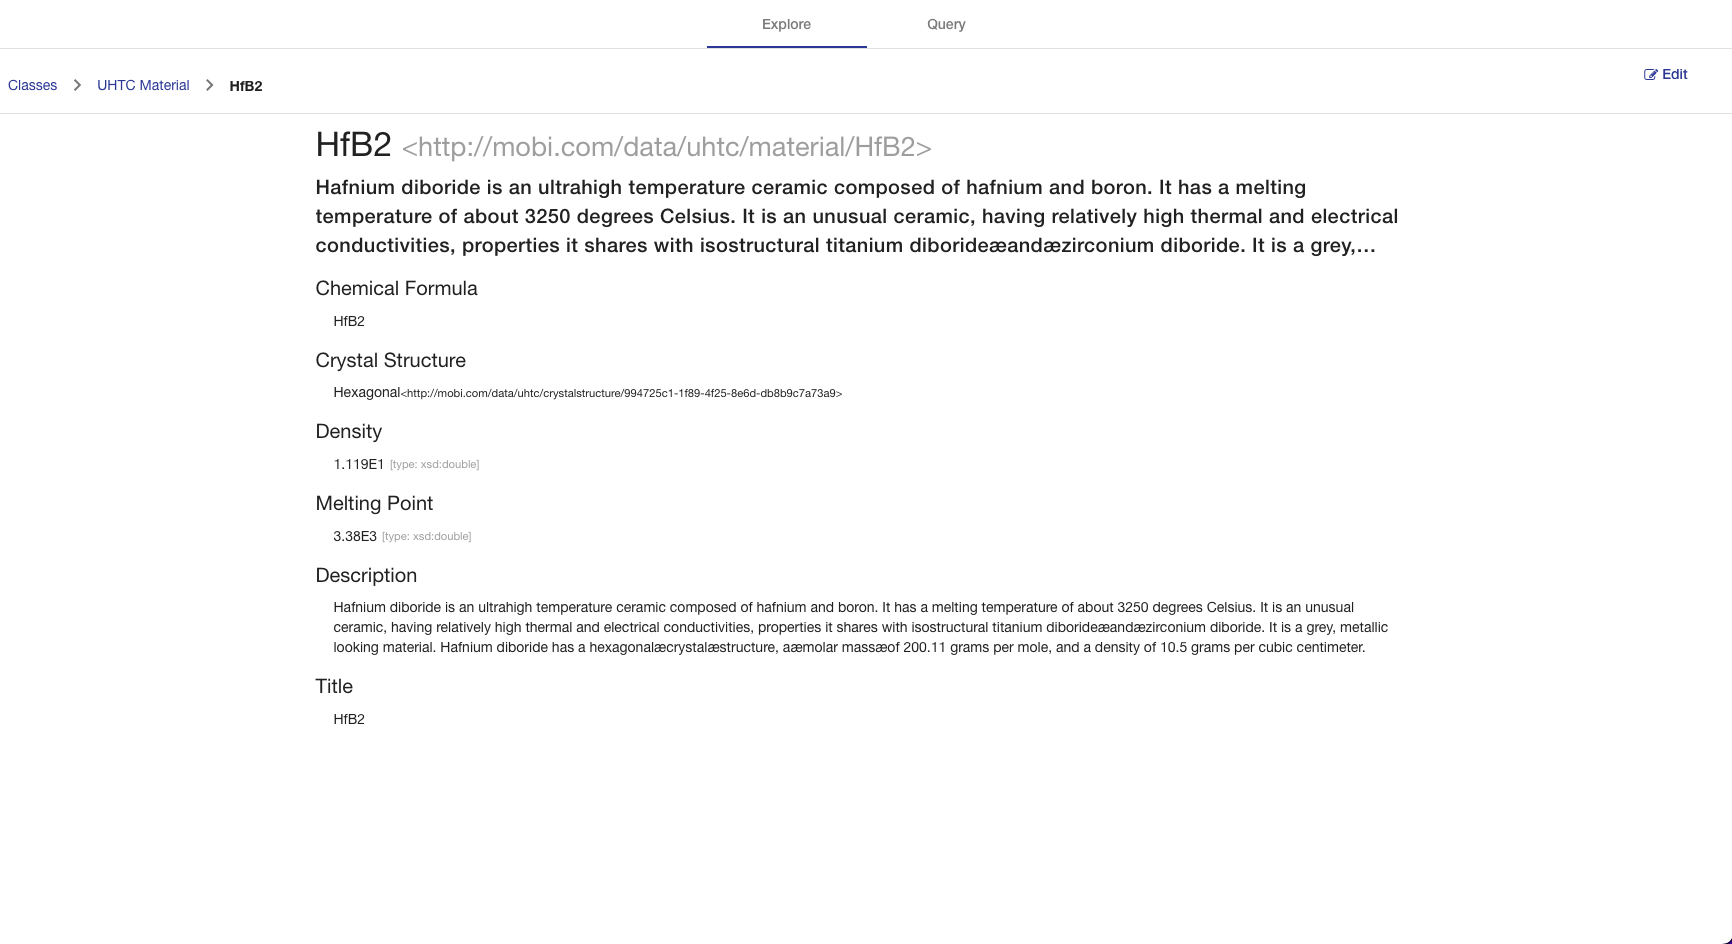
The single instance view displays the IRI, label, brief description, and list of all properties associated with the selected instance. Each property will only show one value by default; however, you can view more values, if there are any, by clicking the "Show More" link for that property. The instance view can also display any assertions on a reification of a property value statement by clicking on the small downward arrow on the right side of a property value. Clicking Edit opens the single instance editor.
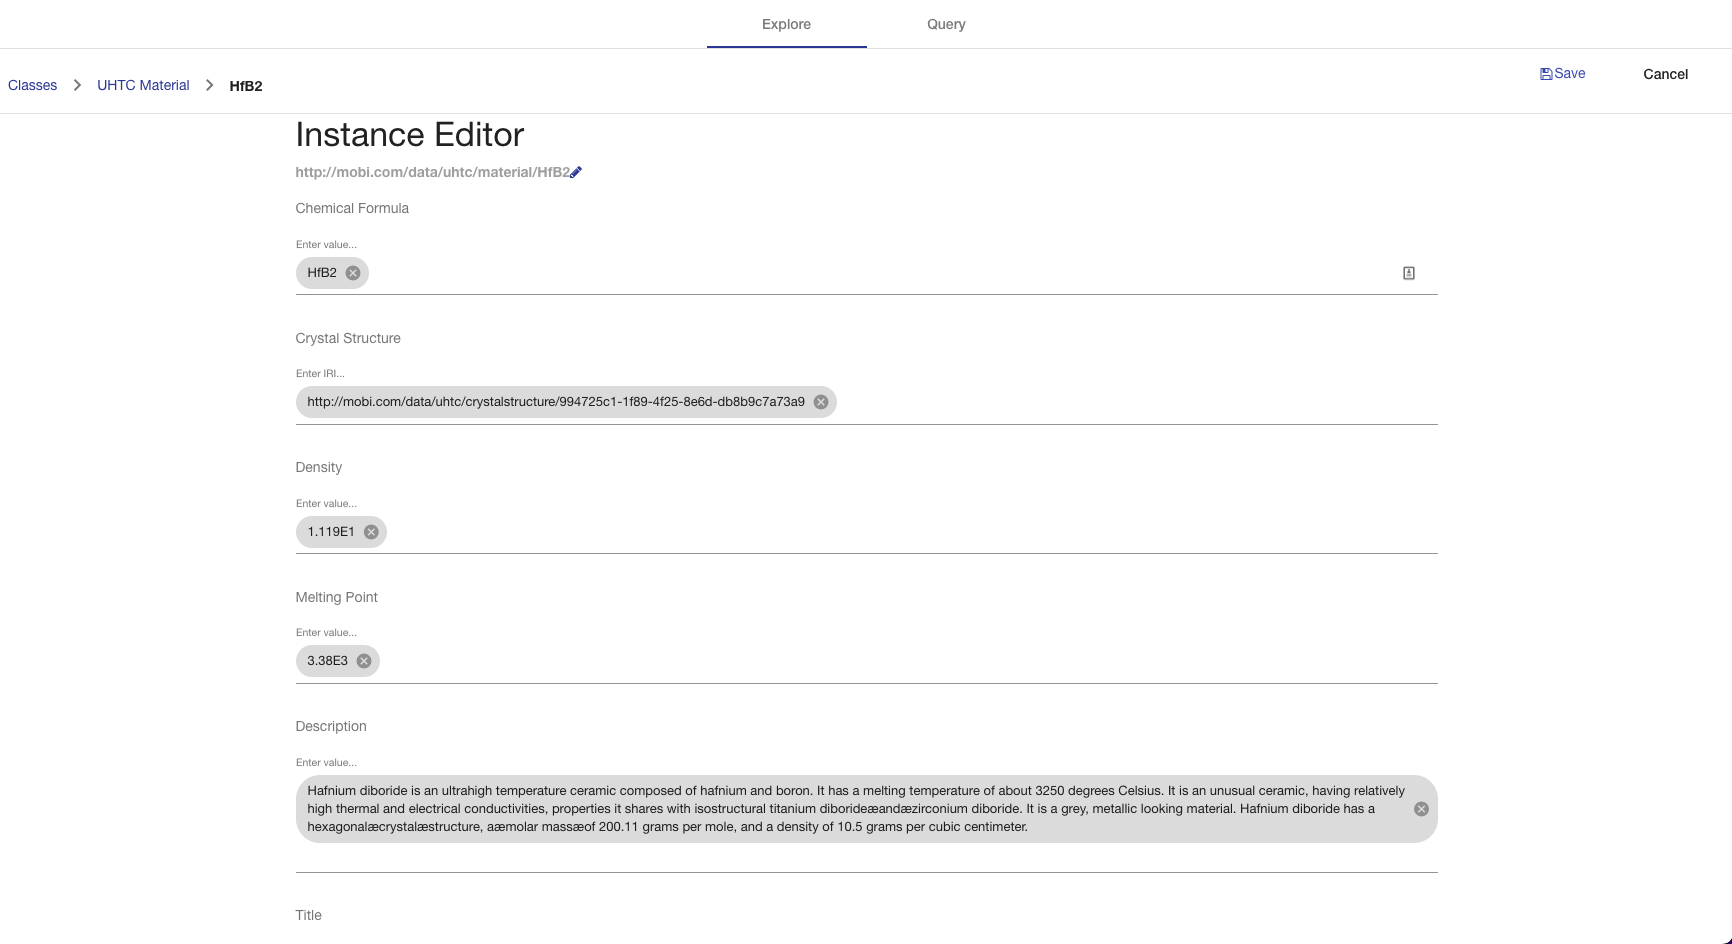
The single instance editor displays the IRI and a list of all properties associated with the selected instance in an editable format. The IRI can be edited by clicking the pencil button next to the IRI which will open the Edit IRI Overlay. If the instance being edited does not have all the required properties set, as described by cardinality restrictions in the ontology, the instance cannot be saved. To add a another property value, type in the provided input and press the ENTER key. To remove a property value, click on the "X" button of the associated chip. To view a complete property value and add assertions to its reification, click on the associated chip.
|
Caution
|
Editing the instance IRI might break relationships within the dataset. |
To add a new property to the instance, click Add New Property and select the property in the overlay. After all edits have been made, clicking Cancel will discard the current changes and go back to the single instance view. Clicking Save will save the current changes to the repository and then go back to the single instance view.
Query
The Query tab of the Discover page allows you to submit SPARQL query against the Mobi repository and optionally a specific dataset.
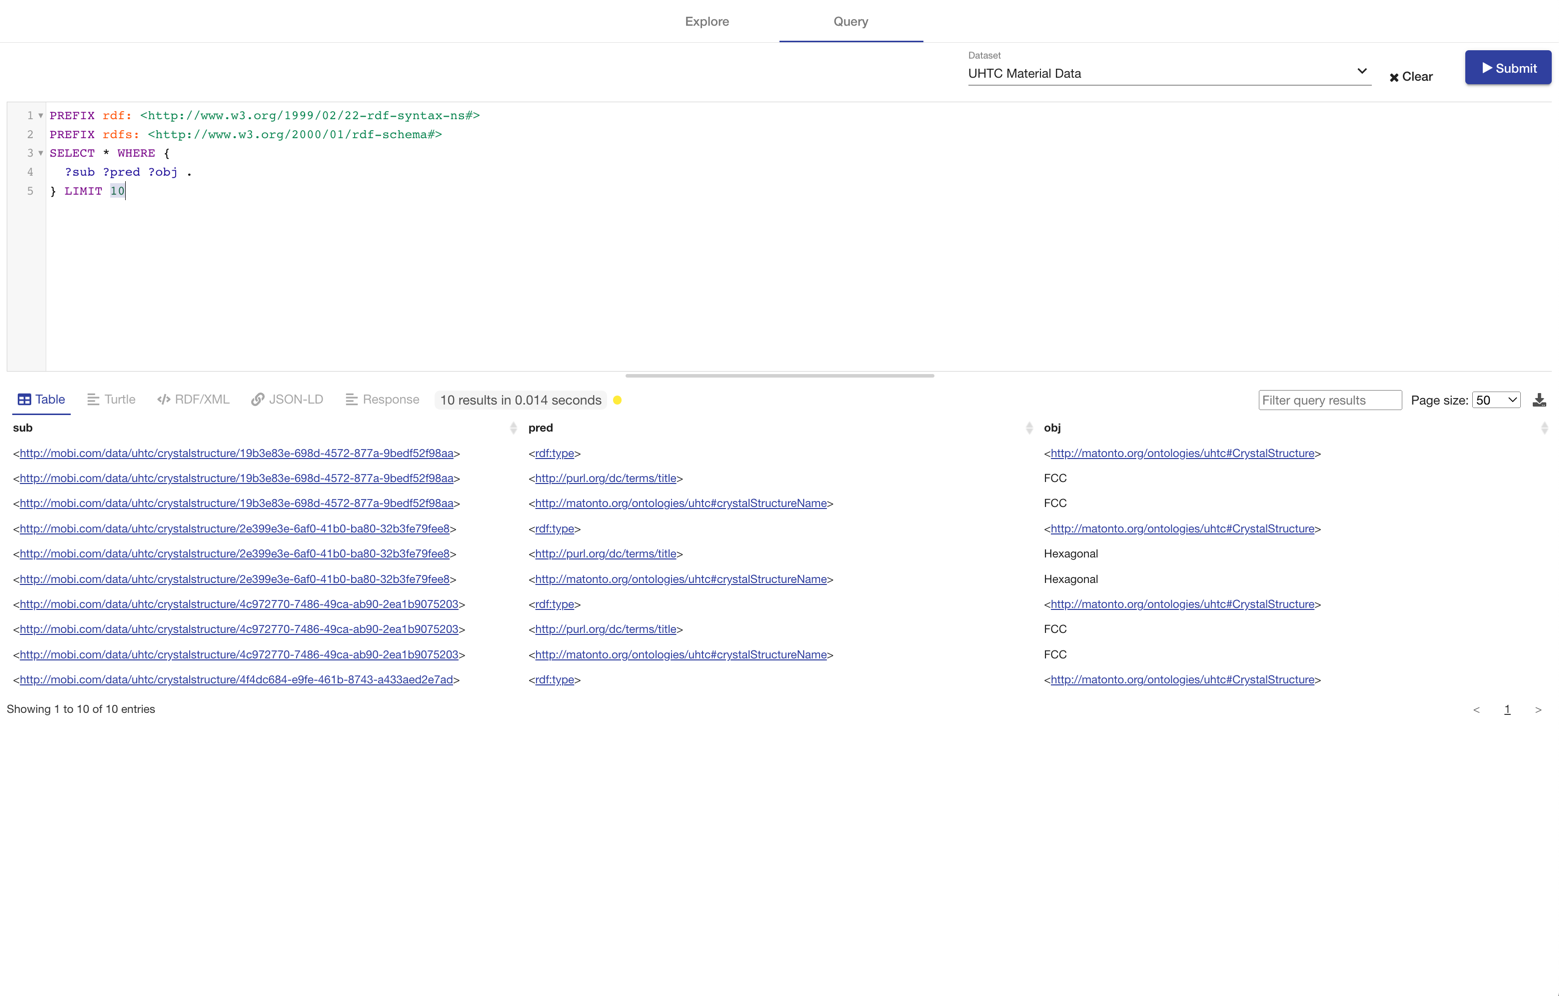
The Query tab provides a SPARQL query editor powered by the YASGUI SPARQL library. The top section of the page contains the query editor (powered by YASQE), a Dataset field and a Submit button. The Dataset field contains a list of all available datasets within the Mobi repository. Selecting a dataset limits the query to search through the data within the selected dataset. Clicking Submit executes the entered query against the Mobi repository, optionally limited by the selected dataset, and updates the bottom section with the results.
The bottom section displays the results of the most recently submitted SPARQL query (powered by YASR). The section has separate tabs for rendering the query result set depending on the type of SPARQL query submitted. SELECT query results are displayed under the Table tab where the headers of the table are the variables specified in the SPARQL query. The Table comes with features such as filtering, page size, sorting and pagination. CONSTRUCT query results can be displayed under the Turtle, JSON-LD and RDF/XML tabs. The query results are limited to 500 triples/rows for rendering, but the entire result set can be downloaded using the button in the upper right corner of the bottom section.
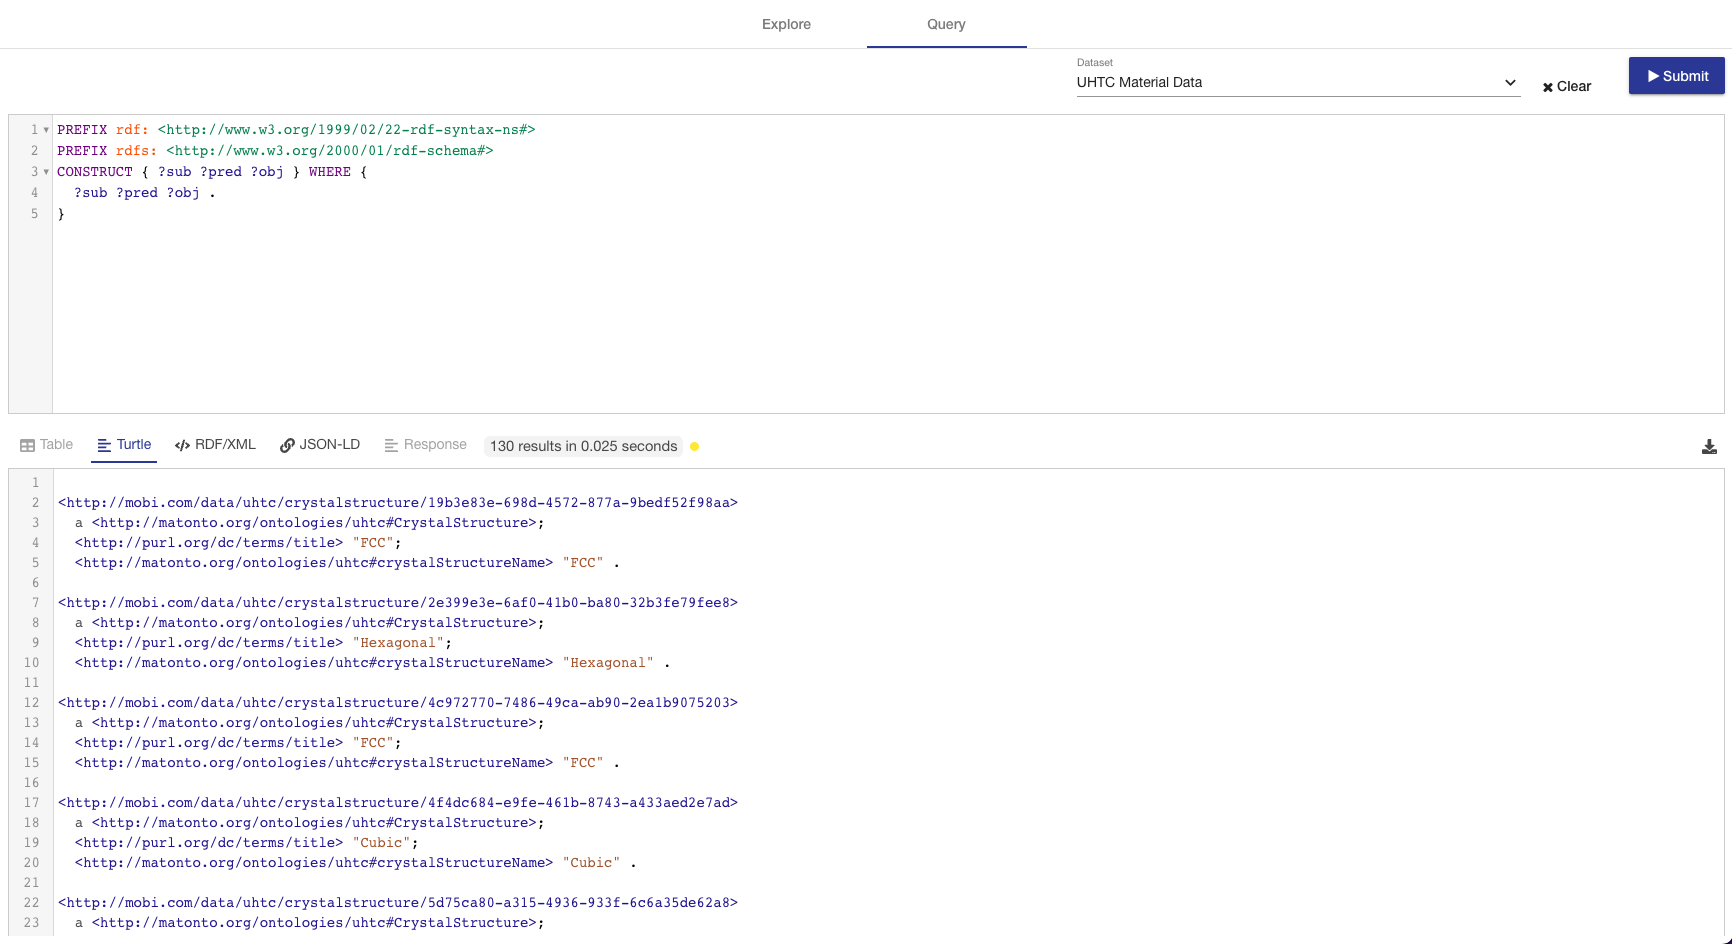
Workflows Module
Workflows are the gateway into agile and responsive knowledge graphs that are able to adapt to new changes, empowering faster and more informed decision making. The extensible Workflows framework allows for user defined actions and triggers to meet a wide variety of use cases. These user defined actions and triggers will be usable within the Workflows UI module without any customization needed. Workflows are also managed within the catalog as Versioned RDF Records ensuring that the change history is preserved.
|
Tip
|
To learn more about the extensible interface and the structure of the configuration, see the Workflows Appendix. |
To reach the Workflows module, click on the link in the left menu.
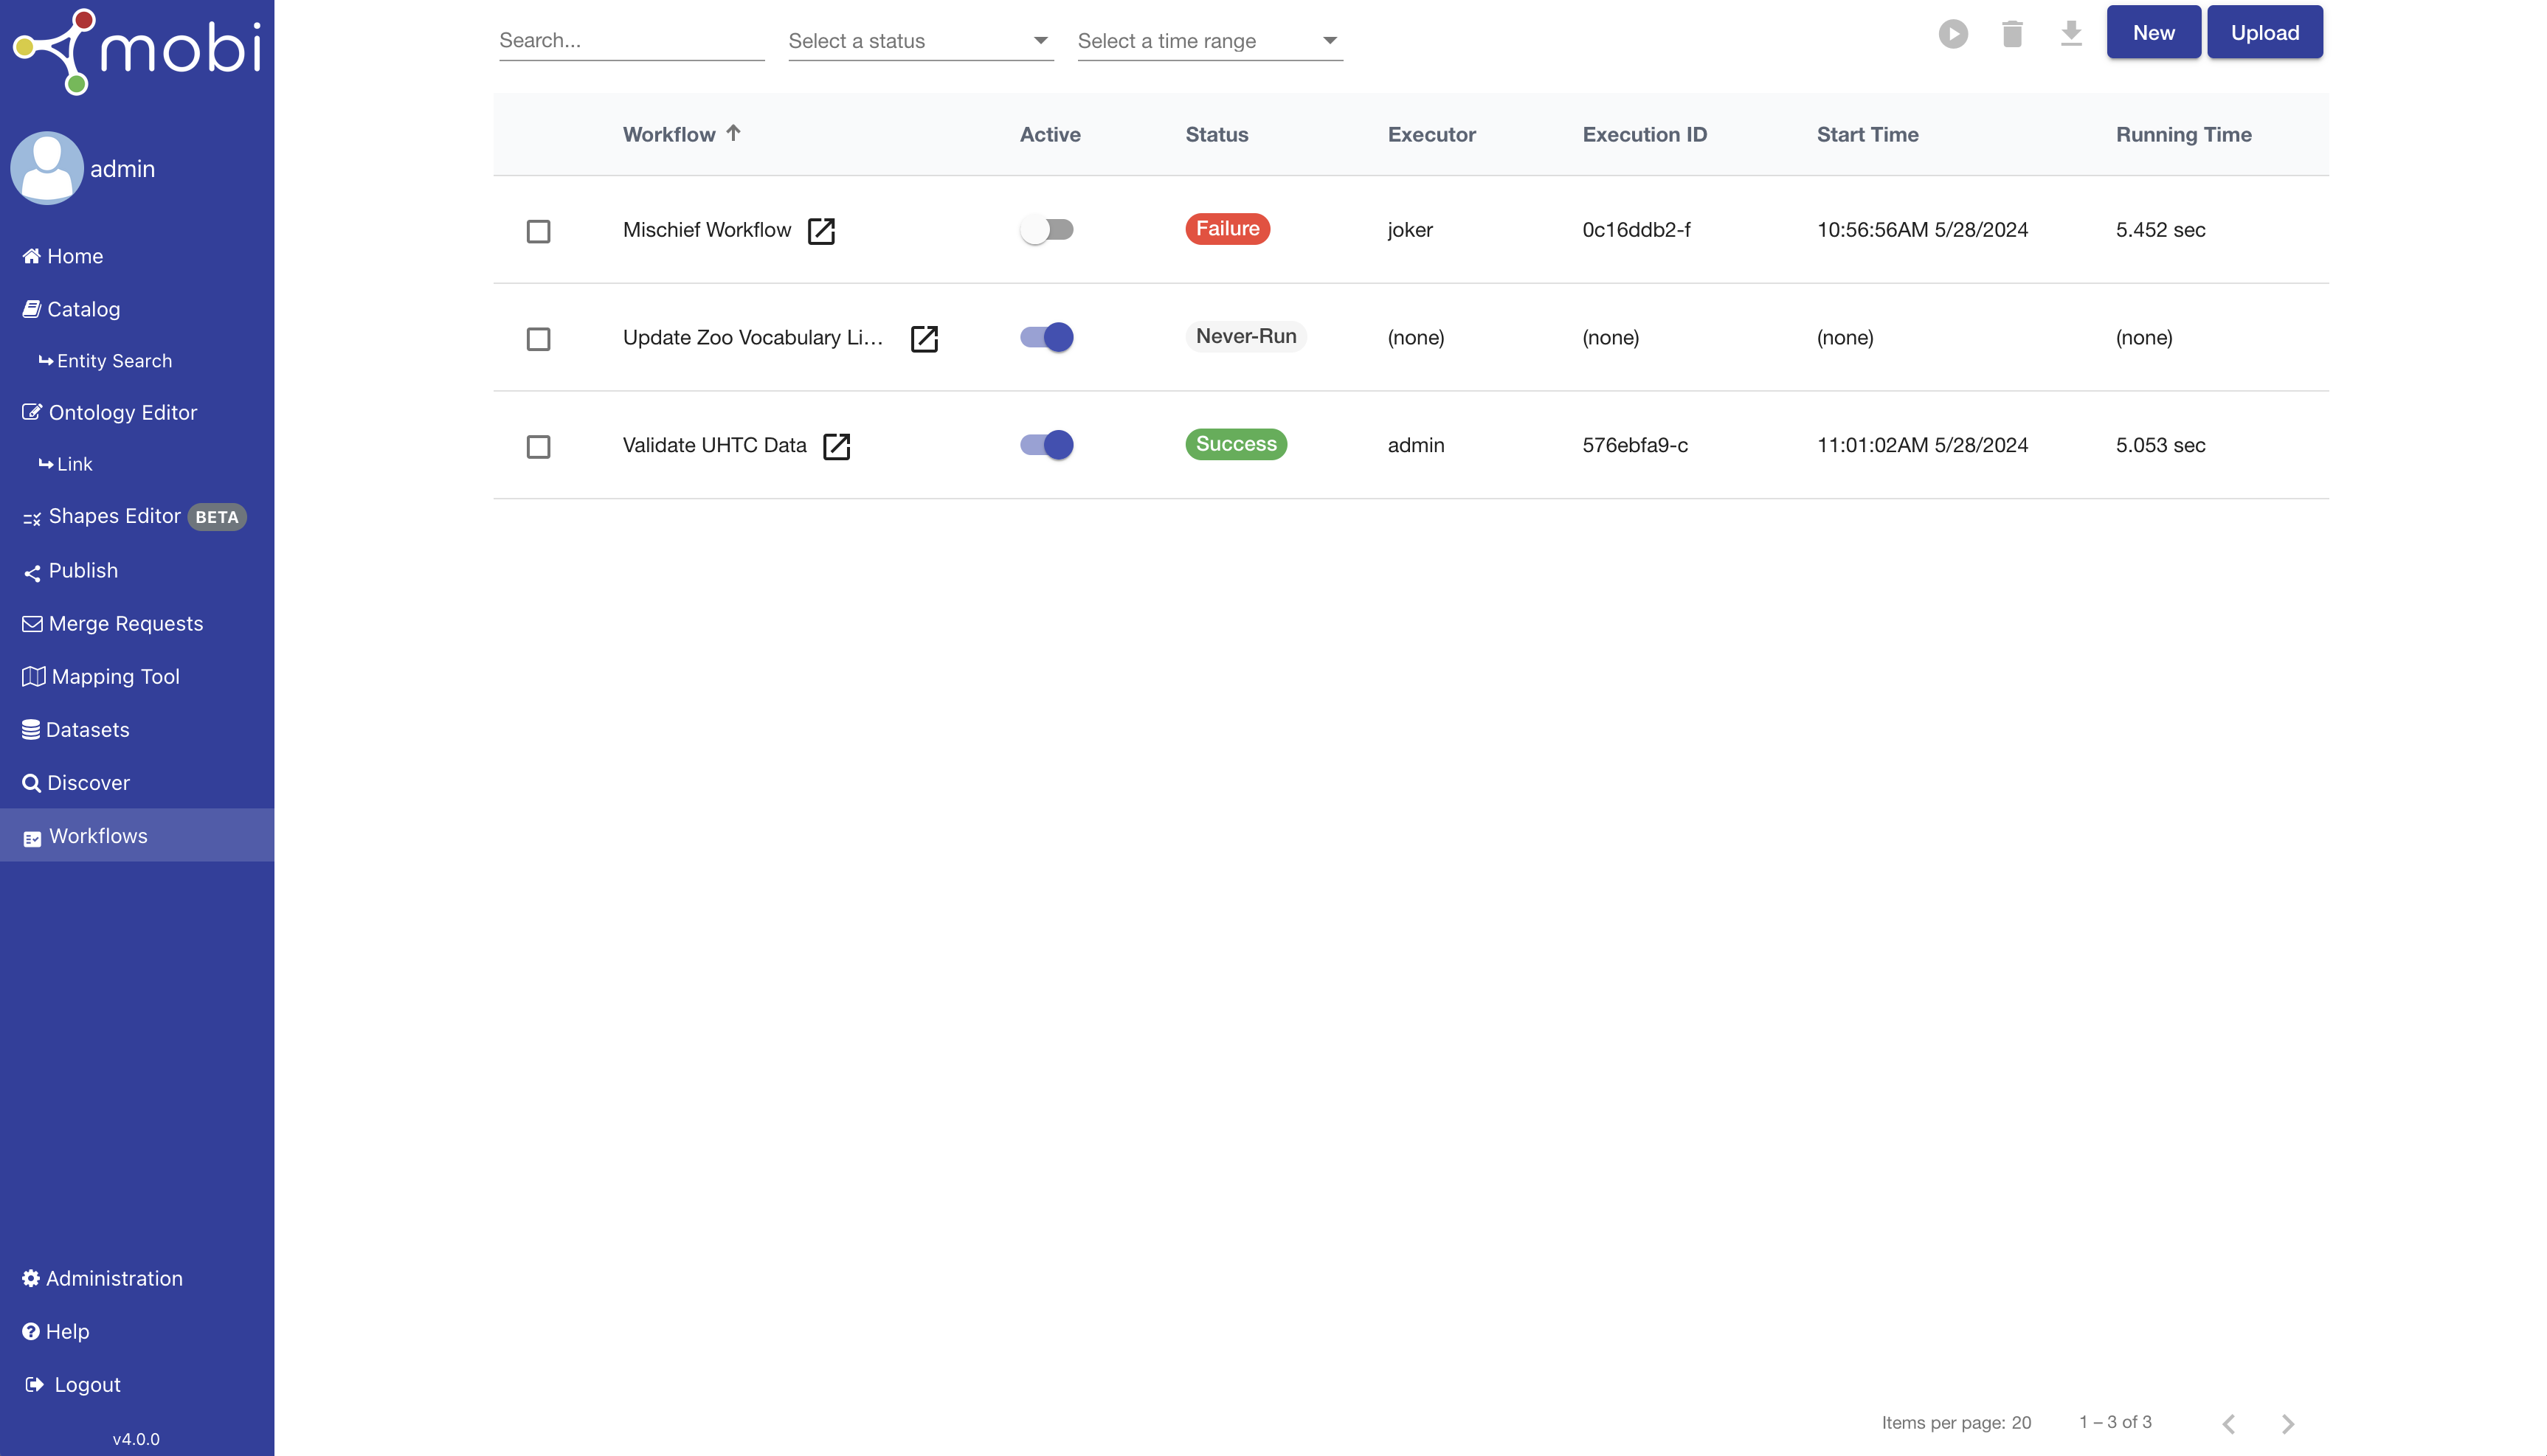
The initial view of the Workflows module displays a searchable, filterable, sortable, and paginated table of all the configured workflows within the local Mobi repository along with the latest status of their executions (status, user who started the execution, start time, and running time). Each Workflow is displayed with its title and toggle-able active status which determines whether that workflow can be executed, including manually or automatically by a Trigger. The latest execution details will update automatically as workflows trigger across the system.
From the landing page, you can download and delete one or more workflows if you have the permissions by checking the box next to all the workflows of interest. You can also start a manual execution of a workflow by checking the box next to it and clicking the run button.

Click the icon next to the workflow title to open up the Individual Workflow Page for that workflow.
Creating a Workflow
To create a new workflow, click the New button above the table. The creation dialog requires a title for the record and an IRI for the Workflow object itself. You can also optionally provide a description and keywords which will be used to describe the workflow record in the local catalog.
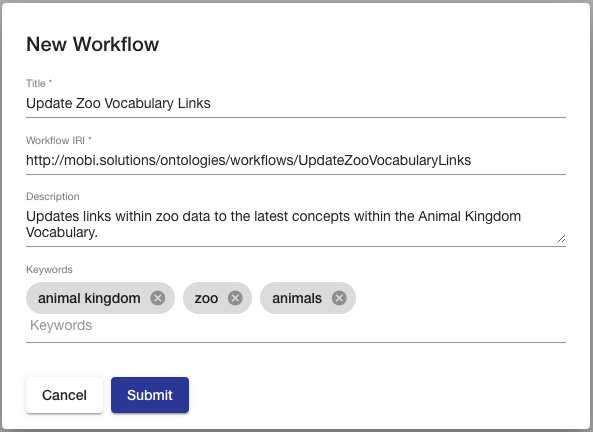
The Workflow IRI is the unique identifier for the new workflow. The editor pre-populates this field with a default namespace and a local name generated from the Title field. You can always override this behavior. The Title field populates the dcterms:title annotations of both the new workflow record and the workflow object within the new workflow. The Description field populates the dcterms:description annotations of both the new workflow record and the workflow object within the new workflow. The Keywords field will attach the entered values as keywords to the new workflow record. When the dialog is submitted, the new workflow will automatically be opened into the Individual Workflow Page. New workflows are always initialized with no trigger and a single Test Action with a templated message.
Uploading a Workflow
In addition to creating a new workflow from scratch, you can upload an existing conformant workflow definition (see the Workflows Appendix for a valid structure). To do so, click the Upload button above the table. This will bring up the browser’s native file browser ot select a file containing a workflow definition (accepts all standard RDF formats).
Once the file is selected, a dialog will prompt you for metadata entry for the workflow record (title, description, keywords). This metadata is used to describe the workflow in the local catalog. By default, the editor will set the Title to the file name. The Title field populates the dcterms:title annotation of the new workflow record. The Description field populates the dcterms:description annotation of the new workflow record. The Keywords field will attach the entered values as keywords to the new workflow record.
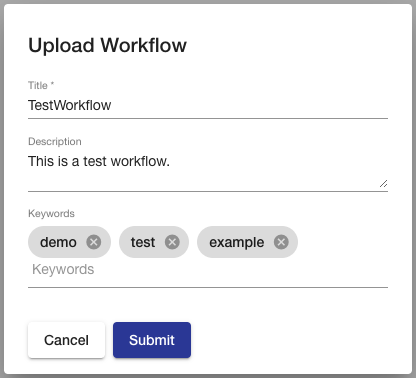
Individual Workflow Page
The Individual Workflow page will display all metadata about the workflow record along with the full execution history, the commit history, and a visualization of the workflow components that can be expanded to fill the entire screen. The page also includes the same active status toggle and buttons to run, delete, and download the workflow as on the Workflows landing page. If the page is in edit mode (see Editing Workflows), the download button will include any in progress changes made to the workflow.
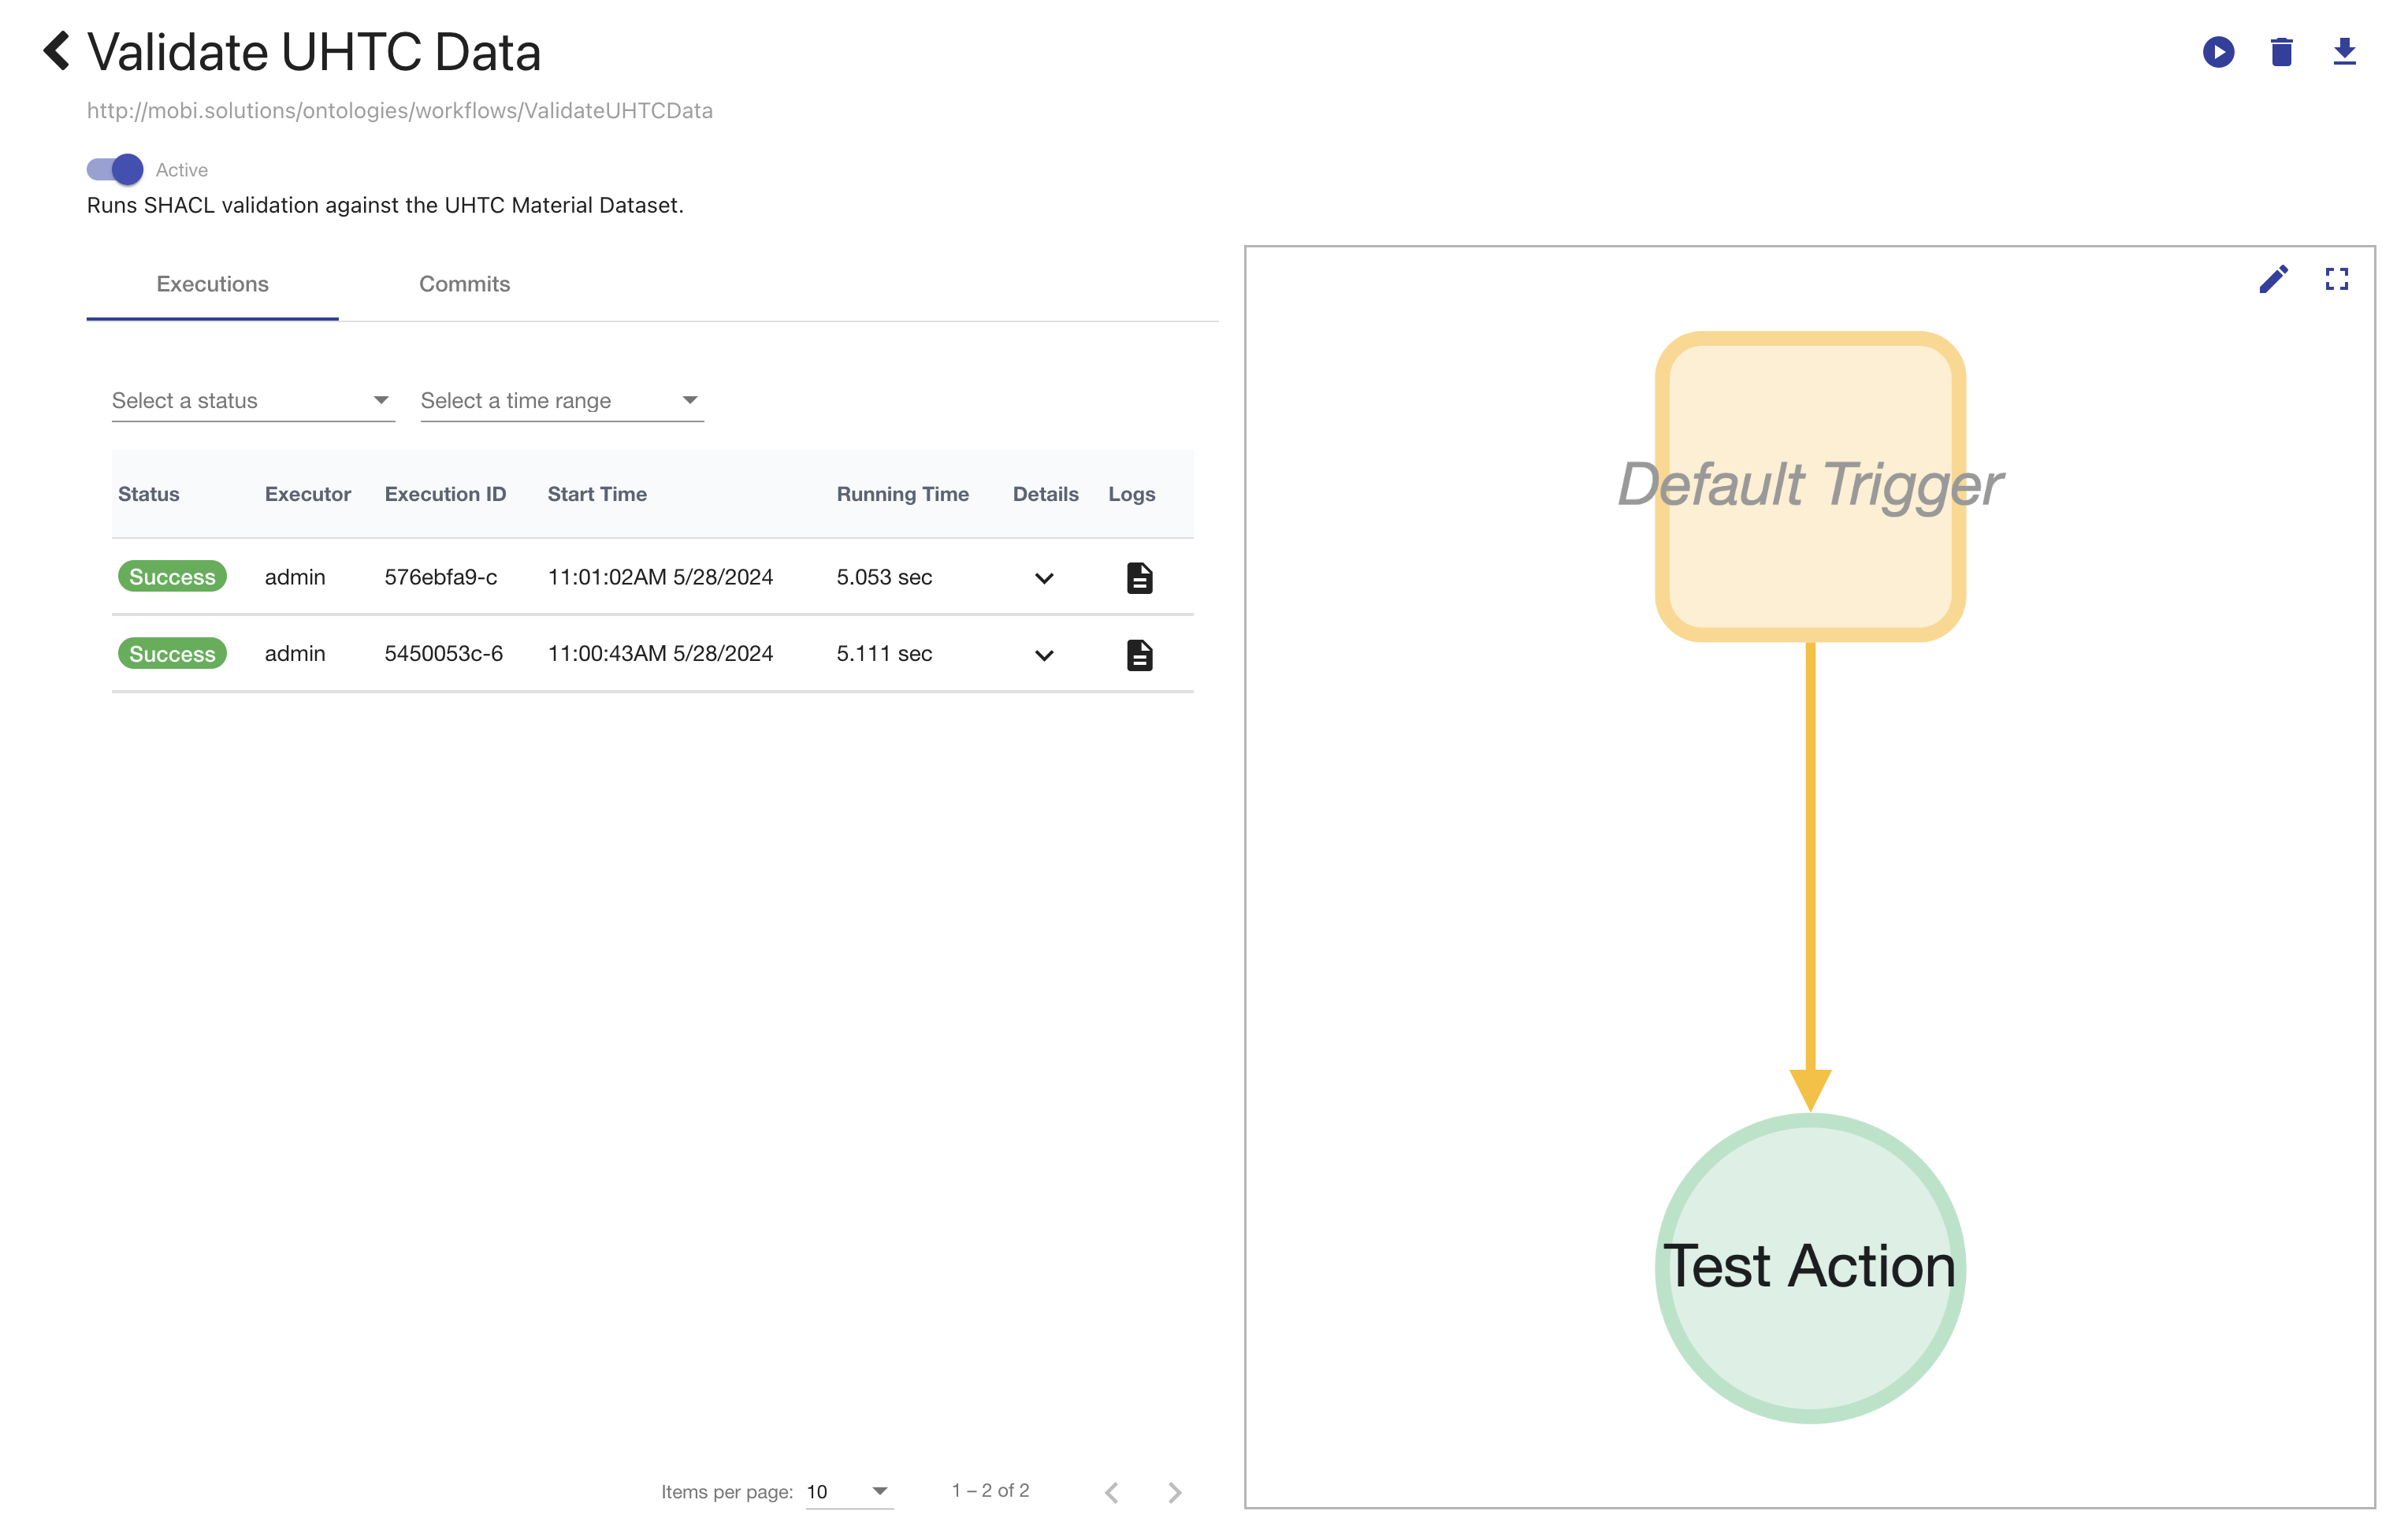
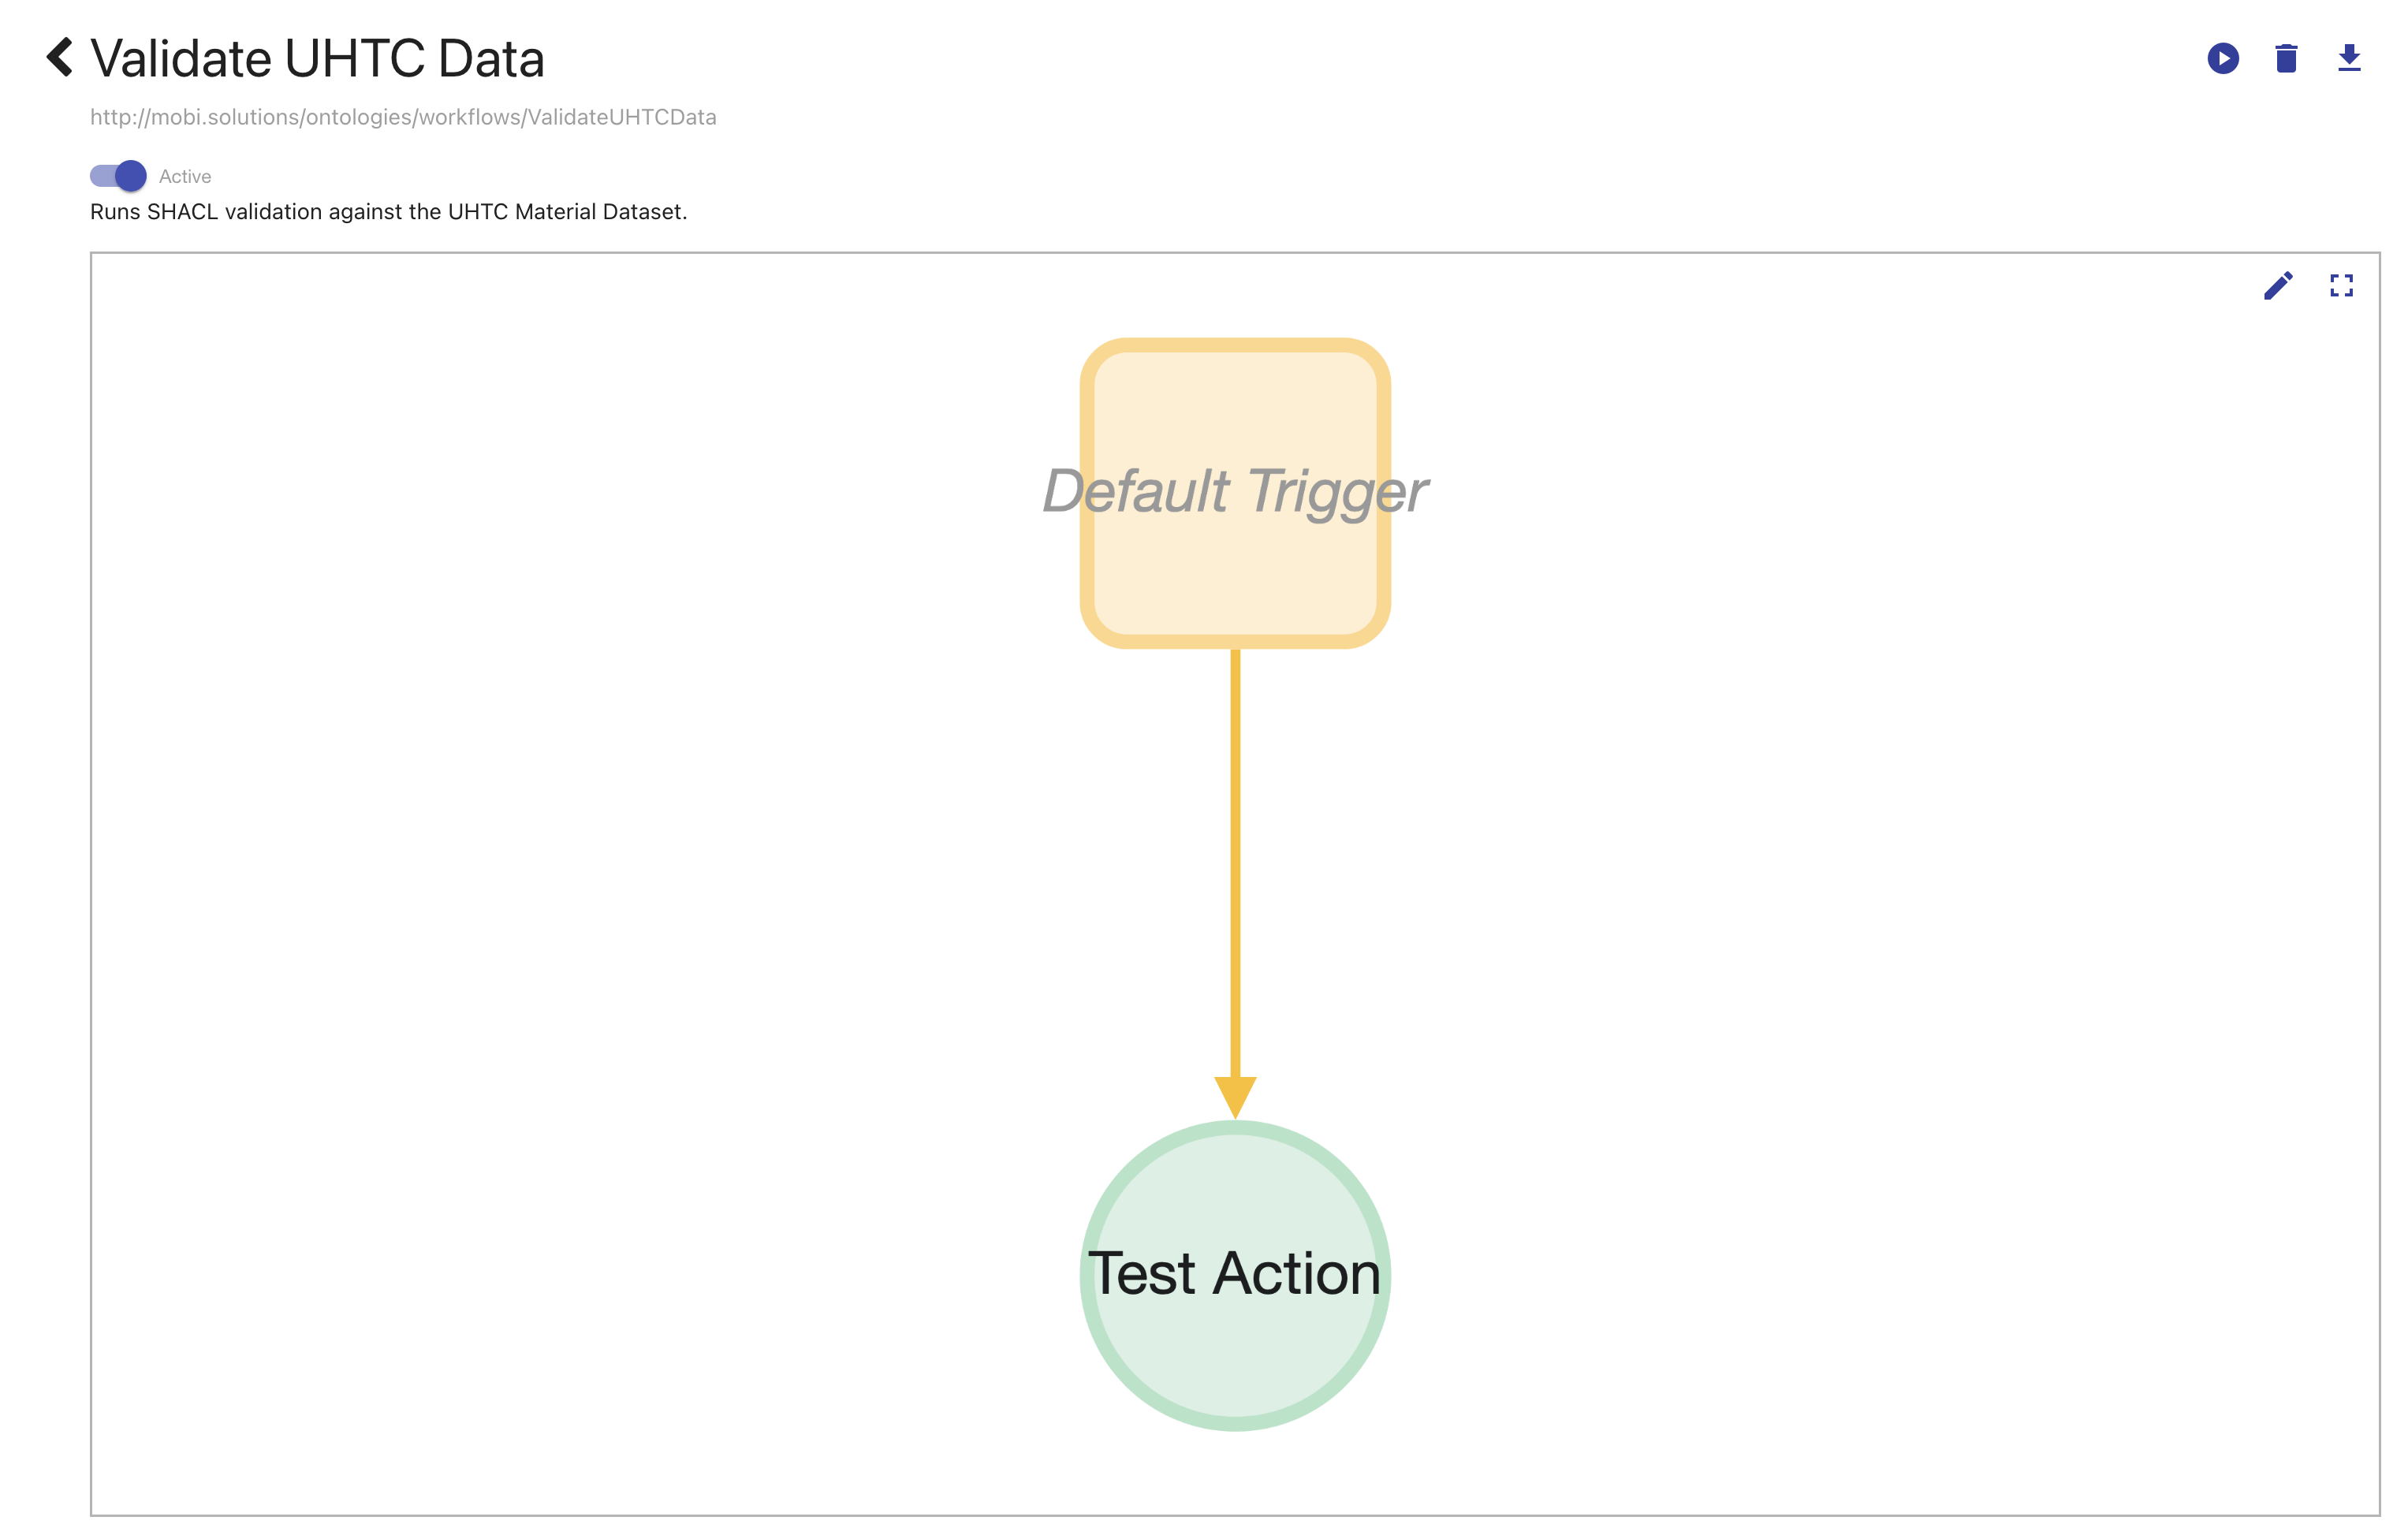
The graphical display of the Workflow will display the Trigger, if set, as a yellow square and all configured Actions as green circles. Every workflow can have at most one Trigger and must have at least one Action. If a Trigger has not been configured for the workflow, "Default Trigger" will be displayed on the Trigger node. The nodes will display the configured title or type of the Trigger/Action and clicking on a node will bring up a summary of the configuration for the component.
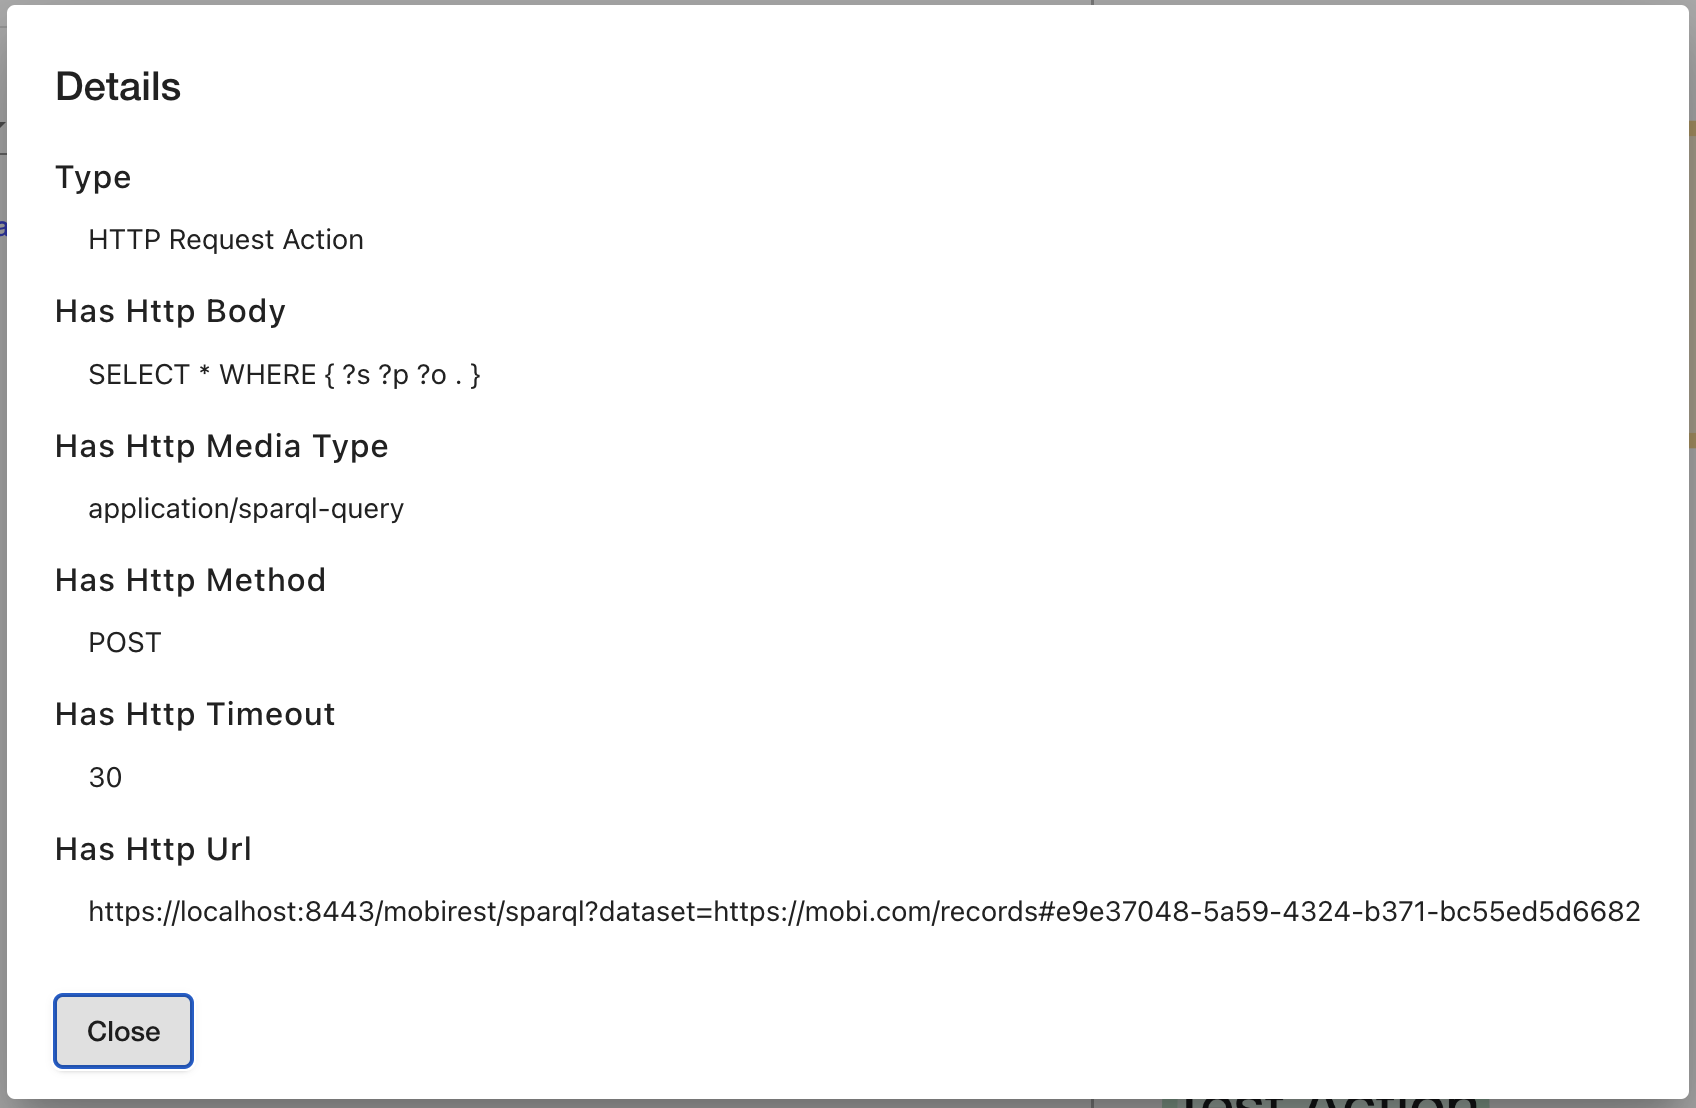
The Workflow Execution History is presented in a filterable, paginated table with the latest executions displayed at the beginning. Each execution is displayed with its status, user who started the execution, start time, and running time and each row can be expanded to provide further details about each Action that was executed during the run. Each execution also has a button to open a page to view the detailed logs output by that run. The page will display metadata about the execution you are viewing along with a dropdown selector to load the overall execution logs or the logs output from an individual action. Each log file can also be downloaded for further investigation.
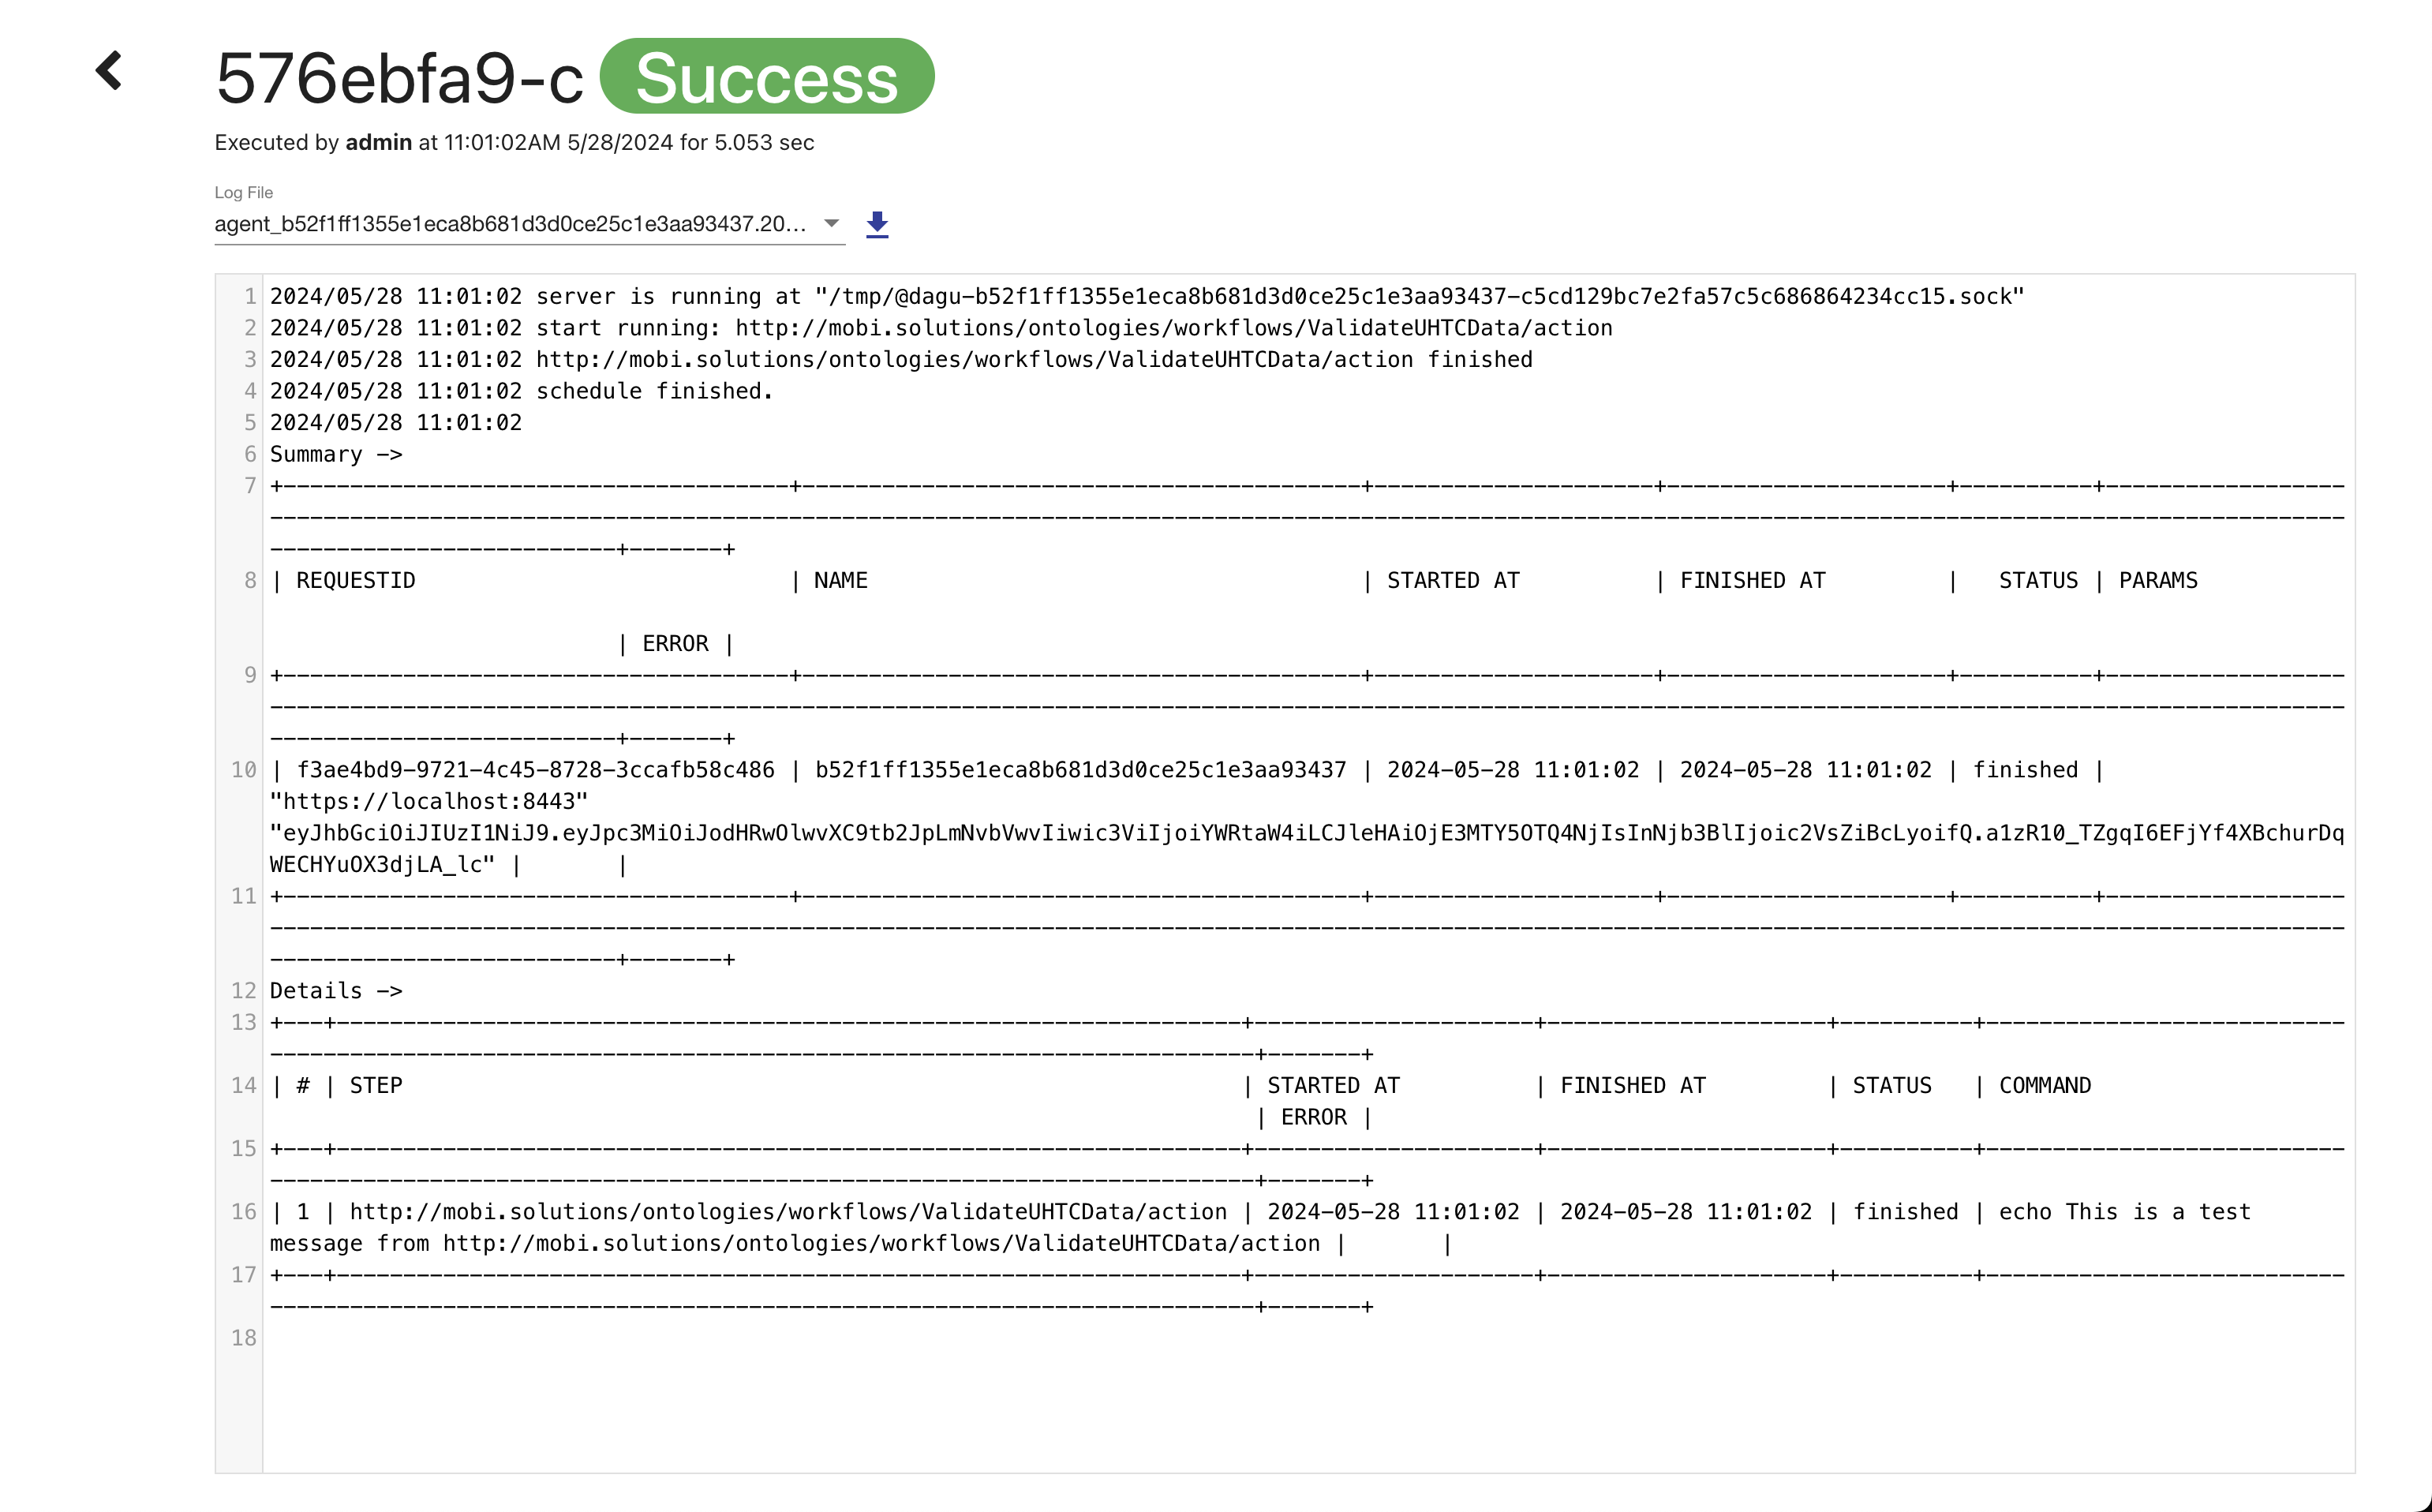
Editing Workflows
To update the configuration of an individual workflow, open the Individual Workflow Page and click on the pencil icon in the top right corner of the graphical display as long as the workflow is not currently running. This sets the Individual Workflow Page into edit mode where the execution history and overall metadata is still visible, but the workflow active status cannot be toggled and the workflow cannot be run or deleted. In edit mode, the graphical display will contain buttons to upload a new version of the workflow as a file and have the system determine the changes and a button to save all changes made so far. If changes have been made, the graphical display will also contain an info message stating as such.
|
Note
|
If the new version of the Workflow being uploaded is invalid, the modal will display a SHACL validation report detailing what invalid triples need to be addressed. |
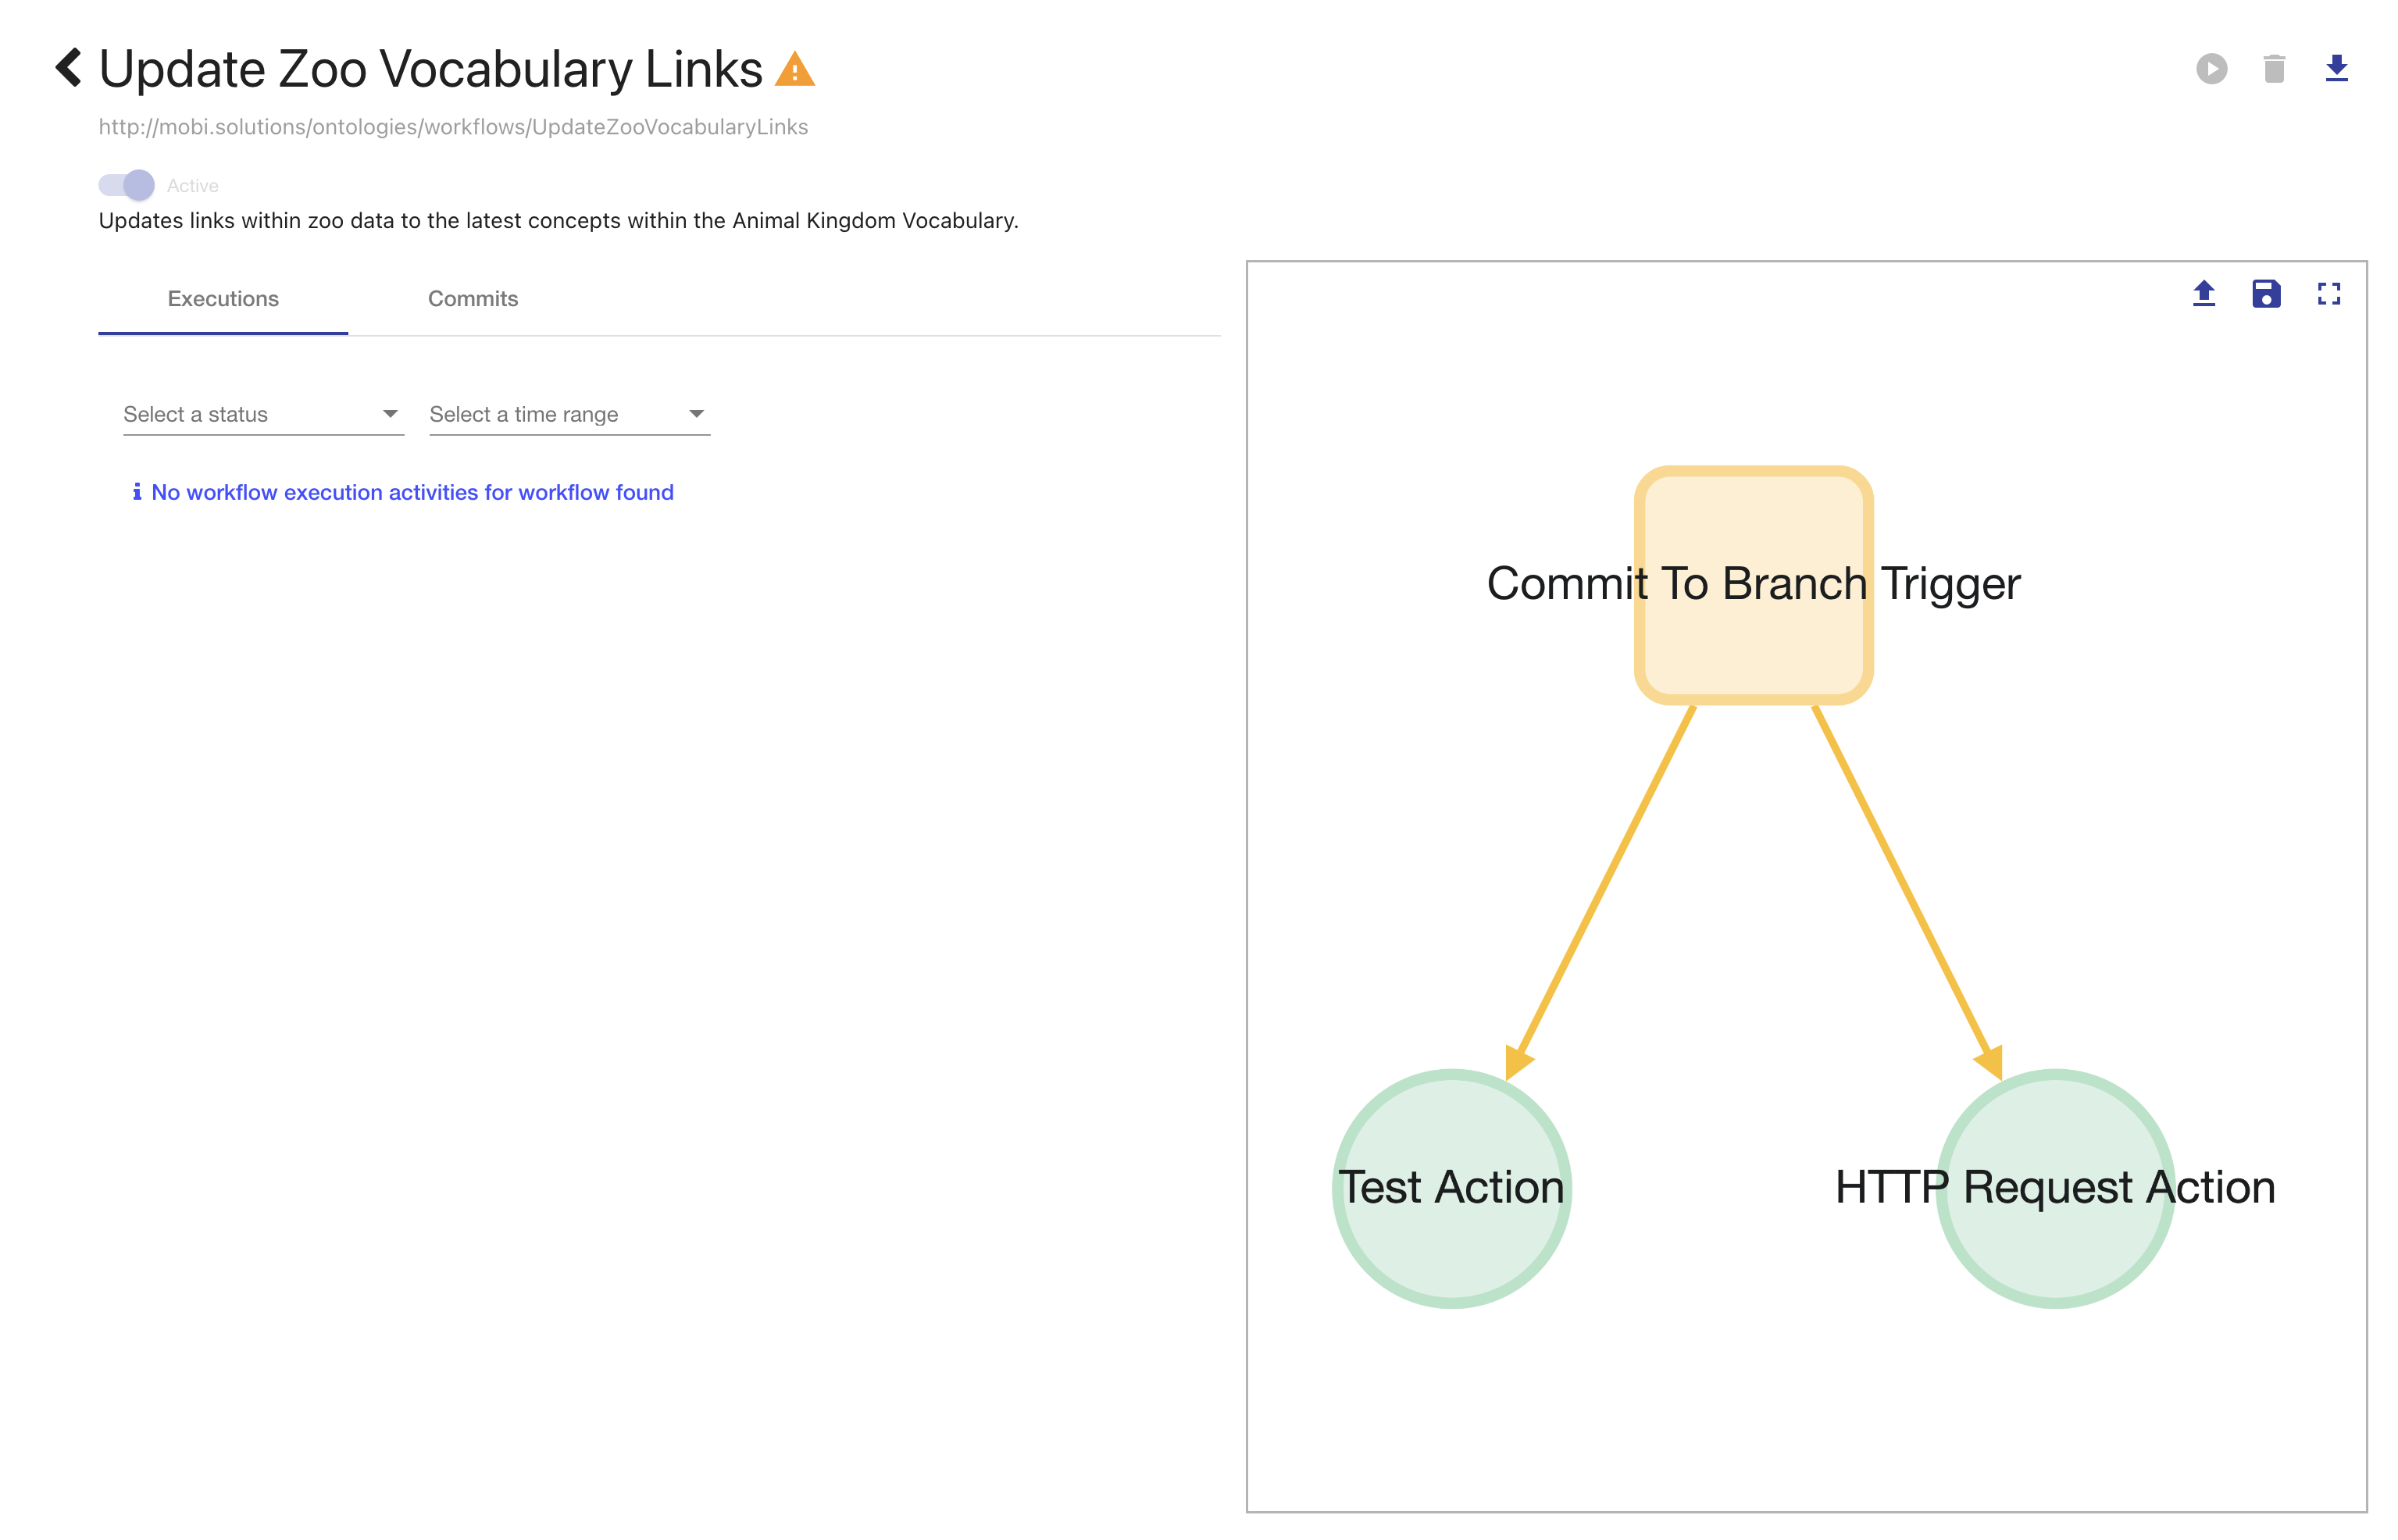
In edit mode, the nodes and edges in the graphical display will have a menu that can be opened with a right click and hold so that each component can edited individually. The Trigger node menu will provide the options to remove any existing Trigger configuration (trash icon), to add/edit the Trigger configuration (pencil icon), or to add a new entry Action (plus icon). The Action node menu will provide the options to remove the Action configuration, edit the Action configuration, or add a new child Action. The edge menu will provide the option to remove the edge between nodes. To draw a new edge between nodes, click and drag from one node to another.
|
Note
|
A Workflow must always have at least one Action. There can be no cycles between actions or the trigger. |
|
|
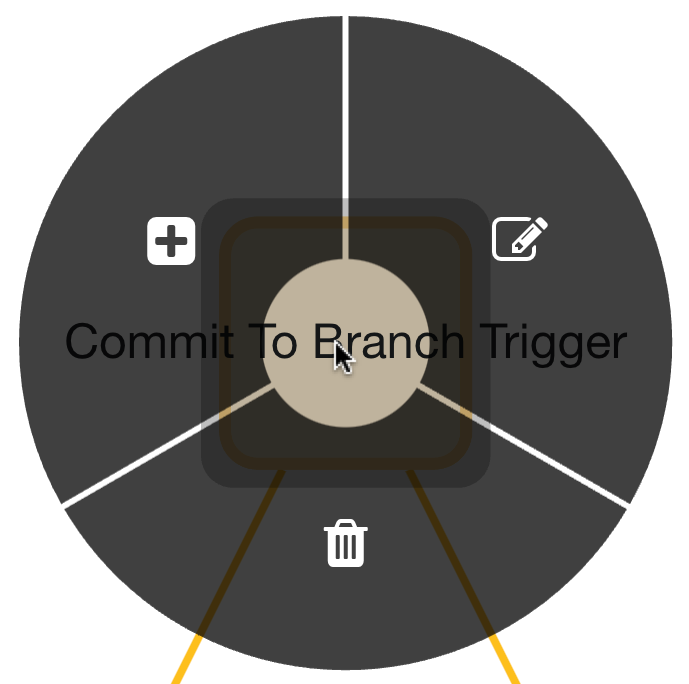
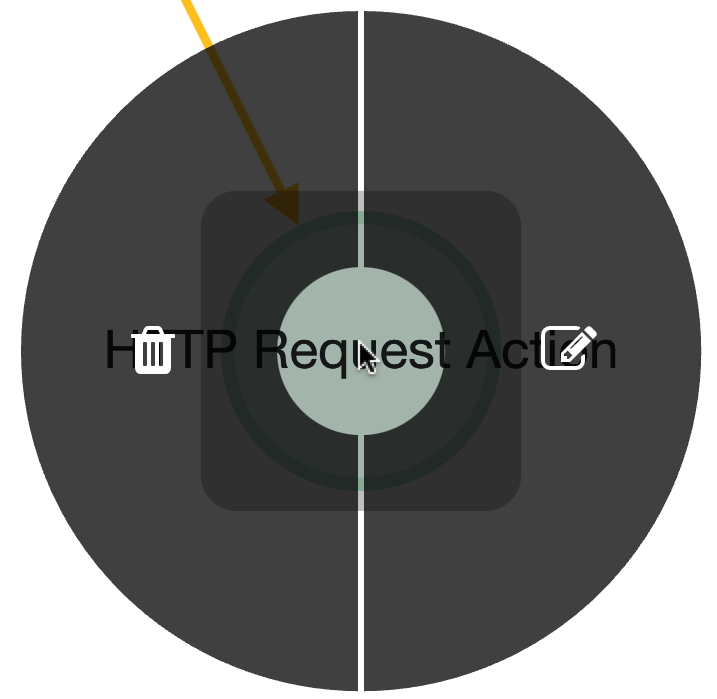
Editing Triggers
When adding/editing a Trigger, the modal will contain a dropdown with all the available types of Triggers within the system (see the description of Extending Workflows). Once you’ve selected a Trigger type, the modal will update with an appropriate form with all the configuration options for that Trigger type. Mobi currently supports two Trigger types:
-
A Scheduled Trigger will execute the Workflow according to a configured Quartz compatible expression.
-
A Commit To Branch Trigger will execute the Workflow whenever a commit is made to a configured Branch on the configured Versioned RDF Record.
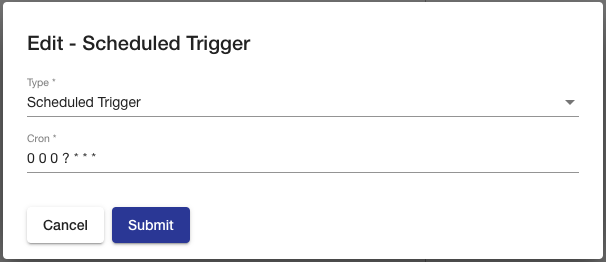
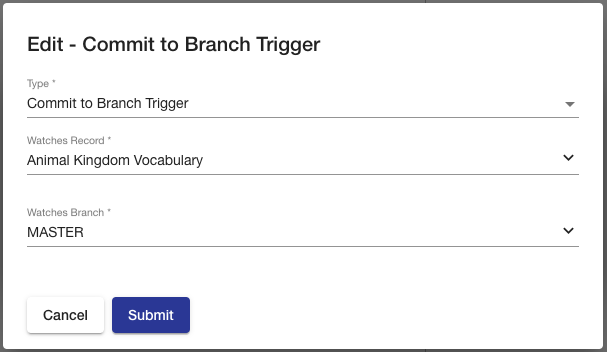
Editing Actions
When adding/editing an Action, the modal will contain a dropdown with all the available types of Actions within the system (see the description of Extending Workflows) along with a field to set an optional title for the Action. Once you’ve selected an Action type, the modal will update with an appropriate form with all the configuration options for that Action type. Mobi currently supports two Action types:
-
A Test Action will simply output the configured message to the logs. Meant for simple Workflow execution testing.
-
An HTTP Request Action will execute a call to the configured URL using the configured HTTP method. The Action also allows you to configure a body for the request with a media type, a request timeout in seconds, and a list of custom HTTP Request headers.
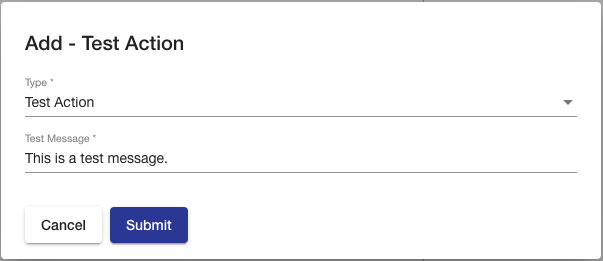
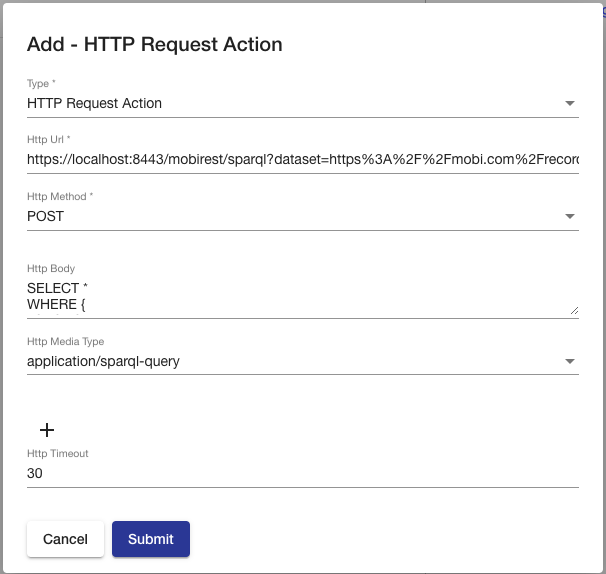
My Account
The My Account page of Mobi provides users with a way to configure their own account and customize various aspects of the application to suit their needs.
To reach the My Account page, click on the display of your username/name in the left menu.
The My Account page contains four main tabs for configuring your account:
Profile
The Profile tab contains a form for viewing and editing your basic profile information. This information includes your First Name, Last Name, and Email address. None of this information is required. Your current settings for these fields will be displayed to start. To edit, simply change the values in one or more of the fields and and click Save in the bottom right. If the change was successful, you will see a success message at the top of the section.
Groups
The Groups tab contains a list of all the groups you belong to. Next to each group title is an indicator of how many users are within that group. If a group has the admin role, an indicator will be next to the group’s title.
Password
The Password tab contains a form for updating your password. To change it, you must first input your Current Password in the first field. Then enter your desired New Password in the second field and click Save in the bottom right. If the change was successful, you will see a success message at the top of the tab.
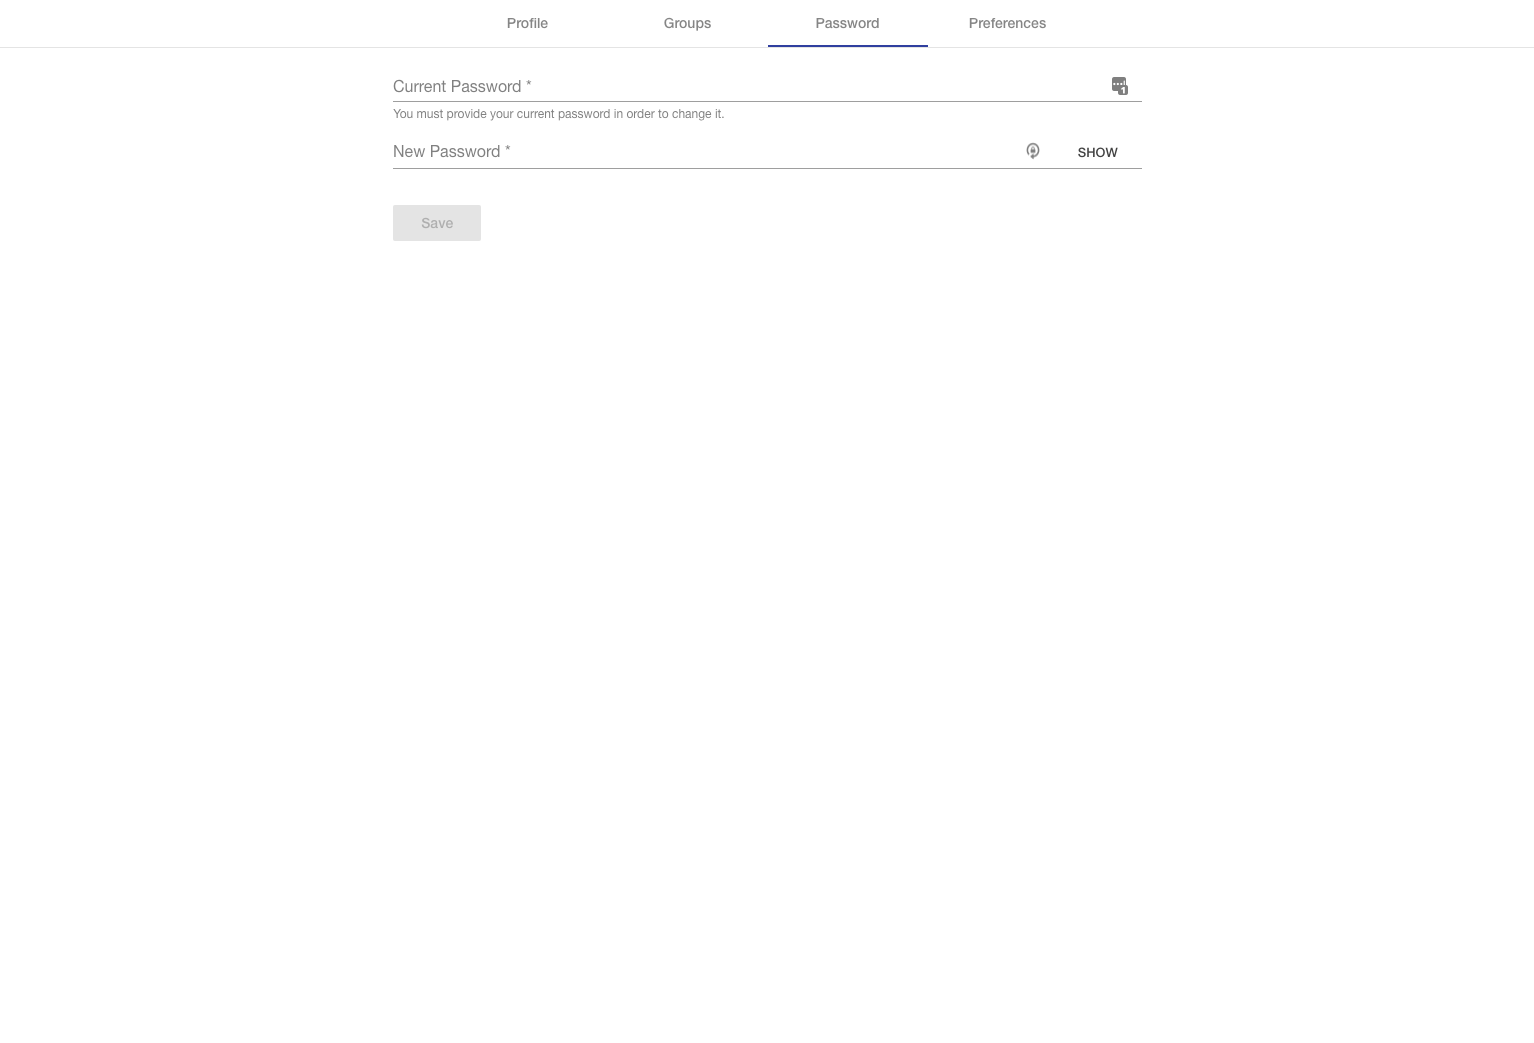
Preferences
The Preferences tab will dynamically populate with user preference definitions added to the repository (see documentation here). These preferences are specific to your user. Preferences are grouped into clickable sections on the left.
The "Editor Preferences" will customize your experience when editing records across the application.
-
Default Annotation Preference - Controls which standard annotation set will be utilized when creating new entities within editors. The default value is the DC Terms annotation set (i.e.
dct:titleanddct:description)
Administration
The Administration page provides administrators with a portal to create, edit, and remove users and groups in Mobi. From this module, you can also assign high level access control for common actions within the application.
To reach the Administration page, click on Administration in the left menu. This option is not available to non-administrators.
There are six main tabs of the Administration page:
If you are running a Mobi Enterprise installation, there are three extra tabs for Publish Configurations, Licensing, and LDAP/SSO available as well.
Users
The Users tab allows you to create, edit, and remove users from the application.
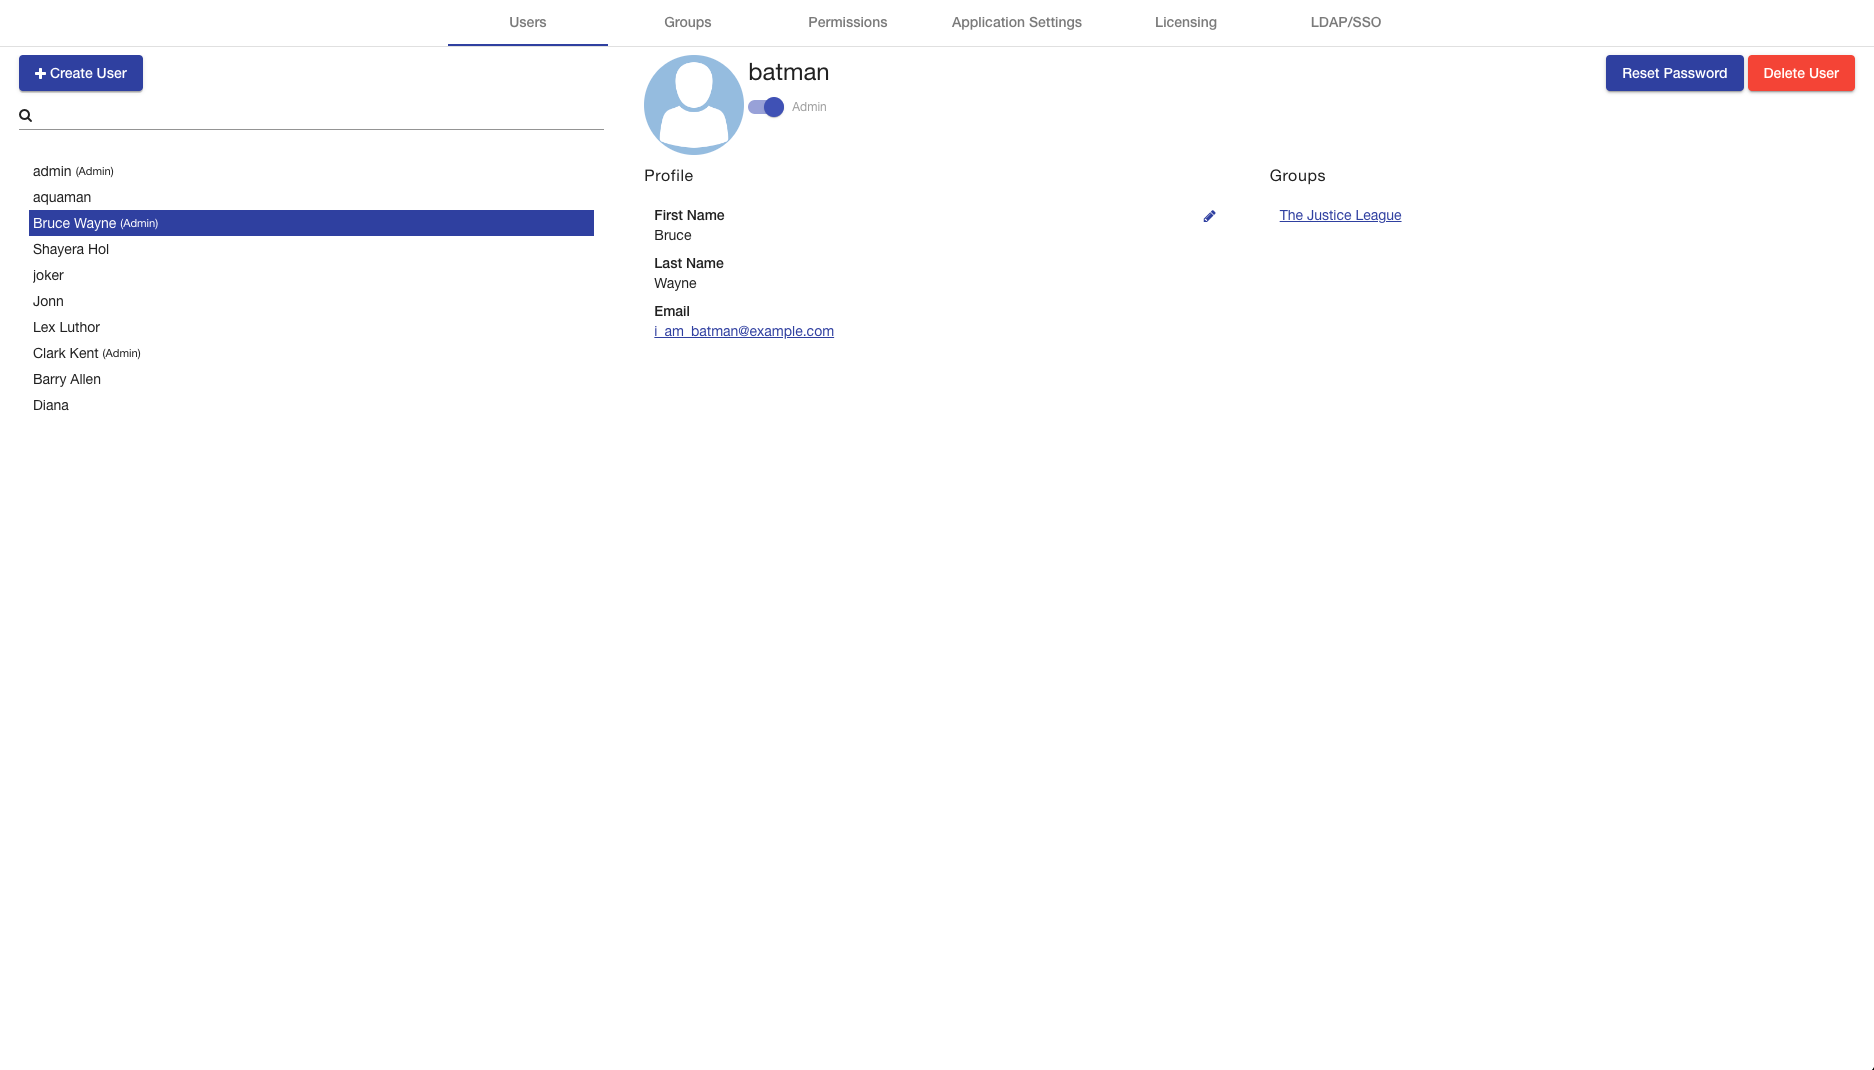
The left side of the tab contains a list of all the users in Mobi. Each user is displayed using their first and last names, if available, or their username. If a user is an administrator, whether by having the admin role or by being a part of a group with the admin role, an indicator will be next to their username in the list. At the top of the list is a search bar that will filter the list of users based on their first name, last name, or username. Clicking on a user will load that user’s information into the right side of the section.
|
Note
|
The default Admin user can not be deleted. |
The middle of the Users tab contains the username of the selected user, a block for viewing and editing the user’s profile information, and a block for resetting the user’s password. Resetting a user’s password cannot be undone.
The right side of the tab contains blocks for viewing and editing the selected user’s permissions and viewing the user’s groups. Clicking on the title of a group will open it in the Groups section.
To create a user, click Create User and the Create User overlay will appear. The Username field (required) must be unique within the application. The Password fields (required) allow you to enter the password for the new user. The First Name, Last Name, and Email fields are not required, but allow you to enter in basic profile information for the new user. The last section contains a checkbox for setting whether the new user is an administrator. Clicking Cancel will close the overlay. Clicking Submit will create a new user with the entered information.
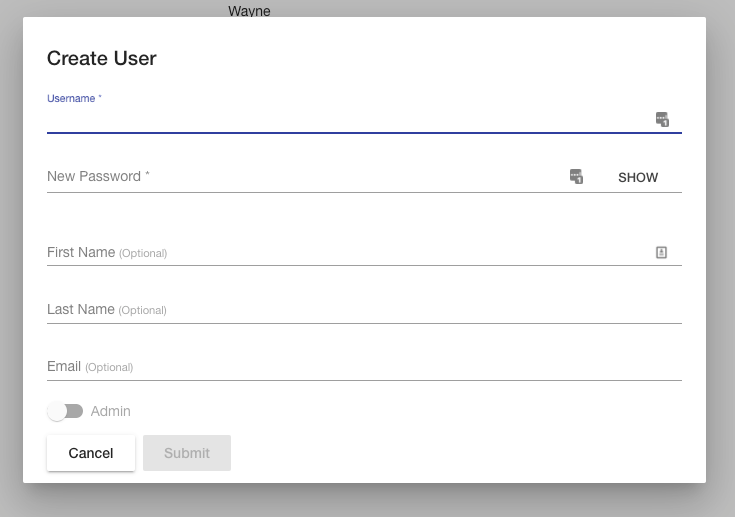
Groups
The Groups tab allows you to create, edit, and remove groups from the application. Groups allow you to associate users with one another and apply the same permissions and roles to all members.
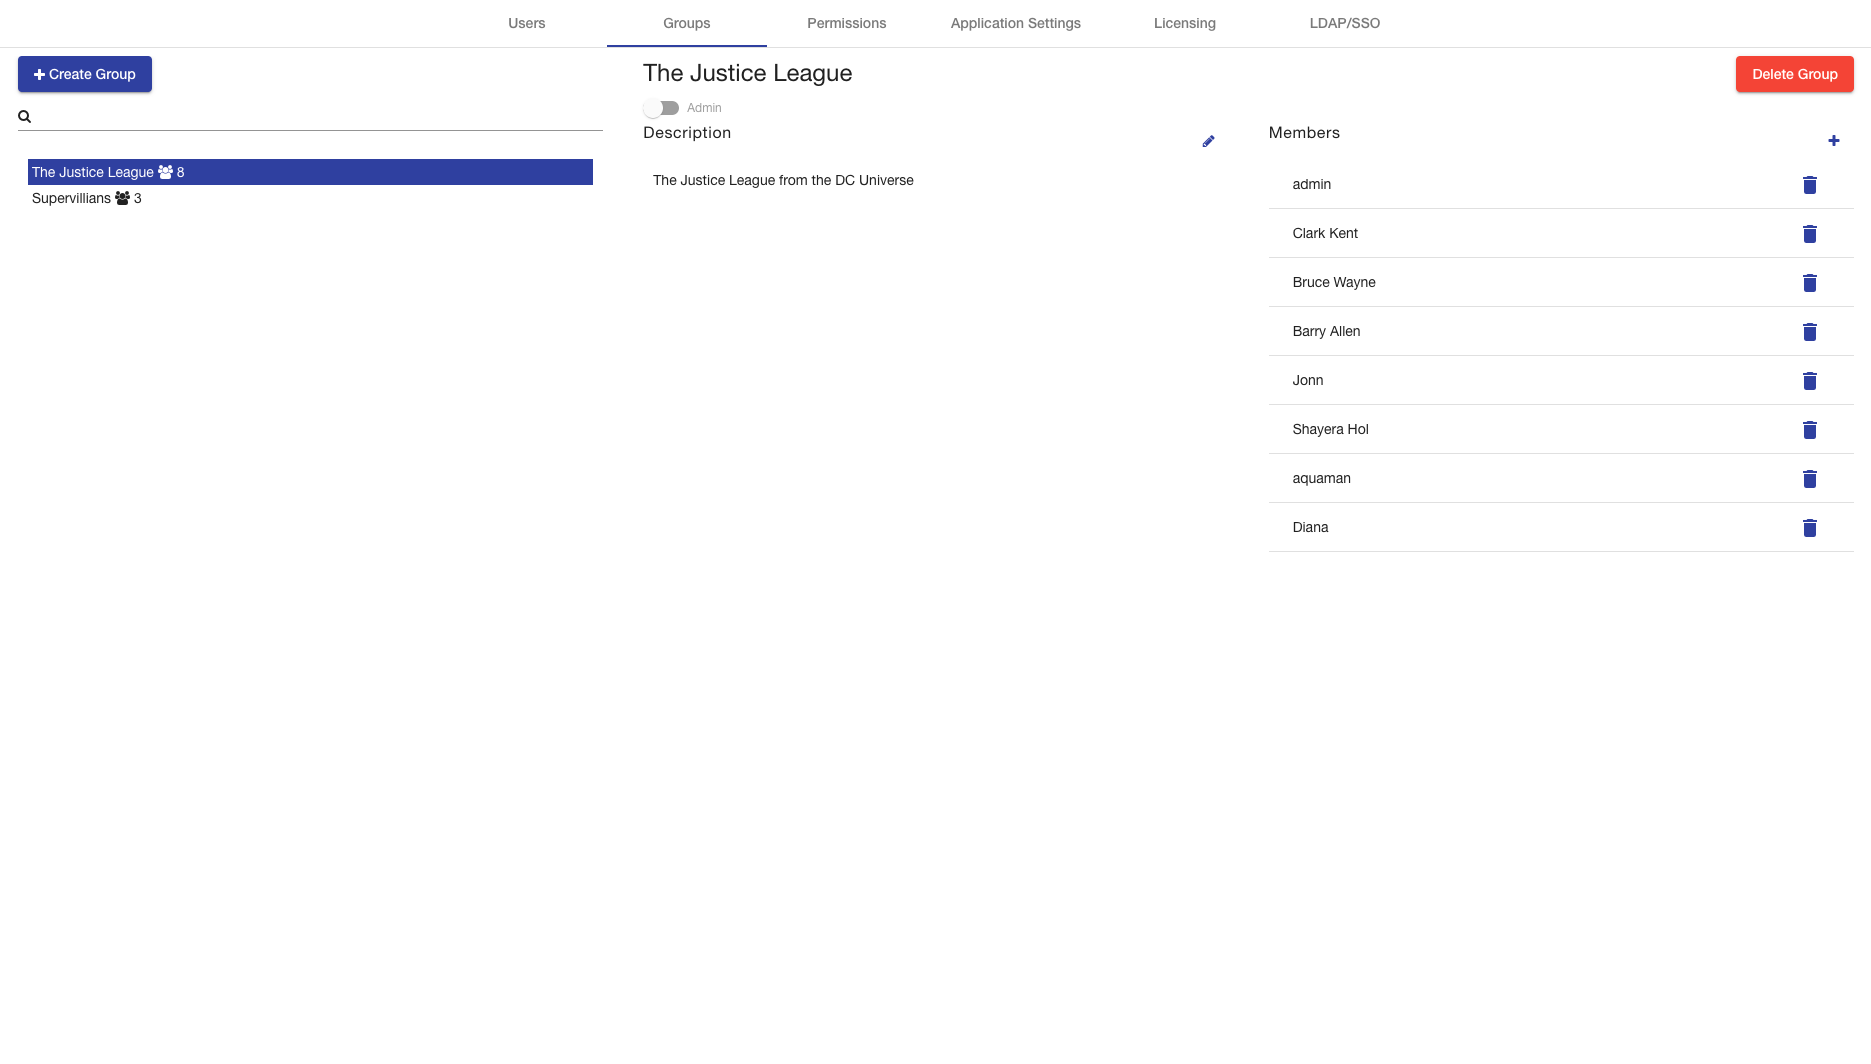
The left side of the tab contains a list of all the groups in Mobi. Next to each group title is an indicator of how many users are within that group. At the top of the list is a search bar that will filter the list of groups based on their title. Clicking on a group title will load that group’s information into the right side of the section.
The right side of the tab contains the selected group’s title and two rows of blocks. The top row contains blocks that allow you to edit the group’s description and permissions. If a group has the "Admin" role, all members within that group are considered administrators.
The bottom row contains a block that allows you to view, add, and remove the group’s members. To add another user to the group, click Add Member and that line in the table will transform into a dropdown selector of all the users in Mobi that have not already been selected. Selecting a user in this dropdown will automatically add them to the group. To remove a user from the table, click on the corresponding delete button at the end of the row. Any changes in this table will immediately be applied. Clicking on a username in this table will open that user’s information in the Users section.
To create a group, click Create Group and the Create Group overlay will appear. The Group Title field (required) allows you to specify a name for the group. The Description field allows you to enter a description about what the group represents. At the bottom of the overlay is a table for adding users to the group. Your user account will be added automatically. To add others to the group, click Add Member and that line in the table will transform into a dropdown selector of all the users in Mobi that have not already been selected. To remove a user from the table, click on the corresponding delete button at the end of the row. Clicking Cancel will close the overlay. Clicking Submit will create a new group with the entered information and add the listed users to it.
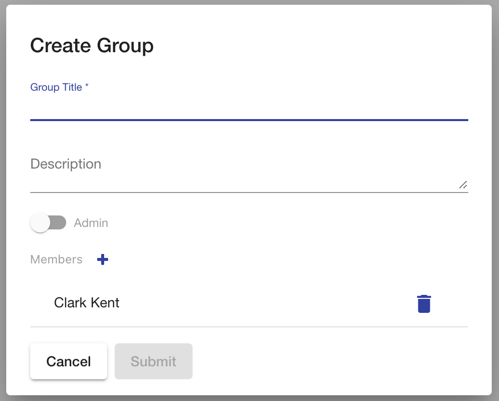
Permissions
The Permissions tab allows you to set high level access control for common actions in the application, such as creating Ontology Records and querying the system repository. Permissions can be set to allow all authenticated users (the Everyone slider) or limit access to specific users and groups. To set the permission to a user or group, unselect the Everyone permission, find a user or group in the search box underneath the appropriate box, and select it. To remove a user or group from the permission, click the X button next to the username or group title. After you have finished making the changes you want, make sure to click the save button in the bottom right.
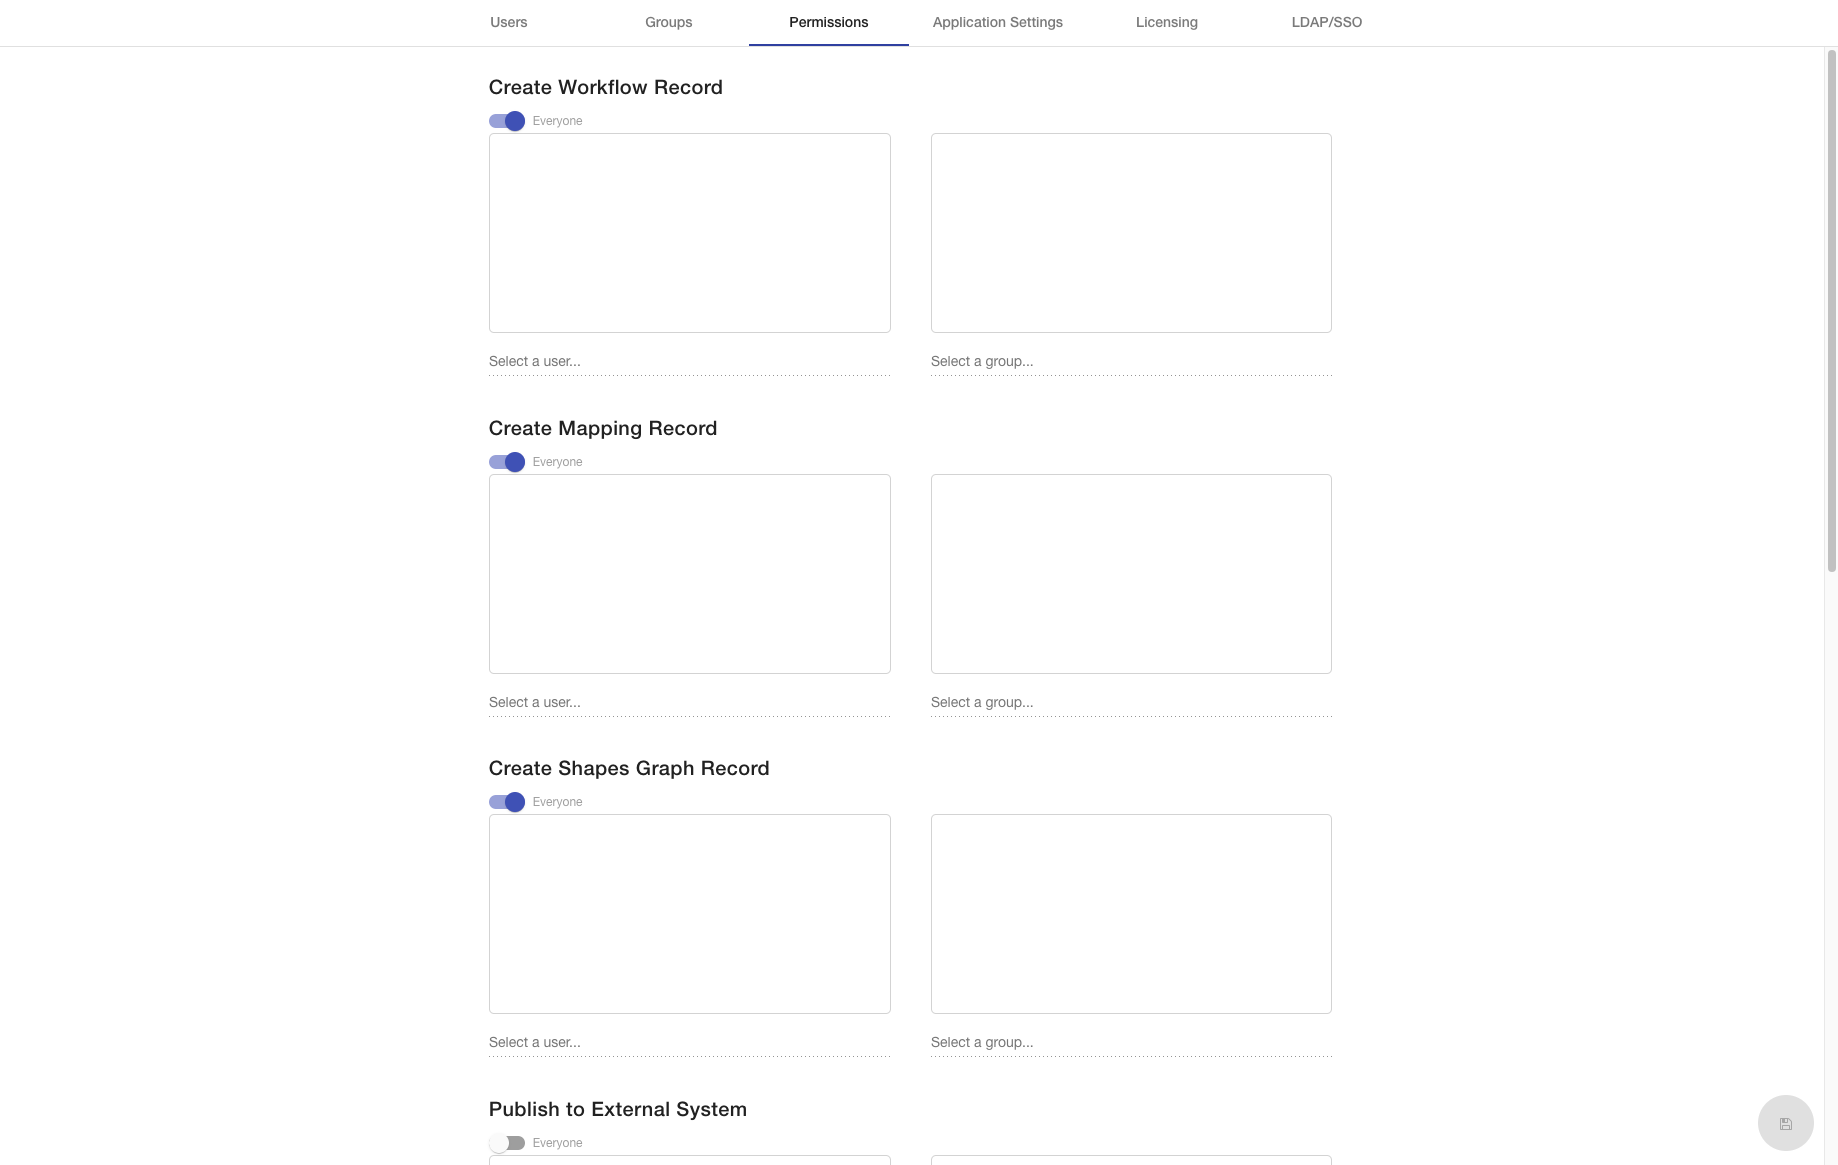
Application Settings
The Application Settings tab enables you to alter/maintain system-wide settings. Below are descriptions of the settings currently available in the application.
|
Note
|
More Application Settings coming soon! |
- Default Ontology Namespace
-
The namespace to be used when generating default IRIs for new ontologies/vocabularies in the Ontology Editor.
- Default Shapes Graph Namespace
-
The namespace to be used when generating default IRIs for new shapes graphs in the Shapes Editor.
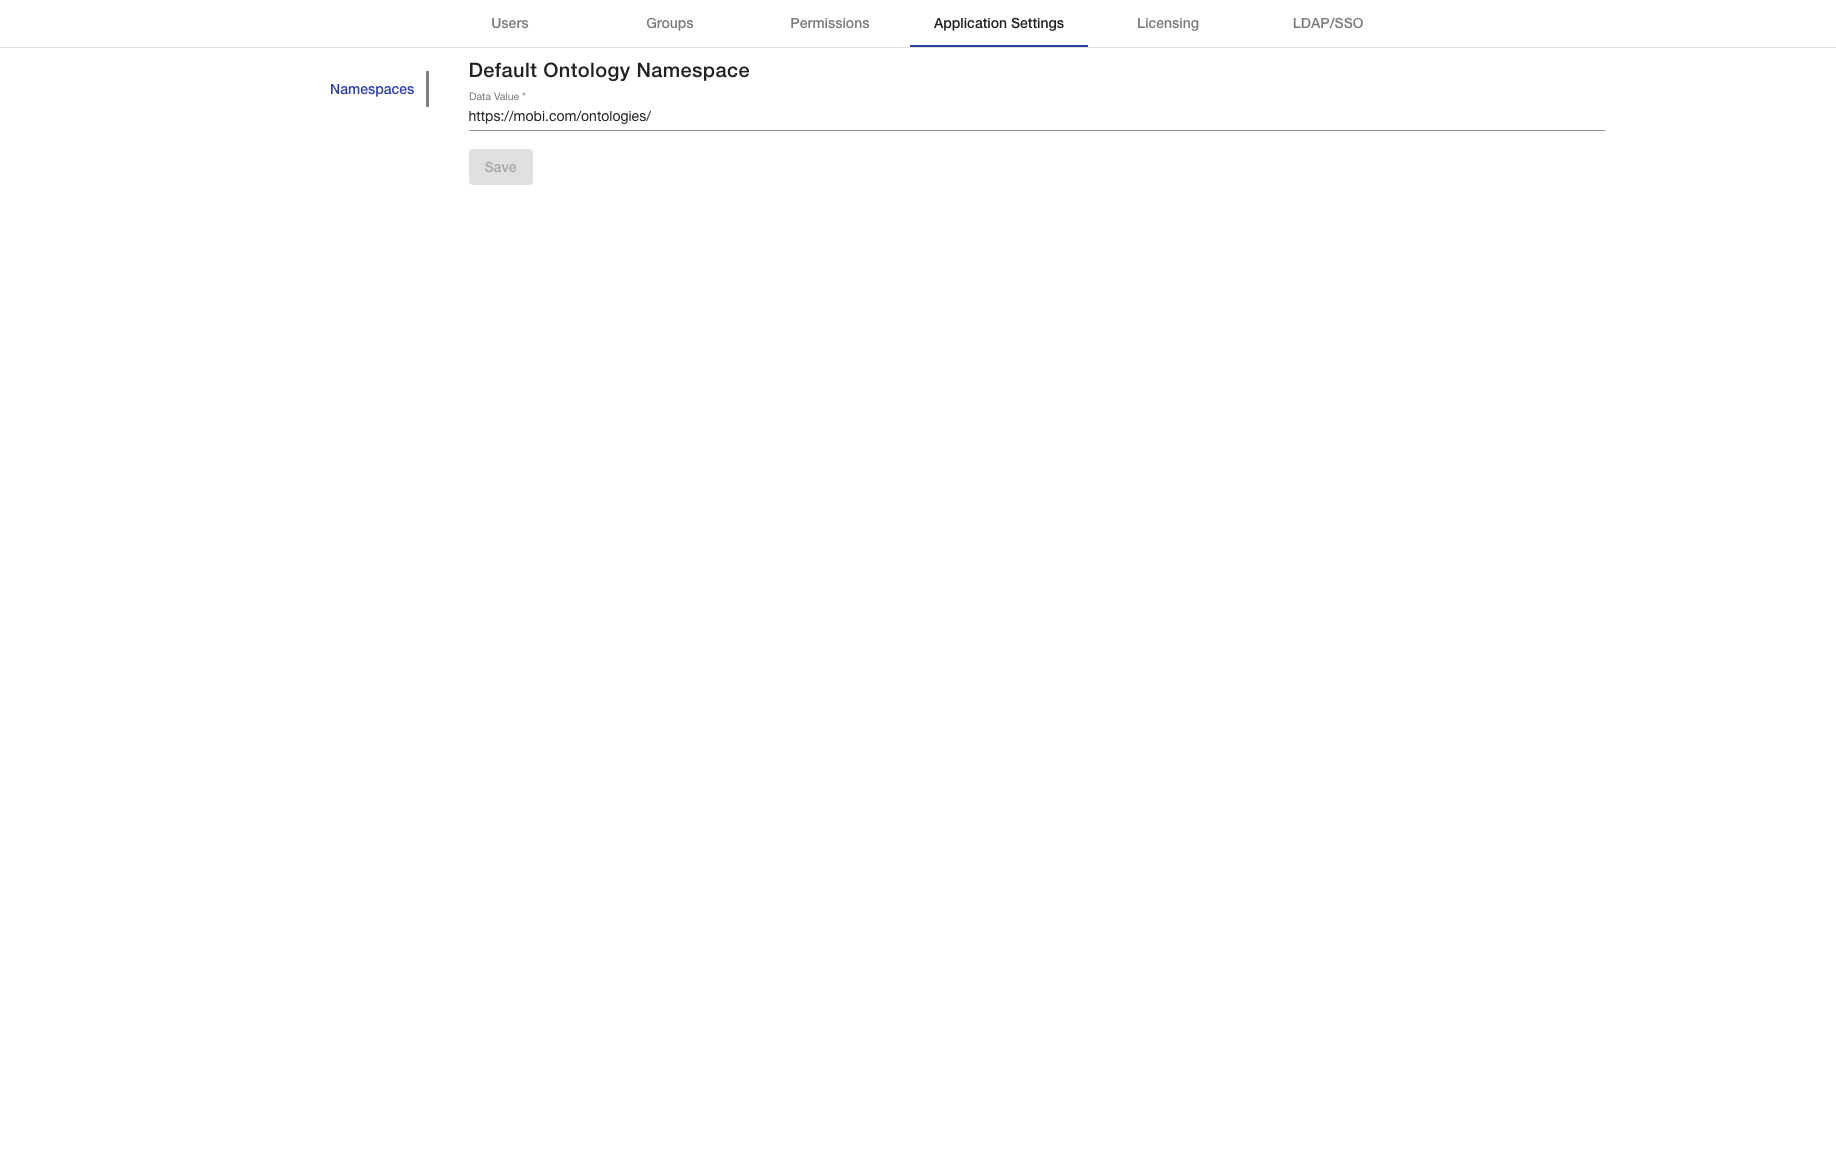
Repositories
The Repositories tab presents a list of all the configured triple stores that Mobi is tracking. This includes the central system repository (which manages all platform data) and the prov repository (which manages all provenance related data). Each repository is color coded and labeled according to its type. And if a repository type supports it, the capacity will be represented for monitoring purposes.
|
Note
|
More information about the available repository types and their configurations can be found here. |
|
Note
|
Management of repository configurations in the UI coming soon! |
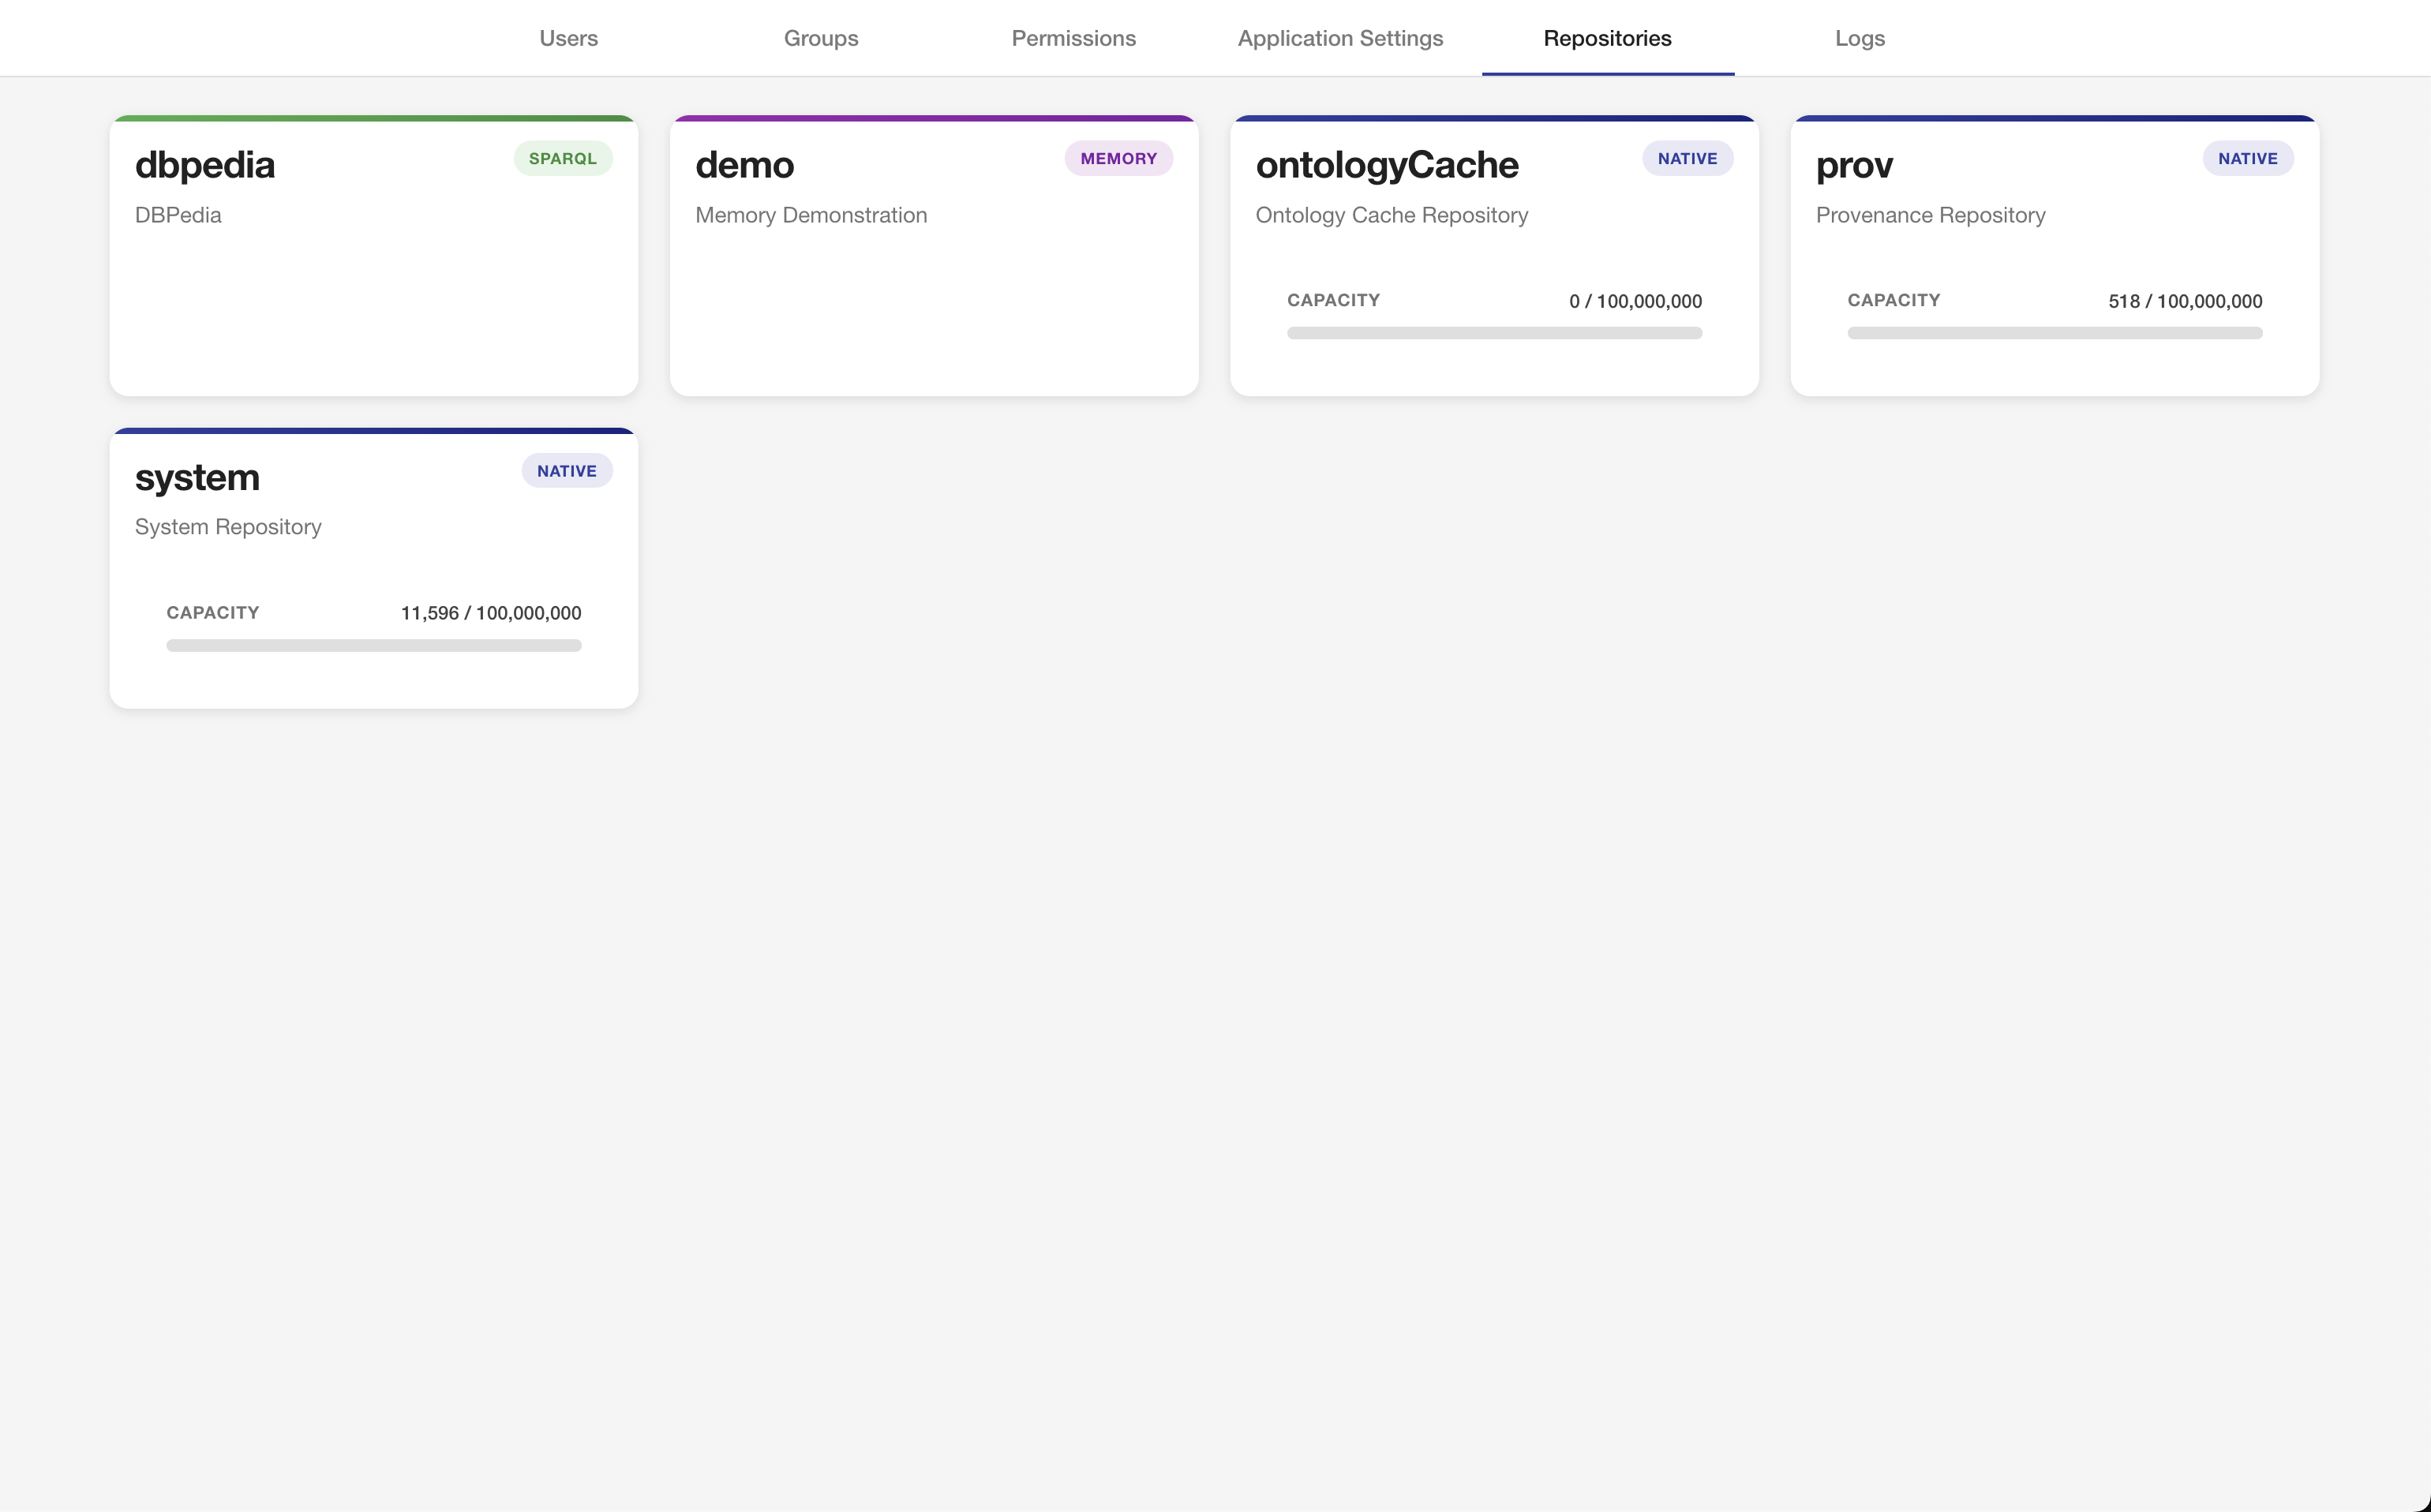
Logs
The Logs tab enables administrators the ability to review, search, and download the application logs. All logs are loaded from the default log directory of the distribution ($MOBI_HOME/data/log). The tab allows you to view the most recent 100 lines in a "Tail" view or paginate through the entire log file. You can also execute a search through the logs to find relevant results. The full log file can be downloaded from this view to better assist with any triage or parsing activities required. To select a different log file, click on the FILENAME field and select from the dropdown.
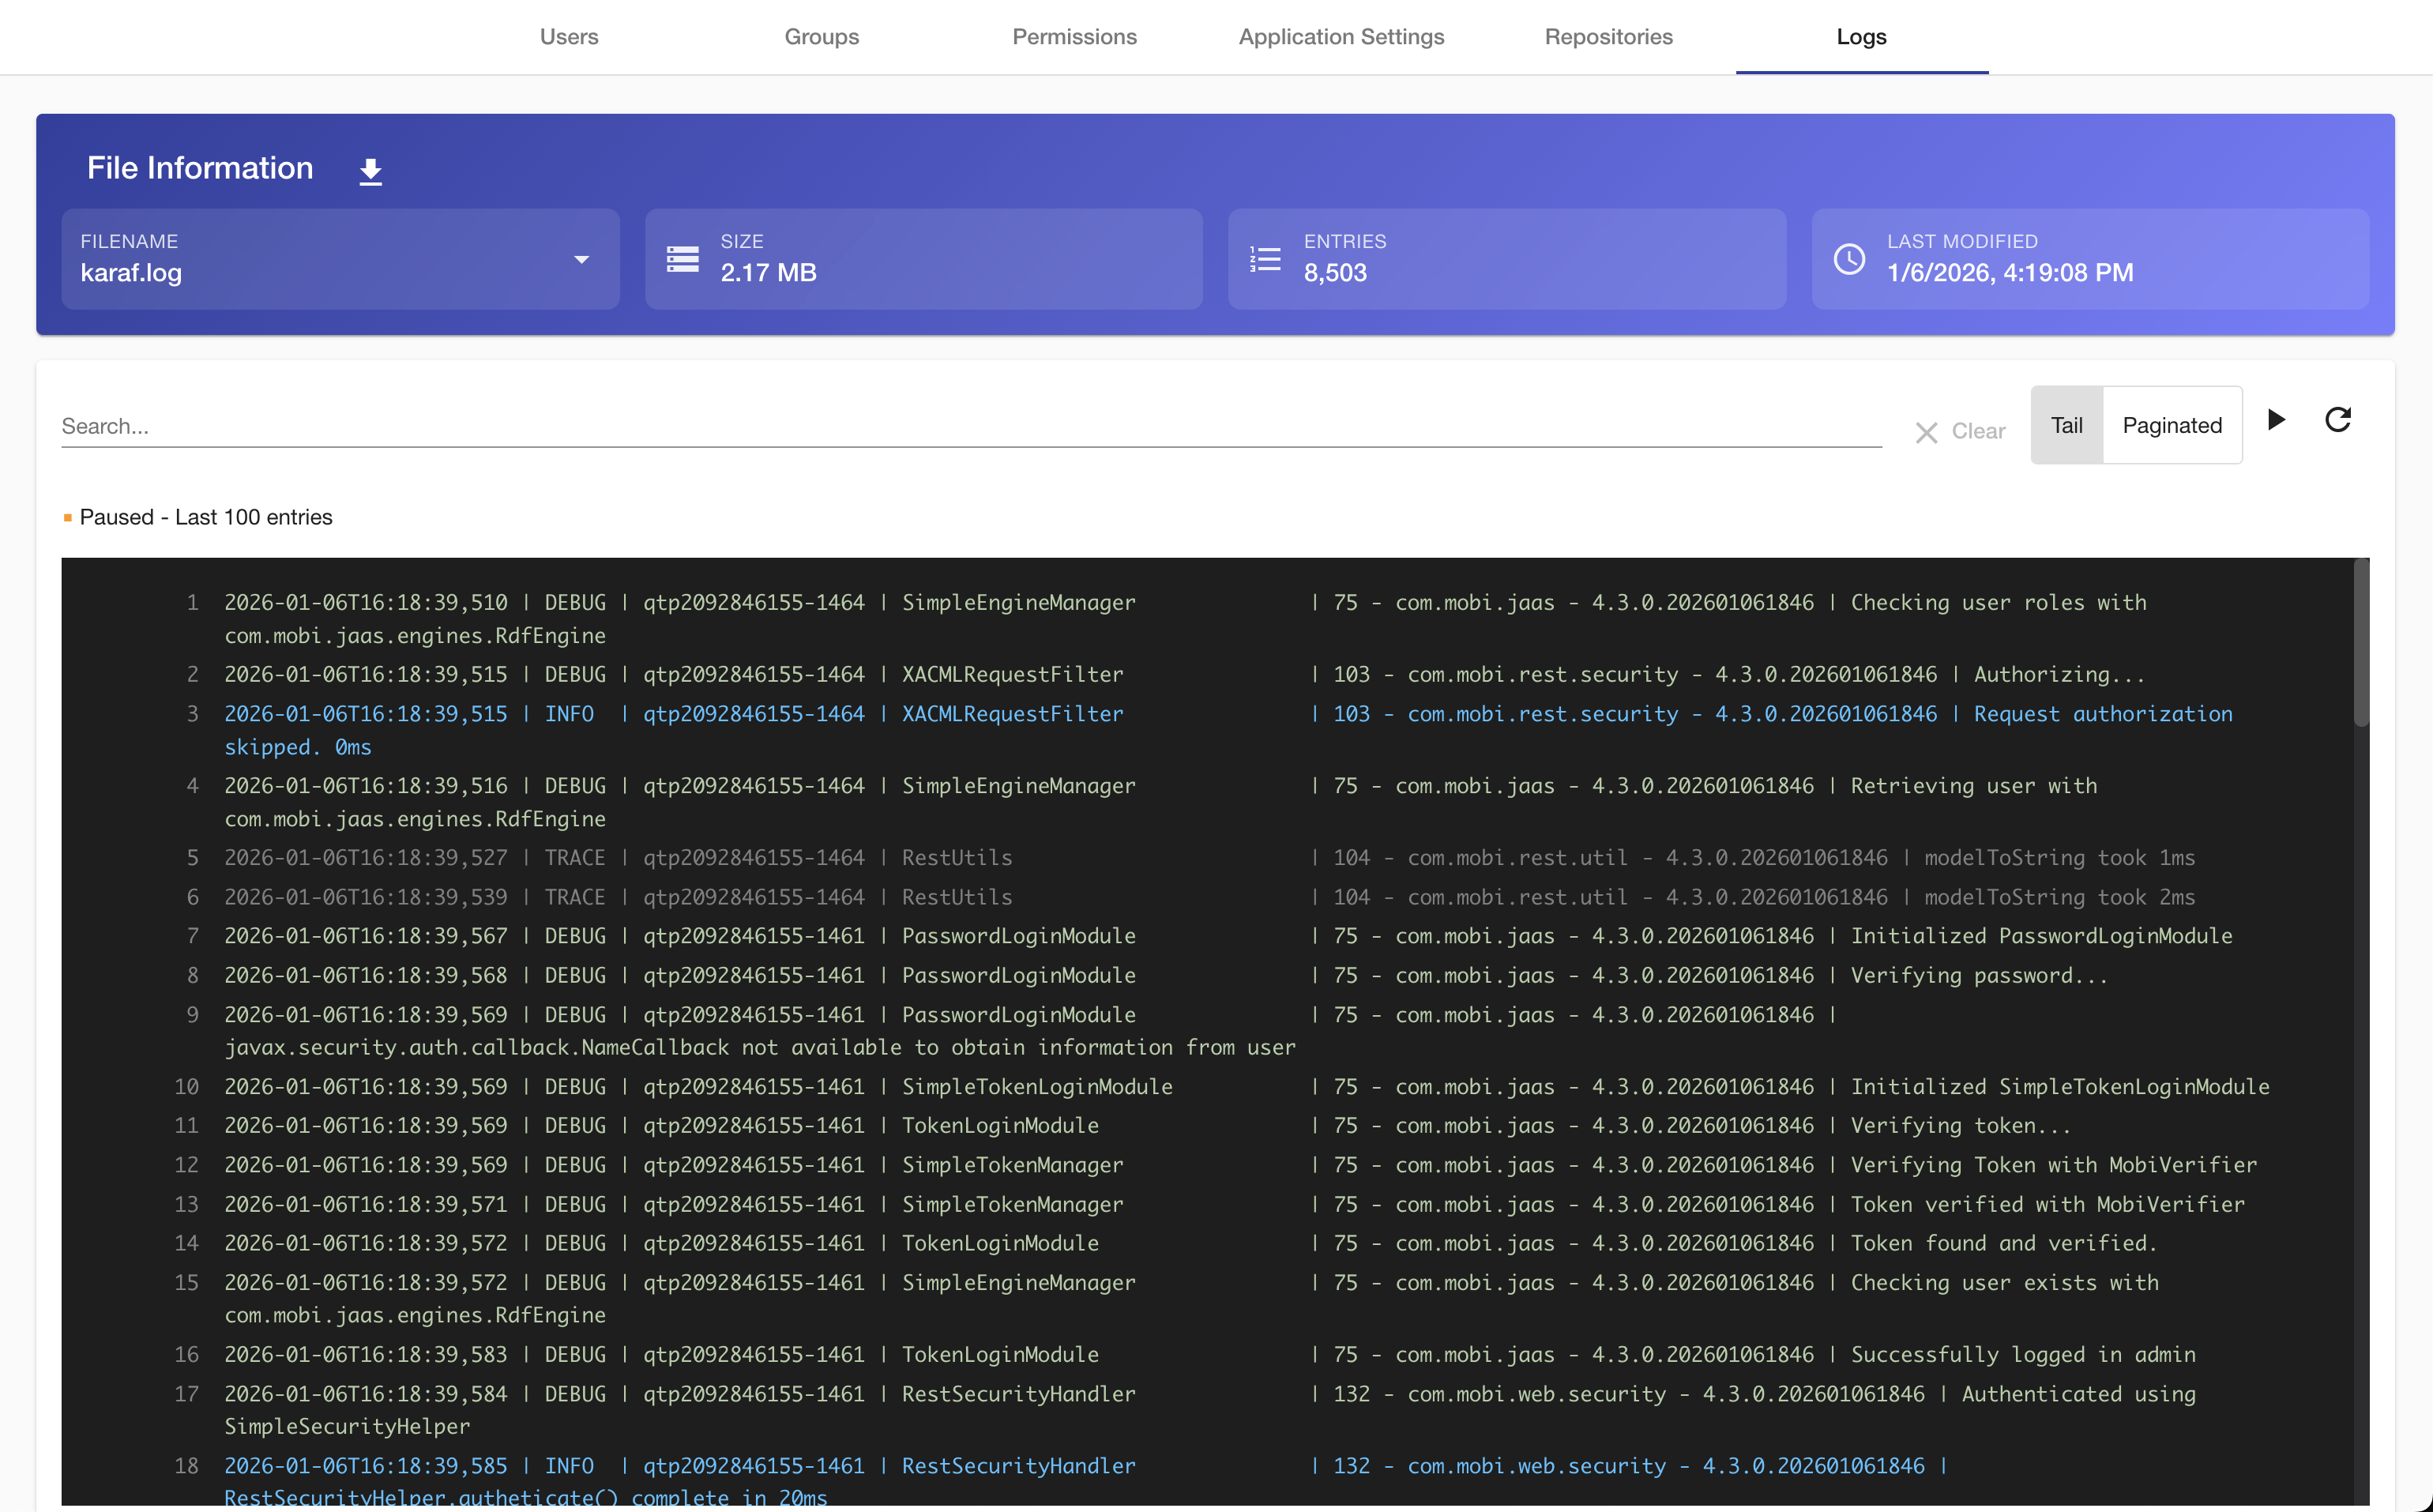
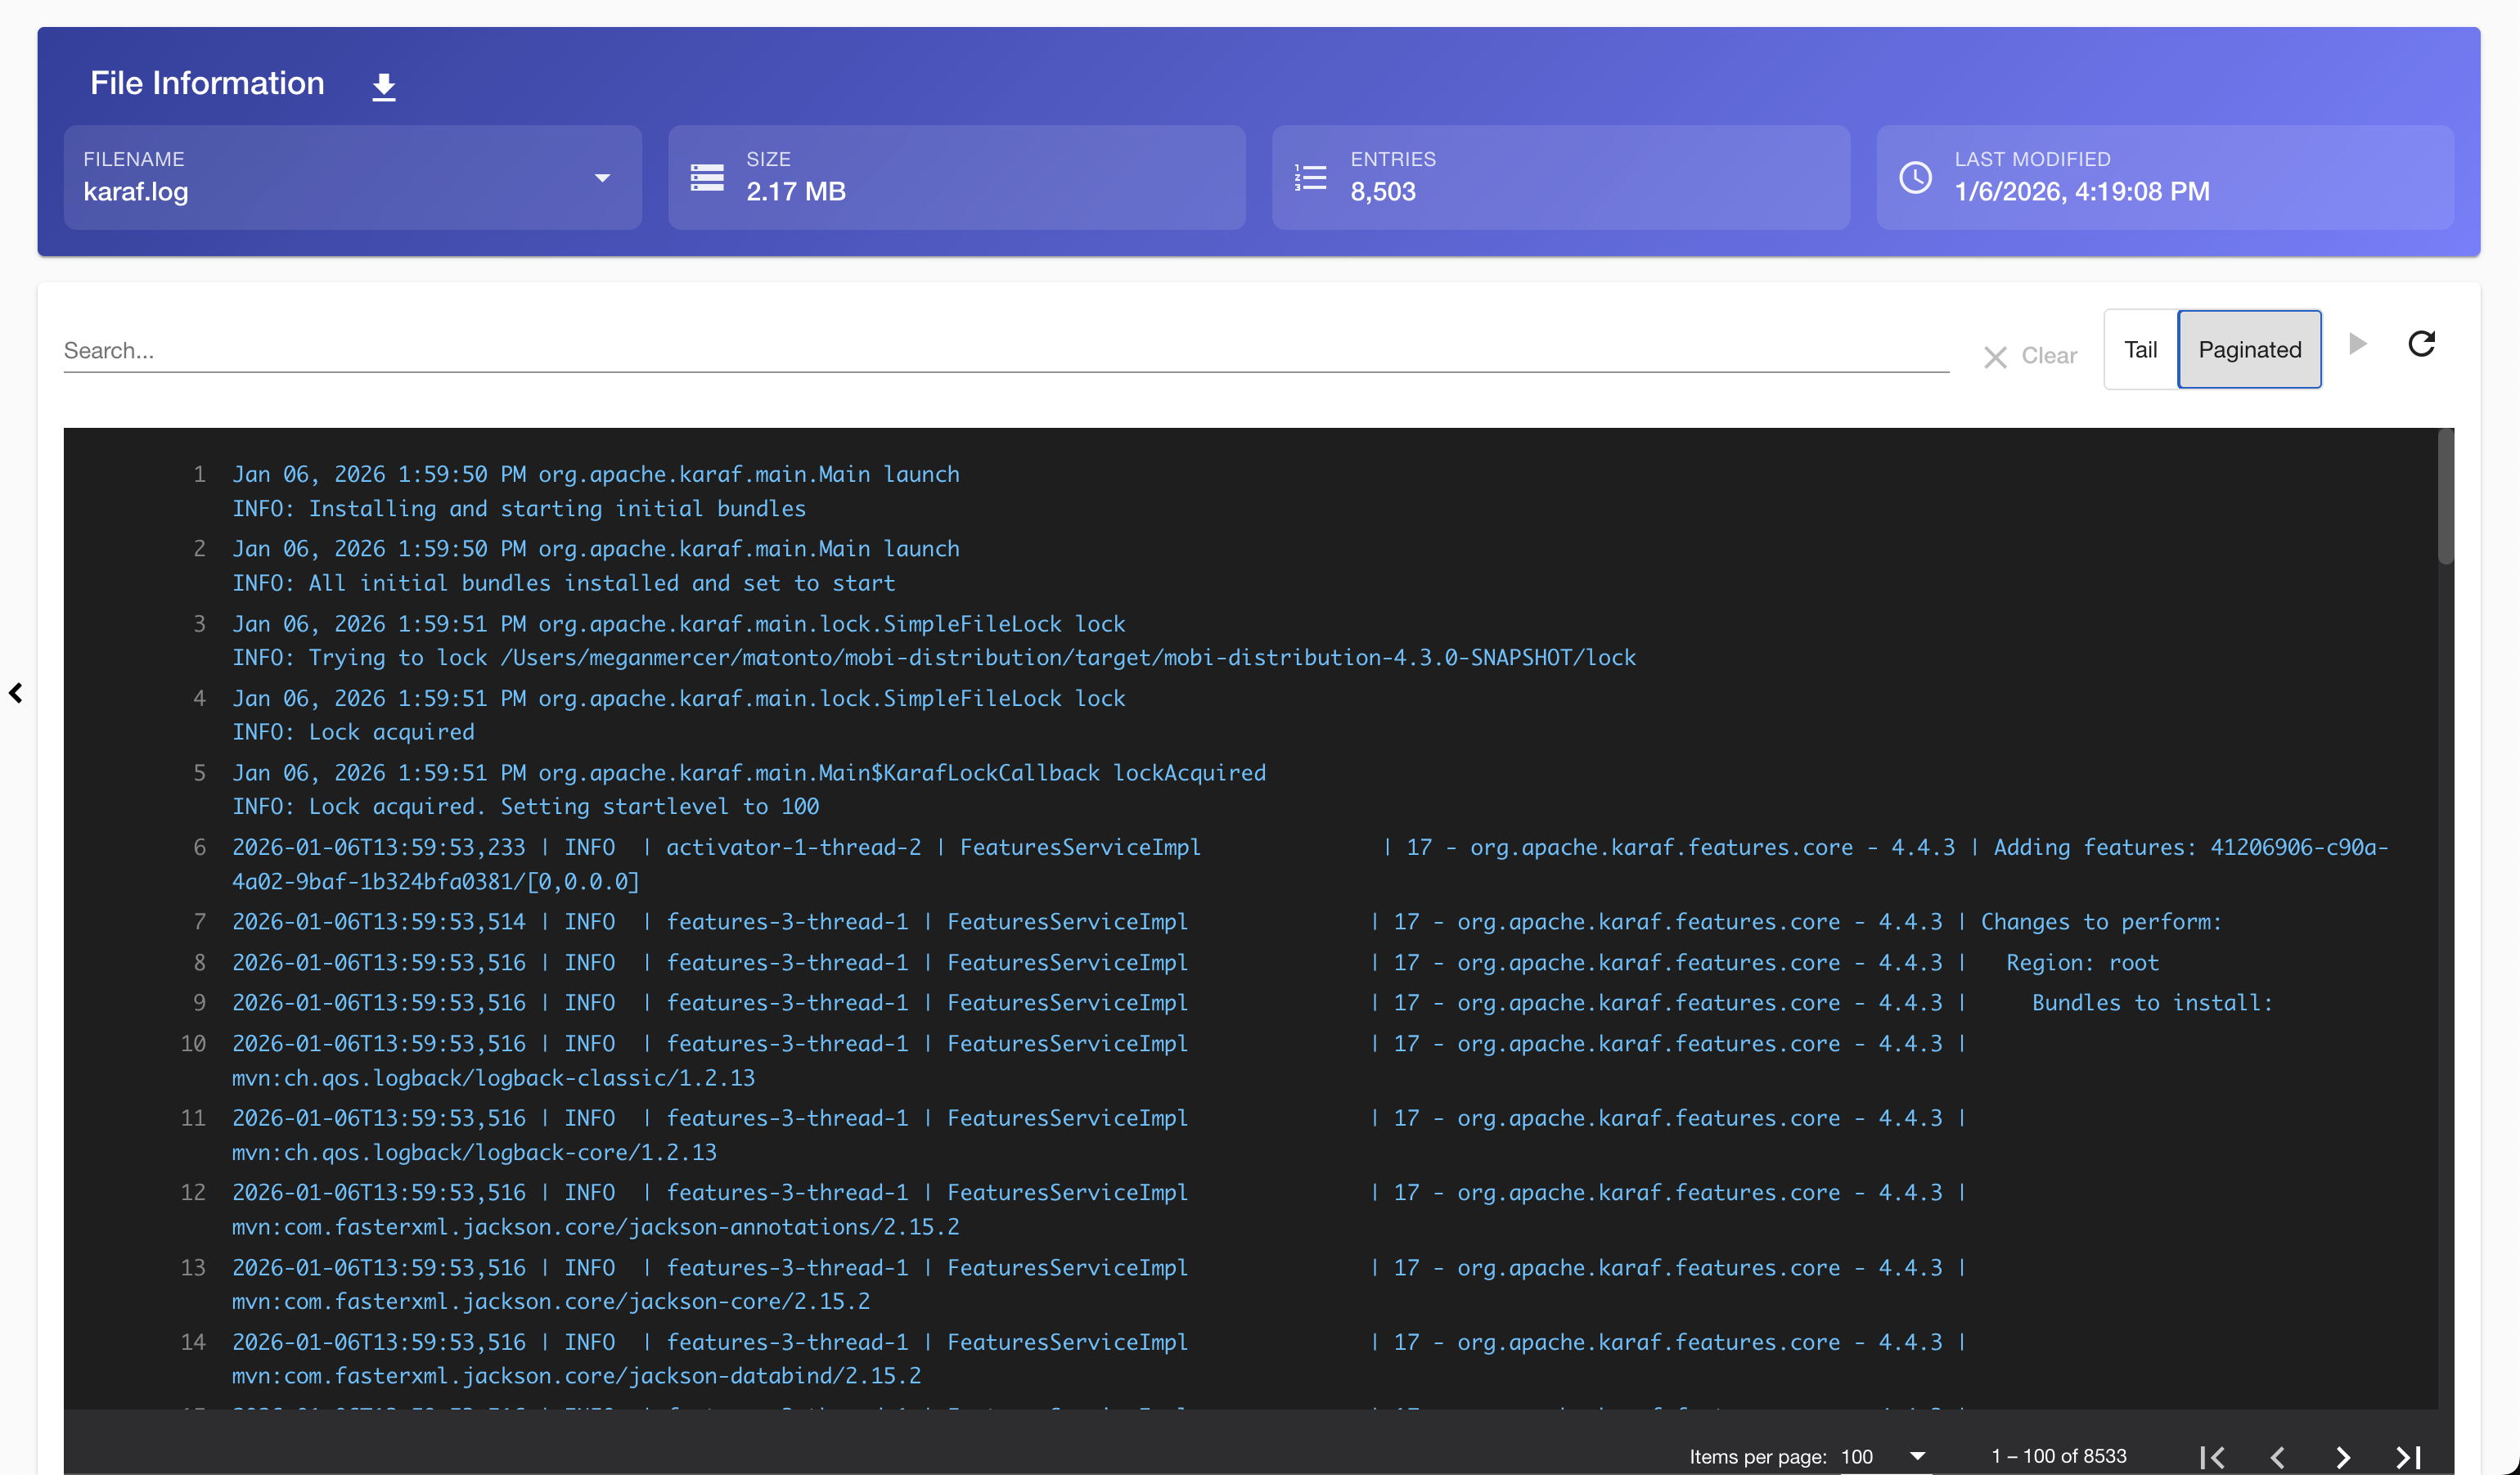
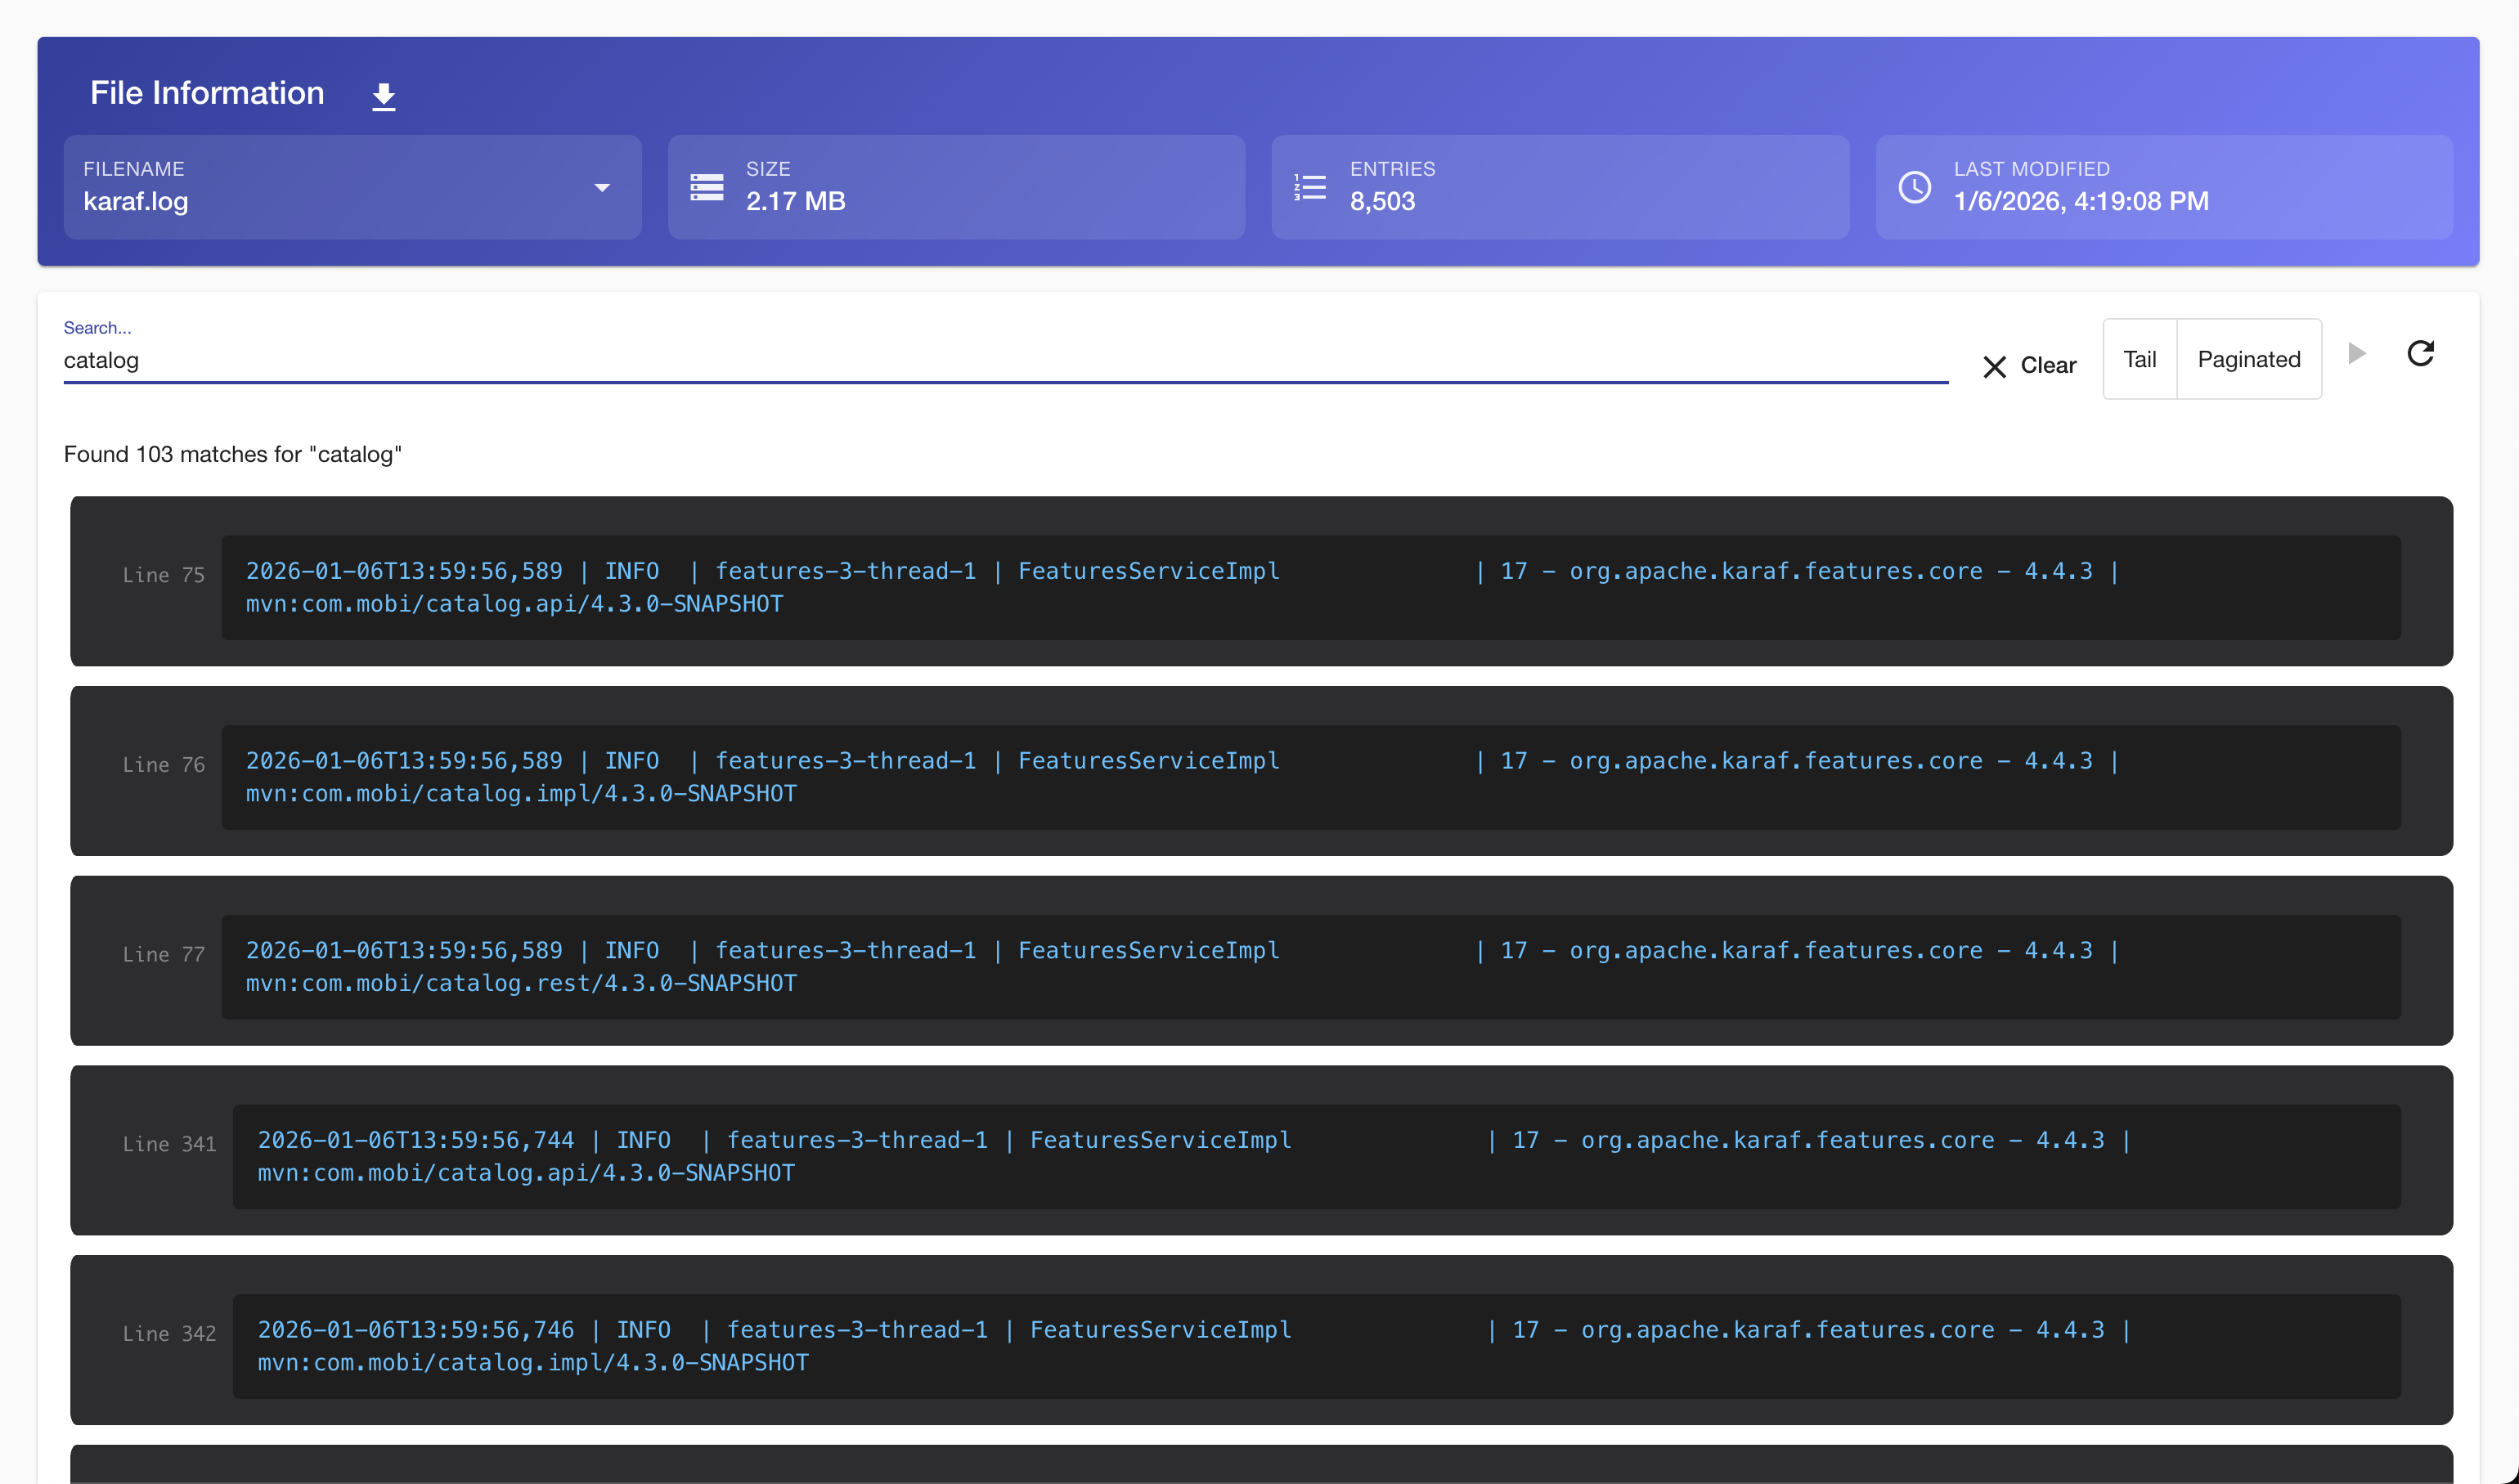
Publish Configuration (ENTERPRISE)
The Publish Configuration tab available in Enterprise only allows you to manage connections to external systems to be utilized within the Publishing Tool. This view is based on an extensible framework for introducing new types of external systems with their own unique requirements and supports multiples connections for each type. By default, Mobi Enterprise supports connections to Altair Graph Studio and GraphDB systems. The left side of the tab displays the list of all configurations grouped by the type of external systems along with a button to create a new configuration. Every publish configuration is uniquely identified by its type and ID.
The modal to create a new publish configuration will first display a select field with all registered types of publish configurations. Once an external system is selected, the modal will populate with all configuration options for that type of external system along with a button to test the connection to the external system before the configuration is saved.
|
|
Clicking on a configuration in the left hand list will display all settings on the right side of the tab in an editable form. Each field is displayed with an information tooltip describing the purpose of the value. Any sensitive fields will be masked with dots and to update the value, the existing value must be cleared. Buttons to test the connection to the external system, save the updated form, and delete the configuration are at the bottom of the form.
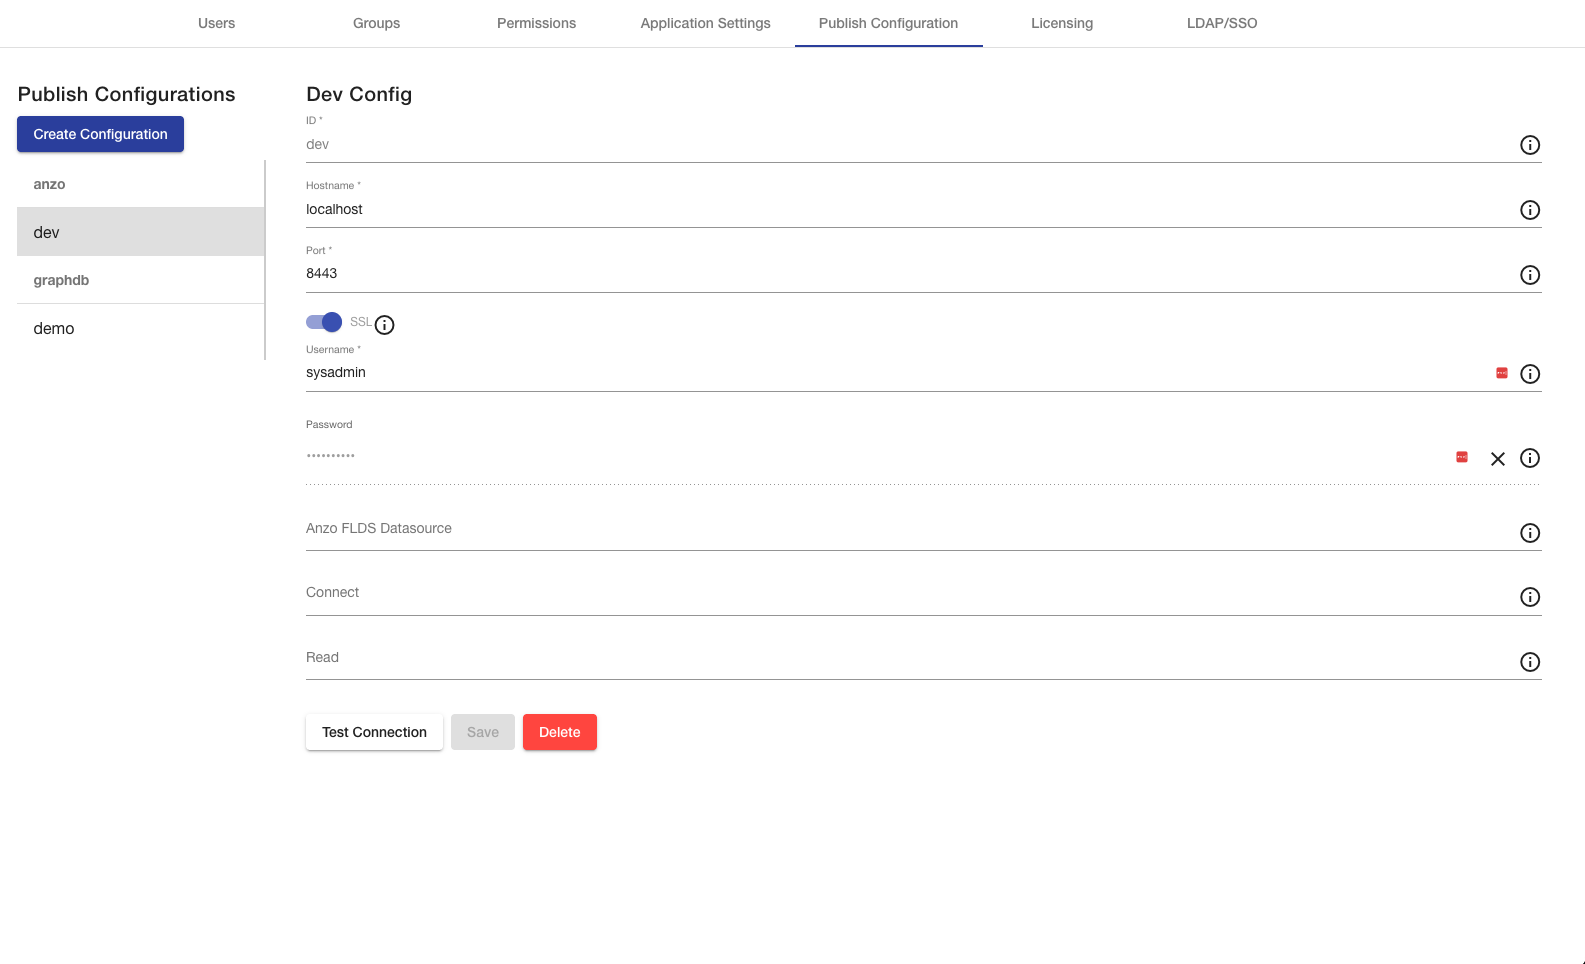
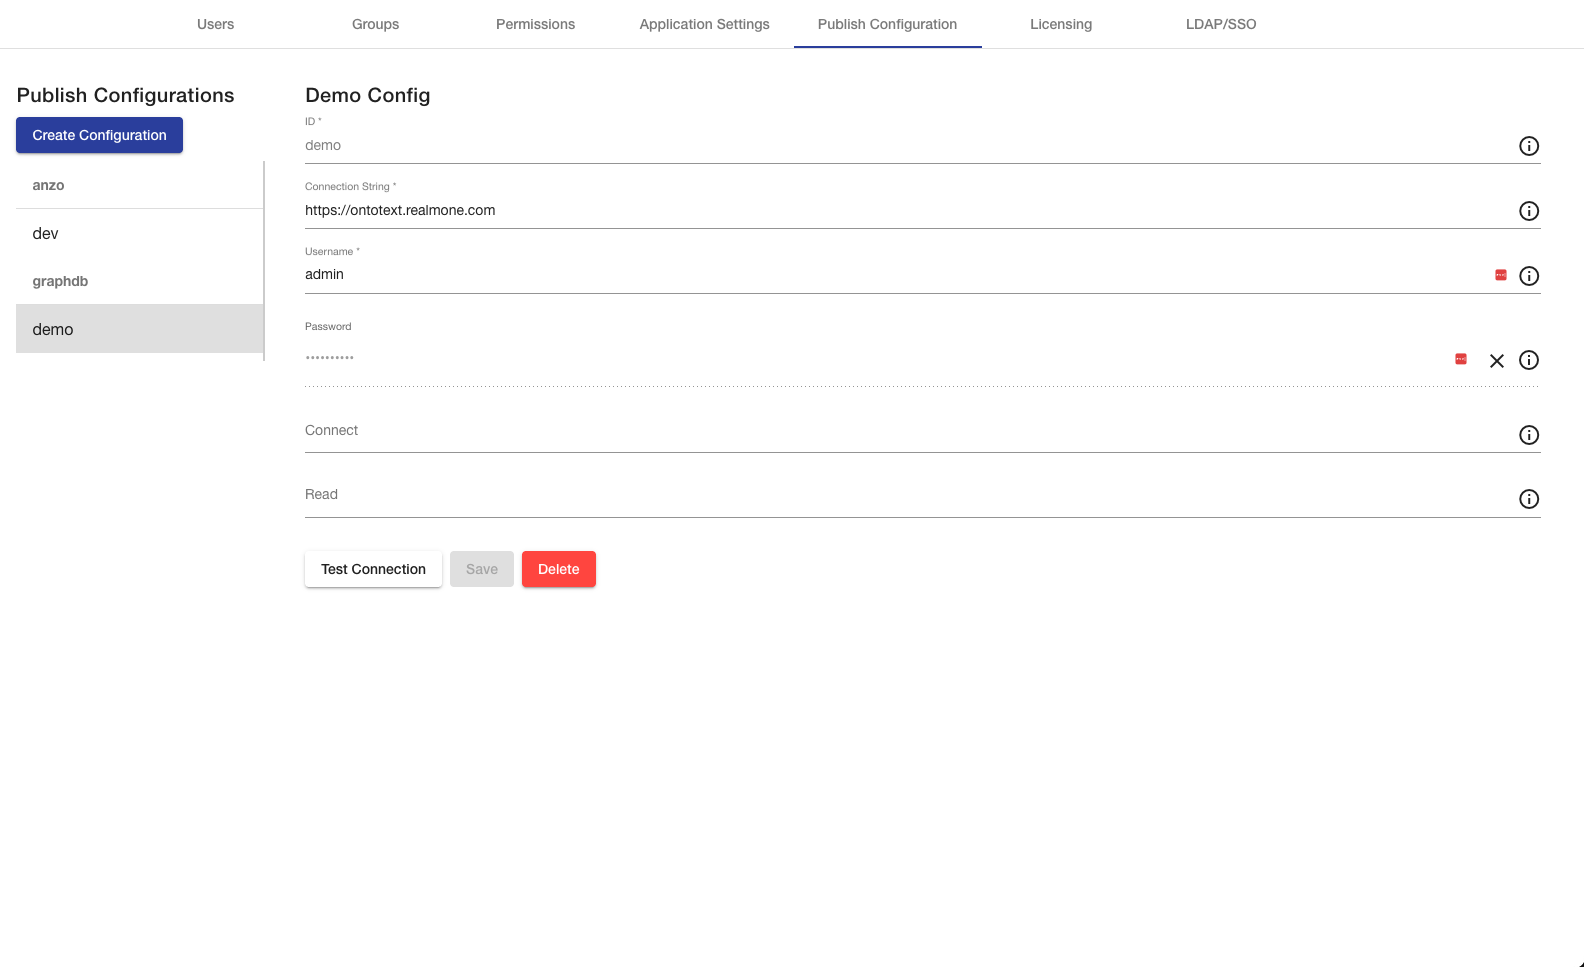
Licensing (ENTERPRISE)
The Licensing tab available in Enterprise only allows you to view and update the current license of the server. The values displayed are pulled from the current license file contents on the installation server and any updates made will be persisted back to that file. The page displays the unique Server ID of the installation, the Owner of the license, the expiration date of the license, the policy attached to the license metadata (older licenses may not have this set), and the full license string that is stored within the license file. To update the license contents, click the pencil button shown on hover, replace the field contents with the complete new license string, and click the save icon.
If your license is expiring within 7 days, a warning banner will be displayed at the bottom of the screen.

LDAP/SSO (ENTERPRISE)
The "LDAP/SSO" tab available in Enterprise only provides a clear view of your current LDAP/SSO configurations, allowing you to easily review the settings used by the application for authentication. The values displayed are pulled from the configuration file contents on the installation server and any updates made will be persisted back to those files. If a configuration is not set, the left hand link will be italicized.
|
Tip
|
To learn about the available LDAP and SSO configuration files, see LDAP Configuration (ENTERPRISE) |
If an LDAP configuration is set using the associated form, users can log into the application with the Users/Groups defined in your organization’s directory. The form also allows you to remove the configuration. The changes will immediately go into effect once the form is saved/cleared.
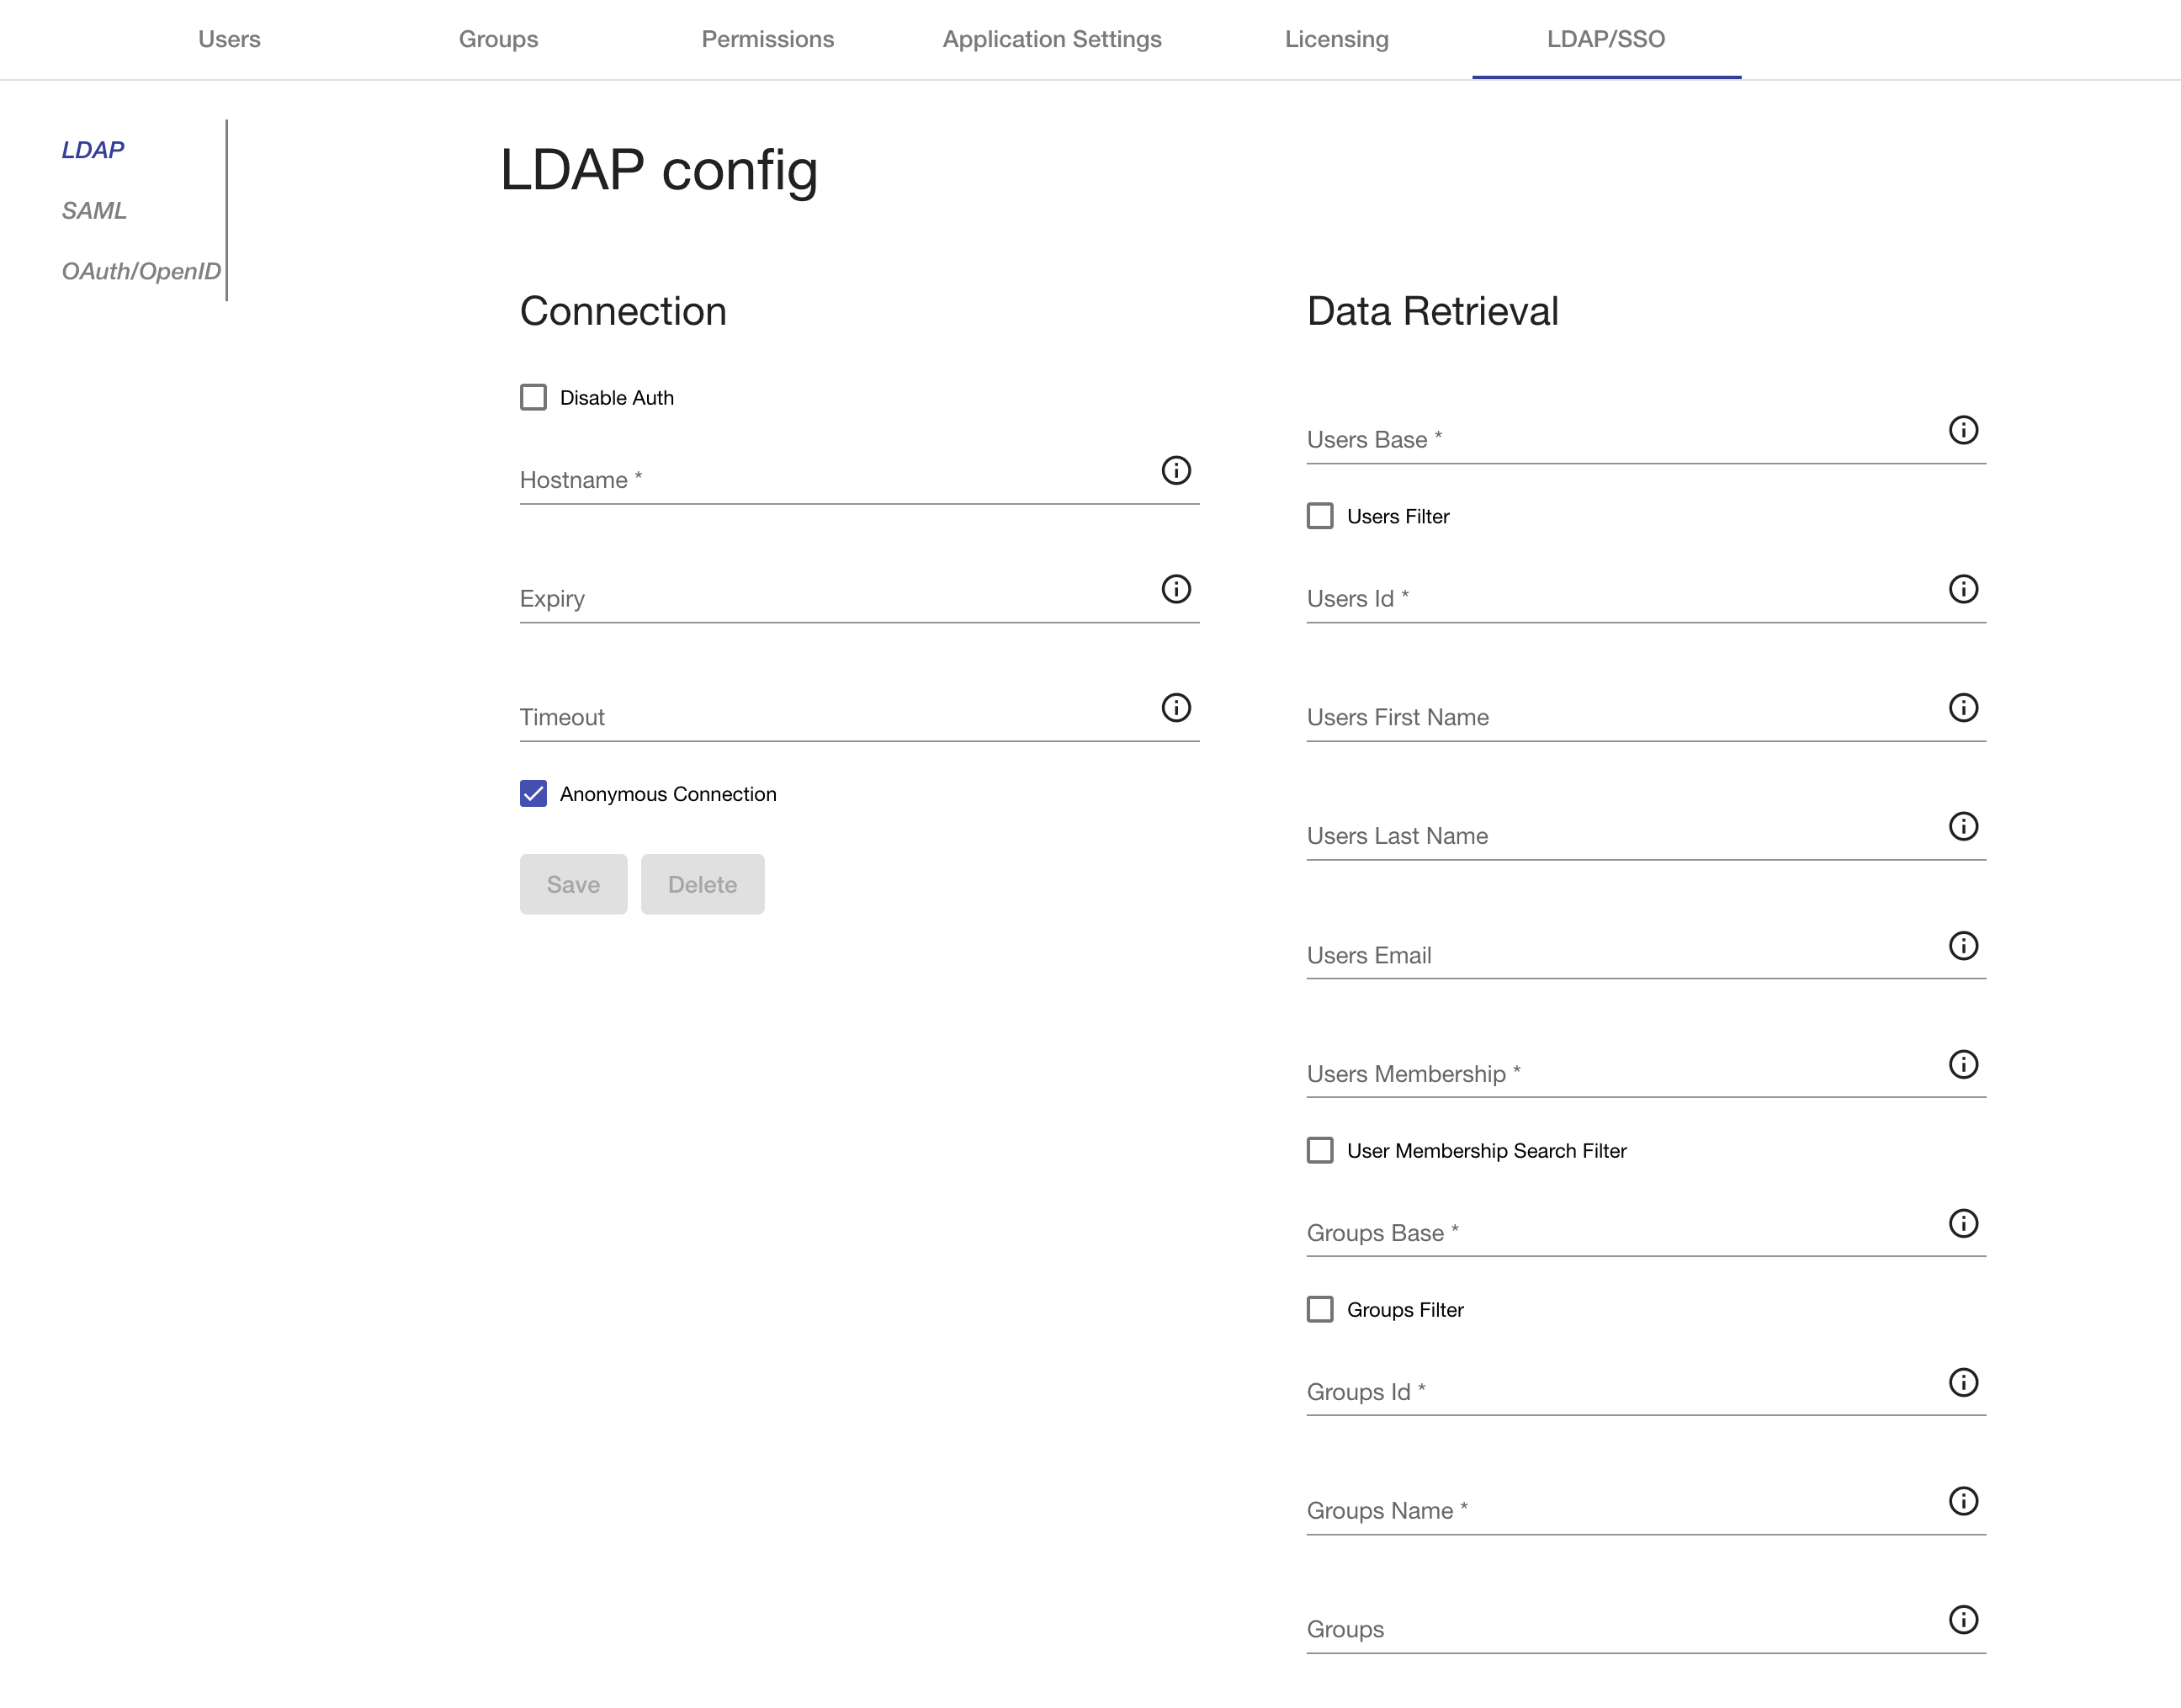
The LDAP form is separated into two sections. The "Connection" section contains the following fields:
-
Hostname: The hostname for the LDAP server.
-
Verify SSL Certificates: This checkbox, when checked, will verify all SSL certificates when connecting to the LDAP server.
-
Disable Authentication: This checkbox, when checked, disables direct authentication to the LDAP engine.
-
Expiry: The number of milliseconds before a User from the LDAP engine should be retrieved again.
-
Timeout: The number of seconds Mobi will keep trying to reach the LDAP server before it gives up.
-
Anonymous Connection: This is a checkbox. When unchecked, it displays the following subfields:
-
Admin DN: This is a required text field for the administrator’s distinguished name (LDAP DN).
-
Admin Password: This is a required password field for the administrator’s password.
-
The administrator account is expected to have appropriate permissions to query all users, groups, and attributes desired
-
The "Data Retrieval" section contains the following fields:
-
Users Base: The base DN at which to start looking for users on the LDAP server.
-
Filter Users: When checked, it displays a field to set an LDAP filter for retrieved users. Any user that does not meet this filter will not be authenticated.
-
User ID: The field name on users that the Mobi application will use as the username to log in.
-
User First Name: The field name on users whose value is the first name of the user.
-
User Last Name: The field name on users whose value is the last name of the user.
-
User Email: The field name on users whose value is the email address of the user.
-
User Membership: The field name on users whose values are the groups they are a part of.
-
User Membership Values: The format of the user membership field. Should be set to the field name on groups that the values of the user membership field uses. If this is not set, Mobi assumes the values are full group DNs.
-
Groups Base: The base DN at which to start looking for groups on the LDAP server.
-
Filter Groups: When checked, it displays a field an LDAP filter for retrieved groups. Any group that does not meet this filter will not be represented in Mobi.
-
Group ID: The field name for groups' ids.
-
Group Name: The field name for groups' names/titles.
-
Group Description: The field name on groups whose value is the description of the group.
-
Group Membership: The field name on groups whose values are the users that are a part of the group.
-
Group Membership Values: The format of the group membership field. Should be set to the field name on users that the values of the group membership field uses. If this is not set, Mobi assumes the values are full user DNs.
In addition, Mobi can be configured to integrate with an SSO provider for authentication. LDAP can be configured alongside the SSO provider to retrieve additional user details, but it is not required. If SSO is configured with LDAP, it is recommended to disable direct authentication against the LDAP directory by checking the "Disable Authentication" box in the LDAP form. Mobi supports SAML, OAuth 2.0, and OpenID SSO providers.
|
Note
|
If a SAML or OAuth/OpenID configuration is present and not set to standalone, the LDAP link on the left hand side will notify you if you are missing the required LDAP configuration. |
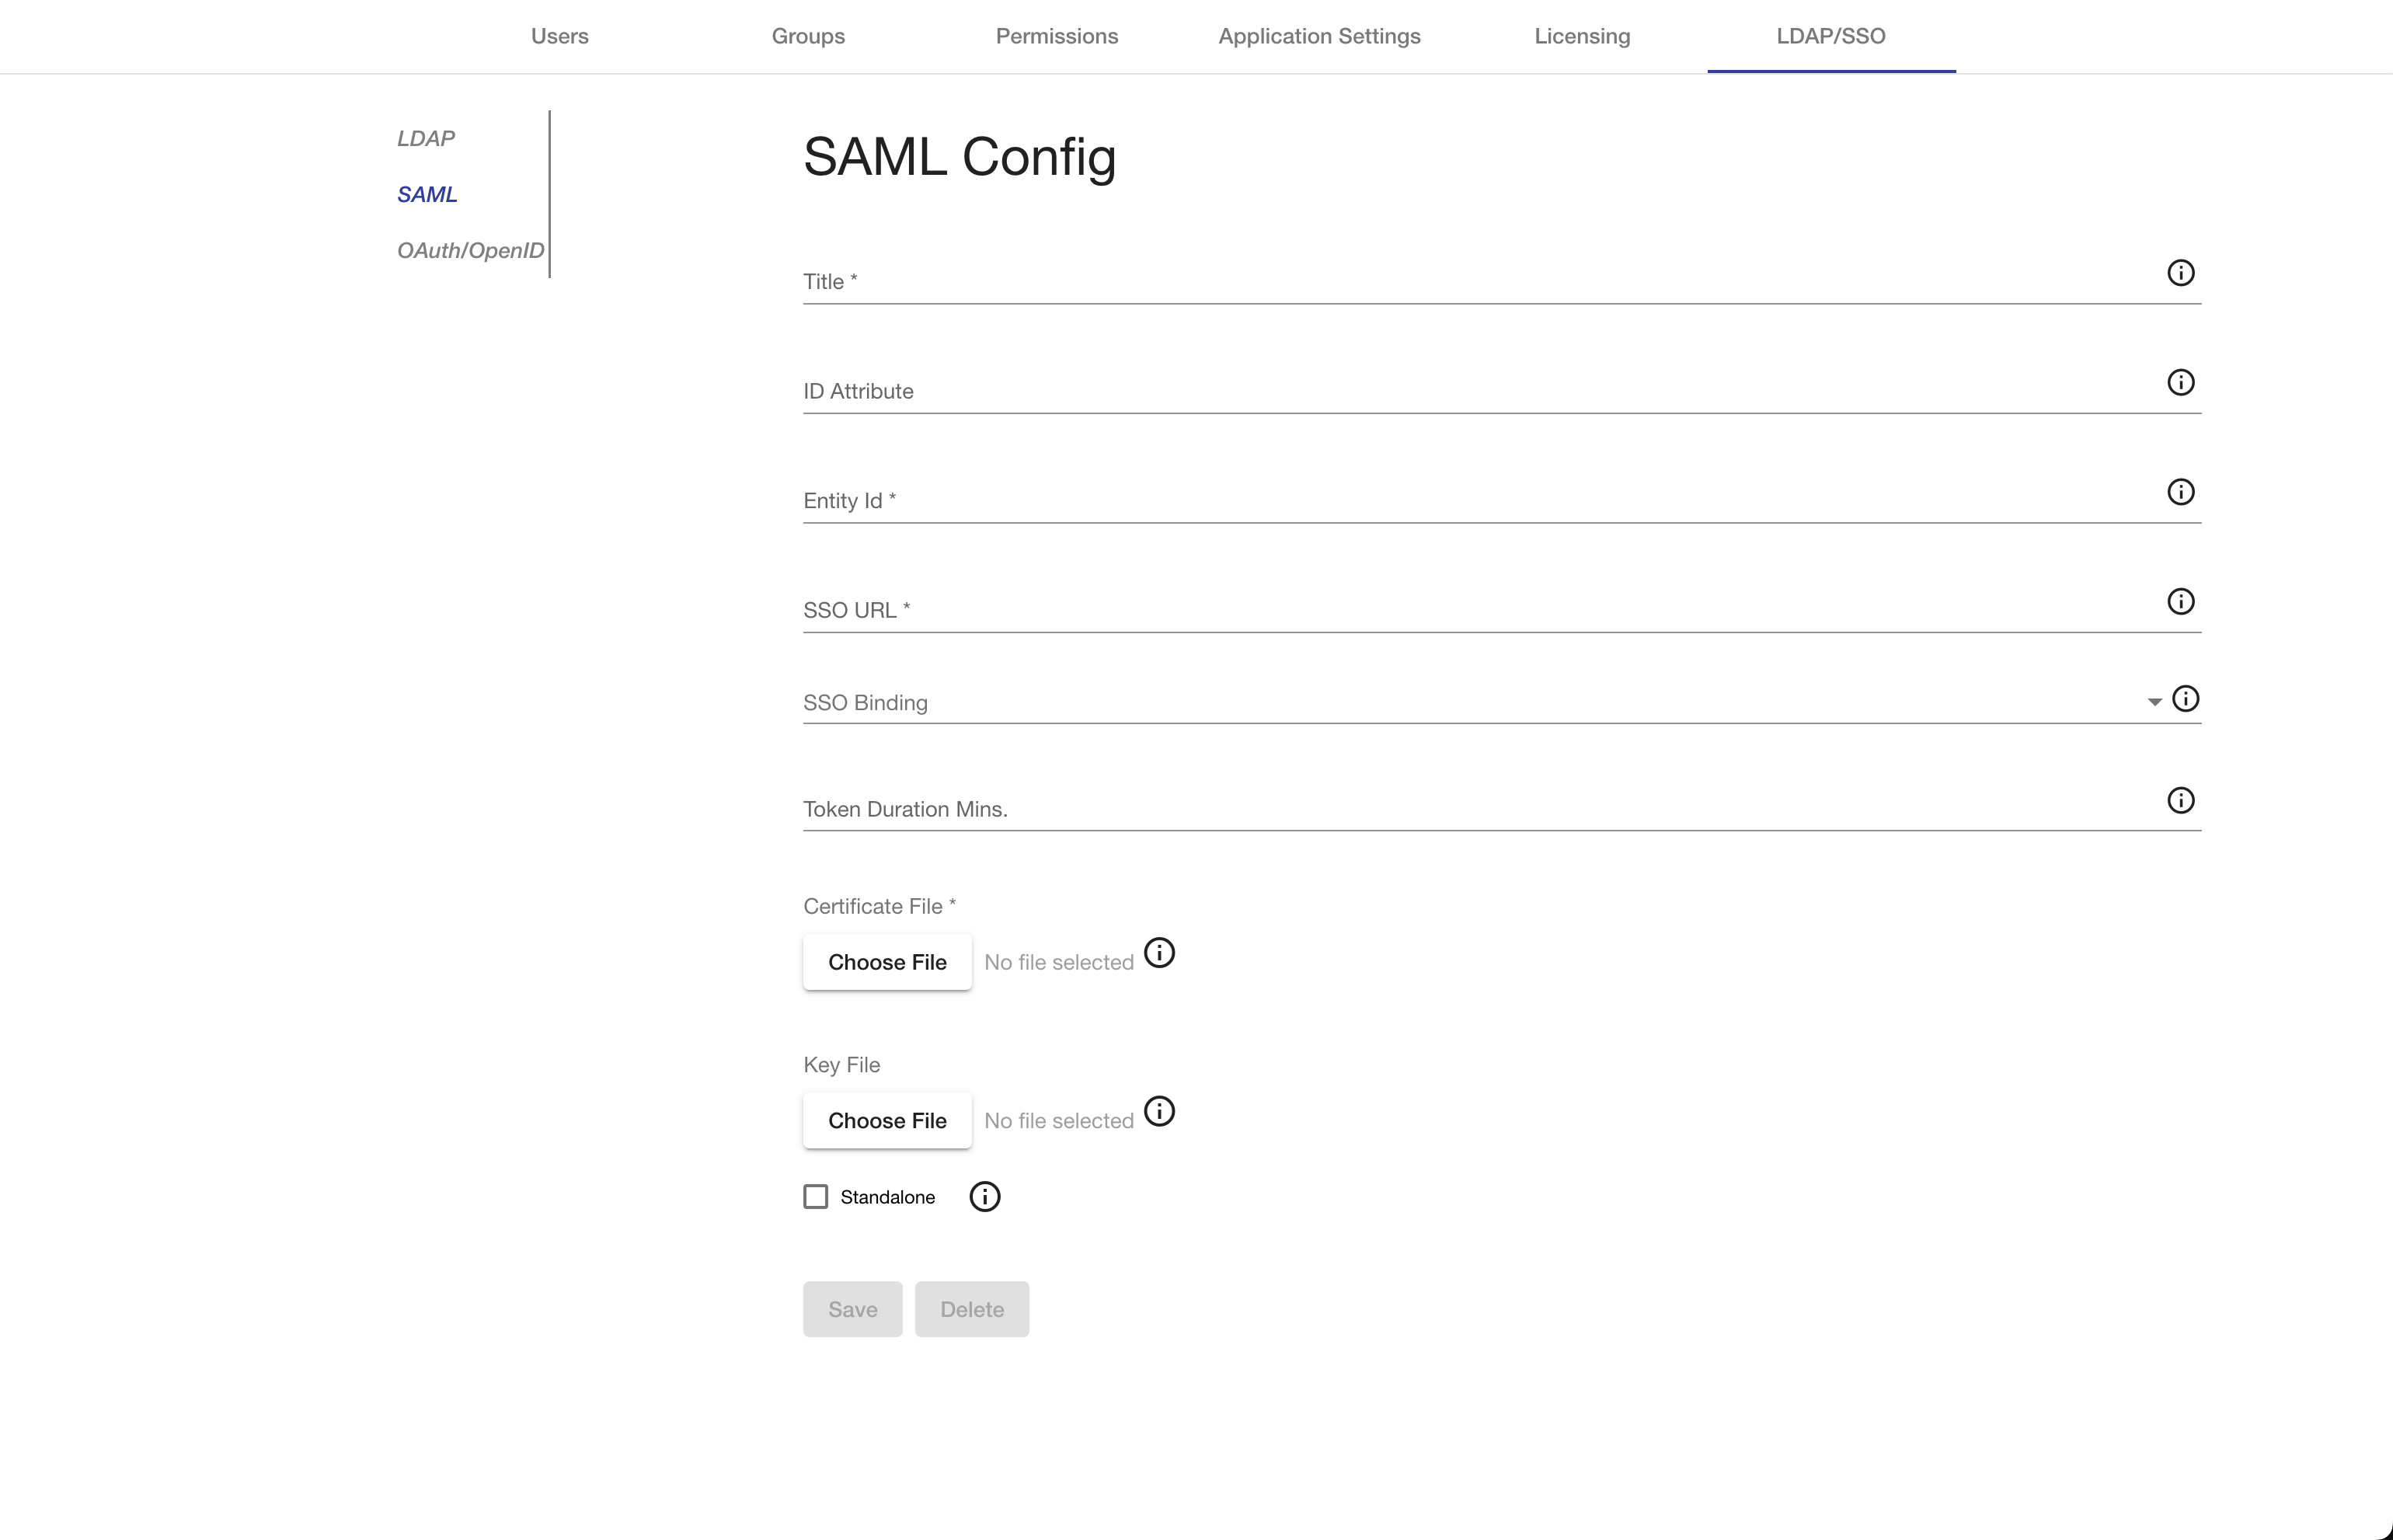
The SAML form provides options to customize the connection from Mobi, acting as a Service Provider (SP), to a SAML Identity Property (IdP) and how to pull various user details out of the SAML responses. The form also allows you to remove the configuration. The changes will immediately go into effect once the form is saved/cleared.
|
Note
|
When removing the configuration, any uploaded files will not be removed from disk. |
|
Note
|
In SAML flows, the Identity Property (IdP) will often require the Reply URL, at minimum, so that the IdP will know where to return the authorized user details. For Mobi, that Reply URL should be set to $MOBI_HOST/mobirest/auth/saml.
|
The SAML form contains the following fields:
-
Title: The title for the SSO provider. This title will be used in the UI for triggering the SSO authentication in the format of “Login with title”
-
ID Attribute: The name of the
Attributein the SAML response where the username can be found. If configured with LDAP, this must match the values of the User ID attribute. Defaults to using the<NameId>. -
Entity ID: The SP EntityId. The SSO provider must be configured to expect requests with this SP EntityId.
-
SSO URL: The URL for the SingleSignOnService from the IdP. This is where Mobi will redirect to.
-
SSO Binding: The binding to be used for the SAML Requests. Options are HTTP Redirect or HTTP POST. The default is HTTP Redirect.
-
Token Duration Mins.: How long in minutes a token generated through a SAML flow should last. If not specified, will use a default of 1 day.
-
Certificate File: The file containing the X509 certificate for verifying the signature of SAML responses.
-
Key File: The optional file containing the PKCS8 key for verifying the signature of SAML responses.
-
Standalone: Whether the SAML configuration should be used by itself or with a LDAP backend as well. If unchecked, an LDAP configuration is required. If checked, the following fields are shown:
-
First Name Attribute: The optional name of the attribute in the SAML responses that contains the first name of the authenticated user.
-
Last Name Attribute: The optional name of the attribute in the SAML responses that contains the last name of the authenticated user.
-
Email Name Attribute: The optional name of the attribute in the SAML responses that contains the email name of the authenticated user.
-
Group Attribute: The optional name of the attribute in the SAML responses that contains the groups of the authenticated user. The values of this attribute will be used as the Group’s title in Mobi.
-
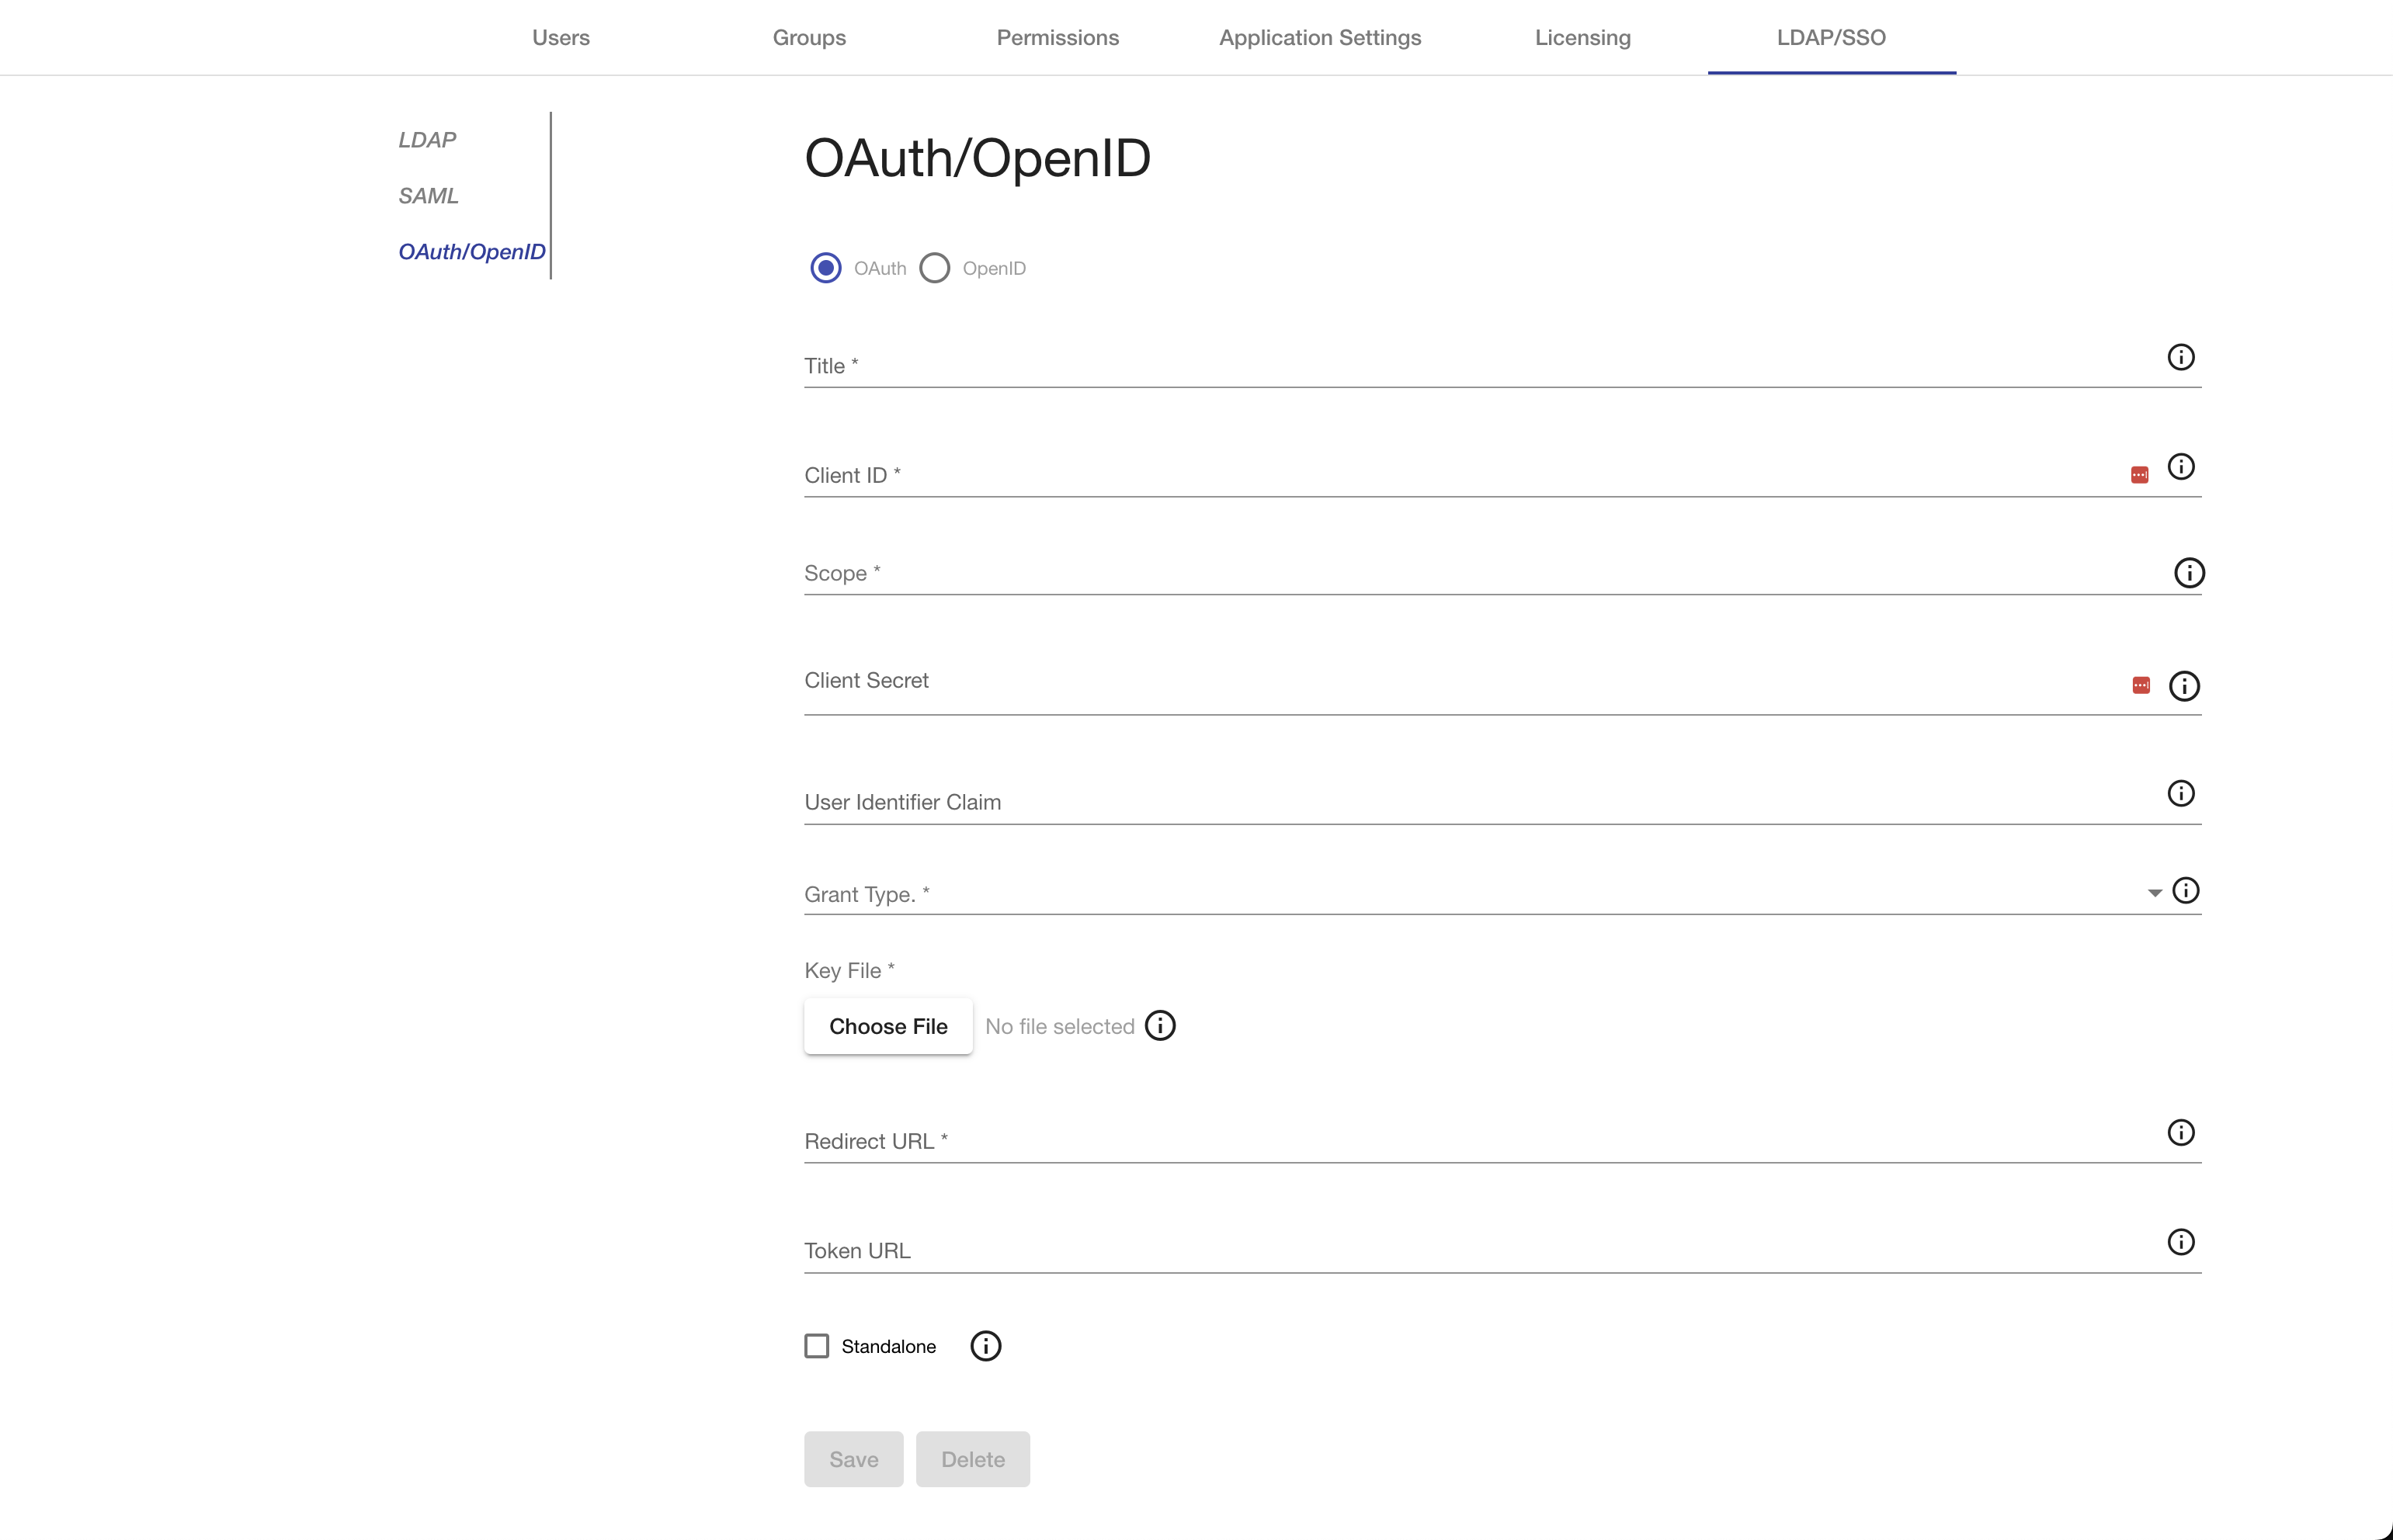
The OAuth/OpenID form provides options to customize the connection from Mobi to either a generic OAuth 2.0 Provider or an OpenID provider. The form also allows you to remove the configuration. The changes will immediately go into effect once the form is saved/cleared. Certain fields are the same between both OAuth and OpenID configurations and others that are unique to one vs. the other. The form contains a radio button to allow you to specify which type of provider is configured.
|
Note
|
When removing the configuration, any uploaded files will not be removed from disk. |
The OAuth/OpenID form contains the following fields for both types of providers:
-
Title: The title for the SSO provider. This title will be used in the UI for triggering the SSO authentication in the format of “Login with title”
-
Client ID: The ID for the Mobi installation. The OAuth/OpenID provider must be configured to expect requests with this ID.
-
Scope: The OAuth scopes to include in the authentication request.
-
Client Secret: The optional client secret to use in requests to the OAuth/OpenID provider.
-
Client Authentication Method: The authentication method to use when fetching a token from the Identity Provider. When unset, it will default to using Basic Auth.
-
User Identifier Claim: An optional property to specify which claim in the returned JWT contains the user’s username. If configured with LDAP, these values must match the values for the LDAP User ID attribute. Defaults to using the
subof the JWT. -
Standalone: Whether the OAuth/OpenID configuration should be used by itself or with a LDAP backend as well. If unchecked, an LDAP configuration is required. If checked, the following fields are shown:
-
Group Claim: The optional claim in the returned JTW that contains the groups the user is a part of. The values of this attribute will be used as the Group’s title in Mobi.
-
Use User Info: An optional checkbox only for OpenID connections to indicate whether Mobi should make a call to the UserInfo endpoint after retrieving the token to pull additional user details. If unchecked, the following fields are displayed:
-
First Name Claim: The optional claim in the returned JWT that contains the first name of the authenticated user.
-
Last Name Claim: The optional claim in the returned JWT that contains the last name of the authenticated user.
-
Email Claim: The optional claim in the returned JWT that contains the email of the authenticated user.
-
-
If the form is set to OAuth, the following fields are displayed:
-
Grant Type: The OAuth 2.0 grant type to use for authentication. Mobi currently supports the Code and Implicit flows.
-
Redirect URL: The URL for the OAuth/OpenID provider. This is where Mobi will redirect to.
-
Token URL: The URL to hit to retrieve the token in the Code grant type flow.
-
Key File: The file containing the PKCS8 key for verifying the signature of returned JWT tokens.
If the form is set to OpenID, the following fields are displayed:
-
OpenID Configuration Hostname: The hostname of the OpenID provider. The standard
/.well-known/openid-configurationpath will be appended to this value if not already present.
Configuration
All default configuration files for Apache Karaf and Mobi are located inside the $MOBI_HOME/etc directory.
Mobi
Basic Service Configuration
The basic Mobi services can be configured using the following files:
| Configuration File | Description |
|---|---|
|
Configurations for the Mobi Catalog |
|
Configurations for the Mobi State Manager |
|
Configurations for the Mobi System Repository |
|
Configurations for the Mobi Provenance Repository |
By default, all resources besides provenance data are stored in the system repository which is an RDF triplestore located in the data/repos/system directory of the Mobi distribution. The provenance data is stored within the prov repository. Each repository in Mobi is uniquely identified by its id. To change the data location, id, or title of either repository, edit the dataDir, id, and title properties respectively in the appropriate file. Apache Karaf will dynamically reload any changes made to this existing file.
You can create new repositories to be used for storage in Mobi. First, choose either a "native" repository or a "memory" repository. These two types of repositories are defined in the NativeRepositoryConfig and MemoryRepositoryConfig classes in the com.mobi.repository.impl.sesame module. Once you have chosen the type of repository, make a new .cfg file in the $MOBI_HOME/etc directory with a file name that starts with either "com.mobi.service.repository.native" or "com.mobi.service.repository.memory". In the file, set the id, title, and dataDir properties you wish for the repository. The file should look like this:
id=demo
title=Demonstration
dataDir=path/to/directory
Apache Karaf will automatically recognize the new configuration file and create the new repository.
The repository that all Catalog resources are stored with is controlled within the com.mobi.catalog.config.CatalogConfigProvider.cfg file. The storage repository for all other types of data are controlled individually in other configuration files. To change each of these repository configurations, open the associated .cfg file and change the id of the repository.target property to be the id of the new repository. For example to change the repository for storing Catalog resources to the repository in the example above, you would open the com.mobi.catalog.config.CatalogConfigProvider.cfg file and edit the repository target line to be:
repository.target = (id=demo)Apache Karaf will automatically detect the changes and reload the new configuration.
Core Security Configuration
The configuration for user authentication, authorization, and management are stored in the following files in the $MOBI_HOME/etc directory:
| Configuration File | Description |
|---|---|
|
Configurations for the Mobi RDF Engine |
|
Configurations for the XACML security policy manager |
Mobi utilizes JAAS for user authentication and basic authorization. By default, user credentials and information are managed by the RdfEngine service which is configured with the com.mobi.jaas.engines.RdfEngine.cfg file. The file contains an id of the repository to be used for storage, the encryption settings for JAAS which are enabled to start, and the two default roles: "user" and "admin". Apache Karaf will automatically detect any changes and reload the updated configurations.
The default user for Mobi is "admin" with password "admin". To change the credentials of the "admin" user or perform any other user management activities, utilize the Administration page, the My Account page, or the appropriate REST endpoints.
For more advanced authorization functionality, Mobi uses the an Attribute Based Access Control (ABAC) system called XACML. Policies describing the attributes for allowing or denying individual access requests are managed by the XACMLPolicyManager service which is configured with the com.mobi.security.policy.api.xacml.XACMLPolicyManager.cfg file. The file contains an id of the repository to be used for storage, the location the XACML policy files should be stored in, and whether the policy file location should be created if it does not already exist. Apache Karaf will automatically detect any changes and reload the updated configurations.
Configure Default Authentication Token (JWT) Duration
To configure the web authentication token duration, you must create a file called com.mobi.jaas.SimpleTokenManager.cfg with the property detailed below and put it in the etc/ directory of your Mobi installation before starting the application, otherwise the token duration will use the default of 24 hours.
|
Note
|
In Enterprise deployments, this is only applied to non-SSO based authentication. |
| Property Name | Description | Required | Default |
|---|---|---|---|
|
Token Duration time in minutes |
1440 |
An example file would look like this.
### 1 day token duration
tokenDurationMins = 1440|
Note
|
.p12 and .jks files should both be supported |
Licensing Configuration (ENTERPRISE)
By default, Mobi Enterprise will communicate with our central licensing service over HTTPS, loading the license file from either $MOBI_HOME/etc/license.lic or from ~/.mobi/license.lic and passing it back for verification. If the deployment environment is air-gapped or requires there to be no outbound traffic, your sales or support representative can provide you with a checked out license and machine file such that the software can verify and validate your license and your host machine independently. To generate a machine file, you will need to provide your representative with the serverId that is auto-generated into the com.mobi.platform.server.cfg file in the $MOBI_HOME/etc/ directory.
To enable offline/air-gapped support, you will need to update the networkEnabled flag to false in the com.mobi.enterprise.licensing.api.LicensingManager.cfg file in the $MOBI_HOME/etc/ directory. Below are the default contents of the file for reference.
|
Warning
|
Docker deployments in offline/air-gapped mode is not currently supported. |
# networkEnabled (Boolean)
# Description: Whether network-based license validation is enabled.
# If disabled, only offline validation will be used.
networkEnabled = true

# licenseFile (String)
# Description: The optional location of the enterprise license file
# licenseFile = /opt/license.lic

# machineFile (String)
# Description: The optional location of the machine-specific license file
# machineFile = /opt/machine.lic
LDAP Configuration (ENTERPRISE)
In Enterprise deployments only, Mobi can be configured so that users can log into the application with the Users/Groups defined in your organization’s directory, you must create a file called com.mobi.enterprise.ldap.impl.engine.LDAPEngine.cfg with the following properties and put it in the $MOBI_HOME/etc/ directory before starting the application. If a property is not required, you can delete the line from the config file. The list of possible fields for the config file are shown in the table below.
| Property Name | Description | Required | Default |
|---|---|---|---|
|
Should always be (id=system) |
✓ |
|
|
The hostname of the LDAP server (ex: https://localhost:10389). |
✓ |
|
|
Whether SSL certificates should be verified when connecting to the LDAP server. |
true |
|
|
The number of seconds it will keep trying to reach the LDAP server before it gives up (ex: |
✓ |
30 |
|
Whether direct authentication to the LDAP engine is disabled (ex: |
false |
|
|
The number of milliseconds before a LDAPUser should be retrieved (ex: |
3600000 |
|
|
The admin DN on your LDAP server (ex: |
||
|
The admin password on your LDAP server (ex: |
||
|
The base DN at which to start looking for users on the LDAP server ( |
✓ |
|
|
An optional LDAP filter for retrieved users. (ex: |
||
|
The field name on users that the Mobi application will use as the username to log in (ex: |
✓ |
|
|
The field name on users whose value is the first name of the user (ex: |
||
|
The field name on users whose value is the last name of the user (ex: |
||
|
The field name on users whose value is the email address of the user (ex: |
||
|
The field name on users whose values are the groups they are a part of (ex: |
✓ |
|
|
The format of the user membership field. Should be set to the field name on groups that the values of the user membership field uses. If this is not set, assume the values are full group DNs. (ex: |
||
|
The base DN at which to start looking for groups on the LDAP server (ex: |
✓ |
|
|
An optional LDAP filter for retrieved groups (ex: |
||
|
The field name for groups' ids (ex: |
✓ |
|
|
The field name for groups' names/titles (ex: |
||
|
The field name on groups whose value is the description of the group (ex: |
||
|
The field name on groups whose values are the users that are a part of the group (ex: |
✓ |
|
|
The format of the group membership field. Should be set to the field name on users that the values of the group membership field uses. If this is not set, assume the values are full user DNs. (ex: |
An example file would look like this.
repository.target = (id=system)
ldap.hostname = http://localhost:10389
ldap.timeout = 30
ldap.admin.dn = uid=admin,ou=system
ldap.admin.password = secret
ldap.users.base = ou=people,dc=example,dc=com
ldap.users.filter = (businessCategory=Superhero)
ldap.users.id = uid
ldap.users.firstName = givenName
ldap.users.lastName = sn
ldap.users.membership = memberOf
ldap.groups.base = ou=groups,dc=example,dc=com
ldap.groups.id = cn
ldap.groups.name = cn
ldap.groups.description = description
ldap.groups.membership = member
SSO Configuration (ENTERPRISE)
In Enterprise deployments only, Mobi can be configured to integrate with an SSO provider for authentication. LDAP can be configured alongside the SSO provider to retrieve additional user details, but it is not required. If configured, it is recommended to disable direct authentication against the LDAP directory by adding ldap.disable-auth = false to the com.mobi.enterprise.ldap.impl.engine.LDAPEngine.cfg file. Mobi supports SAML, OAuth 2.0, and OpenID SSO providers.
SAML Configuration
In order to configure Mobi to use SAML, you will need to create a file called com.mobi.enterprise.auth.saml.api.SAMLConfigProvider.cfg to the $MOBI_HOME/etc/ directory. The file must have the following fields.
|
Note
|
${karaf.etc} is a reference to the $MOBI_HOME/etc/ directory that the
application will understand and replace
|
|
Important
|
In order for the certFile to ba valid format, it must contain the appropriate -----BEGIN CERTIFICATE----- header and -----END CERTIFICATE----- footer
|
|
Important
|
In SAML flows, the Identity Property (IdP) will often require the Reply URL, at minimum, so that the IdP will know where to return the authorized user details. For Mobi, that Reply URL should be set to $MOBI_HOST/mobirest/auth/saml. An example value would look like https://example.com/mobirest/auth/saml.
|
| Property Name | Description | Required |
|---|---|---|
|
The title for the SSO provider. This title will be used in the UI for triggering the SSO authentication in the format of “Login with title” |
✓ |
|
The SP EntityId. The SSO provider must be configured to expect requests with this SP EntityId |
✓ |
|
The file path to a file containing the X509 certificate for verifying the signature of SAML responses. Best practice is to put the file in the |
✓ |
|
The optional file path to a file containing the PKCS8 key for verifying the signature of SAML responses. Best practice is to put the
file in the |
|
|
The URL for the SingleSignOnService from the IdP. This is where Mobi will redirect to. |
✓ |
|
The name of the |
|
|
The full URN of the binding to be used for the SAML Requests. Defaults to |
|
|
Whether the SAML configuration should be considered by itself or with a LDAP backend as well. Defaults to |
|
|
An optional property to specify the name of the attribute in the SAML responses that contains the first name of the authenticated user. Only applicable if |
|
|
An optional property to specify the name of the attribute in the SAML responses that contains the last name of the authenticated user. Only applicable if |
|
|
An optional property to specify the name of the attribute in the SAML responses that contains the email of the authenticated user. Only applicable if |
|
|
An optional property to specify the name of the attribute in the SAML responses that contains the groups that the authenticated user is a part of. The values of this attribute will be used as the Group’s title in Mobi. Only applicable if |
An example file with an LDAP backend would look like this.
title=Samling
entityId=https://localhost:8443/mobi/#/login
certFile=${karaf.etc}/samling.cert
keyFile=${karaf.etc}/samling_pkcs8.key
ssoUrl=https://capriza.github.io/samling/samling.html
idAttribute=ShortName
ssoBinding=urn:oasis:names:tc:SAML:2.0:bindings:HTTP-POST
An example standalone configuration would look like this.
title=Samling
entityId=https://localhost:8443/mobi/#/login
certFile=${karaf.etc}/samling.cert
keyFile=${karaf.etc}/samling_pkcs8.key
ssoUrl=https://capriza.github.io/samling/samling.html
idAttribute=ShortName
ssoBinding=urn:oasis:names:tc:SAML:2.0:bindings:HTTP-POST
standalone=true
firstNameAttribute=FirstName
lastNameAttribute=LastName
emailAttribute=MBox
groupAttribute=Groups
Default SAML Token Duration
In order to configure the token duration for SAML logins, you must create a file called com.mobi.enterprise.auth.rest.SAMLRest.cfg with the following properties and put it in the $MOBI_HOME/etc/ directory before starting the application, otherwise the token duration will use the default of one day. There is only one possible field for the config file as shown in the table below that is configurable and not required to set the token duration value.
| Property Name | Description | Required | Default |
|---|---|---|---|
|
Token Duration time in minutes |
1440 |
An example file would look like this.
### 1 day token duration
tokenDurationMins = 1440
OAuth/OpenID Configuration
In order to configure Mobi to use OAuth or OpenID, you will need to create two files in the $MOBI_HOME/etc directory: com.mobi.enterprise.auth.oauth.api.OAuthConfigProvider.cfg and com.mobi.enterprise.auth.oauth.impl.token.OAuthTokenLoginModuleProvider.cfg. The latter must be an empty file. The former can be used to configure a generic OAuth 2.0 Provider or an OpenID Provider. For either, the file must have the following fields.
|
Important
|
In OAuth/OpenID flows, the OpenID Provider (OP) will often require specifying valid Redirect URIs, so that the OP will know what types of requests to accept. For Mobi, the Redirect URI should be set to $MOBI_HOST/mobirest/auth/oauth/callback. An example value would look like https://example.com/mobirest/auth/oauth/callback.
|
|
Warning
|
If you are integrating with Azure AD, please see the special instructions in the Azure AD OpenID Setup section below. |
| Property Name | Description | Required |
|---|---|---|
|
The title for the SSO provider. This title will be used in the UI for triggering the SSO authentication in the format of “Login with title” |
✓ |
|
The ID for the Mobi installation. The OAuth/OpenID provider must be configured to expect requests with this clientId |
✓ |
|
The OAuth scopes to include in the authentication request |
✓ |
|
The optional client secret to use in requests to the OAuth/OpenID provider. |
|
|
The method by which the client, i.e. Mobi, will be authenticated with the Identity Provider when fetching a token (if configured to do so). Supported options are |
|
|
An optional property to specify which claim in the returned JWT contains the user’s username. These values must match what is configured for the LDAP users id. Defaults to using the |
|
|
Whether the OAuth/OpenID configuration should be considered by itself or with a LDAP backend as well. Defaults to |
|
|
An optional property to specify which claim in the returned JWT contains the groups the user is a part of. The values of this attribute will be used as the Group’s title in Mobi. Only applicable if |
For OAuth 2.0, the file must also contain these fields.
| Property Name | Description | Required |
|---|---|---|
|
The OAuth 2.0 grant type to use for authentication. Mobi currently supports the CODE and IMPLICIT flows. |
✓ |
|
The URL for the OAuth/OpenID provider. This is where Mobi will redirect to. |
✓ |
|
The URL to hit to retrieve the token in the CODE flow. |
|
|
The file path to a file containing the PKCS8 key for verifying the signature of JWT tokens. Best practice is to put the file in the |
✓ |
An example file would look like this.
title=Mock OAuth
clientId=mobi
scope=read,openid
grantType=CODE
redirectUrl=http://localhost:8080/authorize
tokenUrl=http://localhost:8080/token
keyFile=${karaf.etc}/NTs4oGbx1A-cROpjgUKdKtzTEkHUhhSwQ7xdhN6FdlQ_pub.pem
For OpenID, the file must also contain these fields.
| Property Name | Description | Required |
|---|---|---|
|
The hostname of the OpenID provider. The standard |
✓ |
|
An optional property to specify whether AVM should make a call to the UserInfo endpoint after retrieving the token to pull additional user details. Default is true. If false, will pull details directly from the claims of the JWT token. Only applicable if |
|
|
An optional property to specify which claim in the returned JWT contains the first name of the user. By default will use |
|
|
An optional property to specify which claim in the returned JWT contains the last name of the user. By default will use |
|
|
An optional property to specify which claim in the returned JWT contains the email of the user. By default will use |
An example file would look like this.
title=Mock OAuth
clientId=mobi
scope=read,openid
openidConfigHostname=http://localhost:8080
Azure AD OpenID Setup
If you want to configure OpenID integration with Azure AD, there are a few extra steps that need to be taken due to the unique structure of the returned JWTs.
The complementary LDAP configuration for an Azure AD OpenID provider must set the userPrincipalName as the ldap.users.id property in the com.mobi.enterprise.ldap.impl.engine.LDAPEngine.cfg as the Azure AD JWTs do not contain the typical samAccountName values.
In addition, v2.0 of Azure AD adds an additional field to the header of the JWT after signing it, thus making the signature incapable of being verified by the algorithms returned from the JWKS endpoint. In order to stop Azure AD from adding this additional field, you can add a new custom scope to the App registration. The steps to do this are described in this article (https://medium.com/@abhinavsonkar/making-azure-ad-oidc-compliant-5734b70c43ff) under “Problem 1”.
Password Encryption Configuration
Mobi provides a way to automatically encrypt plaintext passwords stored within service configurations on startup and subsequent updates. The setup for this is very short. All you have to do is ensure that a file called com.mobi.security.api.EncryptionService.cfg exists in the $MOBI_HOME/etc directory and contains the following fields:
enabled=true
password=ENTER_A_UNIQUE_PASSWORD_HERE|
Note
|
This password is not the password you want to encrypt, rather it is a unique master password used for encrypt and decrypt operations. |
This encryption config is present and enabled by default, meaning your passwords will be automatically encrypted. An alternate way of providing an encryption master password is via environment variable. To configure the use of an environment variable, use the following fields:
enabled=true
variable=MY_CHOSEN_ENVIRONMENT_VARIABLE
If you use an environment variable, make sure before you start Mobi that you have stored a unique password as the value for that environment variable.
|
Warning
|
If there is a default password in the Encryption Config (i.e. CHANGEME) make sure you change it to a unique password before starting Mobi, otherwise your passwords will be easy to decrypt.
|
Once the encryption config is added, start Mobi and if a Mobi service configuration includes a plaintext password, it will encrypt the value and update the configuration file. To change an encrypted value, simply replace it with the new plaintext value in the configuration file and after a few seconds it will be automatically re-encrypted and the file will be updated.
Services that use Encryption
| Service | Config File | Field that gets encrypted |
|---|---|---|
LDAP (ENTERPRISE) |
|
|
SSO OAuth/OpenId (ENTERPRISE) |
|
|
|
|
To update the encryption master password, change the password field in the com.mobi.security.api.EncryptionService.cfg file while Mobi is running. After a few seconds have passed, all passwords will be automatically re-encrypted using the new master password.
|
Note
|
If the master password is changed while Mobi is not running, all previously encrypted passwords must be re-entered in plain text for the encryption service to re-encrypt. |
AI Assistant Configuration (ENTERPRISE)
The Enterprise AI Assistant is an optional Alpha feature that allows users to generate ontologies through a conversational interface. To enable this feature, Mobi must be configured with connection details to a deployed AI Ontology Assistant service.
To configure the AI Assistant, edit the com.mobi.enterprise.ontology.assistant.rest.OntologyAssistantProxy.cfg file in the $MOBI_HOME/etc/ directory with the following properties.
| Property Name | Description | Required | Default |
|---|---|---|---|
|
Enable or disable the AI Assistant feature. Must be set to |
✓ |
false |
|
The base URL where the AI Ontology Assistant service is running. |
✓ |
http://localhost:8000 |
|
Read timeout in milliseconds for Server-Sent Events connections. Lower values prevent thread exhaustion but may cause more reconnections. |
60000 |
An example file would look like this.
# Enable AI Assistant
enabled=true

# AI Ontology Service URL
baseUrl=http://localhost:8000

# SSE Read Timeout (milliseconds)
sseReadTimeout=60000|
Note
|
The AI Ontology Assistant service must be deployed and accessible from the Mobi server before enabling this feature. Contact your administrator for service deployment details. |
Imports Resolver Configuration
When resolving imported ontologies from the web, Mobi uses a default set of configuration for making those connections, but in some deployments it may be beneficial to tweak the timeouts utilized when making those external web connections. Furthermore, in air-gapped environments, it may be beneficial to disable web resolution for imports entirely. To customize these settings, create a file called com.mobi.ontology.utils.imports.ImportsResolver.cfg in the $MOBI_HOME/etc/ directory with the following fields.
| Property Name | Description | Required | Default |
|---|---|---|---|
|
The connection timeout in milliseconds when attempting to resolve a web ontology URI. |
3000 |
|
|
The read timeout in milliseconds when attempting to resolve a web ontology URI. |
10000 |
|
|
Whether to disable web resolution for imports entirely. If true, Mobi will not attempt to resolve any web ontology URIs and will only resolve imports that are already stored in the repository. |
false |
An example file would look like this.
connectionTimeout = 5000
readTimeout = 20000
disableWebImports = false
Ontology Cache Configuration
Mobi utilizes a caching mechanism within a triple store to improve performance when retrieving ontology and shapes graph data. The maintenance and cleanup of the cache is configured in the com.mobi.cache.impl.repository.CleanupRepositoryCache.cfg file in the $MOBI_HOME/etc directory.
This file is responsible for deleting stale ontologies and shapes graphs within the repository after a specified period in order to preserve resources and improve processing. The format looks like the following:
repoId = ontologyCache
expiry = 1800
scheduler.expression=0 0 * * * ?
Graph Studio Publish Connection Configuration (ENTERPRISE)
To enable Publishing to an Graph Studio instance, you must configure Mobi Enterprise with connection details about an Graph Studio server. More than one Graph Studio connection can be configured at a time. To do this, create a file called com.mobi.enterprise.anzo.connector.api-{The ID of the Graph Studio config}.cfg in the $MOBI_HOME/etc/ directory. The file must have the following fields.
|
Note
|
The Publish integration requires an Graph Studio version of 5.4.7 or later. |
| Property Name | Description | Required | Default |
|---|---|---|---|
|
The identifier for the Graph Studio server within Mobi. Must match what is in the file name. |
✓ |
|
|
The host name of the Graph Studio server. |
✓ |
|
|
The port for the Graph Studio server. |
✓ |
|
|
Whether to use SSL when connecting to the Graph Studio server. Most the time, this should be |
✓ |
|
|
The username of the account Mobi should use when connecting to the Graph Studio server. Either this and the |
||
|
The password of the account Mobi should use when connecting to the Graph Studio server. Either this and the |
||
|
A Bearer Token of the account Mobi should use when connecting to the Graph Studio server. Either this field must be present or the |
||
|
The connection timeout in number of milliseconds when communicating with the Graph Studio server. |
10000 |
|
|
The read timeout in number of milliseconds when communicating with the Graph Studio server. |
30000 |
|
|
The URI of the Data Source that should be utilized when creating datasets on the Graph Studio server. If not specified will use the default Datasource URI. |
|
An example file would look like this.
id = dev
anzo.hostname = localhost
anzo.port = 8443
anzo.ssl = true
anzo.username = sysadmin
anzo.password = 123
If the default Graph Studio Data Source does not meet your environment’s needs (eg. is not mounted to your Altair Graph Lakehouse deployments), you can set the flds.datasource property to a different Graph Studio Data Source within your installation with the following steps:
-
Within the Graph Studio Administration view, go to Connections → Data Store and click on the target Graph Studio Data Source.
-
Click the copy button next to the Graph Studio Data Source’s URI in the right hand gray box.
-
Edit the
flds.datasourceproperty in your.cfgfile and the new value will automatically be used next time a publish is made.
GraphDB Publish Connection Configuration (ENTERPRISE)
To enable Publishing to a GraphDB instance, you must configure Mobi Enterprise with connection details about the GraphDB server. More than one GraphDB connection can be configured at a time. To do this, create a file called com.mobi.enterprise.graphdb.impl-{The ID of the graphdb config}.cfg in the $MOBI_HOME/etc/ directory. The file must have the following fields.
| Property Name | Description | Required | Default |
|---|---|---|---|
|
The identifier for the GraphDB server within Mobi. Must match what is in the file name. |
✓ |
|
|
The protocol, hostname, and port of the configured GraphDB server. |
✓ |
|
|
The username for the configured GraphDB server. |
✓ |
|
|
The password for the configured GraphDB server. |
✓ |
|
|
The connection timeout in number of milliseconds when communicating with the GraphDB server. |
60000 |
|
|
The read timeout in number of milliseconds when communicating with the GraphDB server. |
30000 |
An example file would look like this.
id = prod
connection.string = http://localhost:7200
username = admin
password = root
Workflow Engine Configuration
The Workflows framework supports different implementations of the underlying engine used for actual execution of the defined Workflows. The chosen engine does not affect the Workflow RDF definition, but does affect how the execution logs will be structured. Workflows can thus be defined and managed by the platform, but execution of the Workflow requires a Workflow Engine to be installed and configured. By default, Mobi supports Dagu as the Workflow Engine of choice.
Dagu Workflow Engine
Dagu is a free and open source workflow engine that defines executions as Directed Acrylic Graphs (or DAGs) and supports interaction with Mobi via REST. To utilize Dagu in executing Workflows, you will need to install the software, and then configure Mobi’s connection to Dagu.
Install Dagu 1.13 according to their installation instructions. It is recommended that you configure Dagu with Basic Authentication enabled such that only authorized users can execute DAGs in your installation. Mobi supports interaction with Dagu both locally (i.e., on the same server) or remotely. The following table describes the recommended Dagu installation method based on the OS of the system Mobi is installed on and the desired Dagu location.
|
Note
|
Mobi currently only supports Dagu version 1.13. |
|
Note
|
The default port of 8080 for Dagu is fine when installing Dagu locally on the Mobi server. |
| Mobi OS | Dagu Location | Supported Dagu Installation |
|---|---|---|
Unix |
Local |
Brew, Bash script, Binary, Docker |
Unix |
Remote |
Brew, Bash script, Binary, Docker |
Windows |
Local |
Docker |
Windows |
Remote |
Brew, Bash script, Binary, Docker |
To configure Mobi’s connection to Dagu, create a file called com.mobi.workflows.impl.dagu.DaguWorkflowEngine.cfg with the following properties and put it in the $MOBI_HOME/etc/ directory.
| Property Name | Description | Required | Default |
|---|---|---|---|
|
The full URL of the Dagu server (ex: http://localhost:8080) |
✓ |
|
|
The full path to the directory where the Dagu generated Workflow execution logs should be stored. This is recommended to be somewhere in the |
✓ |
|
|
Whether the Dagu installation is local to the Mobi server or remote. |
✓ |
true |
|
Number of seconds between calls to Dagu to check on a Workflow’s execution status. |
10 |
|
|
Number of seconds before Mobi will treat the workflow execution as failed if it has not completed. |
300 |
|
|
The username of the Basic Auth account configured on the Dagu server. |
||
|
The password of the Basic Auth account configured on the Dagu server. |
||
|
The number corresponding to how many workflows can be run concurrently |
100 |
An example file would look like this.
daguHost=http://localhost:8080
logDir=${karaf.home}/data/virtualFiles/dagu
local=true
pollInterval=10
pollTimeout=300
username=test
password=test
concurrencyLimit=100
Banner Configuration (ENTERPRISE)
In Enterprise deployments only, Mobi can be configured to show a banner at the top of every page with custom HTML and background color. To enable the banner and configure the content, edit the com.mobi.enterprise.branding.rest.BrandingRest.cfg file in the $MOBI_HOME/etc directory. The default contents will look like this.
enabled=false
htmlBody=<div>Change me</div>
backgroundColor=white
There are three properties in the file that control how the banner is shown to the user. The enabled` property controls whether the banner should be shown and accepts either “true” or “false”. The htmlBody property accepts any valid HTML string that will be the body of the banner. The backgroundColor property accepts any valid hex string representing a color. This W3School site provides a helpful tool for picking HTML color that will output a hex string for you.
An example configuration could look like this which will result in the the screenshots below. Note that hyperlinks are supported within the HTML body.
enabled=true
htmlBody=<div>This is the banner for Mobi, you can change this text in the configuration file <a href="url">Google.com</a> </div>
backgroundColor=#99ffce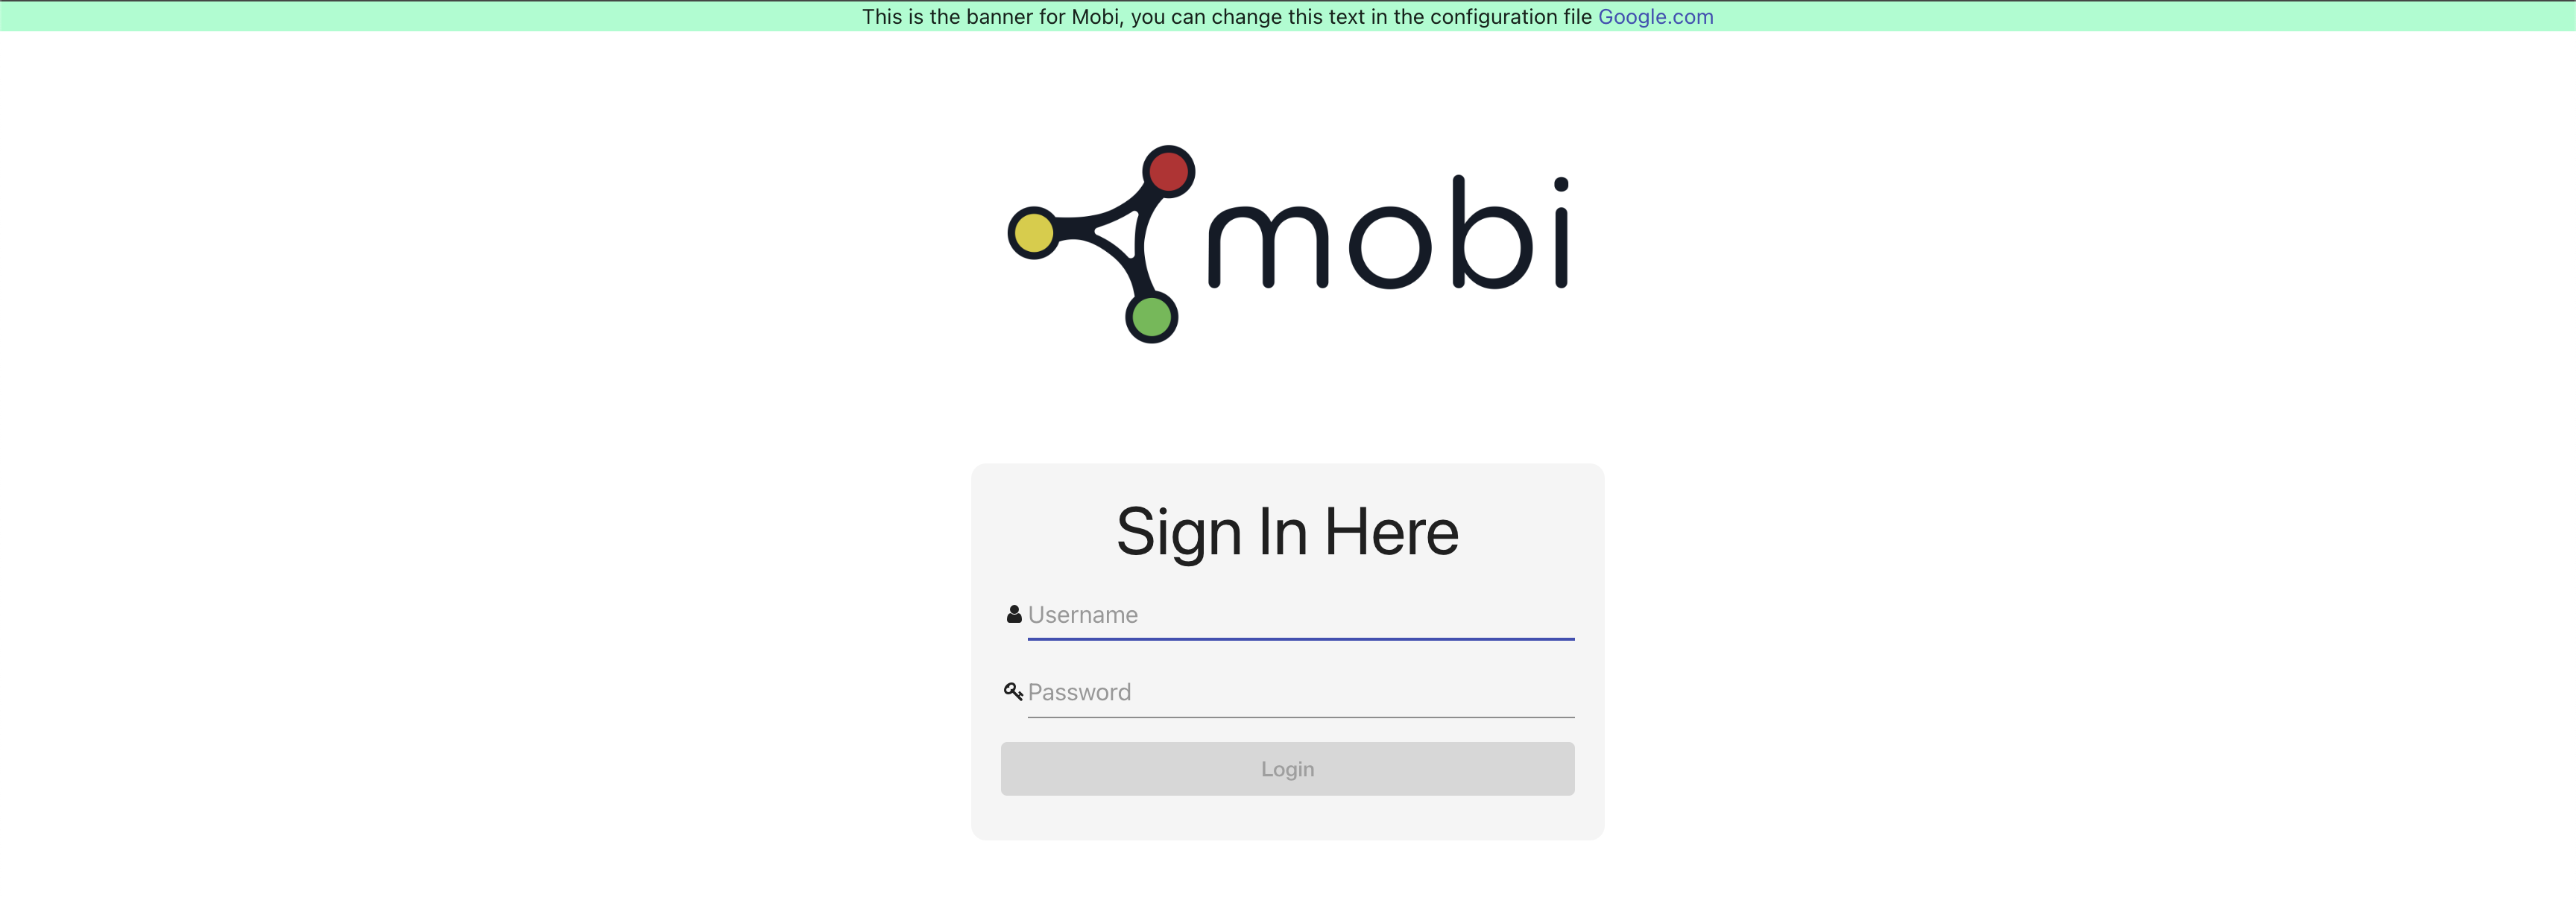
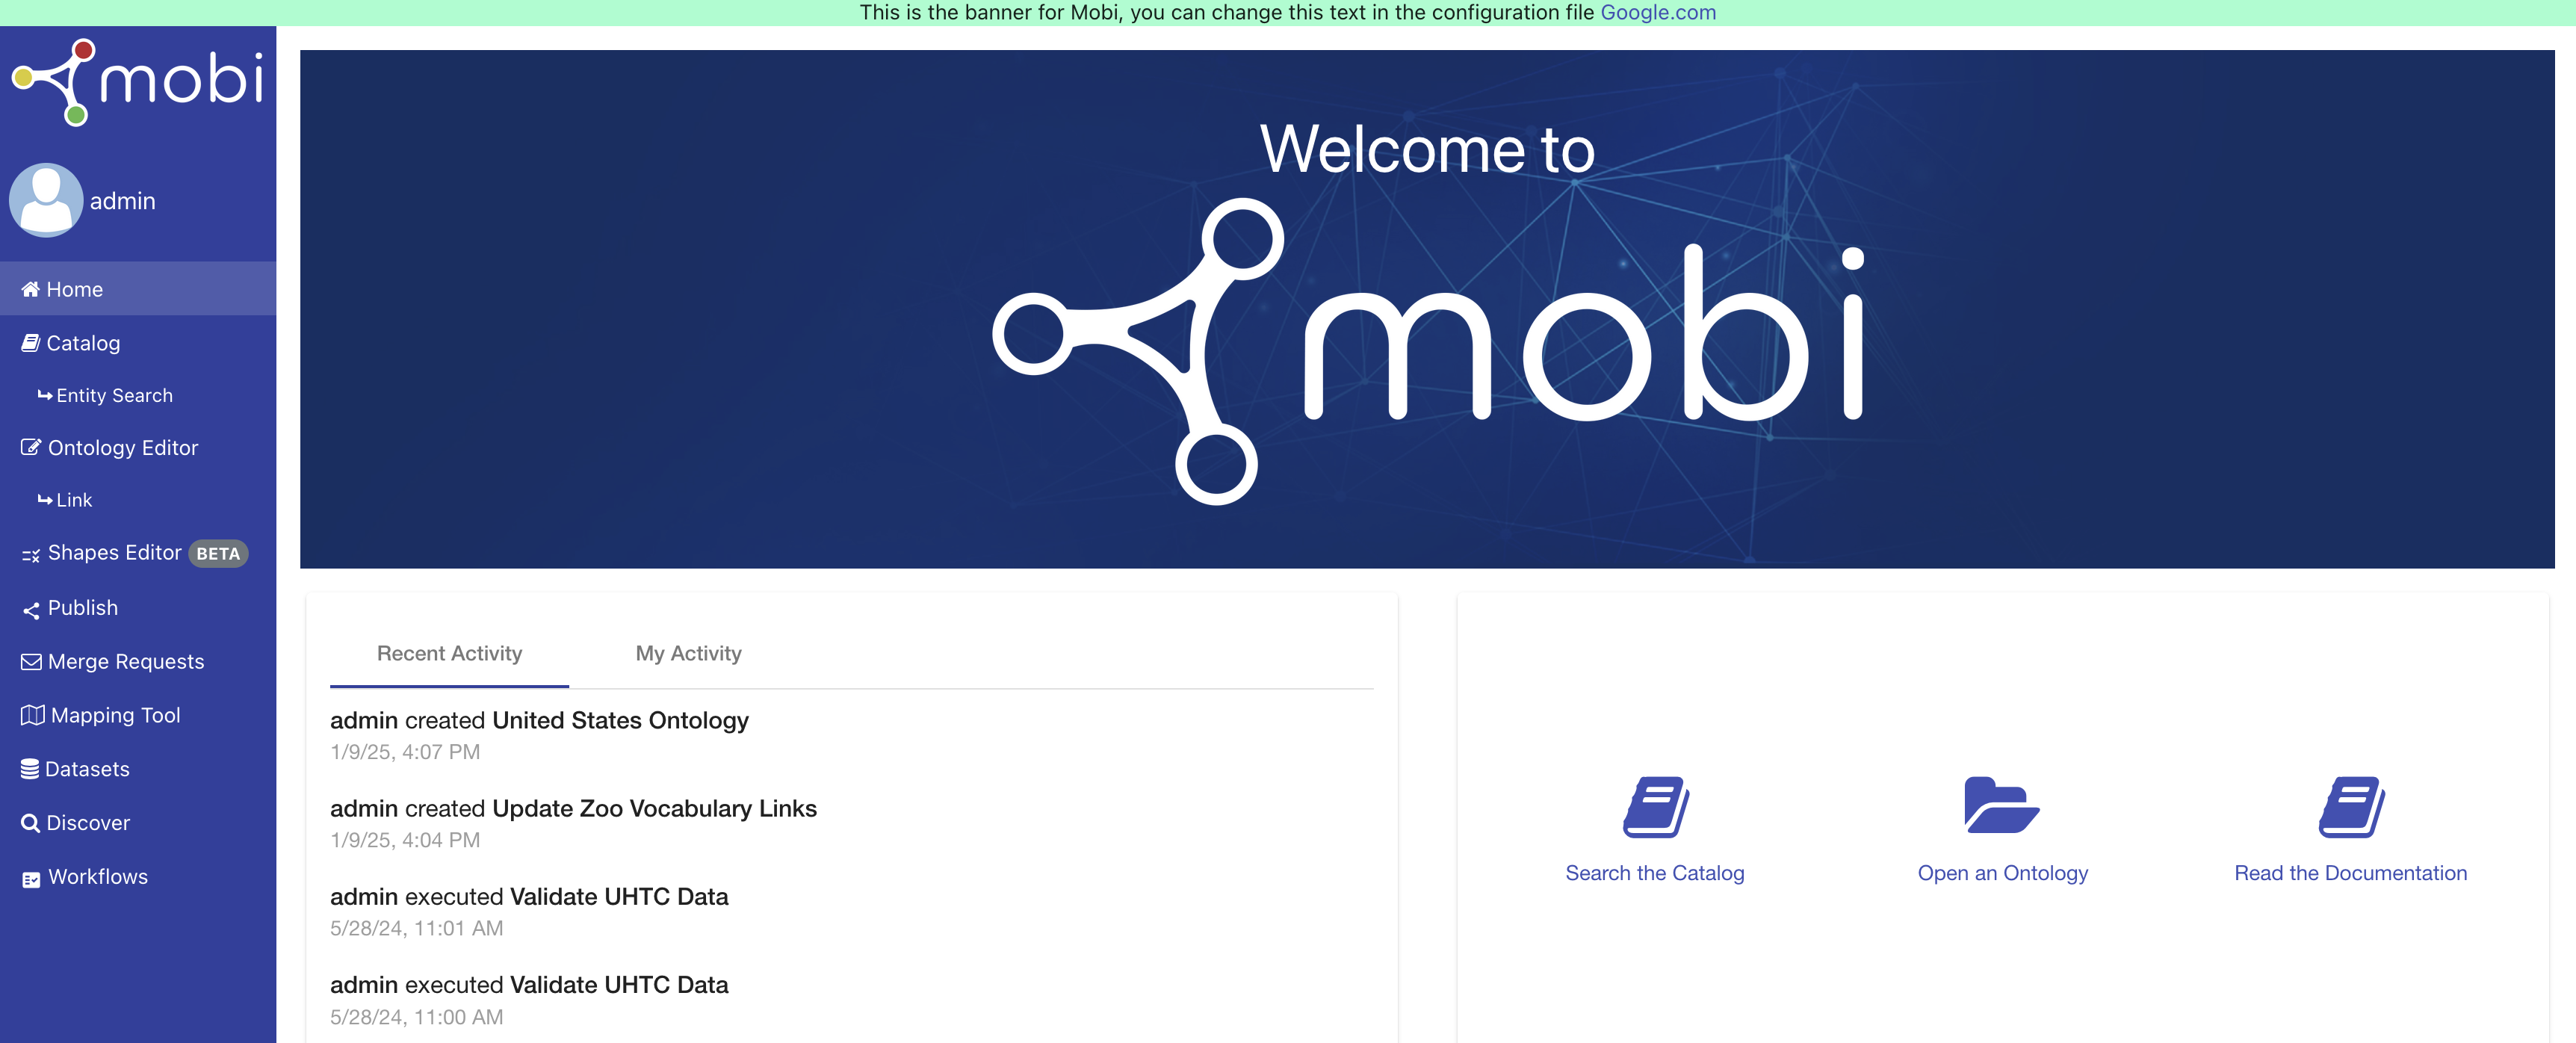
Multi-Line HTML Template
To use a multiline value for htmlBody, add a \ (backslash) to the end of each line. See an example below.
enabled=true
htmlBody= <div>\
   Change me \
   <a href="url">http://www.google.com</a> \
 </div>
backgroundColor=#99ffce
Inline CSS
The htmlBody property supports inline CSS such as <p style=”color:red”>This is RED.</p>. Inline CSS can be useful for adding custom styling to specific elements in the custom content and will override internal or external style sheets.
|
Note
|
Because inline styles take precedence, you could accidentally override internal or external styles that you did not intend to. For example, changing the element positioning like in the configuration below could break the general layout of the application. |
enabled=true
htmlBody= <div style="position:absolute; top:80px; width:300px; height:300px;right:50%;background: black;">\
   Change me \
   <a href="url">http://www.google.com</a> \
 </div>
backgroundColor=#99ffce
Email Service Configuration
The configuration for the Mobi Email Service is stored in the com.mobi.email.api.EmailService.cfg file in the $MOBI_HOME/etc directory The Mobi Email Service is built on the Apache Commons Email API. The Email Service provides the ability to connect to a provided SMTP server and send an email using a configured email account. By default, the service is configured to connect to a Gmail SMTP server. The service has configurations for smtpServer, port, emailAddress, emailPassword, security, and emailTemplate. Please see below for different configurations of popular email services.
Gmail
To send emails with Gmail, you must also follow the steps here to allow less secure apps to access the gmail account. Gmail also has strict sending limits that can impair functionality as your organization grows. Additionally, Gmail may flag a machine that it does not recognize and prevent access. If this occurs, log in to your gmail and grant the device access.
smtpServer = smtp.gmail.com
emailAddress = my.email@gmail.com
emailPassword = my-password
port = 587
security = STARTTLS
emailTemplate = emailTemplate.html
Outlook
smtpServer = smtp-mail.outlook.com
emailAddress = my.email@outlook.com
emailPassword = my-password
port = 587
security = STARTTLS
emailTemplate = emailTemplate.html
Office 365
smtpServer = smtp.office365.com
emailAddress = my.email@yourdomain.com
emailPassword = my-password
port = 587
security = STARTTLS
emailTemplate = emailTemplate.html
Yahoo
smtpServer = smtp.mail.yahoo.com
emailAddress = my.email@yahoo.com
emailPassword = my-password
port = 465
security = STARTTLS
emailTemplate = emailTemplate.html
Mailgun
smtpServer = smtp.mailgun.org
emailAddress = my.email@mg.gitlab.com
emailPassword = my-password
port = 587
security = STARTTLS
emailTemplate = emailTemplate.html
Email Template
The Mobi Email Email Service supplies a default email template that works across most email clients. The default file is located in the $MOBI_HOME/etc directory. If you want to provide your own email template, modify the emailTemplate configuration to the new email template with either a relative or absolute path to the file. The email service will resolve relative file paths for an email template using the $MOBI_HOME/etc directory as the base directory.
The email service provides a method for doing a simple string replace on the !|$MESSAGE!|$ binding within the template. For more complex HTML inserts, the service provides a method to replace all HTML between the two !|$BODY!|$ bindings. Custom templates must have the aforementioned bindings (!|$MESSAGE!|$ & !|$BODY!|$). The !|$MESSAGE!|$ binding must be between two !|$BODY!|$ bindings. For example:
<html lang="en" xmlns="http://www.w3.org/1999/xhtml">
...
<body>
!|$BODY!|$
<table>
    <tbody>
    <tr>
        <td>
            <p>
                <!-- A simple message to replace -->
                !|$MESSAGE!|$
            </p>
        </td>
    </tr>
    </tbody>
</table>
!|$BODY!|$
...
</body>
</html>
Apache Karaf
The Karaf instance that runs Mobi can be configured using the configuration files located in the $MOBI_HOME/etc
directory.
| Configuration File | Description |
|---|---|
|
Configurations for Maven repositories used for bundle resolution and deployment |
|
Configurations for HTTPS connections |
The org.ops4j.pax.url.mvn.cfg file specifies how Apache Karaf will resolve Maven URLs. This file is set up so that
Apache Karaf will use the basic Maven repositories along with your local Maven repository and the public Mobi remote
repository to resolve artifacts.
The org.ops4j.pax.web.cfg file configures the web service Apache Karaf uses to run Mobi. By default, Mobi only
runs HTTPS on port 8443.
Mobi Shell
The Mobi Shell is a wrapper around the Karaf shell which provides additional commands and tools for working with Mobi data. To access the shell, run the bin/client script in $MOBI_HOME (that’s bin\client.bat for you Windows users). The startup screen of the Mobi shell looks like the following.
                 @#@@
                @###@
               @@@@@                   _     _
   @@@       @@@@      _ __ ___   ___ | |__ (_)
  @,,,@@@@@&    @     | '_ ` _ \ / _ \| '_ \| |
  @,,&&     @  @      | | | | | | (_) | |_) | |
              @@      |_| |_| |_|\___/|_.__/|_|
               @@
              @///@
              @////&
               @@@@


  mobi (x.x.x)
  Powered by Apache Karaf (4.0.6)

Hit '<tab>' for a list of available commands
and '[cmd] --help' for help on a specific command.
Hit '<ctrl-d>' or 'osgi:shutdown' to shutdown mobi.

karaf@mobi>
The Mobi specific commands all start with mobi:. To view the list of available commands, type mobi: and hit TAB. To get information about a particular command, type the name of the command and --help afterwards and run it. For example, running mobi:import --help would show you this.
karaf@mobi>mobi:import --help
DESCRIPTION
        mobi:import

	Imports objects to a repository or dataset

SYNTAX
        mobi:import [options] ImportFile

ARGUMENTS
        ImportFile
                The file to be imported into the repository

OPTIONS
        -c, --continueOnError
                If true, continue parsing even if there is an error on a line.
        -d, --dataset
                The id of the DatasetRecord the file will be imported to
        -r, --repository
                The id of the repository the file will be imported to
        --help
                Display this help message
        -b, --batchSize
                The number representing the triple transaction size for importing.
                (defaults to 10000)
You can also run commands in the Mobi shell without opening it by running bin/client "command". For example, to run the mobi:repository-list command, you would run bin/client "mobi:repository-list". If the command you are running involves files with spaces in the name, make sure the spaces are escaped, meaning use "\ " instead of " ". The same goes for commands that include text within quotes, make sure the quotes are escaped as well.
Administration Guide
Mobi is made available as a compressed distribution package available here, a Docker image here, or as an RPM package available here. Mobi comes pre-bundled with an open-source, file-based RDF database. By default, all data, logs, and configurations will be stored in the extracted file location. All Mobi logs are stored in ${MOBI_HOME}/data/log.
For detailed instructions on deploying with Docker, please refer to Docker Deployments in the Appendix.
|
Note
|
The Enterprise edition of Mobi is provided via our Nexus Repository Manager as a compressed distribution tarball, an RPM package, or a Docker image. Your sales or support representative will provide you credentials to access the appropriate repositories in Nexus along with your license. The main installation processes are the same as the Community edition, but the Enterprise edition requires a license file to start. See the Licensing Configuration (ENTERPRISE) section for more details. |
Mobi Requirements
Hardware Requirements
We provide recommended hardware requirements as a guideline. These specifications are based on standard deployment environments. Larger production data or user requirements may require more powerful hardware configurations.
|
Important
|
Due to a known issue with Azure Container Apps automatic-decoding of HTTP requests, Mobi deployments in Azure Container Apps is not supported at this time. |
The table below provides a summary of the recommended hardware for production servers and the minimum requirements for test servers.
| Component | Minimum | Recommended | Guidelines |
|---|---|---|---|
Available RAM |
1 GB |
8 GB or more |
Mobi needs enough RAM to load large ontology and data files and run Mobi processes. The configurations provided refer to maximum Java heap size. |
Disk Space |
10 GB |
40 GB or more |
By default, Mobi stores all data and configurations in the extracted file location. |
CPU |
1 core |
4 cores or more |
Multi-core configurations dramatically improve performance of the bundled application server and database. |
Software Requirements
The table below provides a summary of the software requirements.
| Component | Minimum | Recommended | Guidelines |
|---|---|---|---|
Operating System |
RHEL/CentOS 6 |
RHEL/CentOS 8 |
Mobi runs within standard Java runtimes; however, we recommend RHEL/CentOS operating systems for on-premise or cloud-based server environments. |
Java |
1.17 |
1.17 (latest) |
The latest versions of Java 17 include security and performance updates. |
Web Browser |
Chrome |
Chrome |
Use the latest versions of web browsers for best compatibility, performance, and security. |
Firewall Requirements
The table below lists the TCP ports to open on the Mobi host.
|
Important
|
If you are running the enterprise variant of Mobi, you must ensure connectivity from your installation server to the Keygen API at https://api.keygen.sh on port 443 for license validation. Otherwise, your distribution will not start. The alternative is to use an offline license file provided by your sales or support representative. See the Licensing Configuration (ENTERPRISE) section for more details.
|
| Port | Description |
|---|---|
8443 |
Application HTTPS port. |
For more details configuring this port, or enabling HTTP access, see Change the Default Web Port.
Installing Mobi
When using the distribution package, deployment consists of unpacking the distribution to an appropriate location on the filesystem and modifying included configuration files. With the RPM and Docker installation methods, the process will be more automated and configuration files can still be modified.
Install via Docker
Prerequisites
Before installing Mobi, create a service account on the host server. The account will be used to run the Mobi image.
The service account should meet the following requirements:
-
The account needs to have read and write permissions for the directories that are mounted as volumes in the
docker-compose.ymlfile.
On a standard RHEL/CentOS system, this can be created using the following command:
sudo useradd -d /opt/mobi mobiInstall Mobi Docker Image
The Quick Start Guide has basic instructions to spin up the Mobi Community Docker Image. For more detailed instructions and how to install the Enterprise edition, follow the Docker Deployments Appendix.
Install via RPM
Prerequisites
The Mobi package requires Java SE 17 to run. This can be installed via the yum package manager if available in your OS. An example command to install Java SE 17 is:
yum install java-17-openjdk-develIf the package is not available in your OS, you can download and install Java SE 17 a number of ways. We suggest downloading the Oracle installer from here and running sudo rpm -Uvh jdk-17_linux-x64_bin.rpm or sudo rpm -Uvh jdk-17_linux-aarch64_bin.rpm (depending on your OS) to install.
Install Mobi Package
The Quick Start Guide has instructions on how to install the Mobi Community RPM package.
If you are installing the Enterprise edition, see the important differences listed below:
-
The packages are hosted in a separate Nexus repository and require credentials. Please reach out to your sales or support representative for assistance.
-
Use the following command to create the reference to the repository, replacing
{USERNAME}and{PASSWORD}with your provided Nexus credentials.sudo tee /etc/yum.repos.d/realmone-ent.repo > /dev/null <<EOF [realmone_ent] name=RealmOne Enterprise Repository baseurl=https://{USERNAME}:{PASSWORD}@nexus.inovexcorp.com/nexus/repository/public-yum-prod-ent-hosted/ enabled=1 gpgcheck=1 gpgkey=http://nexus.inovexcorp.com/nexus/repository/public-raw-prod-hosted/gpg/prod-public.key repo_gpgcheck=0 priority=1 EOF -
The Enterprise edition of the RPM package is called
mobi-enterpriseinstead ofmobi-community -
When starting and stopping the distribution, substitute in the instructions
mobi-communityformobi-enterprisein the referenced commands (eg.sudo -u mobi-community bin/startbecomessudo -u mobi-enterprise bin/start) -
After installing the package, copy the license file you were provided by your sales or support representative to the auto-generated
/opt/mobi/latest/etc/directory or to a.mobidirectory in the auto-generated/opt/mobidirectory. Mobi Enterprise will not start without this.mkdir -p /opt/mobi-enterprise/.mobi cp license.lic /opt/mobi-enterprise/.mobi/
All Mobi prepackaged bundles, services, and required artifacts and dependencies will be automatically deployed by the runtime once started. The Mobi web application should now be accessible at https://localhost:8443/mobi/index.html (or substitute localhost with the hostname/IP address of the machine running the process dependant on firewall configurations). The default login credentials are admin:admin.
|
Note
|
Due to the self-signed SSL certificate that Mobi comes with, your browser will likely show you a certificate warning when first loaded. This is safe to proceed past. See Configure Custom SSL Certificates for more details. |
To stop the Mobi server, you can either stop the systemd service:
sudo systemctl stop mobior you can manually stop the distribution:
cd /opt/mobi-community/latest
sudo -u mobi-community bin/stop|
Note
|
For Enterprise, those commands are cd /opt/mobi-enterprise/latest and sudo -u mobi-enterprise bin/stop.
|
Install via Distribution Tarball
Prerequisites
Create Service Account
Before installing a Mobi distribution, create a service account on the host server. The account will be used to run Mobi.
The service account should meet the following requirements:
-
The service account must have read and write permissions for the Mobi installation directory. On Linux, this is typically
/opt/mobi/mobi-distribution-<version>.
On a standard RHEL/CentOS system, this can be created using the following command:
sudo useradd -d /opt/mobi mobiInstall Java 17
Mobi requires the latest version of Java 1.17 to operate. Refer to http://www.oracle.com/technetwork/java/javase/ for details on how to download and install Java SE 1.17.
|
Note
|
If you are using a Red Hat system, you can install Java 17 with sudo yum install java-17-openjdk prior to version 8 and sudo dnf install java-17-openjdk-devel on versions 8+.
|
|
Note
|
On a standard RHEL/CentOS system, there is no package available via yum to install. We suggest downloading the Oracle installer from here and running sudo rpm -Uvh jdk-17_linux-x64_bin.rpm or sudo rpm -Uvh jdk-17_linux-aarch64_bin.rpm (depending on your OS) to install.
|
The JAVA_HOME environment variable must be set for the user running Mobi. On a Red Hat system, the path looks something like /usr/lib/jvm/java-17-openjdk. On a standard RHEL/CentOS system (after running the rpm above), the path looks something like /usr/java/jdk-17.0.4.1. Either way, the variable can be set using the following commands:
sudo su - mobi
echo 'export JAVA_HOME=/path/to/java/home' >> ~/.bashrc
exit
Install Mobi Distribution Tarball
Follow the instructions below to install Mobi via the distribution. These instructions assume that you have copied the Mobi distribution to the server.
|
Note
|
These instructions are prepared for a standard RHEL/CentOS deployment server. |
|
Note
|
If you are running the enterprise variant of Mobi, be sure you have added your license file to either the $MOBI_HOME/etc/ directory or to a .mobi directory in the home directory of the user running Mobi prior to starting the server for the first time.
|
-
Unpack Mobi to the installation parent directory (e.g.
/opt/mobi)sudo su - mobi tar -xf $MOBI_HOME.tar.gz -
Create a symlink to the latest distribution
ln -s $MOBI_HOME latest -
Start the Mobi server
cd latest
./bin/start
All Mobi prepackaged bundles, services, and required artifacts and dependencies will be automatically deployed by the runtime once started. The Mobi web application should now be accessible at https://localhost:8443/mobi/index.html (or substitute localhost with the hostname/IP address of the machine running the process dependant on firewall configurations). The default login credentials are admin:admin.
|
Note
|
Due to the self-signed SSL certificate that Mobi comes with, your browser will likely show you a certificate warning when first loaded. This is safe to proceed past. See Configure Custom SSL Certificates for more details. |
To stop the Mobi server, run the following command:
./bin/stopPost-Installation Configuration
In addition to the steps below, Mobi supports a number of configurations to customize your installation and users' experience. See the Mobi Configurations section for more details.
Change the Default Java Heap Size
Set the max heap size in $MOBI_HOME/bin/setenv (e.g. JAVA_MAX_MEM=4G). In version 1.21, to include the JAVA_MAX_MEM and JAVA_MIN_MEM variables in the Mobi startup, add the following line beneath them in the setenv file.
|
Note
|
All versions from 1.22 onwards have this line already added. |
export JAVA_OPTS="-Xms${JAVA_MIN_MEM} -Xmx${JAVA_MAX_MEM}"Set the Host Name
If the Mobi installation will be communicating with external systems, most of those connections utilize a core hostname configuration in order to build the appropriate callback URLs. This setting is within $MOBI_HOME/etc/com.mobi.platform.server.cfg and defaults to https://localhost:8443. If your external systems are not hosted on the same machine, this needs to be a resolvable host that can be reached, for example a DNS record you have configured in your enterprise.
hostName = <APP_HOST_NAME>Change the Default Web Port
If required, change the default SSL port in $MOBI_HOME/etc/org.ops4j.pax.web.cfg
org.osgi.service.http.port.secure = <SSL_APPLICATION_PORT>|
Tip
|
We recommend running Mobi on the default port 8443 and using firewall configuration or a proxy server for SSL (port 443) termination and redirection. |
If required, Mobi can be configured to run on a non-SSL port by changing the following properties in $MOBI_HOME/etc/org.ops4j.pax.web.cfg.
# Enable HTTP (Unsecured)
org.osgi.service.http.enabled=true
# Disable HTTPS (Secured)
org.osgi.service.http.secure.enabled=false
# Set the HTTP port (Default is usually 8181)
org.osgi.service.http.port=8181
Configure Custom SSL Certificates
Mobi comes bundled with default self-signed SSL certificates stored in a Java Keystore file in etc/keystore. This self-signed certificate is why your browser will most likely show you a certificate warning when browsing to the web application.
To provide your own SSL certificates, simply replace the default keystore file with your own:
cp mycerts.jks $MOBI_HOME/etc/keystoreIf there is a keystore password, it can be configured in the $MOBI_HOME/etc/org.ops4j.pax.web.cfg file using the following configuration properties:
| Configuration Property | Description |
|---|---|
|
The password used for keystore integrity check |
|
The password used for keystore |
|
Note
|
.p12 and .jks files should both be supported
|
In addition to the keystore, Mobi also comes bundled with a custom truststore at $MOBI_HOME/etc/truststore to store any SSL certificates required for connecting to external systems. Common needs for this include the Enterprise SSO and Publishing capabilities. The truststore that Mobi uses can be changed with the following properties in the $MOBI_HOME/etc/system.properties file.
| Configuration Property | Description |
|---|---|
|
The password used for truststore integrity check |
|
The path to the truststore Mobi will utilize |
|
The type of truststore specified, such as |
Configuring a Reverse Proxy
In production environments, Mobi is often run behind a reverse proxy for SSL termination and redirection from port 443. If you are using a reverse proxy, be sure to configure the appropriate proxy settings in the $MOBI_HOME/bin/setenv file in the EXTRA_JAVA_OPS variable. The most common properties to set are http.proxyHost, http.proxyPort, https.proxyHost, and https.proxyPort.
|
Note
|
If your proxy requires authentication, you will also need to set http.proxyUser, http.proxyPassword, https.proxyUser, and https.proxyPassword.
|
export EXTRA_JAVA_OPTS="-Dhttps.proxyHost=${HTTPS_PROXY_HOST} -Dhttps.proxyPort=${HTTPS_PROXY_PORT} -Dfile.encoding=UTF-8"Installing Mobi as a Service
We recommend that you configure Mobi as a Linux service for starting Mobi automatically as the service user. Follow the instructions below to implement the service on a standard RHEL/CentOS environment.
|
Note
|
If you installed via the RPM package this was done for you. |
|
Note
|
The below steps should be run as the root user. |
|
Warning
|
Be sure to correctly configure the file locations and user. |
-
Create a file called
mobi.servicein the/usr/lib/systemd/systemdirectory. For example:[Unit] Description=Mobi Service. After=network.target StartLimitIntervalSec=30 [Service] Type=forking PIDFile=/install_path/latest/karaf.pid User=mobi ExecStart=/install_path/latest/bin/start ExecStop=/install_path/latest/bin/stop ExecReload=/install_path/latest/bin/stop; /install_path/latest/bin/start Restart=always [Install] WantedBy=default.target -
Save and close the file, and then run the following commands to start and enable the new service:
systemctl start mobi
systemctl enable mobi
Once the service is enabled, Mobi should be running. The Mobi process will start and stop automatically with the server. Any time you start and stop Mobi manually, run the following systemctl commands: sudo systemctl stop mobi and sudo systemctl start mobi.
Upgrading Mobi
Upgrades of the Mobi platform are performed via a backup/restore process where a .zip file is created of all the system data of the current installation and loaded into the new version installation. This process will handle any migration steps required when migrating to newer versions.
|
Warning
|
If restoring from a version prior to 1.22, there are two files which are not included in the backup whose contents will need to be manually updated in the new distribution. The $NEW_MOBI_HOME/bin/setenv file contains the Java Max and Min Memory settings that should be updated to the desired levels post upgrade (See Change the Default Java Heap Size). The $NEW_MOBI_HOME/etc/com.mobi.platform.server.cfg file holds a variable for the hostName of the application (See Set the Host Name). This will need to be manually updated to the previous value to support certain connections with other applications.
|
Upgrading via Docker
If you installed Mobi via Docker, follow the instructions in the Docker Deployments Appendix to upgrade Mobi via Docker.
Upgrading via RPM
If you installed Mobi via the RPM package, the backup/restore process is performed for you as part of the upgrade.
-
Download the latest Mobi RPM package
-
Shut down the existing installation. If you installed Mobi as a service, then use the appropriate
sudo systemctl stop mobicommand. -
Run the following command to upgrade the existing installation.
sudo rpm -U {path_to_rpm_package}
Upgrading via Distribution Tarball
To upgrade Mobi when installed directly with the distribution, the basic steps are outlined below and are applicable for any upgrades within major versions (e.g. 2.1 to 2.4).
|
Note
|
$MOBI_HOME is the extracted directory from your current Mobi distribution (e.g. /path/to/mobi-distribution-2.3.2).
|
-
Run the following command to create a zipped backup of your old distribution. The name of the backup can be whatever you choose as long as it is a valid zip file name. NOTE: If you have any binary data represented in the system, such as Workflow Execution Logs, and you are going to restore into an installation on a different machine, you will want to add the
-bflag with the absolute path to the $NEW_MOBI_HOME directory. This will ensure all file paths on the binary file instances within the repositories reflect the new installation location.$MOBI_HOME/bin/client "mobi:backup -o /path/to/mobi-backup.zip" -
Shut down your old installation. If you installed Mobi as service, then use the appropriate
systemctl stop mobicommand.$MOBI_HOME/bin/stop -
Unpack and start up the new distribution. If you created a symlink for your installation, make sure to update that link with
ln -sfn $NEW_MOBI_HOME latest. If you installed Mobi as a service, the use the appropriatesystemctl start mobicommand after updating the symlink.tar -xf $NEW_MOBI_HOME.tar.gz $NEW_MOBI_HOME/bin/start -
Run the following command with the path to your zipped backup to restore your data into the new installation. This process can take several minutes, but when it completes you will see a message that looks like "Restarting all services" and the application will restart with the new data.
$NEW_MOBI_HOME/bin/client "mobi:restore /path/to/mobi-backup.zip"
|
Note
|
The Mobi server can take several seconds to start up. If the client script fails, try again after a few seconds. If the server is not starting, check the logs in $NEW_MOBI_HOME/data/log/karaf.log.
|
Upgrading to Mobi 4.x
Mobi 4.0 introduced a number of breaking changes from prior versions that also include a few notable configuration changes. The basic steps for upgrading must still be followed, but the following items should be taken note:
-
Due to the new "inversioning" paradigm for commit histories, the restore process is expected to take longer than previous upgrades as all the commit histories are restructured to the new format. Please account for this when planning any downtimes.
-
During the restoration process, a versioned RDF record may be marked as "incompatible" with the new installation for one of two reasons.
-
An Ontology/Shapes Graph Record might share an ontology/shapes graph IRI with another record. In this case, the restore operation will abort with a log statement about the failed records and steps to remedy the issue before attempting the restore again.
-
Invalid data might be discovered within older commits of records that were created in much older version (eg. < 2.x). In this case, the restore operation will not abort and will log any invalid records to be addressed for tailored migration process. If this situation occurs, reach out to the product team to help ensure your data is migrated completely and appropriately.
-
-
ENTERPRISE ONLY For Graph Studio publishing, no plugins are required to be deployed to a target Graph Studio system. Any pre-existing custom plugins (the previously required "AVM Ontology Loader" and "AVM Vocabulary Orchestration Service" plugins) should be removed from the Graph Studio installation.
Developer Guide
Prerequisites
To build the Mobi source code, you must have the following software and tools installed.
| Technology | Version | Download Link |
|---|---|---|
Java |
17 |
http://www.oracle.com/technetwork/java/javase/downloads/index.html |
Maven |
3.6+ |
|
Node.js |
14+ |
|
Google Chrome |
105+ |
Build from Source
Clone the Mobi project from GitHub and navigate to that directory on your machine. Run the following command to build the source:
mvn clean installThe build creates the Mobi distribution as both a .tar.gz file and a .zip file in the mobi-distribution/target directory. Extract one of the files and navigate into that directory.
Inside the extracted distribution directory, start up the Mobi Karaf instance. For Unix/Linux:
bin/startor for Windows:
bin\start.batAll the Mobi bundles and services and their dependencies will be automatically deployed using OBR.
The Mobi web application should now be accessible at https://localhost:8443/mobi/index.html.
Load Dataset Data
Data can be manually loaded into an existing Dataset using the Mobi shell. You will need the full path to the data file and the IRI of the target DatasetRecord.
Open the Mobi shell and run the mobi:import command passing the IRI of the DatasetRecord and the path to the data file. For example, if you wanted to load data located at /Users/tester/Documents/testData.trig into the https://mobi.com/records/my-dataset DatasetRecord, you would run the following command:
mobi:import --dataset https://mobi.com/records/my-dataset /Users/tester/Documents/testData.trigAll triples that are not within a named graph will be loaded into the system default named graph. All triples within named graphs will be added and their named graphs associated with the Dataset.
Accessing Swagger REST API Documentation
Every installation of Mobi provides Swagger Documentation for the full suite of Mobi REST APIs. This documentation is provided as a standard Swagger YAML file as well as a fully interactive hosted version. The Swagger YAML file can be downloaded at $MOBI_HOST/swagger-ui/mobi-swagger.yaml. To reach the Swagger Documentation UI, navigate to $MOBI_HOST/swagger-ui/index.html. For example, in a default deployment these URLs would look like https://localhost:8443/swagger-ui/mobi-swagger.yaml and https://localhost:8443/swagger-ui/index.html, respectively. If the browser session is already logged into Mobi, there is no need to click the Authorize button.
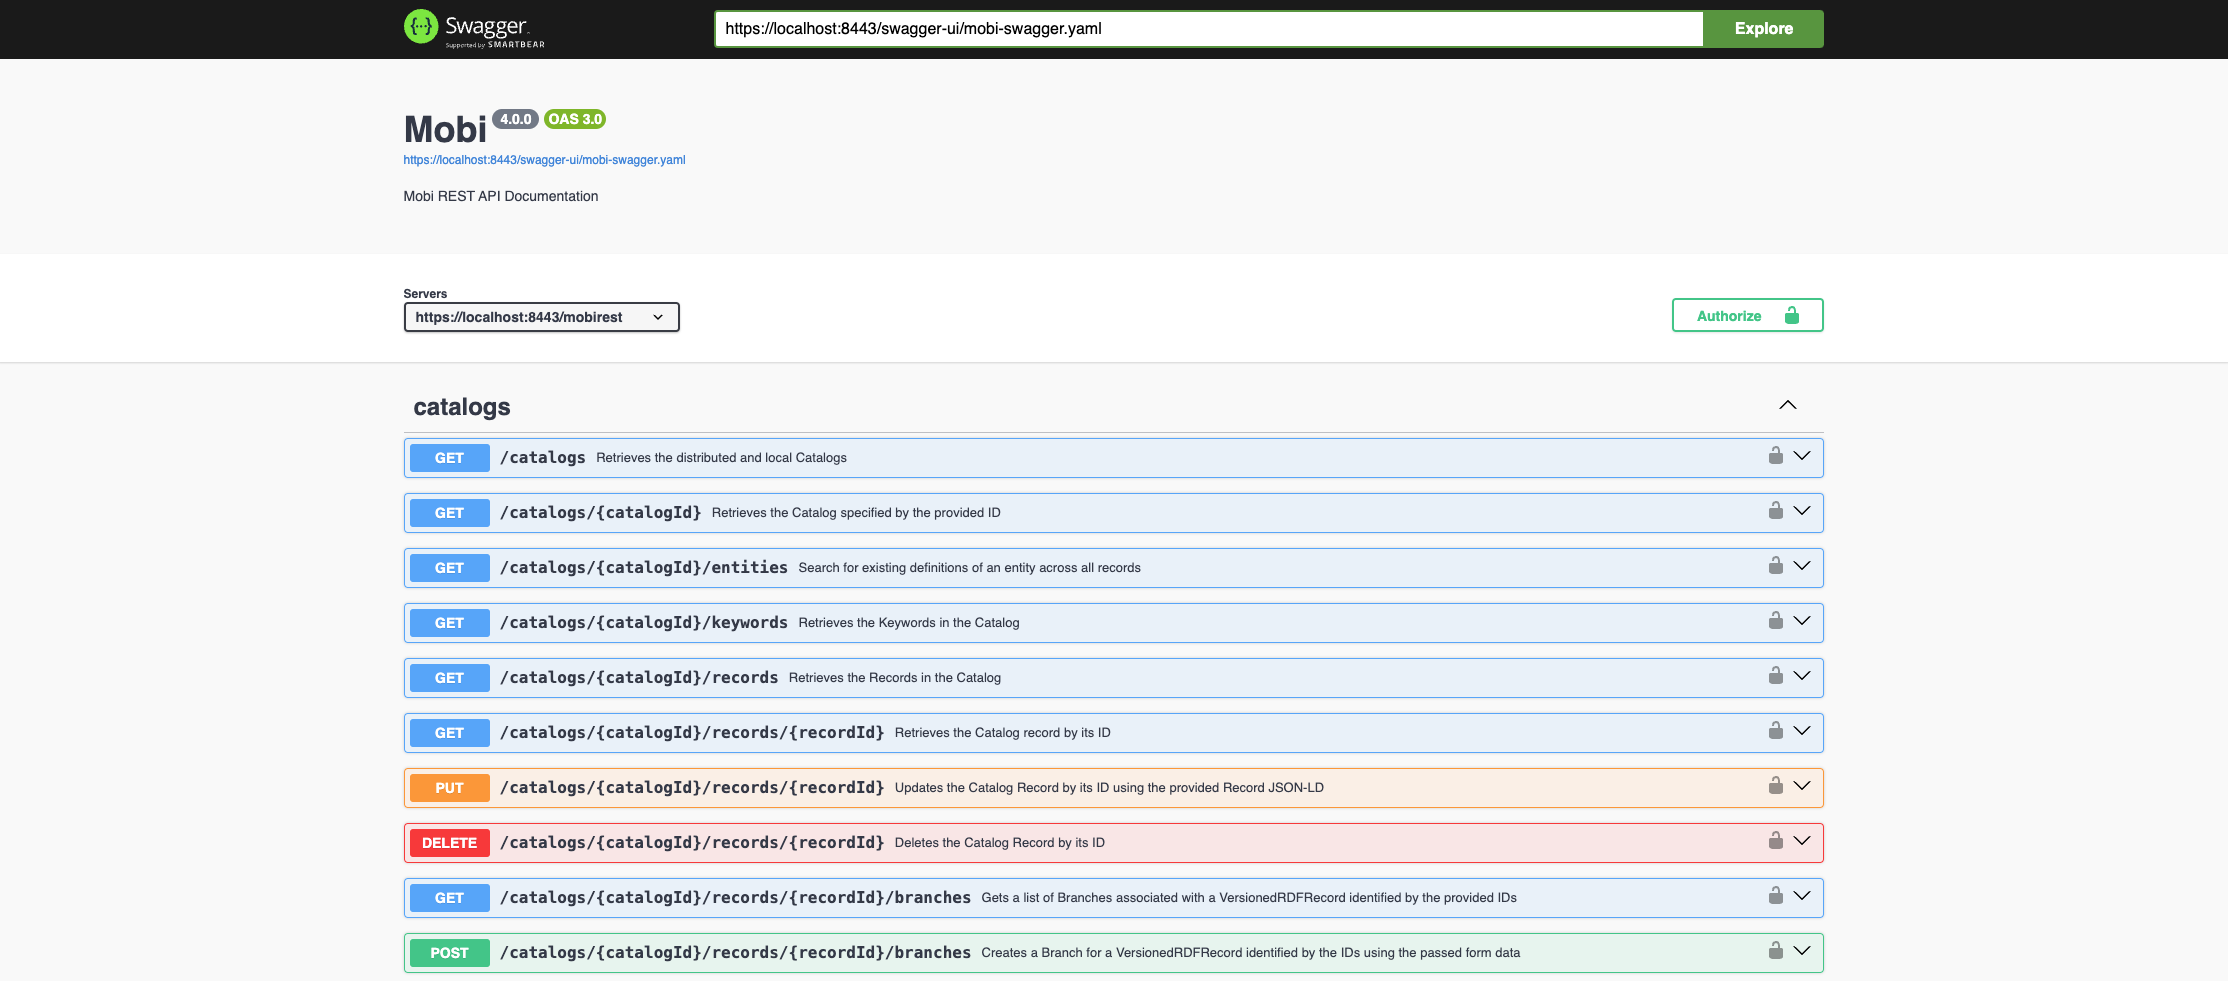
Translating Documents
Files in the xml, json, or csv formats can be transformed into an ontology and corresponding instance data using Mobi’s document translation tool. This experimental feature can be utilized via REST endpoint, the Mobi shell, or from the Swagger UI, with all methods providing users configuration options to alter the generated files.
Utilizing the Mobi Shell
The tool can be run from the Mobi shell with the mobi:document-translate command. The command accepts the full path
to both the input file to translate and output location for the result. Below is an example call to the command:
mobi:document-translate /Users/tester/Documents/example.json /Users/tester/Documents/outputDirThe Document Translate command accepts several additional configuration options to tailor the way the input file is processed. These options currently include the ability to set the default namespace of the generated ontology and instance data, specify the type of file being translated, and set a number of rows in a CSV to be analyzed before identifying a data property range. The command result is a zip file located at the output destination that contains two turtle files: ontology.ttl which will contain an ontology describing the structure of the input file and data.ttl which will contain the data within your input file translated into RDF data conforming to the ontology.
Utilizing the REST endpoints and Swagger UI
Mobi’s REST endpoints & Swagger UI provide additional ways to use the document translation tool. When using either a direct REST call or the Swagger UI, users are able to select an input file from their filesystem and convert it to valid RDF. If successful, output is returned as a downloadable zip file. Similar to the output generated by the Mobi shell, this zip file contains two turtle files containing the generated ontology and conforming instance data respectively. Additionally, these two methods provides users the same configurable options that the Mobi shell does, with one additional option. When using Rest endpoints or the Swagger UI to translate a document, users are able to also specify the name of the output file. If one is not specified, the name of the input file will be used with a timestamp added on to the end.
Translating Different File Types
XML
The XML translator uses the hierarchical structure of the XML input file in order to construct classes and object properties.
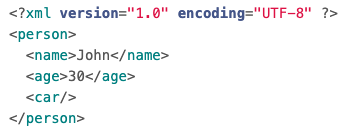
When generating the ontology, each element is simultaneously treated as a class and object property if it has child elements and is regarded as a datatype property if it does not. The output will resemble a file similar to the one below.
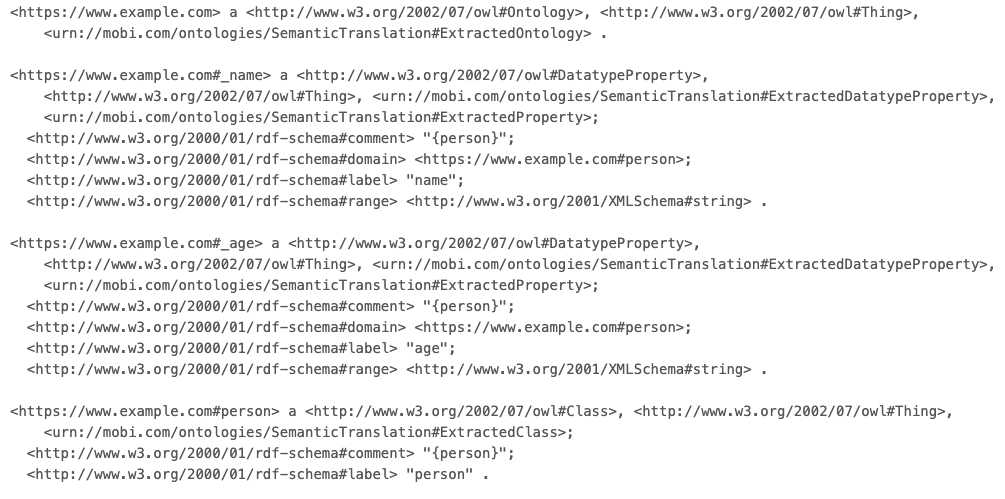
The generated data file is composed of elements that have been deemed a class and that have literal values attached to it. Each instance is given a unique IRI based on the namespace of the ontology with a trailing UUID attached at the end.

JSON
Given a JSON file like below, the JSON translator will use the nested structure of JSON objects in order to construct classes and object properties.

An output ontology is then generated using the passed in IRI or a UUID as the namespace. Classes and object properties relating these classes are created based on the keys present in the input file.
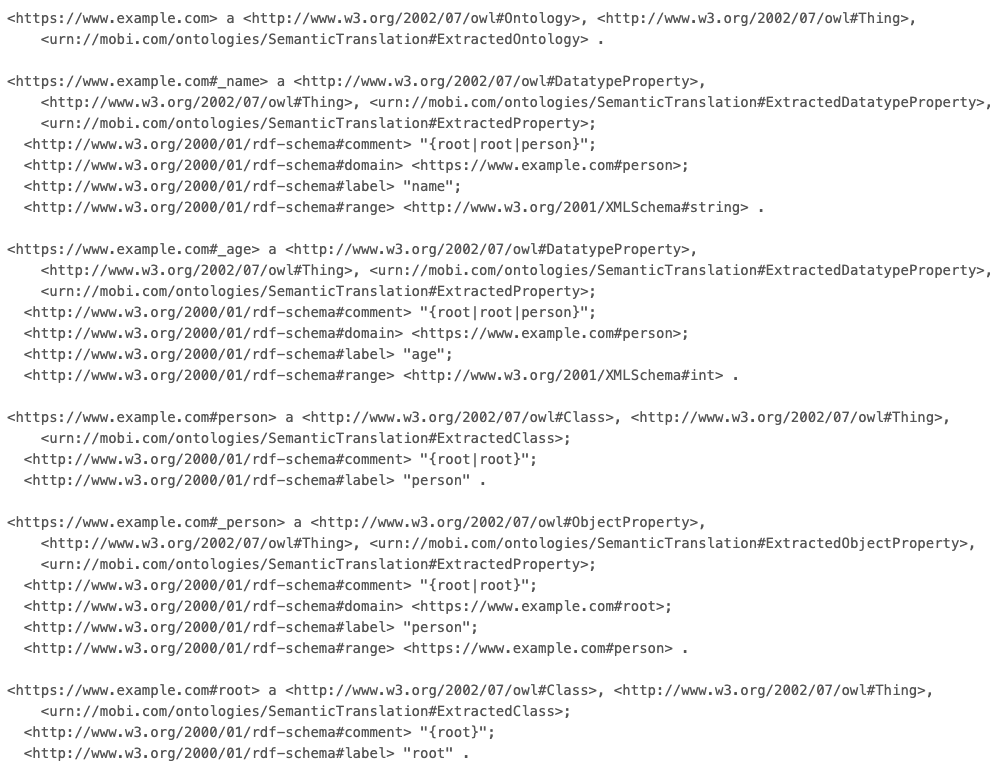
The generated data file is created by utilizing the literal values of each key object. For each instance of a JSON object there is in the input file an RDF entity is created with the same namespace as the ontology.

CSV
The CSV translation tool is the only translator that does not create multiple classes or any object properties. A singular class is generated per file, with the name of the file being used as the name of the class.
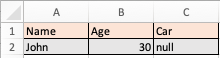
Each column header is treated as a different datatype property, with the translator parsing a certain number of rows to determine the range of the property.
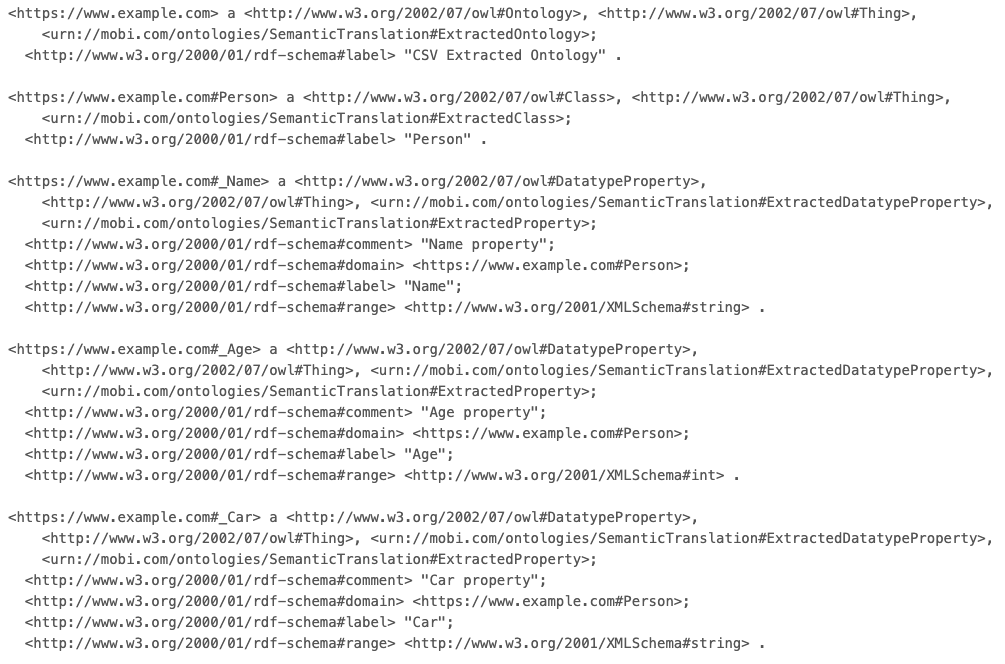
When creating the instance data, each row within the file is treated as an instance of the class with the cell values being the object of the triples generated by the datatype properties.

Appendix A: Mobi Mappings
Mobi mappings are used to convert delimited data into RDF and are made up of instances of classes defined in a custom ontology found in the com.mobi.etl.api/src/main/resources/delimited.ttl file in the source code. These main classes are:
|
Note
|
All examples in this Appendix will be in Turtle RDF serialization and use the following prefixes:
|
Mapping
The delim:Mapping class represents the mapping itself. Every mapping must have one and only one instance of the Mapping class. Properties associated with this class provide information about the mapping that are needed for the Mapping Tool to have context. These properties are:
sourceRecord
The delim:sourceRecord property specifies the OntologyRecord a mapping uses for its classes and properties. The Mapping Tool requires this property along with sourceBranch and sourceCommit to retrieve a specific version of an ontology saved in Mobi. A mapping will have access to all entities defined in ontologies within the imports closure of the source ontology. The Mapping Tool utilizes all class and property definitions to validate the class and property mappings and apply the correct datatypes to data property values.
sourceRecordexample:DocumentExample delim:sourceRecord <http://mobi.com/records/uhtc> .
sourceBranch
The delim:sourceBranch property specifies the Branch of the sourceRecord a mapping uses for its classes and properties. The Mapping Tool requires this property along with sourceRecord and sourceCommit to retrieve a specific version of an ontology saved in Mobi. A mapping will have access to all entities defined in ontologies within the imports closure of the source ontology. The Mapping Tool utilizes all class and property definitions to validate the class and property mappings and apply the correct datatypes to data property values.
sourceBranchexample:DocumentExample delim:sourceBranch <http://mobi.com/branches/master> .
sourceCommit
The delim:sourceCommit property specifies the Commit of the sourceBranch a mapping uses for its classes and properties. The Mapping Tool requires this property along with sourceRecord and sourceBranch to retrieve a specific version of an ontology saved in Mobi. A mapping will have access to all entities defined in ontologies within the imports closure of the source ontology. The Mapping Tool utilizes all class and property definitions to validate the class and property mappings and apply the correct datatypes to data property values.
sourceCommitexample:DocumentExample delim:sourceCommit <http://mobi.com/commits/0> .
ClassMapping
The delim:ClassMapping class represents a blueprint for creating an instance of a class. Every ClassMapping defined in a mapping will create an instance of the class it maps to for every row in a set of delimited data. Each class instance created will have a generated IRI. Properties associated with this class specify how the class instance it creates should be constructed. These properties are:
mapsTo
The delim:mapsTo property specifies the class a ClassMapping will create. This is a required property for a ClassMapping since otherwise, the Mapping Tool will not know which class to create an instance of. It must point to a class that is defined either within the source ontology of the mapping or one of the ontologies in the source ontology’s imports closure.
mapsToexample:ClassMappingExample delim:mapsTo <http://mobi.com/ontologies/uhtc> .
dataProperty
The delim:dataProperty property specifies a DataMapping that is associated with a ClassMapping. It must point to a DataMapping instance defined within the mapping. A ClassMapping can have one or more of this property. Every instance of a class created from a ClassMapping will have the property specified in the DataMapping specified by dataProperty.
dataPropertyexample:ClassMappingExample delim:dataProperty example:DataMapping1 ;
delim:dataProperty example:DataMapping2 .
objectProperty
The delim:objectProperty property specifies an ObjectMapping that is associated with a ClassMapping. It must point to a ObjectMapping instance defined within the mapping. A ClassMapping can have one or more of this property. Every instance of a class created from a ClassMapping will have the property specified in the ObjectMapping specified by objectProperty.
objectPropertyexample:ClassMappingExample delim:objectProperty example:ObjectMapping1 ;
delim:objectProperty example:ObjectMapping2 .
hasPrefix
The delim:hasPrefix property specifies the namespace of the IRI for every class instance created by a ClassMapping. This property is required by the Mapping Tool so it knows how to construct the IRI for each class instance created by the ClassMapping. The value of this property is a string and must be a valid namespace.
hasPrefixexample:ClassMappingExample delim:hasPrefix "http://guide.org/example/" .
localName
The delim:localName property specifies how the local name of the IRI will be generated for every class instance created by a ClassMapping. This property points to a string literal and must be in the following format. The string must start with a dollar sign ($) and contain either the string "UUID" or a number surrounded by curly braces "{}". The "UUID" string will generate a unique identifier for every class instance created by the ClassMapping. A number will grab the value of the column at that zero-based index in the row being mapped. If the column specified has duplicate values, the Mapping Tool will combine the properties of every class instance with that IRI and combine them into a single instance. If this property is not set on a ClassMapping, the Mapping Tool will default to generating a UUID for every class instance.
localNameThis means every class instance will have a unique identifier for a local name.
example:ClassMappingExample1 delim:localName "${UUID}" .
This means every class instance will have the value from the third column for a local name.
example:ClassMappingExample2 delim:localName "${2}" .
DataMapping
The delim:DataMapping class represents a blueprint for creating a data property on a class instance. Since data properties in an ontology point to literal values, a DataMapping specifies a column whose value in the row being mapped will be used as the value of the generated data property. Properties associated with this class define how a data property will be created. These properties are:
columnIndex
The delim:columnIndex property specifies which column a DataMapping should pull the value from to set as the value of the generated data property. This property is required for a DataMapping so that the Mapping Tool knows where to get the value of a data property. All column values retrieved by this property are interpreted as strings. The value of this property must be a string and all the column indexes are zero-based.
columnIndexThis will retrieve the value from the first column.
example:DataMapping1 delim:columnIndex "0" .
hasProperty
The delim:hasProperty property specifies which data property a DataMapping will create. This property is required for a DataMapping so that the Mapping Tool knows what property to create. It must point to a data property defined either within the source ontology of the mapping or one of the ontologies in the source ontology’s imports closure. This property can be associated with either a DataMapping or a ObjectMapping.
hasProperty for DataMappingexample:DataMapping1 delim:hasProperty <http://mobi.com/ontologies/uhtc/aDataProperty> .
datatypeSpec
The delim:datatypeSpec property specifies a manual override for the datatype of generated data property values resulting from a DataMapping. By default, the datatype will be determined from the range of the property if found with a fallback of string. This setting has precedence over the range of the property. This property is optional for a DataMapping. The value of this property must be the IRI of a standard XSD datatype.
datatypeSpecThis will set the datatype of all values to xsd:double.
example:DataMapping1 delim:datatypeSpec xsd:double .
languageSpec
The delim:languageSpec property specifies a language for all generated data property values resulting from a DataMapping. If this property is set, the mapper will manually change the datatype of the value to be rdfs:langString. Any datatype specified by the range of the property will be ignored. This property is optional for a DataMapping. The value of this property must be a valid language tag string (found here under the ISO 639-1 column).
languageSpecThis will set the language of all values to be English.
example:DataMapping1 delim:languageSpec "en" .
ObjectMapping
The delim:ObjectMapping class represents a blueprint for creating an object property on a class instance. Since object properties in an ontology point to other classes or class expressions, an ObjectMapping specifies a ClassMapping that will be created for the same row and whose generated class instance will be used as the value of the generated object property. Properties associated with this class define how an object property will be created. These properties are:
classMapping
The delim:classMapping property specifies which class instance generated from a ClassMapping will be used as the value of the generated object property. This property is required for an ObjectMapping so that the Mapping Tool knows which class should be the value of the object property. The generated value will be the class instance created by the specified ClassMapping for the row being mapped. The value must be a ClassMapping defined within the mapping.
classMappingexample:ObjectMapping1 delim:classMapping delim:ClassMappingExample .
hasProperty
The delim:hasProperty property specifies which object property an ObjectMapping will create. This property is required for an ObjectMapping so that the Mapping Tool knows what property to create. It must point to a object property defined either within the source ontology of the mapping or one of the ontologies in the source ontology’s imports closure. This property can be associated with either a ObjectMapping or a DataMapping.
hasProperty for ObjectMappingexample:ObjectMapping1 delim:hasProperty <http://mobi.com/ontologies/uhtc/aObjectProperty> .
Appendix B: Mobi Datasets
Mobi datasets are used to group and store RDF data into various graphs for enhanced query isolation, data segmentation, and management. The Mobi dataset structure is defined in a custom ontology found in the com.mobi.dataset.api/src/main/resources/dataset.ttl file in the source code. This design is loosely based on the W3C Specification for SPARQL Datasets wherein a collection of graphs can be queried as default named graphs or named graphs. The primary class is dataset:Dataset, and the properties associated with this class provide information about all the named graphs within the dataset. These properties are:
|
Note
|
All examples in this Appendix will be in TriG RDF serialization and use the following prefixes:
|
systemDefaultNamedGraph
The dataset:systemDefaultNamedGraph property specifies the default named graph that Mobi will use when loading data that does not specify a graph (e.g. data from a Turtle file). For example, this approach is currently used for data created by the Mapping Tool. This named graph will be cleared, but not removed when a dataset is cleared.
systemDefaultNamedGraphGRAPH example:DatasetExample {
example:DatasetExample a dataset:Dataset ;
dataset:systemDefaultNamedGraph example:sdng .
}
GRAPH example:sdng {
example:Subject a example:Object .
}
defaultNamedGraph
The dataset:defaultNamedGraph property specifies a default named graph within the dataset. These graphs are not maintained by the system and can be used when data segmentation is required within a dataset. These graphs are removed when a dataset is cleared.
defaultNamedGraphGRAPH example:DatasetExample {
example:DatasetExample a dataset:Dataset ;
dataset:defaultNamedGraph example:dng .
}
GRAPH example:dng {
example:Subject a example:Object .
}
namedGraph
The dataset:namedGraph property specifies a named graph within the dataset. These graphs are not maintained by the system and can be used when data segmentation is required within a dataset. These graphs are removed when a dataset is cleared.
namedGraphGRAPH example:DatasetExample {
example:DatasetExample a dataset:Dataset ;
dataset:namedGraph example:ng .
}
GRAPH example:ng {
example:Subject a example:Object .
}
Appendix C: SHACL Web Forms
Mobi utilizes a custom framework for generating forms within the UI based on SHACL Shapes Graphs such that the forms can generate valid RDF conforming to the configured constraints. This framework is utilized in several key experiences within the Mobi web application, such as the Settings Framework, the Publish Framework, and the Workflows.
All RDF examples will be provided in Turtle format. The following prefixes will be used in the rest of this appendix:
| Prefix | Namespace |
|---|---|
|
http://www.w3.org/2002/07/owl# |
|
http://www.w3.org/2000/01/rdf-schema# |
|
http://www.w3.org/ns/shacl# |
|
https://mobi.solutions/ontologies/form# |
|
http://www.w3.org/2001/XMLSchema# |
Web Form NodeShape
Mobi SHACL generated web forms require a top level sh:NodeShape that uses implicit class targeting to specify the type of the RDF instance that the form will generate. An example Node Shape looks like the following:
@prefix owl: <http://www.w3.org/2002/07/owl#> .
@prefix rdfs: <http://www.w3.org/2000/01/rdf-schema#> .
@prefix sh: <http://www.w3.org/ns/shacl#> .
@prefix : <http://mobi.solutions/example#> .

:ExampleClass a owl:Class, sh:NodeShape, rdfs:Class ;
  rdfs:label "Example Class" .
To indicate the fields to display in the form, this sh:NodeShape must include sh:property values pointing to conformant sh:PropertyShape instances. The web form will create an RDF subject defined as the IRI of the sh:NodeShape and will populate predicates on that subject based on the sh:path values of the related sh:PropertyShapes.
Web Form PropertyShapes
Every sh:PropertyShape associated with the top level sh:NodeShape provided to a SHACL web form will become a field. The framework expects the sh:PropertyShape to meet the following criteria:
-
Must have a
sh:pathpredicate with a simple predicate path, i.e. a single property IRI -
May have a
wf:usesFormFieldpredicate with a valid value (see the following sections for descriptions of the supported input types) -
May have a
sh:namepredicate with a string value that will be used as the label of the field in the UI. If none provided, the UI will display a "beautified" version of the local name of the property IRI value ofsh:path -
May have optional
sh:minCountand/orsh:maxCountfields denoting the min and max number of possible values for the preference which will be enforced in the UI. -
May have optional
sh:defaultValuecharacteristic set which will set the value of the form field if no instance data is populating the form. -
May use the
sh:nodeconstraint to reference anothersh:NodeShapeso that the RDF instance the web form generates can point to one or more associated instances. The associatedsh:NodeShapemust meet the same criteria listed, excluding the allowance of thesh:nodeconstraint on its associatedsh:PropertyShapeinstances, i.e. the framework only allows one level of nesting instances.
The sections below describe the different input types supported by the framework and thus the valid values of the wf:usesFormField predicate.
wf:ToggleInput
The wf:ToggleInput type will create a Material Design toggle input. This is meant to be used for boolean property values. Below are the supported SHACL constraints.
| Constraint | Description |
|---|---|
Expected to be set to |
|
Recommended to be set to 1 as most boolean properties are Functional in that the instance should only have one value set. |
|
Recommended to be set to 1 as most boolean properties are Functional in that the instance should only have one value set. |
An example sh:PropertyShape for this input type is shown below.
@prefix owl: <http://www.w3.org/2002/07/owl#> .
@prefix rdfs: <http://www.w3.org/2000/01/rdf-schema#> .
@prefix sh: <http://www.w3.org/ns/shacl#> .
@prefix wf: <https://mobi.solutions/ontologies/form#> .
@prefix : <http://mobi.solutions/example#> .

:ExamplePropertyShape a sh:PropertyShape ;
  sh:path :exampleProperty ;
  sh:datatype xsd:boolean ;
  sh:minCount 1 ;
  sh:maxCount 1 ;
  wf:usesFormField wf:ToggleInput .
wf:TextInput
The wf:TextInput type will create a standard text input. This is meant to be used for short textual or numeric property values. Below are the supported SHACL constraints.
| Constraint | Description |
|---|---|
Expected to be set to |
|
May be set to 0 or more. If set to 1 and |
|
May be set to 1 or more. If set to 1 and |
|
Will ensure that the entered value matches the specified Regular Expression. Can specify any needed REGEX flags using |
An example sh:PropertyShape for this input type is shown below.
@prefix owl: <http://www.w3.org/2002/07/owl#> .
@prefix rdfs: <http://www.w3.org/2000/01/rdf-schema#> .
@prefix sh: <http://www.w3.org/ns/shacl#> .
@prefix wf: <https://mobi.solutions/ontologies/form#> .
@prefix : <http://mobi.solutions/example#> .

:ExamplePropertyShape a sh:PropertyShape ;
  sh:path :exampleProperty ;
  sh:datatype xsd:string ;
  sh:minCount 1 ;
  sh:pattern "[A-Z]+" ;
  wf:usesFormField wf:TextInput .
wf:TextareaInput
The wf:TextareaInput type will create a standard textarea input. This is meant to be used for long textual property values. Below are the supported SHACL constraints.
| Constraint | Description |
|---|---|
Expected to be set to |
|
May be set to 0 or more. If set to 1 and |
|
May be set to 1 or more. If set to 1 and |
|
Will ensure that the entered value matches the specified Regular Expression. Can specify any needed REGEX flags using |
An example sh:PropertyShape for this input type is shown below.
@prefix owl: <http://www.w3.org/2002/07/owl#> .
@prefix rdfs: <http://www.w3.org/2000/01/rdf-schema#> .
@prefix sh: <http://www.w3.org/ns/shacl#> .
@prefix wf: <https://mobi.solutions/ontologies/form#> .
@prefix : <http://mobi.solutions/example#> .

:ExamplePropertyShape a sh:PropertyShape ;
  sh:path :exampleProperty ;
  sh:datatype xsd:string ;
  sh:minCount 1 ;
  sh:maxCount 1 ;
  sh:pattern "[A-Z]+" ;
  wf:usesFormField wf:TextareaInput .
wf:CheckboxInput
The wf:CheckboxInput type will create a collection of checkboxes with assigned values. This is meant to be used for selecting one or more values for a property based a configured list of valid values. Below are the supported SHACL constraints.
| Constraint | Description |
|---|---|
Expected to be set to |
|
Expected to be set to a list of the acceptable values for the property which will become separate checkboxes in the form. |
|
May be set to 0 or more. Will ensure at least the specified number of checkboxes are checked. If both this and |
|
May be set to 1 or more. Will ensure no more than the specified number of checkboxes are checked. If both this and |
An example sh:PropertyShape for this input type is shown below.
@prefix owl: <http://www.w3.org/2002/07/owl#> .
@prefix rdfs: <http://www.w3.org/2000/01/rdf-schema#> .
@prefix sh: <http://www.w3.org/ns/shacl#> .
@prefix wf: <https://mobi.solutions/ontologies/form#> .
@prefix : <http://mobi.solutions/example#> .

:ExamplePropertyShape a sh:PropertyShape ;
  sh:path :exampleProperty ;
  sh:datatype xsd:string ;
  sh:minCount 1 ;
  sh:minCount 4 ;
  sh:in ("Red", "Orange", "Yellow", "Green", "Blue", "Indigo", "Violet") ;
  wf:usesFormField wf:CheckboxInput .
wf:RadioInput
The wf:RadioInput type will create a collection of radio buttons with assigned values. This is meant to be used for selecting one value from a configured list of valid values. Below are the supported SHACL constraints.
| Constraint | Description |
|---|---|
Expected to be set to |
|
Expected to be set to a list of the acceptable values for the property which will become separate radio buttons in the form. |
|
Recommended to be set to 1 as most radio button like values are meant to be Functional in that the instance should only have one value set. If both this and |
|
Recommended to be set to 1 as most radio button like values are meant to be Functional in that the instance should only have one value set. If both this and |
An example sh:PropertyShape for this input type is shown below.
@prefix owl: <http://www.w3.org/2002/07/owl#> .
@prefix rdfs: <http://www.w3.org/2000/01/rdf-schema#> .
@prefix sh: <http://www.w3.org/ns/shacl#> .
@prefix wf: <https://mobi.solutions/ontologies/form#> .
@prefix : <http://mobi.solutions/example#> .

:ExamplePropertyShape a sh:PropertyShape ;
  sh:path :exampleProperty ;
  sh:datatype xsd:string ;
  sh:minCount 1 ;
  sh:minCount 1 ;
  sh:in ("Yes", "No", "I don't know") ;
  wf:usesFormField wf:RadioInput .
wf:DropdownInput
The wf:DropdownInput type will create a select field with a specified list of values. This is meant to be used for selecting one value from a configured list of valid values, especially a long list of values. Below are the supported SHACL constraints.
| Constraint | Description |
|---|---|
Expected to be set to |
|
Expected to be set to a list of the acceptable values for the property which will become separate options in the form. |
|
May be set to 0 or more. If set to 1 and |
|
May be set to 1 or more. If set to 1 and |
An example sh:PropertyShape for this input type is shown below.
@prefix owl: <http://www.w3.org/2002/07/owl#> .
@prefix rdfs: <http://www.w3.org/2000/01/rdf-schema#> .
@prefix sh: <http://www.w3.org/ns/shacl#> .
@prefix wf: <https://mobi.solutions/ontologies/form#> .
@prefix : <http://mobi.solutions/example#> .

:ExamplePropertyShape a sh:PropertyShape ;
  sh:path :exampleProperty ;
  sh:datatype xsd:string ;
  sh:minCount 1 ;
  sh:minCount 1 ;
  sh:in ("Apple", "Banana", "Orange", "Watermelon", "Mango", "Grape", "Cherry", "Raspberry", "Blackberry", "Blueberry", "Peach", "Pear", "Kiwi", "Strawberry", "Cantaloupe", "Apricot", "Plum") ;
  wf:usesFormField wf:DropdownInput .
wf:AutocompleteInput
The wf:AutocompleteInput type will create a Material Design autocomplete field. This is meant to be used for selecting one value from a variable list of valid values that is dynamically retrieved from the system repository. Below are the supported SHACL constraints.
| Constraint | Description |
|---|---|
May be set to |
|
May be set to a static list of options for the autocomplete field. Should not be set if the |
|
May be set to the IRI of the type of instances to fetch from the system repository. The IRIs of the instances will be returned as options for the autocomplete field along with display names. Should not be set if the |
|
May be set to a SPARQL query that will filter out any instances that are not valid options for the autocomplete. The |
|
May be set to 0 or more. If set to 1 and |
|
May be set to 1 or more. If set to 1 and |
An example sh:PropertyShape for this input type is shown below.
@prefix owl: <http://www.w3.org/2002/07/owl#> .
@prefix dct: <http://purl.org/dc/terms/> .
@prefix rdfs: <http://www.w3.org/2000/01/rdf-schema#> .
@prefix sh: <http://www.w3.org/ns/shacl#> .
@prefix mcat: <http://mobi.com/ontologies/catalog#> .
@prefix wf: <https://mobi.solutions/ontologies/form#> .
@prefix : <http://mobi.solutions/example#> .

:ExamplePropertyShape a sh:PropertyShape ;
  sh:path :exampleProperty ;
  sh:class mcat:MergeRequest ;
  sh:minCount 1 ;
  sh:minCount 1 ;
  sh:sparql [
    a sh:SPARQLConstraint ;
    sh:prefixes dct: ;
    sh:select """
      SELECT $this ?value
      WHERE {
        $this $PATH ?value .
        ?value dct:title ?title .
        FILTER(STRSTARTS(LCASE(?title), "draft"))
      }
    """
  ] ;
  wf:usesFormField wf:DropdownInput .
Appendix D: Settings Framework
The Settings Framework was designed to allow the tracking and editing of Settings within Mobi. The framework was designed to be easily extensible such that a new setting can be added to the platform with only some RDF and a few code changes.
The Preferences Tab is powered by the User Preference definitions stored within the system which can be tailored to populate different types of forms depending on the type of data to be stored.
Setting RDF Definition
In order to introduce new Settings to Mobi, a developer must create an RDF representation of the Setting they want to add to the application. The Setting Framework uses the SHACL Web Forms Framework to define settings so that the UI will generate the forms for you. Setting RDF must consist of exactly one SHACL NodeShape and one SHACL PropertyShape in order to be recognized as a Setting by Mobi. The NodeShape and PropertyShape must also meet the requirements of the SHACL Web Forms Framework. Requirements for the structure of these SHACL shapes is outlined below.
The following prefixes will be used in the rest of this appendix:
| Prefix | Namespace |
|---|---|
|
http://www.w3.org/2002/07/owl# |
|
http://www.w3.org/2000/01/rdf-schema# |
|
http://www.w3.org/ns/shacl# |
|
http://mobi.com/ontologies/setting# |
|
https://mobi.solutions/ontologies/form# |
|
http://www.w3.org/2001/XMLSchema# |
For an explanation of what each SHACL class and property represent, read the descriptions given here. The following are descriptions of Mobi specific properties.
setting:Preference
The setting:Preference class acts as the parent class of all preferences within Mobi. Mobi preferences always have an rdfs:subClassOf setting:Preference and are also of type sh:NodeShape.
setting:ApplicationSetting
The setting:ApplicationSetting class acts as the parent class of all application settings within Mobi. Mobi application settings always have an rdfs:subClassOf setting:ApplicationSetting and are also of type sh:NodeShape.
|
Note
|
From here on, when referring to either setting:Preference or setting:ApplicationSetting the phrase setting subType may be used.
|
setting:PreferenceGroup
Every Mobi preference must have a setting:inGroup of a instance of setting:PreferenceGroup. These preference groups are meant to group together semantically related preferences.
setting:ApplicationSettingGroup
Every Mobi application setting must have a setting:inGroup of a instance of setting:ApplicationSettingGroup. These application setting groups are meant to group together semantically related application settings.
setting:hasDataValue
The setting:hasDataValue property is used by instances of setting subTypes to point to the current value of that setting. All Settings must point to a Property Shape that has an sh:path of setting:hasDataValue.
setting:inGroup
The setting:inGroup property specifies either the setting:PreferenceGroup or setting:ApplicationSettingGroup that a Mobi Setting belongs too. It is used to semantically group related Settings in the UI.
Required SHACL NodeShape
In addition to the requirements of the SHACL Web Forms Framework, the NodeShape must meet the following requirements:
-
Must have an
rdfs:subClassOfofsetting:Preferenceorsetting:ApplicationSetting. -
Must have an
sh:descriptionthat will be shown above the Setting in the UI. -
Must have a
sh:propertythat points to the required SHACL PropertyShape for the setting. -
Must have a
setting:inGroupof an IRI in the system of typesetting:PreferenceGrouporsetting:ApplicationSettingGroup.
Required SHACL PropertyShape
In addition to the requirements of the SHACL Web Forms Framework, the PropertyShape must meet the following requirements:
-
Must have an
sh:pathofsetting:hasDataValue. -
Must have a
setting:inGroupof a valid instance of thesetting:PreferenceGrouporsetting:ApplicationSettingGroupclass.
Required PreferenceGroup/ApplicationSettingGroup
-
At least one instance of
setting:PreferenceGrouporsetting:ApplicationSettingGroupmust exist which has anrdfs:label.-
Preference/ApplicationSetting Groups already in the system can be reused.
-
|
Note
|
Predefined Property Groups coming soon |
The following diagram illustrates the relationship between the various preference related classes and properties:
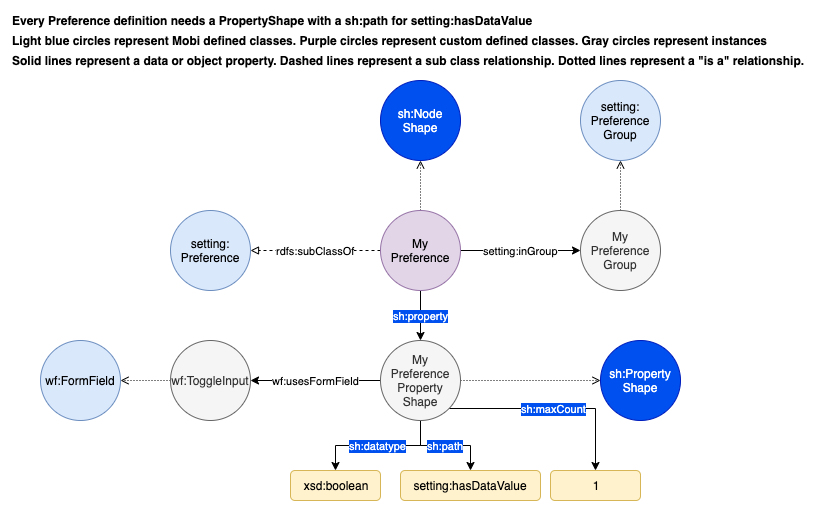
Example RDF
@prefix owl: <http://www.w3.org/2002/07/owl#>.
@prefix xsd: <http://www.w3.org/2001/XMLSchema#>.
@prefix rdfs: <http://www.w3.org/2000/01/rdf-schema#>.
@prefix sh: <http://www.w3.org/ns/shacl#>.
@prefix setting: <http://mobi.com/ontologies/setting#>.
@prefix wf: <https://mobi.solutions/ontologies/form#>.
@prefix : <http://mobi.com/ontologies/test#>.
@base <http://mobi.com/ontologies/test>.

:MyBooleanPreference a owl:Class, sh:NodeShape;
    rdfs:subClassOf setting:Preference;
    sh:description "What value do you want for your Boolean Preference?" ;
    sh:property :MyBooleanPreferencePropertyShape;
    setting:inGroup :MyTestPreferenceGroup .

:MyBooleanPreferencePropertyShape a sh:PropertyShape;
    sh:path setting:hasDataValue;
    sh:datatype xsd:boolean;
    sh:minCount 1 ;
    sh:maxCount 1 ;
    wf:usesFormField wf:ToggleInput .

:MyTestPreferenceGroup a setting:PreferenceGroup ;
    rdfs:label "My Test Preference Group"@en .
Adding Custom Settings
In order to create new custom settings in Mobi, there are 3 steps:
-
Create Setting RDF to model the new Setting
-
Generate Java classes from the Setting RDF using the Mobi
rdf-orm-plugin -
Load the Setting RDF into the Mobi Repository
Generate Java Classes from Setting RDF
-
Create an RDF file with your custom setting definition in the
src/main/resourcesdirectory of a Mobi bundle. This can be any valid RDF format, such a Turtle. A list of supported RDF formats can be found under Uploading Existing Ontologies. -
Create a
pom.xmlbased on the following example XML in the appropriate Mobi bundle. Replace${mobi.version}with the appropriate version of Mobi the bundle will be deployed to.
<project xmlns="http://maven.apache.org/POM/4.0.0"
         xmlns:xsi="http://www.w3.org/2001/XMLSchema-instance"
         xsi:schemaLocation="http://maven.apache.org/POM/4.0.0 http://maven.apache.org/xsd/maven-4.0.0.xsd">
    <modelVersion>4.0.0</modelVersion>
    <groupId>org.example</groupId>
    <artifactId>test</artifactId>
    <version>1.0-SNAPSHOT</version>
    <name>${project.groupId}.${project.artifactId}</name>
    <packaging>bundle</packaging>
    <parent>
        <artifactId>mobi-parent</artifactId>
        <groupId>com.mobi</groupId>
        <version>${mobi.version}</version>
        <relativePath></relativePath>
    </parent>
    <dependencies>
        <dependency>
            <groupId>com.mobi</groupId>
            <artifactId>rdf.orm</artifactId>
            <version>${mobi.version}</version>
        </dependency>
        <dependency>
            <groupId>com.mobi</groupId>
            <artifactId>setting.api</artifactId>
            <version>${mobi.version}</version>
        </dependency>
    </dependencies>
    <repositories>
        <repository>
            <id>inovex</id>
            <url>http://nexus.inovexcorp.com/nexus/content/repositories/public-maven-prod-group/</url>
        </repository>
    </repositories>
    <pluginRepositories>
        <pluginRepository>
            <id>inovex</id>
            <url>http://nexus.inovexcorp.com/nexus/content/repositories/public-maven-prod-group/</url>
        </pluginRepository>
    </pluginRepositories>
    <build>
        <plugins>
            <plugin>
                <groupId>org.apache.felix</groupId>
                <artifactId>maven-bundle-plugin</artifactId>
                <version>5.1.4</version>
                <extensions>true</extensions>
                <configuration>
                    <obrRepository>NONE</obrRepository>
                </configuration>
            </plugin>
            <plugin>
                <groupId>com.mobi.orm</groupId>
                <artifactId>rdf-orm-maven-plugin</artifactId>
                <version>${mobi.version}</version>
                <executions>
                    <execution>
                        <id>generateOrmSources</id>
                        <phase>generate-sources</phase>
                        <goals>
                            <goal>generate-orm</goal>
                        </goals>
                        <inherited>false</inherited>
                        <configuration>
                            <generates>
                                <ontology>
                                    <ontologyFile>${project.basedir}/src/main/resources/myontologyfile.ttl</ontologyFile>
                                    <outputPackage>org.example.test.ontologies</outputPackage>
                                    <ontologyName>MyOntologyName</ontologyName>
                                </ontology>
                            </generates>
                            <references>
                                <ontology>
                                    <ontologyFile>jar:http://nexus.inovexcorp.com/nexus/repository/public-maven-prod-group/com/mobi/rdf.orm.ontologies/${mobi.version}/rdf.orm.ontologies-${mobi.version}.jar!shacl.ttl</ontologyFile>
                                    <outputPackage>com.mobi.ontologies.shacl</outputPackage>
                                </ontology>
                                <ontology>
                                    <ontologyFile>jar:http://nexus.inovexcorp.com/nexus/repository/public-maven-prod-group/com/mobi/setting.api/${mobi.version}/setting.api-${mobi.version}.jar!setting.ttl</ontologyFile>
                                    <outputPackage>com.mobi.setting.api.ontologies</outputPackage>
                                    <ontologyName>Setting</ontologyName>
                                </ontology>
                            </references>
                            <outputLocation>${project.basedir}/src/main/java</outputLocation>
                        </configuration>
                    </execution>
                </executions>
            </plugin>
        </plugins>
    </build>
</project>
Be sure to replace references to "My ontology" and "My bundle" with your actual ontology and bundle. Also make sure to have the <packaging>bundle</packaging> and the com.mobi.rdf.orm dependency. On your next Mobi build, interfaces, implementation classes, and factory classes will be created based on your ontology.
Load Setting RDF into Mobi Repo
In order for Setting RDF to be recognized by Mobi, it must be loaded into the http://mobi.com/setting-management graph. This can be done one of two ways. The first option is to upload the RDF via Mobi Command Line. To do this, create a trig file with a graph of http://mobi.com/setting-management that has the same contents as your setting RDF. The following is an example:
@prefix owl: <http://www.w3.org/2002/07/owl#>.
@prefix xsd: <http://www.w3.org/2001/XMLSchema#>.
@prefix rdfs: <http://www.w3.org/2000/01/rdf-schema#>.
@prefix sh: <http://www.w3.org/ns/shacl#>.
@prefix setting: <http://mobi.com/ontologies/preference#>.
@prefix wf: <https://mobi.solutions/ontologies/form#>.
@prefix : <http://mobi.com/ontologies/test#>.
@base <http://mobi.com/ontologies/test>.

<http://mobi.com/setting-management> {
:MyBooleanPreference a owl:Class, sh:NodeShape;
    rdfs:subClassOf setting:Preference;
    sh:description "What value do you want for your Boolean Preference?";
    sh:property :MyBooleanPreferencePropertyShape;
    setting:inGroup :MyTestPreferenceGroup.

    :MyBooleanPreferencePropertyShape a sh:PropertyShape;
        sh:path setting:hasDataValue;
        sh:datatype xsd:boolean;
        sh:minCount 1 ;
        sh:maxCount 1 ;
        wf:usesFormField wf:ToggleInput .

    :MyTestPreferenceGroup a setting:PreferenceGroup ;
        rdfs:label "My Test Preference Group"@en .
}
Next, start up Mobi, and run the following command in the Mobi Shell: mobi:import -r system /path/to/my/trigfile.trig. At this point, the preference should now be present and editable in the Mobi UI.
|
Note
|
This will only work if you have already built using the rdf-orm-plugin described earlier in the documentation to generate Java classes for the setting RDF.
|
The second option to load your Setting RDF into the Mobi Repository is to add code to the activate method of a service in your corresponding Mobi bundle. The following methods can be used to help add code into the Mobi Repository.
-
The
Models.createModel()method to turn anInputStreaminto aModel. -
getRepository().getConnection().add(…)from theCatalogConfigProviderclass used to add a model to the repo. Be sure to pass thehttp://mobi.com/setting-managementiri as the context parameter value.
Example:
settingUtilsService.updateRepoWithSettingDefinitions(MY_ONTOLOGY_INPUT_STREAM, MY_ONTOLOGY_NAME);Using a Stored Setting
In order to use the value of a stored setting, the setting service will be used in conjunction with one or more of the ORM generated classes (classes generated in the Generate Java Classes from Setting RDF section). The following is an example of how to extract the value of a boolean preference that exists in the system:
boolean myBooleanPreferenceValue = false;
Optional<Preference> myPreferenceOptional = preferenceService.getSetting(valueFactory.createIRI(MyPreference.TYPE), user;
if (myPreferenceOptional.isPresent()) {
    MyPreference myPreference = (MyPreference) myPreferenceOptional.get();
    myBooleanPreferenceValue = myPreference.getHasDataValue().orElseThrow(() -> new IllegalStateException("Some message")).booleanValue();
}
Appendix E: Mobi Security Policies
Mobi utilizes XACML standards to support Attribute-Based Access Control (ABAC). See the ABAC section for more detail.
Attribute-Based Access Control
Attribute-Based Access Control is an alternative to the traditional Role-Based Access Control (RBAC) - an authorization model where users are permitted to access resources based on the roles assigned to the user. As the name implies, ABAC evaluates a combination of Attributes to determine the user’s access permissions.
The base Attributes in Mobi’s ABAC model are:
-
Subject: The subject is the user requesting access to a resource in order to perform an action. These are typically gathered from a token or an existing database/HR system.
-
Resource: The resource is an object or asset (e.g., files, records, metadata, application, etc.) that the user wants to access. Resource attributes in Mobi are typically the IRIs of object.
-
Action: The action is what the user wants to do with the resource. The typical actions in Mobi are "Create", "Read", "Update", "Delete", and "Modify".
Attribute-Based Access Control Workflow
As an example, a policy in Mobi may state "Only users who have the admin role may view Ontology Record 1." When a request is made, Mobi’s XACML Engine (discussed below) will evaluate the request and grant view permission if the request has the following attributes:
-
Subject is the IRI of the User making the request
-
Subject
hasUserRoleofadmin -
Action is the "Read" action
-
Resource is the IRI of Ontology Record 1
XACML
eXtensible Access Control Markup Language (XACML) is an XML based language that enables security policy definitions and request evaluation to determine if a user has access to given resource. It is composed of the following components:
-
Policy Decision Point (PDP): Evaluates requests against authorization policies before issuing access decisions
-
Policy Enforcement Point (PEP): Intercepts user’s access request to a resource, makes a decision request to the PDP to obtain the access decision (i.e. access to the resource is approved or rejected), and acts on the received decision
-
Policy Information Point (PIP): The system entity that acts as a source of attribute values (i.e. a resource, subject, environment)
-
Policy Retrieval Point (PRP): Point where the XACML access authorization policies are stored, typically a database or the filesystem.
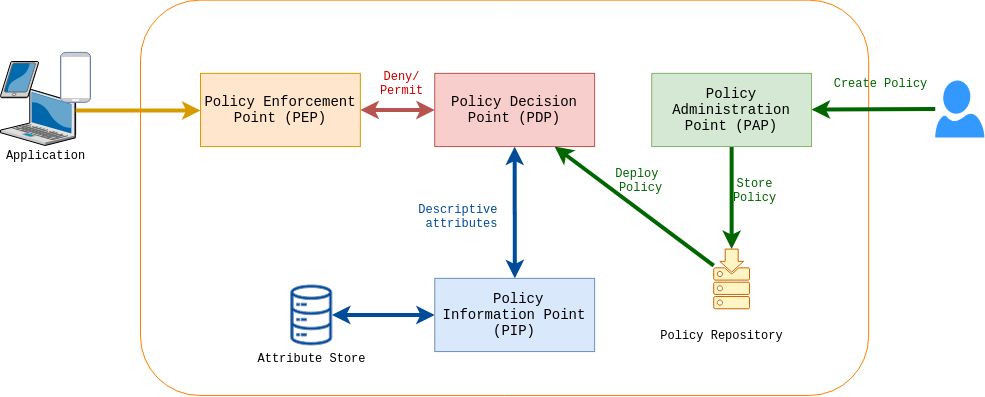
The XACML specification supports both Attribute-Based Access Control and Role-Based Access Control. Mobi’s implementation of XACML only supports ABAC. Requests made to the PEP are evaluated in the PDP and return whether a user can access a Resource based on the ABAC schema defined above.
Mobi’s XACML definitions are structured using combinations of the following top level elements:
-
Policy: contains a set of Rule elements and a specified procedure for combining the results of their evaluation. It is the basic unit of the policy used by the PDP, and so it is intended to form the basis of an authorization decision
-
Rule: contains a Boolean expression that can be evaluated in isolation, but that is not intended to be accessed in isolation by a PDP. A Rule can be comprised of the following sub-elements:
-
Target: defines the set of requests to which the rule is intended to apply in the form of a logical expression on attributes in the request.
-
Effect: indicates the rule-writer’s intended consequence of a "True" evaluation for the rule. Two values are allowed: "Permit" and "Deny".
-
Condition: represents a Boolean expression that refines the applicability of the rule beyond the predicates implied by its target. Therefore, it may be absent.
-
Obligation Expressions: An operation specified in a rule, policy or policy set that should be performed by the PEP in conjunction with the enforcement of an authorization decision. These are currently unused in Mobi policies.
-
Advice Expressions: A supplementary piece of information in a policy or policy set which is provided to the PEP with the decision of the PDP. These are currently unused in Mobi policies.
-
XACML Example
Here is an example policy that is used in Mobi to control what users may create an Ontology Record:
<Policy xmlns="urn:oasis:names:tc:xacml:3.0:core:schema:wd-17" PolicyId="http://mobi.com/policies/ontology-creation" RuleCombiningAlgId="urn:oasis:names:tc:xacml:3.0:rule-combining-algorithm:deny-unless-permit" Version="1.0">
    <Description>Who can create an OntologyRecord in the Local Catalog?</Description>
    <Target>
        <AnyOf>
            <AllOf>
                <Match MatchId="urn:oasis:names:tc:xacml:1.0:function:string-equal">
                    <AttributeValue DataType="http://www.w3.org/2001/XMLSchema#string">http://mobi.com/catalog-local</AttributeValue>
                    <AttributeDesignator AttributeId="urn:oasis:names:tc:xacml:1.0:resource:resource-id" Category="urn:oasis:names:tc:xacml:3.0:attribute-category:resource" DataType="http://www.w3.org/2001/XMLSchema#string" MustBePresent="true"/>
                </Match>
                <Match MatchId="urn:oasis:names:tc:xacml:1.0:function:string-equal">
                    <AttributeValue DataType="http://www.w3.org/2001/XMLSchema#string">http://mobi.com/ontologies/policy#Create</AttributeValue>
                    <AttributeDesignator AttributeId="urn:oasis:names:tc:xacml:1.0:action:action-id" Category="urn:oasis:names:tc:xacml:3.0:attribute-category:action" DataType="http://www.w3.org/2001/XMLSchema#string" MustBePresent="true"/>
                </Match>
                <Match MatchId="urn:oasis:names:tc:xacml:1.0:function:string-equal">
                    <AttributeValue DataType="http://www.w3.org/2001/XMLSchema#string">http://mobi.com/ontologies/ontology-editor#OntologyRecord</AttributeValue>
                    <AttributeDesignator AttributeId="http://www.w3.org/1999/02/22-rdf-syntax-ns#type" Category="urn:oasis:names:tc:xacml:3.0:attribute-category:action" DataType="http://www.w3.org/2001/XMLSchema#string" MustBePresent="true"/>
                </Match>
            </AllOf>
        </AnyOf>
    </Target>
    <Rule RuleId="urn:createOntologyRecord" Effect="Permit">
        <Target>
            <AnyOf>
                <AllOf>
                    <Match MatchId="urn:oasis:names:tc:xacml:1.0:function:string-equal">
                        <AttributeValue DataType="http://www.w3.org/2001/XMLSchema#string">http://mobi.com/roles/user</AttributeValue>
                        <AttributeDesignator AttributeId="http://mobi.com/ontologies/user/management#hasUserRole" Category="urn:oasis:names:tc:xacml:1.0:subject-category:access-subject" DataType="http://www.w3.org/2001/XMLSchema#string" MustBePresent="true"/>
                    </Match>
                </AllOf>
            </AnyOf>
        </Target>
    </Rule>
    <Rule RuleId="urn:createOntologyRecordAdmin" Effect="Permit">
        <Target>
            <AnyOf>
                <AllOf>
                    <Match MatchId="urn:oasis:names:tc:xacml:1.0:function:string-equal">
                        <AttributeValue DataType="http://www.w3.org/2001/XMLSchema#string">admin</AttributeValue>
                        <AttributeDesignator Category="urn:oasis:names:tc:xacml:1.0:subject-category:access-subject" AttributeId="http://mobi.com/ontologies/user/management#username" DataType="http://www.w3.org/2001/XMLSchema#string" MustBePresent="true"/>
                    </Match>
                </AllOf>
            </AnyOf>
        </Target>
    </Rule>
</Policy>
The Target of this policy matches requests where:
-
The Resource is the Mobi Catalog
http://mobi.com/catalog-local -
The Action is Create
http://mobi.com/ontologies/policy#Create -
The Action Attribute for the RDF Type is an Ontology Record
http://mobi.com/ontologies/ontology-editor#OntologyRecord
Any request that have these 3 criteria are evaluated against the rule section. If either rule resolves to be True, then the request’s response is a Permit as defined in the Effect field in each Rule element.
The first Rule states that the user making the request must be a user in Mobi:
-
hasUserRole(http://mobi.com/ontologies/user/management#hasUserRole) ofuser(http://mobi.com/roles/user)
The second Rule states that the user must be the admin user:
-
username(http://mobi.com/ontologies/user/management#username) must equaladmin
These match operator is defined by the MatchId field of the Match element. Most Mobi policies use the basic equals operator urn:oasis:names:tc:xacml:1.0:function:string-equal. See the XACML Functions section of the specification to see other possible operations.
XACML Workflow
Let’s modify our previous example to only allow the admin user to create Ontology Records by deleting the Rule with the hasUserRole section. Our new modified policy now looks like this:
<Policy xmlns="urn:oasis:names:tc:xacml:3.0:core:schema:wd-17" PolicyId="http://mobi.com/policies/ontology-creation" RuleCombiningAlgId="urn:oasis:names:tc:xacml:3.0:rule-combining-algorithm:deny-unless-permit" Version="1.0">
    <Description>Who can create an OntologyRecord in the Local Catalog?</Description>
    <Target>
        <AnyOf>
            <AllOf>
                <Match MatchId="urn:oasis:names:tc:xacml:1.0:function:string-equal">
                    <AttributeValue DataType="http://www.w3.org/2001/XMLSchema#string">http://mobi.com/catalog-local</AttributeValue>
                    <AttributeDesignator AttributeId="urn:oasis:names:tc:xacml:1.0:resource:resource-id" Category="urn:oasis:names:tc:xacml:3.0:attribute-category:resource" DataType="http://www.w3.org/2001/XMLSchema#string" MustBePresent="true"/>
                </Match>
                <Match MatchId="urn:oasis:names:tc:xacml:1.0:function:string-equal">
                    <AttributeValue DataType="http://www.w3.org/2001/XMLSchema#string">http://mobi.com/ontologies/policy#Create</AttributeValue>
                    <AttributeDesignator AttributeId="urn:oasis:names:tc:xacml:1.0:action:action-id" Category="urn:oasis:names:tc:xacml:3.0:attribute-category:action" DataType="http://www.w3.org/2001/XMLSchema#string" MustBePresent="true"/>
                </Match>
                <Match MatchId="urn:oasis:names:tc:xacml:1.0:function:string-equal">
                    <AttributeValue DataType="http://www.w3.org/2001/XMLSchema#string">http://mobi.com/ontologies/ontology-editor#OntologyRecord</AttributeValue>
                    <AttributeDesignator AttributeId="http://www.w3.org/1999/02/22-rdf-syntax-ns#type" Category="urn:oasis:names:tc:xacml:3.0:attribute-category:action" DataType="http://www.w3.org/2001/XMLSchema#string" MustBePresent="true"/>
                </Match>
            </AllOf>
        </AnyOf>
    </Target>
    <Rule RuleId="urn:createOntologyRecordAdmin" Effect="Permit">
        <Target>
            <AnyOf>
                <AllOf>
                    <Match MatchId="urn:oasis:names:tc:xacml:1.0:function:string-equal">
                        <AttributeValue DataType="http://www.w3.org/2001/XMLSchema#string">admin</AttributeValue>
                        <AttributeDesignator Category="urn:oasis:names:tc:xacml:1.0:subject-category:access-subject" AttributeId="http://mobi.com/ontologies/user/management#username" DataType="http://www.w3.org/2001/XMLSchema#string" MustBePresent="true"/>
                    </Match>
                </AllOf>
            </AnyOf>
        </Target>
    </Rule>
</Policy>
The following request is for a user that is not the admin user and is attempting to create an Ontology Record:
-
Resource is
http://mobi.com/catalog-local -
Action is
http://mobi.com/ontologies/policy#Create -
Action Attribute for Type is
http://mobi.com/ontologies/ontology-editor#OntologyRecord -
Subject is user with username
batman
Let’s now go through the typical XACML workflow from request to evaluation to response.
-
A REST request is made to a Mobi endpoint where the request is intercepted by the Policy Enforcement Point
-
Relevant user information is extracted from the request
-
Action and Resource information is extracted from the targeted endpoint
-
These are defined by Java Annotations on the endpoints in the Mobi source code.
-
-
-
A XACML request is generated from the data extracted from the REST request.
-
The XACML request is then passed along to the Policy Decision Point
-
The Policy Decision Point reaches out to the Policy Information Point and Policy Retrieval Point to retrieve additional attributes and relevant policies to evaluate against.
-
The Policy Decision Point evaluates the request against any relevant policies. In this case it is our policy listed above.
-
The Policy Decision Point sees that the User making the request is
batmanand notadmin. Using a deny unless permit model the Policy Decision Point returnsDenyas the response to the request. -
The Policy Enforcement Point propagates this
Denyout, never actually entering the code for the REST request, and returns a 401 Unauthorized error to the system making the REST request.
Mobi Policies
Mobi System Policies
Mobi stores default system policies in the ${karaf.etc}/policies/systemPolicies directory. Custom XACML system policies should be added to this directory. On initial startup these policies are loaded into the Repository and Virtual Filesystem.
|
Warning
|
Any edits made to these policies after initial system startup will not be applied unless a mobi:reload-system-policy command is run from the Karaf terminal.
|
Reload System Policy Command
A helper utility exists in the Karaf terminal for reloading manually edited system policies. The command take a path to a system policy.
|
Note
|
System policy file names must be a URI Encoding of the Policy IRI. |
karaf@mobi()> mobi:reload-system-policy --help
DESCRIPTION
        mobi:reload-system-policy

	Reloads a system policy in Mobi

SYNTAX
        mobi:reload-system-policy [PolicyFilePath]

ARGUMENTS
        PolicyFilePath
                The path to the system policy file
This command will replace existing system policies with the policy file provided as an argument
Mobi Policy Templates
Mobi makes use of policy templates for generating default policies for different Record Types. There are two main record policy template types:
-
Record Policy: A policy for managing the READ/DELETE/MODIFY permissions of a Record
-
Policy Policy: A policy for managing the Record Policy and adjusting who can edit the permissions of a Record Policy
|
Note
|
Unlike System Policies, these policies do not need to be reloaded after editing. They are picked up by the Mobi Record Services when a user creates a new Record. |
The following policy templates can be found in the ${karaf.etc}/policies/policyTemplates directory with their system defaults:
-
datasetRecordPolicy.xml: Default policy template for Dataset Records
-
Read Permissions: Any user with the User role
-
Delete Permissions: The user who created the Record
-
Update/Manage Permissions: The user who created the Record
-
Modify Permissions: Any user with the User role
-
-
mappingRecordPolicy.xml: Default policy template for Mapping Records
-
Read Permissions: Any user with the User role
-
Delete Permissions: Any user with the User role
-
Update/Manage Permissions: The user who created the Record
-
Modify Permissions: Any user with the User role
-
Modify Master Branch: Any user with the User role
-
-
recordPolicy.xml: Default policy template for Versioned RDF Records (Ontology Records and Shapes Graph Records)
-
Read Permissions: Any user with the User role
-
Delete Permissions: The user who created the Record
-
Update/Manage Permissions: The user who created the Record
-
Modify Permissions: Any user with the User role
-
Modify Master Branch: The user who created the Record
-
-
policyPolicy.xml: The default policy template for managing access control for a Record. This policy is tied to each type of Record and is associated with the Update Permission for the Record. If the User has the Update Permission, then they can also change who else can Read/Delete/Manage/Modify a given Record.
-
Read Permissions: The user who created the Record
-
Update/Manage Permissions: The user who created the Record
-
These default policy templates for Records can be manually adjusted in the filesystem to reflect any organization specific need for access control for Records. The templates use a few tokens to do string replacement on when processed by the Mobi Record Services on creation. These tokens are:
-
%RECORDIRI%: The IRI of the created Record -
%USERIRI%: The IRI of the User creating the Record -
%POLICYIRI%: The IRI of the Record Policy - this is used by the policyPolicy.xml for managing who can adjust permissions for a given Record -
%MASTER%: The IRI of the Master branch if it is a Versioned RDF Record
The most common patterns utilized within the rules of the policy templates are described below. Pay close attention to the values on the AttributeDesignator element as they will change for each case.
Allow "Everyone"
To allow any authenticated user within Mobi to execute an action, the Target of the Rule should include a Match block that looks like this.
<Match MatchId="urn:oasis:names:tc:xacml:1.0:function:string-equal">
    <AttributeValue DataType="http://www.w3.org/2001/XMLSchema#string">http://mobi.com/roles/user</AttributeValue>
    <AttributeDesignator AttributeId="http://mobi.com/ontologies/user/management#hasUserRole" Category="urn:oasis:names:tc:xacml:1.0:subject-category:access-subject" DataType="http://www.w3.org/2001/XMLSchema#string" MustBePresent="true"/>
</Match>
Allow "Creator" or Specific User
To allow only the creator of the Record to execute an action, the Target of the Rule should include a Match block that looks like this.
<Match MatchId="urn:oasis:names:tc:xacml:1.0:function:string-equal">
    <AttributeValue DataType="http://www.w3.org/2001/XMLSchema#string">%USERIRI%</AttributeValue>
    <AttributeDesignator AttributeId="urn:oasis:names:tc:xacml:1.0:subject:subject-id" Category="urn:oasis:names:tc:xacml:1.0:subject-category:access-subject" DataType="http://www.w3.org/2001/XMLSchema#string" MustBePresent="true"/>
</Match>
If you want to hardcode a specific User, change the %USERIRI% to that user’s IRI.
Allow Specific Group
To allow only users in a specific group to execute an action, the Target of the Rule should include a Match block that looks like this with substituting %GROUPIRI% for the IRI of the Group in question (%GROUPIRI% is not a recognizing substitution within the platform).
<Match MatchId="urn:oasis:names:tc:xacml:1.0:function:string-equal">
    <AttributeValue DataType="http://www.w3.org/2001/XMLSchema#string">%GROUPIRI%</AttributeValue>
    <AttributeDesignator Category="urn:oasis:names:tc:xacml:1.0:subject-category:access-subject" AttributeId="http://mobi.com/policy/prop-path(%5E%3Chttp%3A%2F%2Fxmlns.com%2Ffoaf%2F0.1%2Fmember%3E)" DataType="http://www.w3.org/2001/XMLSchema#string" MustBePresent="true"/>
</Match>
Allow admin Users
To allow only all admin users to execute an action, the Target of the Rule should include a Match block that looks like this.
<Match MatchId="urn:oasis:names:tc:xacml:1.0:function:string-equal">
    <AttributeValue DataType="http://www.w3.org/2001/XMLSchema#string">admin</AttributeValue>
    <AttributeDesignator Category="urn:oasis:names:tc:xacml:1.0:subject-category:access-subject" AttributeId="http://mobi.com/ontologies/user/management#username" DataType="http://www.w3.org/2001/XMLSchema#string" MustBePresent="true"/>
</Match>
Appendix F: Workflows
Mobi supports the automation of actions and activities within the platform using an extensible framework called Workflows. Workflows are defined using a simple RDF schema and managed via the Mobi Catalog as Versioned RDF Records. The framework is built to support different underlying software, or Workflow Engines, to run the actual Workflows while keeping the RDF definition agnostic of the chosen engine.
A Workflow is made up of a central set of metadata, an optional trigger to initiate the Workflow without manual interaction, and a set of actions to be executed. This appendix will describe the RDF structure of a Workflow and the "out-of-the-box" supported functionality as well as how to extend the framework with additional types of triggers and actions.
Workflow RDF Definition
All workflows managed by the system must follow the same general structure that is validated via SHACL constraints. All extended types of actions and triggers come with their own SHACL definitions to ensure compliance as well.
The following prefixes will be used in the rest of this appendix. All RDF examples will be provided in either Turtle or JSON-LD format:
| Prefix | Namespace |
|---|---|
|
http://www.w3.org/2002/07/owl# |
|
http://www.w3.org/ns/prov# |
|
http://www.w3.org/2000/01/rdf-schema# |
|
http://www.w3.org/ns/shacl# |
|
http://www.w3.org/2001/XMLSchema# |
|
http://mobi.com/ontologies/user/management# |
|
http://mobi.com/ontologies/documents# |
|
http://mobi.solutions/ontologies/workflows# |
|
https://mobi.solutions/ontologies/form# |
A complete example of a compliant Workflow RDF definition is shown below.
@prefix owl: <http://www.w3.org/2002/07/owl#>.
@prefix xsd: <http://www.w3.org/2001/XMLSchema#>.
@prefix rdfs: <http://www.w3.org/2000/01/rdf-schema#>.
@prefix sh: <http://www.w3.org/ns/shacl#>.
@prefix w: <http://mobi.solutions/ontologies/workflows#>.
@prefix : <http://mobi.solutions/test#>.
@base <http://mobi.solutions/test>.

:WorkflowA a w:Workflow ;
    w:hasAction :TestActionA .

:TestActionA a w:TestAction, w:Action ;
    w:testMessage "This is a test." .
w:Workflow
Every Workflow RDF definition must have exactly one w:Workflow object with a unique subject IRI. This object is used to hold top level metadata about the Workflow’s execution as well as links to the optional w:Trigger used to initiate executions and the list of w:Action definitions to conduct when the Workflow executes. It can have a max of 1 value for w:hasTrigger and must have a minimum of one value for w:hasAction.
w:Trigger
Instances of w:Trigger specify configuration details for how an execution of the Workflow can be initiated by the system outside of manual user interaction. If a workflow execution should be initiated based off an event occurring elsewhere in the platform, there is a specific subtype of w:Trigger called w:EventTrigger which provides additional functionality in the Java OSGi services side. This is one of the areas of extensibility of the framework where custom subtypes of w:Trigger can be loaded into the platform and made available to the core framework.
|
Note
|
It is required that each w:Trigger instance be defined with all super types as well.
|
The "out of the box" supported w:Trigger types are described below.
| Trigger Type | Description | Fields |
|---|---|---|
|
Enables triggering of a Workflow on a scheduled basis based on a configured cron expression. |
|
|
Enables triggering of a Workflow when a Commit is made on a configured Branch on a configured Versioned RDF Record. Subtype of |
|
w:Action
Instances of w:Action describe what a Workflow should do when it is executed. These are sequentially executed. Logs are stored from the execution of each individual action in addition to the overall workflow logs. This is one of the areas of extensibility of the framework where custom subtypes of w:Action can be loaded into the platform and made available to the core framework. The exact implementation of each of these Actions is dependant on the chosen underlying Workflow Engine.
|
Note
|
It is required that each w:Action instance be defined with all super types as well.
|
The "out of the box" supported w:Action types are described below.
|
Note
|
More Action types are coming soon! |
| Action Type | Description | Fields |
|---|---|---|
|
Outputs a static log message to the workflow execution logs. Meant for testing Workflow executions. |
|
|
Executes an HTTP Request and outputs the response to the workflow execution logs. |
|
Creating and Using Workflows
Complete management and execution of Workflows can be accomplished through Mobi’s extensive REST API suite. Common flows when maintaining Workflows are described below. The described REST requests can be performed via a REST API client like Postman or using the provided Accessing Swagger REST API Documentation from the installation. If you are using a separate software like Postman, be sure to authenticate either using Basic Auth or the dedicated POST $MOBI_HOST/mobirest/session endpoint, passing the username and password as query parameters.
Create a Workflow
To create a workflow, follow the steps below.
-
Create a file containing the RDF definition of your Workflow. An example file is shown below.
workflow.ttl@prefix owl: <http://www.w3.org/2002/07/owl#>. @prefix xsd: <http://www.w3.org/2001/XMLSchema#>. @prefix rdfs: <http://www.w3.org/2000/01/rdf-schema#>. @prefix sh: <http://www.w3.org/ns/shacl#>. @prefix w: <http://mobi.solutions/ontologies/workflows#>. @prefix : <http://mobi.solutions/test#>. @base <http://mobi.solutions/test>. :WorkflowA a w:Workflow ; w:hasAction :TestActionA . :TestActionA a w:TestAction, w:Action ; w:testMessage "This is a test." . -
Send a POST REST request to
$MOBI_HOST/mobirest/workflowswith the following form data contents. The response from this endpoint will include the IRI of the newly created Workflow Record, which will the unique identifier for your Workflow needed for any further requests.Parameter Description fileThe required binary RDF file containing your workflow definition
titleThe required title for the Workflow Record you are creating
descriptionAn optional description for the Workflow Record you are creating
markdownAn optional markdown overview of the Workflow Record you are creating
keywordsAn optional list of keywords to associate with the Workflow Record you are creating
-
Once created, the Workflow Record will appear in the Catalog UI in the application so record metadata and permissions can be adjusted from there.
Activate/Deactivate a Workflow
When a Workflow Record is first created, it is inactive to start, meaning that even manually initiating an execution will not succeed. This is done to ensure that all required edits to the Workflow can be performed without fear of it executing before the changes are complete. To activate a Workflow and enable it to run, you will need to update the Workflow Record metadata following the steps below.
-
Send a GET REST request to
$MOBI_HOST/mobirest/catalogs/http%3A%2F%2Fmobi.com%2Fcatalog-local/records/ENCODED_RECORD_IRIwhereENCODED_RECORD_IRIis replaced by the URL encoded version of the IRI of the target Workflow Record. This will return the full JSON-LD of your Workflow’s metadata, which should look like below.Example Workflow Record JSON-LD[ { "@id": "https://mobi.com/records#19ee2b35-aa29-4a86-a0b1-892633b1d0bc", "@type": [ "http://www.w3.org/2002/07/owl#Thing", "http://mobi.solutions/ontologies/workflows#WorkflowRecord", "http://mobi.com/ontologies/catalog#VersionedRecord", "http://mobi.com/ontologies/catalog#VersionedRDFRecord", "http://mobi.com/ontologies/catalog#Record" ], "http://mobi.com/ontologies/catalog#branch": [ { "@id": "https://mobi.com/branches#19b8cc92-00a9-4594-b759-8565d2f0537a" } ], "http://mobi.com/ontologies/catalog#catalog": [ { "@id": "http://mobi.com/catalog-local" } ], "http://mobi.com/ontologies/catalog#masterBranch": [ { "@id": "https://mobi.com/branches#19b8cc92-00a9-4594-b759-8565d2f0537a" } ], "http://mobi.solutions/ontologies/workflows#active": [ { "@type": "http://www.w3.org/2001/XMLSchema#boolean", "@value": "true" } ], "http://mobi.solutions/ontologies/workflows#latestActivity": [ { "@id": "http://mobi.com/activities/2001f136-5a37-47f2-95b0-ec3f083d634a" } ], "http://mobi.solutions/ontologies/workflows#workflowIRI": [ { "@id": "http://test.com/workflows-example#WorkflowB" } ], "http://purl.org/dc/terms/issued": [ { "@type": "http://www.w3.org/2001/XMLSchema#dateTime", "@value": "2023-09-15T08:55:30.954519-04:00" } ], "http://purl.org/dc/terms/modified": [ { "@type": "http://www.w3.org/2001/XMLSchema#dateTime", "@value": "2023-09-15T08:57:28.801002-04:00" } ], "http://purl.org/dc/terms/publisher": [ { "@id": "http://mobi.com/users/d033e22ae348aeb5660fc2140aec35850c4da997" } ], "http://purl.org/dc/terms/title": [ { "@value": "Workflow B" } ] } ] -
Copy the returned JSON-LD. Send a PUT REST request to
$MOBI_HOST/mobirest/catalogs/http%3A%2F%2Fmobi.com%2Fcatalog-local/records/ENCODED_RECORD_IRIwhereENCODED_RECORD_IRIis replaced by the URL encoded version of the IRI of the target Workflow Record. The paste the Record JSON-LD into the body of the request and change the@valuevalue ofhttp://mobi.solutions/ontologies/workflows#activeto the desired activation state (truefor active andfalsefor inactive).
Update a Workflow Definition
Workflows are managed by Workflow Records, which are types of Versioned RDF Records. This means that all changes to the definition of the Workflow must go through the standard graph-versioning flow in order for the changes to be recognized by the system. Thus, to update the definition of a Workflow, you will need to first create an In Progress Commit with the changes and then commit those changes to the MASTER branch. This can be done by either uploading a new version of the workflow as a file or manually creating an in progress commit with the added and deleted triples. Regardless of which option you choose, you will need to follow steps similar to those below.
-
Make a GET REST request to
$MOBI_HOST/mobirest/catalogs/http%3A%2F%2Fmobi.com%2Fcatalog-local/records/ENCODED_RECORD_IRI/branches/masterwhereENCODED_RECORD_IRIis replaced by the URL encoded version of the IRI of the target Workflow Record. This will return the full JSON-LD of the MASTER Branch of the Workflow Record. We will need both the IRI of the Branch and the IRI of the head Commit for the subsequent requests. An example response is shown below.{ "@id": "https://mobi.com/branches#19b8cc92-00a9-4594-b759-8565d2f0537a", "@type": [ "http://www.w3.org/2002/07/owl#Thing", "http://mobi.com/ontologies/catalog#Branch" ], "http://mobi.com/ontologies/catalog#head": [ { "@id": "https://mobi.com/commits#d78190647e4e9b2e8555c036349fbf8928417c50" } ], "http://purl.org/dc/terms/description": [ { "@value": "The master branch." } ], "http://purl.org/dc/terms/issued": [ { "@type": "http://www.w3.org/2001/XMLSchema#dateTime", "@value": "2023-09-15T08:55:30.955812-04:00" } ], "http://purl.org/dc/terms/modified": [ { "@type": "http://www.w3.org/2001/XMLSchema#dateTime", "@value": "2023-09-15T08:55:31.003336-04:00" } ], "http://purl.org/dc/terms/publisher": [ { "@id": "http://mobi.com/users/d033e22ae348aeb5660fc2140aec35850c4da997" } ], "http://purl.org/dc/terms/title": [ { "@value": "MASTER" } ] } -
Make a GET REST request to
$MOBI_HOST/mobirest/commits/ENCODED_COMMIT_IRI/resourcewhereENCODED_COMMIT_IRIis replaced by the URL encoded version of the IRI of the head Commit retrieved from the last call. This will return the compiled RDF of the latest/current version of the Workflow definition. An example response is below.[ { "@id": "http://test.com/workflows-example#WorkflowB", "@type": [ "http://mobi.solutions/ontologies/workflows#Workflow" ], "http://mobi.solutions/ontologies/workflows#hasAction": [ { "@id": "http://test.com/workflows-example#WorkflowBAction" } ] }, { "@id": "http://test.com/workflows-example#WorkflowBAction", "@type": [ "http://mobi.solutions/ontologies/workflows#Action", "http://mobi.solutions/ontologies/workflows#TestAction" ], "http://mobi.solutions/ontologies/workflows#testMessage": [ { "@value": "This is a test from Workflow B" } ] } ] -
Here you can either manually update the In Progress Commit with the added and deleted statements or upload a new version of the workflow.
-
To manually update the In Progress Commit, make a PUT REST request to
$MOBI_HOST/mobirest/catalogs/http%3A%2F%2Fmobi.com%2Fcatalog-local/records/ENCODED_RECORD_IRI/in-progress-commitwhereENCODED_RECORD_IRIis replaced by the URL encoded version of the IRI of the target Workflow Record with the following form data contents. If successful, the endpoint will return an empty 200 response.Parameter Description additionsThe new desired Workflow definition in JSON-LD RDF format
deletionsThe contents of the previous compiled resource call with the full JSON-LD of the current Workflow RDF definition
-
To upload a new version of the workflow, make a PUT REST request to
$MOBI_HOST/mobirest/workflows/ENCODED_RECORD_IRIwhereENCODED_RECORD_IRIis replaced by the URL encoded version of the IRI of the target Workflow Record with the following form data contents. If successful, the endpoint will return an empty 200 response. If the Workflow definition is invalid, the endpoint will return a 400 response with the Turtle serialization of the SHACL validation report in the body.Parameter Description fileThe file with the new version of the Workflow definition.
-
-
Make a POST REST request to
$MOBI_HOST/mobirest/catalogs/http%3A%2F%2Fmobi.com%2Fcatalog-local/records/ENCODED_RECORD_IRI/branches/ENCODED_BRANCH_IRI/commitswhereENCODED_RECORD_IRIis replaced by the URL encoded version of the IRI of the target Workflow Record andENCODED_BRANCH_IRIis replaced the URL encoded version of the IRI of the MASTER Branch of the Workflow Record. This will commit the changes you created/uploaded in the previous call to the system and update the associated trigger service if appropriate. The response from this endpoint will be the IRI of the newly created Commit.
Manually Initiate a Workflow Execution
Workflows can be configured with automated triggers that will initiate executions, but a Workflow can always be triggered manually following the steps below.
-
Send a POST REST request to
$MOBI_HOST/mobirest/workflows/ENCODED_RECORD_IRI/executionswhereENCODED_RECORD_IRIis replaced by the URL encoded version of the IRI of the target Workflow Record. This will initiate an execution of the target Workflow in an asynchronous process and provide the IRI of the generatedw:WorkflowExecutionActivityin the response to be used in subsequent calls to fetch the status and logs.
Retrieving Workflow Provenance and Logs
As Workflows are executed, provenance is tracked for each execution along with logs with more details about the complete workflow execution and each individual action. The RDF structure of this data can be summarized in the image below, with the key classes described underneath.
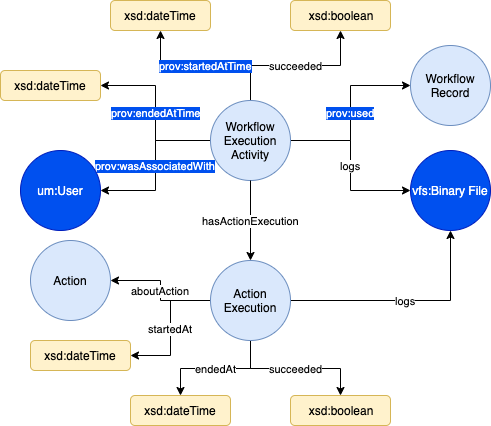
-
w:WorkflowExecutionActivity- Every execution of a Workflow is tracked with an instance of this class. They will have properties for the start/end time, the IRI of the User who initiated the execution, a boolean indicating the success of the execution, a relationship to thevfs:BinaryFilefor the log file generated by the execution, and a relationship back to the Workflow Record in question. -
vfs:BinaryFile- Used to represent a file stored on a file system that the platform has access to. -
w:ActionExecution- Represents an individual execution of a singlew:Actionwithin a Workflow. They will have properties for the start/end time, a boolean indicating the success of the action, a relationship to thew:Actionthat was executed, and a relationship to thevfs:BinaryFilefor the log file generated by the individualw:Action.
This can all be retrieved via various REST endpoints provided by the platform. Common scenarios are described below with the appropriate REST endpoints.
Retrieve Workflow Activity
Send a GET REST request to $MOBI_HOST/mobirest/workflows/ENCODED_RECORD_IRI/executions/ACTIVITY_ID where ENCODED_RECORD_IRI is replaced by the URL encoded version of the IRI of the target Workflow Record and ACTIVITY_ID is either replaced by latest, to get the latest execution details, or the URL encoded version of the IRI of a specific w:WorkflowExecutionActivity. The response will be the full JSON-LD of the w:WorkflowExecutionActivity requested. An example response is shown below.
{
    "@id": "http://mobi.com/activities/2001f136-5a37-47f2-95b0-ec3f083d634a",
    "@type": [
        "http://www.w3.org/ns/prov#Activity",
        "http://mobi.solutions/ontologies/workflows#WorkflowExecutionActivity",
        "http://www.w3.org/2002/07/owl#Thing"
    ],
    "http://mobi.solutions/ontologies/workflows#logs": [
        {
            "@id": "https://mobi.solutions/workflows/log-files/agent_98d3918e09cf5791eee7ad55c6ac67cadbab484e.20230915.14:42:49.158.cbfd8c5c.log"
        }
    ],
    "http://mobi.solutions/ontologies/workflows#succeeded": [
        {
            "@type": "http://www.w3.org/2001/XMLSchema#boolean",
            "@value": "true"
        }
    ],
    "http://www.w3.org/ns/prov#endedAtTime": [
        {
            "@type": "http://www.w3.org/2001/XMLSchema#dateTime",
            "@value": "2023-09-15T14:42:59.176399-04:00"
        }
    ],
    "http://www.w3.org/ns/prov#startedAtTime": [
        {
            "@type": "http://www.w3.org/2001/XMLSchema#dateTime",
            "@value": "2023-09-15T14:42:48.974369-04:00"
        }
    ],
    "http://www.w3.org/ns/prov#used": [
        {
            "@id": "https://mobi.com/records#19ee2b35-aa29-4a86-a0b1-892633b1d0bc"
        }
    ],
    "http://www.w3.org/ns/prov#wasAssociatedWith": [
        {
            "@id": "http://mobi.com/users/d033e22ae348aeb5660fc2140aec35850c4da997"
        }
    ]
}
Retrieve All Workflow Activities
Send a GET REST request to $MOBI_HOST/mobirest/provenance and provide the URL encoded version of the IRI of the target Workflow Record as the value of the entity query parameters. The response will be a JSON object containing a key called activities, which will include a sorted array of all the provenance activities about the target Workflow Record, including all w:WorkflowExecutionActivity and the initial creation activity. An example response is shown below.
{
    "activities": [
        {
            "@id": "http://mobi.com/activities/2001f136-5a37-47f2-95b0-ec3f083d634a",
            "@type": [
                "http://www.w3.org/ns/prov#Activity",
                "http://mobi.solutions/ontologies/workflows#WorkflowExecutionActivity",
                "http://www.w3.org/2002/07/owl#Thing"
            ],
            "http://mobi.solutions/ontologies/workflows#logs": [
                {
                    "@id": "https://mobi.solutions/workflows/log-files/agent_98d3918e09cf5791eee7ad55c6ac67cadbab484e.20230915.14:42:49.158.cbfd8c5c.log"
                }
            ],
            "http://mobi.solutions/ontologies/workflows#succeeded": [
                {
                    "@type": "http://www.w3.org/2001/XMLSchema#boolean",
                    "@value": "true"
                }
            ],
            "http://www.w3.org/ns/prov#endedAtTime": [
                {
                    "@type": "http://www.w3.org/2001/XMLSchema#dateTime",
                    "@value": "2023-09-15T14:42:59.176399-04:00"
                }
            ],
            "http://www.w3.org/ns/prov#startedAtTime": [
                {
                    "@type": "http://www.w3.org/2001/XMLSchema#dateTime",
                    "@value": "2023-09-15T14:42:48.974369-04:00"
                }
            ],
            "http://www.w3.org/ns/prov#used": [
                {
                    "@id": "https://mobi.com/records#19ee2b35-aa29-4a86-a0b1-892633b1d0bc"
                }
            ],
            "http://www.w3.org/ns/prov#wasAssociatedWith": [
                {
                    "@id": "http://mobi.com/users/d033e22ae348aeb5660fc2140aec35850c4da997"
                }
            ]
        },
        {
            "@id": "http://mobi.com/activities/86c8db82-066d-4531-8526-2f6c39556567",
            "@type": [
                "http://www.w3.org/ns/prov#Activity",
                "http://mobi.solutions/ontologies/workflows#WorkflowExecutionActivity",
                "http://www.w3.org/2002/07/owl#Thing"
            ],
            "http://mobi.solutions/ontologies/workflows#logs": [
                {
                    "@id": "https://mobi.solutions/workflows/log-files/agent_98d3918e09cf5791eee7ad55c6ac67cadbab484e.20230915.13:19:53.994.67ebcf55.log"
                }
            ],
            "http://mobi.solutions/ontologies/workflows#succeeded": [
                {
                    "@type": "http://www.w3.org/2001/XMLSchema#boolean",
                    "@value": "true"
                }
            ],
            "http://www.w3.org/ns/prov#endedAtTime": [
                {
                    "@type": "http://www.w3.org/2001/XMLSchema#dateTime",
                    "@value": "2023-09-15T09:20:04.09355-04:00"
                }
            ],
            "http://www.w3.org/ns/prov#startedAtTime": [
                {
                    "@type": "http://www.w3.org/2001/XMLSchema#dateTime",
                    "@value": "2023-09-15T09:19:53.86763-04:00"
                }
            ],
            "http://www.w3.org/ns/prov#used": [
                {
                    "@id": "https://mobi.com/records#19ee2b35-aa29-4a86-a0b1-892633b1d0bc"
                }
            ],
            "http://www.w3.org/ns/prov#wasAssociatedWith": [
                {
                    "@id": "http://mobi.com/users/d033e22ae348aeb5660fc2140aec35850c4da997"
                }
            ]
        },
        {
            "@id": "http://mobi.com/activities/f2df2cde-7eec-4fb7-aa22-4e4ec6cabfd8",
            "@type": [
                "http://www.w3.org/ns/prov#Activity",
                "http://mobi.com/ontologies/prov#CreateActivity",
                "http://www.w3.org/2002/07/owl#Thing"
            ],
            "http://www.w3.org/ns/prov#atLocation": [
                {
                    "@value": "9832af45-7488-3b7c-928e-0618de48a3e3"
                }
            ],
            "http://www.w3.org/ns/prov#endedAtTime": [
                {
                    "@type": "http://www.w3.org/2001/XMLSchema#dateTime",
                    "@value": "2023-09-15T08:55:31.854546-04:00"
                }
            ],
            "http://www.w3.org/ns/prov#generated": [
                {
                    "@id": "https://mobi.com/records#19ee2b35-aa29-4a86-a0b1-892633b1d0bc"
                }
            ],
            "http://www.w3.org/ns/prov#startedAtTime": [
                {
                    "@type": "http://www.w3.org/2001/XMLSchema#dateTime",
                    "@value": "2023-09-15T08:55:30.942226-04:00"
                }
            ],
            "http://www.w3.org/ns/prov#wasAssociatedWith": [
                {
                    "@id": "http://mobi.com/users/d033e22ae348aeb5660fc2140aec35850c4da997"
                }
            ]
        }
    ],
    "entities": [
        {
            "@id": "https://mobi.com/records#19ee2b35-aa29-4a86-a0b1-892633b1d0bc",
            "@type": [
                "http://www.w3.org/2002/07/owl#Thing",
                "http://www.w3.org/ns/prov#Entity",
                "http://mobi.solutions/ontologies/workflows#WorkflowRecord",
                "http://mobi.com/ontologies/catalog#VersionedRecord",
                "http://mobi.com/ontologies/catalog#VersionedRDFRecord",
                "http://mobi.com/ontologies/catalog#Record"
            ],
            "http://mobi.com/ontologies/catalog#branch": [
                {
                    "@id": "https://mobi.com/branches#19b8cc92-00a9-4594-b759-8565d2f0537a"
                }
            ],
            "http://mobi.com/ontologies/catalog#catalog": [
                {
                    "@id": "http://mobi.com/catalog-local"
                }
            ],
            "http://mobi.com/ontologies/catalog#masterBranch": [
                {
                    "@id": "https://mobi.com/branches#19b8cc92-00a9-4594-b759-8565d2f0537a"
                }
            ],
            "http://mobi.solutions/ontologies/workflows#active": [
                {
                    "@type": "http://www.w3.org/2001/XMLSchema#boolean",
                    "@value": "true"
                }
            ],
            "http://mobi.solutions/ontologies/workflows#latestActivity": [
                {
                    "@id": "http://mobi.com/activities/2001f136-5a37-47f2-95b0-ec3f083d634a"
                }
            ],
            "http://mobi.solutions/ontologies/workflows#workflowIRI": [
                {
                    "@id": "http://test.com/workflows-example#WorkflowB"
                }
            ],
            "http://purl.org/dc/terms/issued": [
                {
                    "@type": "http://www.w3.org/2001/XMLSchema#dateTime",
                    "@value": "2023-09-15T08:55:30.954519-04:00"
                }
            ],
            "http://purl.org/dc/terms/modified": [
                {
                    "@type": "http://www.w3.org/2001/XMLSchema#dateTime",
                    "@value": "2023-09-15T08:57:28.801002-04:00"
                }
            ],
            "http://purl.org/dc/terms/publisher": [
                {
                    "@id": "http://mobi.com/users/d033e22ae348aeb5660fc2140aec35850c4da997"
                }
            ],
            "http://purl.org/dc/terms/title": [
                {
                    "@value": "Workflow B"
                }
            ],
            "http://www.w3.org/ns/prov#atLocation": [
                {
                    "@value": "system"
                }
            ],
            "http://www.w3.org/ns/prov#generatedAtTime": [
                {
                    "@type": "http://www.w3.org/2001/XMLSchema#dateTime",
                    "@value": "2023-09-15T08:55:31.853903-04:00"
                }
            ]
        }
    ]
}
Retrieve Specific Workflow Activity Logs
Send a GET REST request to $MOBI_HOST/mobirest/workflows/ENCODED_RECORD_IRI/executions/ENCODED_ACTIVITY_IRI/logs where ENCODED_RECORD_IRI is replaced by the URL encoded version of the IRI of the target Workflow Record and ENCODED_ACTIVITY_IRI is replaced by the URL encoded version of the IRI of a specific w:WorkflowExecutionActivity. The response will be a preview of the plain text contents of the logs file generated by the overall Workflow execution in question. An example response is shown below.
2023/09/15 14:42:49 server is running at "/tmp/@dagu-98d3918e09cf5791eee7ad55c6ac67cadbab484e-4c93e3159bb697634261e271087fbeb1.sock"
2023/09/15 14:42:49 start running: http://test.com/workflows-example#WorkflowBAction
2023/09/15 14:42:49 http://test.com/workflows-example#WorkflowBAction finished
2023/09/15 14:42:49 schedule finished.
2023/09/15 14:42:49
Summary ->
+--------------------------------------+------------------------------------------+---------------------+---------------------+----------+--------------------------------------------------------------------------------------------------------------------------------------------------------------------------------------------------------+-------+
| REQUESTID                            | NAME                                     | STARTED AT          | FINISHED AT         |   STATUS | PARAMS                                                                                                                                                                                                 | ERROR |
+--------------------------------------+------------------------------------------+---------------------+---------------------+----------+--------------------------------------------------------------------------------------------------------------------------------------------------------------------------------------------------------+-------+
| cbfd8c5c-56e3-4861-aefc-f3b833336322 | 98d3918e09cf5791eee7ad55c6ac67cadbab484e | 2023-09-15 14:42:49 | 2023-09-15 14:42:49 | finished | "https://localhost:8443" "eyJhbGciOiJIUzI1NiJ9.eyJpc3MiOiJodHRwOlwvXC9tb2JpLmNvbVwvIiwic3ViIjoiYWRtaW4iLCJleHAiOjE2OTQ4ODk3NjksInNjb3BlIjoic2VsZiBcLyoifQ.aEpjpZZMW5mucXQSQ35fU7_aVxj5_yj-hU_fH7mbFZQ" |       |
+--------------------------------------+------------------------------------------+---------------------+---------------------+----------+--------------------------------------------------------------------------------------------------------------------------------------------------------------------------------------------------------+-------+
Details ->
+---+---------------------------------------------------+---------------------+---------------------+----------+-------------------------------------+-------+
| # | STEP                                              | STARTED AT          | FINISHED AT         | STATUS   | COMMAND                             | ERROR |
+---+---------------------------------------------------+---------------------+---------------------+----------+-------------------------------------+-------+
| 1 | http://test.com/workflows-example#WorkflowBAction | 2023-09-15 14:42:49 | 2023-09-15 14:42:49 | finished | echo This is a test from Workflow B |       |
+---+---------------------------------------------------+---------------------+---------------------+----------+-------------------------------------+-------+
If you want to retrieve the log file itself, you can hit the same endpoint, but with an Accept header of application/octet-stream and the endpoint will download the entire log file contents.
Extending Workflows
The Workflows feature is designed to be extensible, in that customers and third parties can develop their own types of triggers and actions specific to their enterprise needs. This can be accomplished with only some RDF and a few code changes, but does require a coding background.
Trigger/Action RDF Definition
In order to introduce a new w:Trigger or w:Action to Mobi, a developer must create an RDF representation of the Trigger/Action they want to add. The Workflows framework is built on top of the SHACL Web Forms Framework so that new trigger and action types will generate appropriate forms within the Workflows module.
A full example of a w:Trigger and w:Action definition is shown below.
@prefix owl: <http://www.w3.org/2002/07/owl#>.
@prefix xsd: <http://www.w3.org/2001/XMLSchema#>.
@prefix rdfs: <http://www.w3.org/2000/01/rdf-schema#>.
@prefix sh: <http://www.w3.org/ns/shacl#>.
@prefix w: <http://mobi.solutions/ontologies/workflows#>.
@prefix wf: <https://mobi.solutions/ontologies/form#>.
@prefix : <http://mobi.solutions/example/extension#>.
@base <http://mobi.solutions/example/extension>.

:NewTrigger a owl:Class, sh:NodeShape, rdfs:Class ;
    rdfs:subClassOf w:Trigger ;
    rdfs:label "New Trigger"@en ;
    rdfs:comment "A specification for a new type of Trigger."@en ;
    sh:property :newTriggerPropertyShape .

:newTriggerPropertyShape a sh:PropertyShape ;
    wf:usesFormField wf:TextInput ;
    sh:path :newTriggerAttribute ;
    sh:datatype xsd:string ;
    sh:minCount 1 ;
    sh:maxCount 1 .

:newTriggerAttribute a owl:DatatypeProperty, owl:FunctionalProperty ;
    rdfs:label "new trigger attribute"@en ;
    rdfs:comment "An attribute for a new trigger type."@en ;
    rdfs:domain :NewTrigger ;
    rdfs:range xsd:string .

:NewAction a owl:Class, sh:NodeShape, rdfs:Class ;
    rdfs:subClassOf w:Action ;
    rdfs:label "New Action"@en ;
    rdfs:comment "A new extended action."@en ;
    sh:property :newActionPropertyShape.

:newActionPropertyShape a sh:PropertyShape ;
    wf:usesFormField wf:TextInput ;
    sh:path :newActionAttribute ;
    sh:datatype xsd:string ;
    sh:minCount 1 ;
    sh:maxCount 1 .

:newActionAttribute a owl:DatatypeProperty, owl:FunctionalProperty ;
    rdfs:label "new action attribute"@en ;
    rdfs:comment "An attribute for the new action."@en ;
    rdfs:domain :NewAction ;
rdfs:range xsd:string .-
Every new
w:Triggerorw:Actiondefinition must also be defined as ash:NodeShapeand ardfs:Classand meet the requirements of the NodeShape referenced in the SHACL Web Forms Framework -
Every new
w:Triggerorw:Actionmust have ardfs:subClassOfpredicate with the appropriate parent type -
Any configurable properties desired for the new
w:Triggerorw:Actionmust be defined as newowl:DatatypePropertyorowl:ObjectPropertyinstances -
Every new
w:Triggerorw:Actionmust have associated SHACL Property Shapes defined that describe any desired constraints on the values of the configurable properties and meet the requirements of the PropertyShapes referenced in the SHACL Web Forms Framework-
Must have a
sh:pathof one of the configurable properties of the neww:Triggerorw:Action
-
Adding Custom Triggers/Actions
In order to load a new Trigger or Action into Mobi, there are four steps:
-
Create RDF to model the new Trigger/Action inside of a new OSGi bundle.
-
Generate Java classes from the Trigger/Action RDF using the Mobi
rdf-orm-plugin. -
For new Triggers, develop
TriggerServiceandTriggerHandlerimplementations. For new Actions, develop anActionHandlerimplementation. -
Deploy your OSGi bundle to the platform.
Create Workflow Extension Bundle with RDF
-
Make sure your development environment matches the requirements in the Developer Guide. Create a Maven project somewhere on your system.
-
Include RDF file containing your new Trigger/Action definition in the
src/main/resourcesdirectory of your project. -
Adapt the
pom.xmlof your Maven project to look like the contents below. Each change is called out with explanations.<?xml version="1.0" encoding="UTF-8"?> <project xmlns="http://maven.apache.org/POM/4.0.0" xmlns:xsi="http://www.w3.org/2001/XMLSchema-instance" xsi:schemaLocation="http://maven.apache.org/POM/4.0.0 http://maven.apache.org/xsd/maven-4.0.0.xsd"> <modelVersion>4.0.0</modelVersion> <!-- Replace this with your desired group ID, artifact ID, and version numbers --> <groupId>my.plugin</groupId> <artifactId>root</artifactId> <version>1.0-SNAPSHOT</version> <name>my.plugin</name> <!-- Select the Maven bundle plug-in, maven-bundle-plugin, to perform packaging for this project. This setting on its own, however, has no effect until you explicitly add the bundle plug-in to your POM. --> <packaging>bundle</packaging> <!-- Sets the full bundle name--> <name>${project.groupId}.${project.artifactId}</name> <!-- These properties are utilized to set defaults and centralize dependency versions --> <properties> <!-- Declares UTF-8 as the default encoding --> <project.build.sourceEncoding>UTF-8</project.build.sourceEncoding> <!-- Sets a timestamp format for the builds (this will be important for your bundle versions) --> <maven.build.timestamp.format>yyyyMMddHHmm</maven.build.timestamp.format> <!-- Set the default versions for the plugin you will be using to generate bundles and important dependencies --> <maven-bundle-plugin.version>5.1.4</maven-bundle-plugin.version> <osgi-service-jaxrs.version>1.0.0</osgi-service-jaxrs.version> <osgi-service-cm.version>1.6.1</osgi-service-cm.version> <osgi-service-component>1.5.0</osgi-service-component> <osgi-component-annotations.version>1.5.0</osgi-component-annotations.version> <osgi-metatype-annotations.version>1.4.1</osgi-metatype-annotations.version> <osgi-versioning.version>1.1.2</osgi-versioning.version> <osgi.version>8.0.0</osgi.version> <rdf4j.version>4.3.2</rdf4j.version> <!-- Replace this with the version of Mobi you are deploying into. NOTE: Workflows are only supported from version 2.4 onwards --> <mobi.version>3.1.0</mobi.version> </properties> <!-- Establishes the dependencies for several libraries you will need to compile our code and complete the project --> <dependencies> <!-- These dependencies are needed for compiling the OSGi services --> <dependency> <groupId>com.mobi</groupId> <artifactId>rdf.orm</artifactId> <version>${mobi.version}</version> </dependency> <dependency> <groupId>com.mobi</groupId> <artifactId>workflows.api</artifactId> <version>${mobi.version}</version> </dependency> <!-- Include --> <!-- OSGi and other dependencies we'll need when defining the services --> <dependency> <groupId>org.osgi</groupId> <artifactId>osgi.core</artifactId> <version>${osgi.version}</version> </dependency> <dependency> <groupId>org.osgi</groupId> <artifactId>org.osgi.service.cm</artifactId> <version>${osgi-service-cm.version}</version> </dependency> <dependency> <groupId>org.osgi</groupId> <artifactId>org.osgi.service.component</artifactId> <version>${osgi-service-component}</version> </dependency> <dependency> <groupId>org.osgi</groupId> <artifactId>osgi.annotation</artifactId> <version>${osgi.version}</version> </dependency> <dependency> <groupId>org.osgi</groupId> <artifactId>org.osgi.service.metatype.annotations</artifactId> <version>${osgi-metatype-annotations.version}</version> </dependency> <dependency> <groupId>org.osgi</groupId> <artifactId>org.osgi.service.component.annotations</artifactId> <version>${osgi-component-annotations.version}</version> </dependency> <dependency> <groupId>org.osgi</groupId> <artifactId>org.osgi.annotation.versioning</artifactId> <version>${osgi-versioning.version}</version> </dependency> <dependency> <groupId>org.eclipse.rdf4j</groupId> <artifactId>rdf4j-model-api</artifactId> <version>${rdf4j.version}</version> <exclusions> <exclusion> <groupId>com.github.jsonld-java</groupId> <artifactId>*</artifactId> </exclusion> </exclusions> </dependency> </dependencies> <!-- Defines some defaults for plugins you will be using for building the bundle --> <build> <plugins> <plugin> <groupId>org.apache.felix</groupId> <artifactId>maven-bundle-plugin</artifactId> <version>${maven-bundle-plugin.version}</version> <extensions>true</extensions> <configuration> <obrRepository>NONE</obrRepository> <!-- Instructs the plugin how to generate our MANIFEST.MF file for the OSGi bundle --> <instructions> <Bundle-SymbolicName>${project.groupId}.${project.artifactId}</Bundle-SymbolicName> <Bundle-Name>My Plugin</Bundle-Name> <!-- Replace this with your desired bundle name --> <!-- Ensures the OSGi bundle version is our Maven project version --> <Bundle-Version>${project.version}</Bundle-Version> <Export-Package> <!-- Include this line if you are creating a new trigger --> com.mobi.workflows.api.trigger;provide:=true, <!-- Include this line if you are creating a new action --> com.mobi.workflows.api.action;provide:=true, </Export-Package> <_metatype>*</_metatype> <build>${maven.build.timestamp}</build> <!-- Substitutes the build timestamp for SNAPSHOT in the bundle version. Will be important for later steps --> <_snapshot>${maven.build.timestamp}</_snapshot> </instructions> </configuration> </plugin> <!-- Tells the Maven project to compile with the appropriate Java version --> <plugin> <groupId>org.apache.maven.plugins</groupId> <artifactId>maven-compiler-plugin</artifactId> <version>3.8.0</version> <configuration> <release>17</release> </configuration> </plugin> <!-- This plugin is needed to generate the Java classes for your new Trigger/Action --> <plugin> <groupId>com.mobi.orm</groupId> <artifactId>rdf-orm-maven-plugin</artifactId> <version>${mobi.version}</version> <executions> <execution> <id>generateOrmSources</id> <phase>generate-sources</phase> <goals> <goal>generate-orm</goal> </goals> <inherited>false</inherited> <configuration> <generates> <ontology> <ontologyFile>${project.basedir}/src/main/resources/filename.ttl</ontologyFile> <!-- Replace this with your file name --> <outputPackage>my.plugin.workflows</outputPackage> <!-- Replace this with your desired output package name --> <ontologyName>MyOntologyName</ontologyName> <!-- Replace this with your desired name for the definitions in your file. Will be used as the top level class name --> </ontology> </generates> <references> <ontology> <ontologyFile>jar:http://nexus.inovexcorp.com/nexus/repository/public-maven-prod-group/com/mobi/rdf.orm.ontologies/${mobi.version}/rdf.orm.ontologies-${mobi.version}.jar!prov-o.ttl</ontologyFile> <outputPackage>com.mobi.ontologies.provo</outputPackage> </ontology> <ontology> <ontologyFile>jar:http://nexus.inovexcorp.com/nexus/repository/public-maven-prod-group/com/mobi/prov.api/${mobi.version}/prov.api-${mobi.version}.jar!mobi_prov.ttl</ontologyFile> <outputPackage>com.mobi.prov.api.ontologies.mobiprov</outputPackage> <ontologyName>MobiProv</ontologyName> </ontology> <ontology> <ontologyFile>jar:http://nexus.inovexcorp.com/nexus/repository/public-maven-prod-group/com/mobi/vfs/${mobi.version}/vfs-${mobi.version}.jar!mobi_documents.ttl</ontologyFile> <outputPackage>com.mobi.vfs.ontologies.documents</outputPackage> <ontologyName>Documents</ontologyName> </ontology> <ontology> <ontologyFile>jar:http://nexus.inovexcorp.com/nexus/repository/public-maven-prod-group/com/mobi/catalog.api/${mobi.version}/catalog.api-${mobi.version}.jar!mcat.ttl</ontologyFile> <outputPackage>com.mobi.catalog.api.ontologies.mcat</outputPackage> <ontologyName>MCAT</ontologyName> </ontology> <ontology> <ontologyFile>jar:http://nexus.inovexcorp.com/nexus/repository/public-maven-prod-group/com/mobi/workflows.api/${mobi.version}/workflows.api-${mobi.version}.jar!workflows.ttl</ontologyFile> <outputPackage>com.mobi.workflows.api.ontologies.workflows</outputPackage> <ontologyName>Workflows</ontologyName> </ontology> </references> <outputLocation>${project.basedir}/src/main/java</outputLocation> </configuration> </execution> </executions> </plugin> </plugins> </build> <!-- Repositories that your project will be pulling the Mobi dependencies from --> <repositories> <repository> <id>inovex</id> <url>https://nexus.inovexcorp.com/nexus/content/repositories/public-maven-prod-group/</url> </repository> </repositories> <pluginRepositories> <pluginRepository> <id>inovex</id> <url>https://nexus.inovexcorp.com/nexus/content/repositories/public-maven-prod-group/</url> </pluginRepository> </pluginRepositories> </project>
Create Workflow Extension Services
In the Maven project you created in the last section, you will need to implement different services depending on whether you are adding a Trigger or an Action. Each option is described in the sections below.
Trigger Extension Services
-
Create a class that implements the
com.mobi.workflows.api.trigger.TriggerHandlergeneric interface and extends thecom.mobi.workflows.api.trigger.BaseTriggerHandlergeneric abstract class.-
Include a static String field with your desired name for the service in the OSGi runtime. The class should look like this to start.
package my.plugin.trigger; import com.mobi.workflows.api.trigger.BaseTriggerHandler; import com.mobi.workflows.api.trigger.TriggerHandler; import my.plugin.workflows.NewTrigger; import org.osgi.service.component.annotations.Activate; import org.osgi.service.component.annotations.Component; public class NewTriggerHandler extends BaseTriggerHandler<NewTrigger> implements TriggerHandler<NewTrigger> { static final String NAME = "my.plugin.trigger.NewTriggerHandler"; } -
Add the following annotation to the class definition to instruct the runtime that this is an OSGi service.
@Component( immediate = true, name = NewTriggerHandler.NAME, service = { TriggerHandler.class, NewTriggerHandler.class }) -
Add a protected method to activate the service that calls a method from the abstract class.
@Activate protected void start() { startService(); } -
Add an implementation of the
setPidmethod from theBaseTriggerHandlerclass that returns your service’s name.@Override protected void setPid() { this.pid = NewTriggerService.NAME; } -
Add an implementation of the
getTypeIRImethod from theTriggerHandlerinterface that returns the IRI of your Trigger definition.@Override public String getTypeIRI() { return NewTrigger.TYPE; } -
Add an implementation of the
getShaclDefinitionmethod from theTriggerHandlerinterface that returns anInputStreamof the contents of the RDF file in the bundle. You should be able to just replace the name of the file in the code snippet below.@Override public InputStream getShaclDefinition() { return NewTriggerHandler.class.getResourceAsStream("/filename.ttl"); } -
Add an implementation of the
setConfigurationPropertiesmethod from theBaseTriggerHandlerclass that retrieves the properties from the RDF definition of an instance of your new Trigger type and sets appropriate OSGi service properties on the provided map. An example is shown below, but the exact contents of this method depend on the logic required for your new Trigger.@Override protected void setConfigurationProperties(NewTrigger trigger, Map<String, Object> properties) { String attribute = trigger.getNewTriggerAttribute() .orElseThrow(() -> new IllegalArgumentException("NewTrigger missing required newTriggerAttribute property")); properties.put("customProperty", attribute); }
-
-
Create a class that implements the
com.mobi.workflows.api.trigger.TriggerServiceand extends either thecom.mobi.workflows.api.trigger.BaseTriggerServiceor thecom.mobi.workflows.api.trigger.BaseEventTriggerServicedepends on whether the new Trigger subclassesw:Triggerorw:EventTriggerrespectively. If extending theBaseEventTriggerService, be sure to implementorg.osgi.service.event.EventHandleras well. The contents of this class will depend largely on how the new Trigger is meant to behave, but there are a few key changes that should be made.-
Include a static String field with your desired name for the service in the OSGi runtime. The class should look like this to start.
package my.plugin.trigger; import com.mobi.workflows.api.trigger.BaseTriggeService; import com.mobi.workflows.api.trigger.TriggerService; import my.plugin.workflows.NewTrigger; import org.osgi.service.component.annotations.Activate; import org.osgi.service.component.annotations.Component; import org.osgi.service.component.annotations.ConfigurationPolicy; import org.osgi.service.component.annotations.Modified; import org.osgi.service.event.Event; import org.osgi.service.event.EventConstants; import org.osgi.service.event.EventHandler; import java.util.Map; public class NewTriggerService extends BaseTriggerService<NewTrigger> implements TriggerService<NewTrigger> { static final String NAME = "my.plugin.trigger.NewTriggerService"; } -
Add a protected method to activate the service and update on modification that calls a method from the abstract class and performs any other startup logic needed. including fetching the OSGi properties set by the new TriggerHandler implementation you created.
@Activate @Modified protected void start(Map<String, Object> properties) { startService(properties); this.attribute = vf.createIRI(properties.get("customProperty").toString()); } -
Add the following annotation to the class definition to instruct the runtime that this is an OSGi service.
@Component( immediate = true, name = NewTriggerService.NAME, service = { TriggerService.class, NewTriggerService.class }, configurationPolicy = ConfigurationPolicy.REQUIRE) -
If the new Trigger is a just a subclass of
w:Trigger, include any methods or logic needed by the new Trigger requirements, but utilize thetriggermethod from theBaseTriggerServiceclass to kick off the workflow. -
If the new Trigger is a subclass of
w:EventTriggerinclude the following changes as well.-
Include the
EventHandlerclass in the list ofserviceclasses in the@Componentannotation and include apropertywith the name of the OSGi Event Topic you are subscribing to.@Component( immediate = true, name = NewTriggerService.NAME, service = { TriggerService.class, NewTriggerService.class, EventHandler.class }, property = EventConstants.EVENT_TOPIC + "=TOPIC_NAME", configurationPolicy = ConfigurationPolicy.REQUIRE) -
Add an implementation of the
handleEventmethod from theEventHandlerinterface that will validate anything required in the event that is caught by your service and if everything is valid, calls thetriggermethod from theBaseTriggerServiceclass. An example is shown below, but the exact logic will depend on your new Trigger requirements.@Override public void handleEvent(Event event) { String someProperty = event.getProperty("someProperty").toString(); if (someProperty.equals(this.attribute)) { this.trigger(); } }
-
-
Action Extension Services
Creating a new Action depends on identifying how to conduct your desired’s Action within the chosen Workflow Engine framework. The following example assumes you are using the default Dagu-based Workflow Engine. Interaction with the Mobi platform via Dagu is intended to be conducted via REST and there are several utility methods provided by the services to assist with that interact. Read through the Dagu documentation and the Mobi REST API documentation to identify how to accomplish your desired tasks using Dagu steps before creating the extension service.
-
Create a class that implements the
com.mobi.workflows.api.action.ActionHandlergeneric interface. -
Include a static String field with your desired name for the service in the OSGi runtime. The class should look like this to start.
package my.plugin.action; import com.mobi.workflows.api.action.ActionHandler; import my.plugin.workflows.NewAction; import org.osgi.service.component.annotations.Activate; import org.osgi.service.component.annotations.Component; public class NewActionHandler implements ActionHandler<NewAction> { static final String NAME = "my.plugin.action.NewActionHandler"; }-
Add the following annotation to the class definition to instruct the runtime that this is an OSGi service.
@Component( immediate = true, name = NewActionHandler.NAME, service = { ActionHandler.class, NewActionHandler.class }) -
Add an implementation of the
getTypeIRImethod from theActionHandlerinterface that returns the IRI of your Action definition.@Override public String getTypeIRI() { return NewAction.TYPE; } -
Add an implementation of the
getShaclDefinitionmethod from theActionHandlerinterface that returns anInputStreamof the contents of the RDF file in the bundle. You should be able to just replace the name of the file in the code snippet below.@Override public InputStream getShaclDefinition() { return NewActionHandler.class.getResourceAsStream("/filename.ttl"); } -
Add an implementation of the
createDefinitionmethod from theActionHandlerinterface that returns acom.mobi.workflows.impl.dagu.actions.DaguActionDefinitioncontaining the Dagu step definitions that accomplish your desired Action behavior based on the provided instance of the new Action. TheDaguActionDefinitionclass provides a few utility methods to assist with creating the string definition. In general, it is recommended that each Dagu step name is associated with the IRI of the new Action instance itself in some manner. A simple example of acreateDefinitionmethod is shown below, but for more complex use cases, it’s usually easiest to create a template YAML file inside the bundle that gets read into the OSGi service and populated with the appropriate configurations.@Override public ActionDefinition createDefinition(NewAction action) { String attribute = action.getNewActionAttribute() .orElseThrow(() -> new IllegalStateException("NewAction must have an attribute")); String step = "- name: " + action.getResource() + "\n" + " command: echo \"" + attribute + "\""; return new DaguActionDefinition(step); }-
The
DaguActionDefinition.getStepsToCheckEmptyVariablemethod will return a String containing Dagu step definitions that will validate that an environment variable set by a previous step has a value. The inputs are the environment variable name and the name of the parent step. -
The
DaguActionDefinition.getPlatformCurlStringmethod will return a String containing acurlcommand that will hit a specific REST endpoint on the host Mobi application. The inputs are a string containing any additional flags needed for thecurlcommand and the REST endpoint path in question (i.e. the path for the endpoint after$MOBI_HOST/mobirest/).
-
-
Deploy OSGi Bundle
-
Once all the steps above are complete for the new Triggers/Actions being added to the platform, all that’s left is to build the OSGi bundle and deploy it to your Mobi installation.
-
In the root of your Maven project, run
mvn clean installto build the OSGi bundle. Be sure that the build succeeds. If the build succeeds, your OSGI bundle for has now been created within thetargetdirectory of the bundle and has been installed in your local maven repository. -
To deploy the bundle to your Mobi installation, you can copy the
.jarfile generated in your project’stargetdirectory into the$MOBI_HOME/deploydirectory of your running installation. -
Validate that the bundle was installed and activated properly by opening the Mobi Karaf Client with
bin/clientfor Unix (orbin\client.batfor Windows) and then runningbundle:list. You should see your bundle’s Name listed with the version you specified in thepom.xmland a state of "Active".
Now that your bundle is active and your extension services are running, the platform can execute and manage any Workflows defined that utilize the newly defined Triggers/Actions provided in the bundle!
Appendix G: Publish Framework Examples (ENTERPRISE)
Mobi Enterprise comes with an extensible framework for publishing versioned RDF managed by records (including ontologies, vocabularies, and shapes graphs) to external systems. This framework is built on top of the SHACL Web Forms Framework and utilizes the SHACL definitions to validate publish requests. Mobi Enterprise comes with the ability to publish to GraphDB and to Anzo.
The publish framework has a generic POST $MOBI_HOST/mobirest/publish endpoint as the entrypoint for all publish activities. The body of a request to the endpoint should be a JSON-LD serialization of a collection of RDF that defines the inputs for the publish as defined by the publish service configuration.
|
Note
|
All examples in this Appendix will be in Turtle RDF serialization and use the following prefixes:
|
Core Publish Definitions
At the core of the Publish Framework is a collection of classes and properties defining the extension points for a new integration. A diagram of these definitions is shown below.
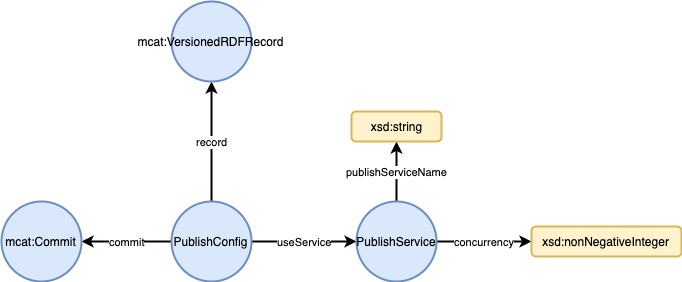
A pub:PublishService represents the capability of the platform to push data from Mobi to a certain type of external system with a human readable name and how many concurrent publishes can be made with the specific service. The instances of this class are what populate the dropdown in the Publish Configuration modal in the UI (see Publish (ENTERPRISE)). The pub:PublishConfig class represents an individual request to publish a Versioned RDF Record to an external system. Instances of this class are required to have a pub:useService predicate pointing to which Publish Service to use along with the IRI of the Versioned RDF Record to publish. It can also optionally have a pointer to a specific Commit of that Versioned RDF Record that should be published. In the absence of this predicate on an instance of pub:PublishConfig, the head Commit of the MASTER Branch will be used. If the Publish Service supports selection of a specific external system to publish to (using the Publish Configuration UI), a pub:PublishConfig can optionally reference the ID of that external system with the config:hasId property.
An extension of the core framework will:
-
Define a new instance of
pub:PublishServicerepresenting the new publish capability -
Define a subclass of
pub:PublishConfigthat is also a SHACL Node Shape aligned with the requirements of the SHACL Web Forms Framework -
Define the configuration properties for the new type of Publish along with SHACL Property Shapes aligned with the requirements of the SHACL Web Forms Framework
-
Define a SHACL Property Shape for the
pub:useServicepredicate withsh:defaultValueandsh:hasValueset to the IRI of the new instance ofPublishServiceand withwf:usesFormFieldset towf:HiddenTextInput -
Include a constraint on
pub:RecordPropertyShapeto restrict the types of Versioned RDF Records that the service supports -
If support for
config:hasIdis required, include a SHACL Property Shape for the predicate, restricting it to only supported external system IDs
Given this framework, the JSON-LD sent to the generic publish endpoint should look like the following.
@prefix xsd: <http://www.w3.org/2001/XMLSchema#> .
@prefix pub: <http://mobi.com/ontologies/publish#> .
@prefix config: <http://mobi.com/config#> .
@prefix : <http://mobi.solutions/example#> .

:test a :CustomPublishConfig, pub:PublishConfig ; # An instance of the publish configuration to execute
  pub:record <https://mobi.com/records#7dbc162b-592c-4742-bf10-4c156c381781> ; # the required IRI of the Versioned RDF Record to publish
  pub:useService :CustomPublishService ; # the required value for this property given the publish configuration
  pub:commit <https://mobi.com/commits#7dbc162b-592c-4742-bf10-4c156c381781> ; # the optional IRI of the Commit to publish
  config:hasId "demo" ; # the optional ID of the external system you will be publishing to
  # any additional custom properties for the type of publish configuration
  .
GraphDB Publish Example
The GraphDB Publish SHACL configurations define:
-
The GraphDB Publish Service (
graphdb:GraphDBPublishService) with an unlimited concurrency -
The GraphDB Publish Configuration (
graphdb:GraphDBPublish) -
A property for the ID of the repository to publish to along constraints to make it a required field (
graphdb:repositoryId) -
A property for the IRI of the named graph the record data should land in along with constraints to ensure a max of 1 valid IRI value (
graphdb:namedGraphIRI) -
A property for whether to overwrite the target named graph with the new data along with constraints to make it a required field and have a default of
true(graphdb:overwrite) -
Required value for
pub:useServiceofgraphdb:GraphDBPublishService -
Required
config:hasIdproperty that must line up with a GraphDB Configuration ID, i.e. instances ofhttp://mobi.com/config#GraphDBConfiguration, to receive the published data see GraphDB Publish Connection Configuration) -
Support for both
OntologyRecordandShapesGraphRecord
GraphDB Publish REST Request
Below is an example request to publish a record to a configured GraphDB instance:
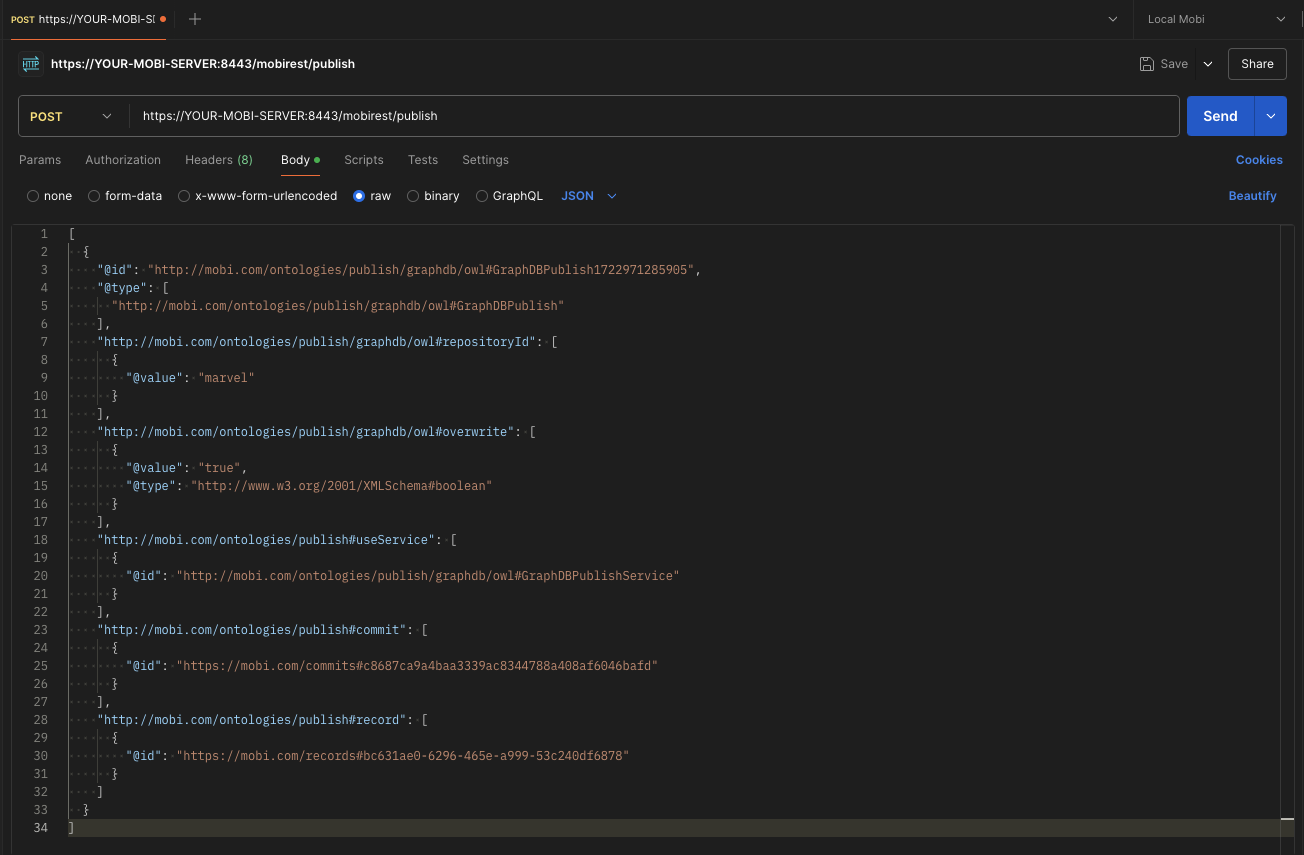
The body of the request represented in turtle is below (See comments for explanation of fields):
@prefix pub: <http://mobi.com/ontologies/publish#> .
@prefix graphdb: <http://mobi.com/ontologies/publish/graphdb/owl#> .
@prefix config: <http://mobi.com/config#> .
@prefix xsd: <http://www.w3.org/2001/XMLSchema#> .

<http://mobi.com/ontologies/publish/graphdb/owl#GraphDBPublish1722971285905>
  a graphdb:GraphDBPublish ; # The type of publish configuration
  pub:commit <https://mobi.com/commits#c8687ca9a4baa3339ac8344788a408af6046bafd> ; # The IRI of the Commit on the Record to publish
  pub:record <https://mobi.com/records#bc631ae0-6296-465e-a999-53c240df6878> ; # The IRI of the Record to publish
  pub:useService <http://mobi.com/ontologies/publish/graphdb/owl#GraphDBPublishService> ; # The PublishService to use, required to line up with the type of publish configuration
  config:hasId "demo" ; # The ID of the GraphDB Configuration to publish to
  graphdb:overwrite true ; # overwrite the existing data in the graph if it exists
  graphdb:repositoryId "testRepo"^^xsd:string . # the GraphDB repository ID to publish data into
Graph Studio Publish Example
There are three ways to publish Records to Graph Studio: an Ontology Record as a SKOS vocabulary within a Dataset, an Ontology Record as an OWL model, or a Shapes Graph Record within a Dataset. All utilize the same SHACL Property Shape for the property specifying which Graph Studio server to publish to (config:hasId). This property is required and must line up with the ID of an Graph Studio Configuration within the platform, i.e. instances of http://mobi.com/config#AnzoConfiguration (see Graph Studio Publish Connection Configuration).
The Graph Studio Publish OWL SHACL configurations define:
-
The Graph Studio OWL Publish Service (
anzoowl:AnzoOwlPublishService) with an unlimited concurrency -
The Graph Studio OWL Publish Configuration (
anzoowl:AnzoOwlPublish) -
A property for whether to publish the data as an Graph Studio Model or an Graph Studio Dataset along constraints to make it a required field of one value, list the acceptable values of "As Model" or "As Dataset", and set the default to "As Model" (
anzoowl:publishMode) -
Required value for
pub:useServiceofanzoowl:AnzoOwlPublishService -
Support only for
OntologyRecord
The Graph Studio Publish SKOS SHACL configurations define:
-
The Graph Studio SKOS Publish Service (
anzoskos:AnzoSkosPublishService) with an unlimited concurrency -
The Graph Studio SKOS Publish Configuration (
anzoskos:AnzoSkosPublish) -
A property for whether to publish whether to pull SKOS Concepts from the specified record and/or to transform the OWL Class hierarchy into SKOS concepts within the generated Anzo Dataset along constraints to ensure there’s at least one value, list the acceptable values of "Concepts" and "Classes", and set the default to "Concepts" (
anzoskos:publishMode) -
Required value for
pub:useServiceofanzoskos:AnzoSkosPublishService -
Support only for
OntologyRecord
The Graph Studio Publish SHACL SHACL configurations define:
-
The Graph Studio SHACL Publish Service (
SHACL) with an unlimited concurrency -
The Graph Studio SHACL Publish Configuration (
anzoshacl:AnzoShaclPublish) -
Required value for
pub:useServiceofanzoshacl:AnzoShaclPublishService -
Support only for
ShapesGraphRecord
Graph Studio Publish REST Request
Below is an example request to publish an Ontology Record as OWL to a configured Graph Studio instance:
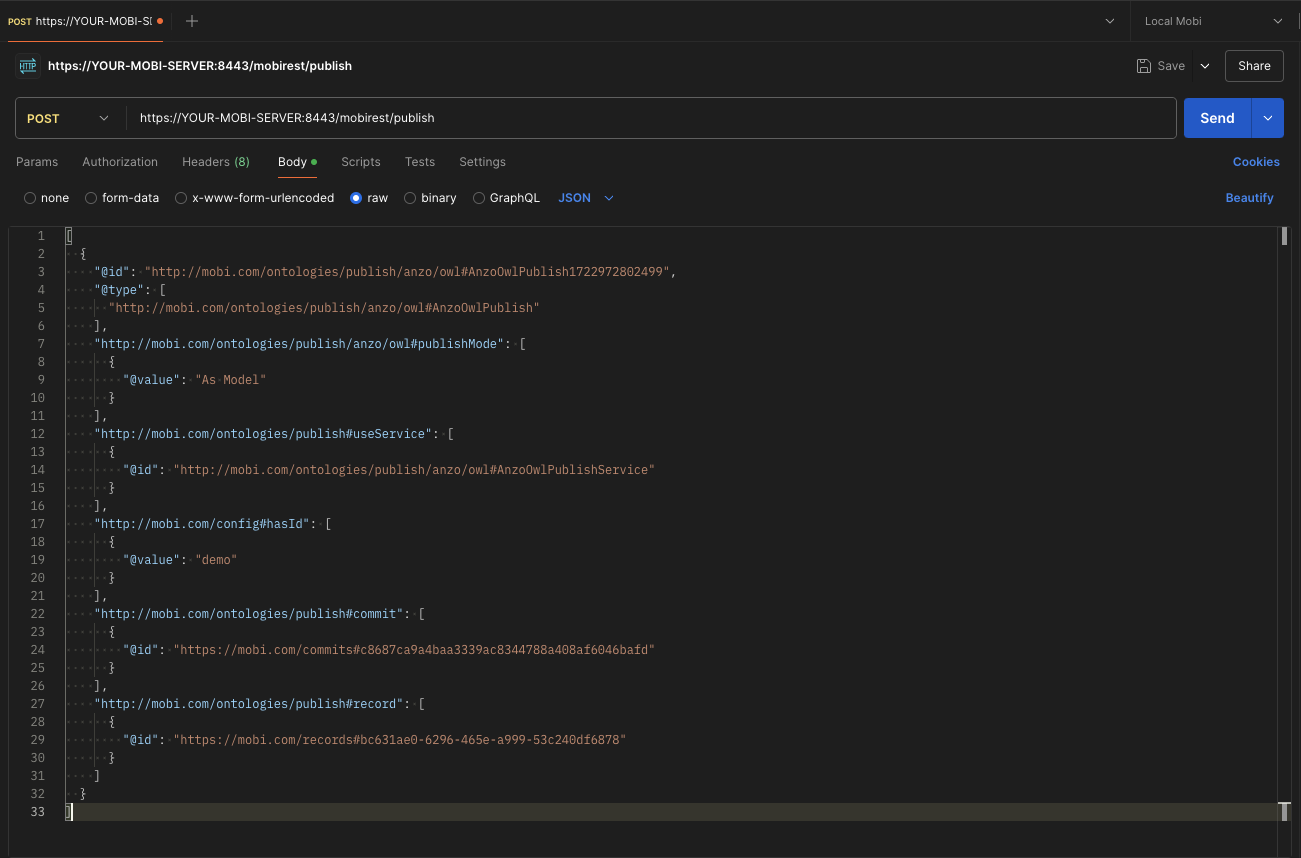
The body of the request represented in Turtle is below (See comments for explanation of fields):
@prefix config: <http://mobi.com/config#> .
@prefix xsd: <http://www.w3.org/2001/XMLSchema#> .
@prefix pub: <http://mobi.com/ontologies/publish#> .
@prefix anzoowl: <http://mobi.com/ontologies/publish/anzo/owl#> .

<http://mobi.com/ontologies/publish/anzo/owl#AnzoOwlPublish1722972802499>
  a anzoowl:AnzoOwlPublish ; # The type of publish configuration
  config:hasId "demo"^^xsd:string ; # The Graph Studio Configuration to publish to
  pub:commit <https://mobi.com/commits#c8687ca9a4baa3339ac8344788a408af6046bafd> ; # The IRI of the Commit on the Record to publish
  pub:record <https://mobi.com/records#bc631ae0-6296-465e-a999-53c240df6878> ; # The IRI of the Record to publish
  pub:useService anzoowl:AnzoOwlPublishService ; # The PublishService to use, required to line up with the type of publish configuration
  anzoowl:publishMode "As Model"^^xsd:string . # Publish to an Graph Studio model. If this value was "As Dataset", it would publish to an Graph Studio Dataset
Below is an example request to publish an Ontology Record as SKOS to a configured Graph Studio instance:
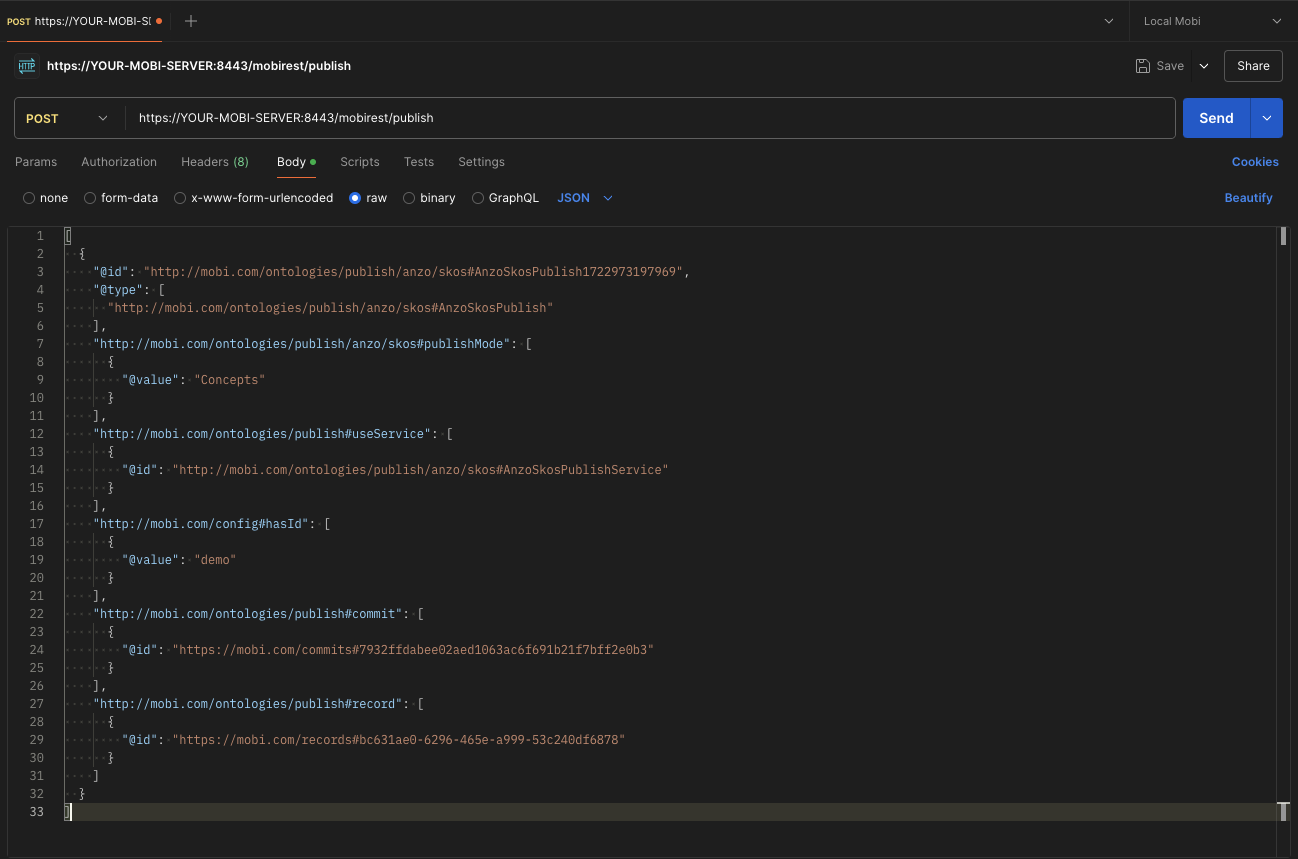
The body of the request represented in Turtle is below (See comments for explanation of fields):
@prefix config: <http://mobi.com/config#> .
@prefix xsd: <http://www.w3.org/2001/XMLSchema#> .
@prefix pub: <http://mobi.com/ontologies/publish#> .
@prefix anzoskos: <http://mobi.com/ontologies/publish/anzo/skos#> .

<http://mobi.com/ontologies/publish/anzo/skos#AnzoSkosPublish1722973197969>
  a anzoskos:AnzoSkosPublish ; # The type of publish configuration
  config:hasId "demo"^^xsd:string ; # The Graph Studio Configuration to publish to
  pub:commit <https://mobi.com/commits#7932ffdabee02aed1063ac6f691b21f7bff2e0b3> ; # The IRI of the Commit on the Record to publish
  pub:record <https://mobi.com/records#bc631ae0-6296-465e-a999-53c240df6878> ; # The IRI of the Record to publish
  pub:useService anzoskos:AnzoSkosPublishService ; # The PublishService to use, required to line up with the type of publish configuration
  anzoskos:publishMode "Concepts"^^xsd:string, "Classes"^^xsd:string . # Publish both Concepts and Classes to an Graph Studio dataset as SKOS Concepts
Below is an example request to publish an Shapes Graph Record to a configured Graph Studio instance:
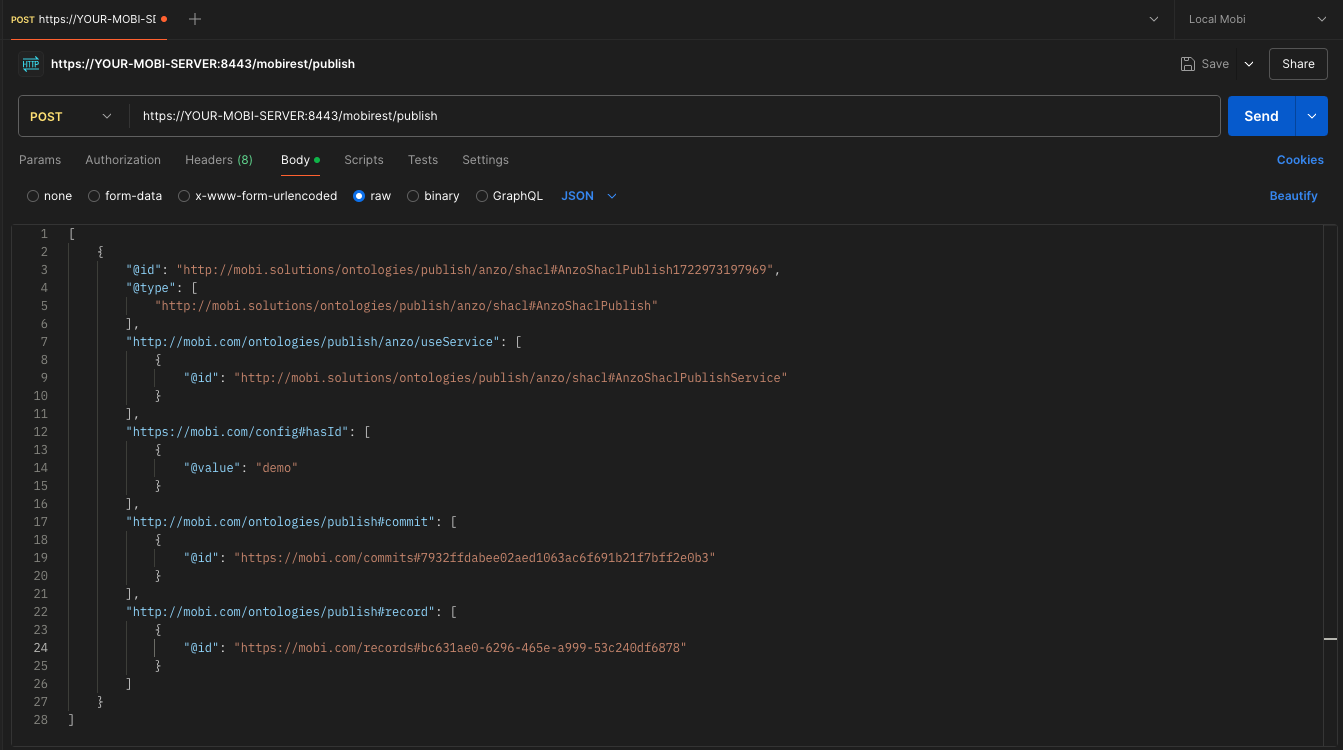
The body of the request represented in Turtle is below (See comments for explanation of fields):
@prefix config: <http://mobi.com/config#> .
@prefix xsd: <http://www.w3.org/2001/XMLSchema#> .
@prefix pub: <http://mobi.com/ontologies/publish#> .
@prefix anzoshacl: <http://mobi.solutions/ontologies/publish/anzo/shacl#> .

<http://mobi.solutions/ontologies/publish/anzo/shacl#AnzoShaclPublish1722973197969>
  a anzoshacl:AnzoShaclPublish ; # The type of publish configuration
  config:hasId "demo"^^xsd:string ; # The Graph Studio Configuration to publish to
  pub:commit <https://mobi.com/commits#7932ffdabee02aed1063ac6f691b21f7bff2e0b3> ; # The IRI of the Commit on the Record to publish
  pub:record <https://mobi.com/records#bc631ae0-6296-465e-a999-53c240df6878> ; # The IRI of the Record to publish
  pub:useService anzoshacl:AnzoShaclPublishService . # The PublishService to use, required to line up with the type of publish configuration
Appendix H: Docker Deployments
Mobi can be deployed using Docker. The Mobi Docker image is available on DockerHub at https://hub.docker.com/r/inovexis/mobi. As mentioned in Installing the Docker Image in the Quick Start Guide, Mobi can be run using the provided docker-compose.yml file. The compose file will start a container for Mobi and a container for Dagu to enable Workflows. This file can be customized to fit your needs.
name: mobi
services:
  mobi:
    container_name: mobi
    image: inovexis/mobi:4.3.0 # image name with tag (It is recommended to pin a version and not use the latest keyword)
    ports:
      - "443:8443"
    command: bash -c '/opt/mobi/mobi-distribution/docker/docker-start.sh'
    volumes:
      - ./data:/opt/mobi/mobi-distribution/data # persist data volume (triplestore, logs, policies, etc)
      - ./etc:/opt/mobi/mobi-distribution/etc # persist etc volume (karaf configuration files)
      - ./backups:/opt/mobi/mobi-distribution/backups # optional directory mount to access backups on host machine
      - ./restore:/opt/mobi/mobi-distribution/restore # optional directory mount to restore a backup
      - ./license:/root/.mobi # directory mount for enterprise license file. **ENTERPRISE ONLY**
  dagu:
    container_name: dagu
    image: ghcr.io/dagu-org/dagu:1.13.1
    command: sh -c "rm -f /home/dagu/.dagu/dags/hello_world.yaml && exec dagu start-all"
volumes:
  data:
  etc:
Enterprise Mobi Docker images are hosted in our Nexus Repository. Please contact your sales and support representative to create you an account to access the images.
License File (Enterprise)
If you are running an Enterprise Mobi server, you will need to adjust the process slightly.
-
Change the image name in the
docker-compose.ymlfile to point to the Enterprise image atnexus.inovexcorp.com/foundry-docker-prod-hosted/mobi-enterprise -
Ensure you can log into the Nexus repository from your Docker host machine. You can do this by running the following command and entering the Nexus username and password provided by your sales and support representative when prompted:
docker login nexus.inovexcorp.com/foundry-docker-prod-hosted -
Mount your license file into the container. You can do this by adding a directory mount to the
docker-compose.ymlfile by adding the following line to thevolumessection of themobiservice:- ./license:/root/.mobiThen after starting the container, you can copy your license file into the
licensedirectory on your host machine. The license file should be namedlicense.lic.
|
Note
|
Offline/air-gapped licensing is not supported with Docker deployments. See the Licensing Configuration (ENTERPRISE) section for more details. |
Backing Up Data
Prior to upgrading your Mobi instance, it is recommended to back up your data. You can do this by running mobi:backup from within the running Mobi container.
docker exec -it mobi sh -c '/opt/mobi/mobi-distribution/bin/client mobi:backup'This will create a backup zip inside the container and made available in the backups directory on your host machine if you have mounted that directory in the docker-compose.yml file. The backup zip will be named with a timestamp such as 20250903Z10536561959724341860.zip unless overridden.
Upgrading Versions
To upgrade to a newer version of Mobi, you can change the image tag in the docker-compose.yml file to the desired version. For example, to upgrade to version 4.3.0, you would change the image line to:
image: inovexis/mobi:4.3.0Then you can run the following commands to stop the current container, remove it, pull the new image, and start a new container with the updated image.
docker-compose down
docker pull inovexis/mobi:4.3.0
docker-compose up -d
This will start a new container with the updated Mobi version. When a new Mobi version is detected, data in the data and etc volumes will be automatically zipped and stored in their respective volumes in case you need to revert to a previous version.
|
Important
|
If you are running Mobi Enterprise, be sure to change the image name to nexus.inovexcorp.com/foundry-docker-prod-hosted/mobi-enterprise:VERSION when upgrading.
|
Restoring Data from a Backup
To restore a backup, place the backup zip file in the host restore directory mount that is specified in the docker-compose.yml file. The running Mobi container will automatically detect the backup file and restore it.
Reverting to a Previous Version
On the chance that you need to revert to a previous version of Mobi, some data management will need to occur in the volumes to proceed. First, stop the running Mobi container:
docker-compose downDirectory Mounted etc and data Directories (default)
If you have mounted the etc and data directories on your host machine, you can navigate to these directories and find the zipped data from the previous version. Copy these zip files up a directory so that they are not in the mounted directories. Then remove the contents of the etc and data directories. Finally, unzip the backup files into their respective directories. For example:
cd etc
cp etc_backup_VERSION_TIMESTAMP.zip ../
rm -rf *
mv ../etc_backup_VERSION_TIMESTAMP.zip .
unzip etc_backup_VERSION_TIMESTAMP.zip
Repeat the same process for the data directory. For example:
cp data_backup_VERSION_TIMESTAMP.zip ../
rm -rf *
mv ../data_backup_VERSION_TIMESTAMP.zip .
unzip data_backup_VERSION_TIMESTAMP.zip
Once both directories have been restored to the previous version, you can change the image tag in the docker-compose.yml file back to the previous version and start a new container using docker-compose.
Volume Mounted etc and data Directories
If you have mounted the etc and data directories as volumes on your host machine,
you will need to access the Docker volumes to retrieve the zipped data from the previous version. You can do this by creating a temporary container that mounts the volumes. For example:
docker run -it -v mobi_etc:/opt/test/etc -v mobi_data:/opt/test/data ubuntu:questingThis will create a temporary Ubuntu container with the mobi_etc and mobi_data volumes mounted to /opt/test/etc and /opt/test/data respectively. You can then navigate to these directories and find the zipped data from the previous version. Copy these zip files up a directory to /opt/test/ so that they are not in the volume directories. Then remove the contents of the etc and data directories in the volumes. Finally, unzip the backup files into their respective directories. For example:
cd /opt/test/etc
cp etc_backup_VERSION_TIMESTAMP.zip ../
rm -rf *
mv ../etc_backup_VERSION_TIMESTAMP.zip .
apt-get update
apt-get install unzip
unzip ../etc_backup_VERSION_TIMESTAMP.zip
Repeat the same process for the data directory. For example:
cp data_backup_VERSION_TIMESTAMP.zip ../
rm -rf *
mv ../data_backup_VERSION_TIMESTAMP.zip .
unzip ../data_backup_VERSION_TIMESTAMP.zip
Once both volumes have been restored to the previous version, you can exit the temporary container and remove it. Then change the image tag in the docker-compose.yml file back to the previous version and start a new container using docker-compose.